iFootage SL160DN User manual

3DK1463001

Features 1
Component Description 2
Operating Description 3
Mode Selection 4
Power Management
5
Menu Bar
6
Bluetooth Connectivity 7
APP Introduction 8
Accessory Installation 9
How to Use 10
Product Parameters 11
Notes 12
Maintenance 12
Contents
Statement 13
Manufacturer Information 13
Thank you for purchasing this iFootage product. This manual provides
important user information for the Anglerfish SL1 60DN LED Light .
Please read the manual carefully before operating the equipment and
keep the manual safe for future reference.
The Anglerfish SL1 60DN is a convenient and versatile LED light
suitable for both video and photography production and features
brightness adjustment, 5600K colour temperature, 8 different special
effects, mobile device APP connectivity providing multiple settings
including key frames. The SL1 60DN is compact enough to carry, cool
enough to be hand held and can be attached to a light stand, magic
arm or other support equipment. This flexible and compact light is
perfect for both studio and location recording.

1
●The 60DN light is compact, portable, has fully adjustable angles,
provides simple onboard controls as well as App control and can be
used hand held or on a stand or with any other suitable support
equipment.
●The 60DN provides a natural spectrum light source, RA 98, high
colour fidelity, realistic and saturated colour IES TM30-18 index,
Rf 97 and Rg100.
●The 60DN offers 8 different special lighting effects designed to suite
various scenarios.
●There are 4 types of dimming curves to choose from.
●Connecting to the App via Bluetooth will provide further functions
such as key frames, multi-lamp control and music mode.
●Key frame and sequence dimming are fully adjustable and can be
preset to suit user requirements.
●Equipped with silent fans the 60DN will automatically adjust fan
speed to accommodate the temperature of the light.
●The product has a 'High Temperature' warning function.
Precautions:
1. Keep dry. Do not expose the product to water, liquids, rain or
moisture either whilst in use or when in storage.It is recommended
that the product should not be handled using wet hands.
2. Do not disassemble or modify the product. Mishandling, including
dropping the product, may result in permanent damage.
3. Please keep this product out of the reach of children and animals.
4. Do not use or store the light in the vicinity of harmful chemicals or
combustible materials. Always read the warning labels prior to using
the product.
5. Please use appropriate adapters for power supply and PD-100
adapters for Type-C supply ensuring the correct voltage, current and
temperature specifications and range. Maximum brightness using a
65w and above adapter is 60%.
6. The effectiveness of the lamp will be impaired if the heat sink is
blocked or covered.

1
2
3
4
7
8
9
10
1Heat sink
2
3
4
11
5
12
6
9
10
11
12
5
7
6
8
2
Light Head
Display
Dimmer Control
Reflector Release
Button
Adjustable Handle
Light Stand Locking
Control
SET Control
Power Button
Type-C Power Connection
DC Power Connection
Angle Locking Control

Long press: On / Off
Short press: Temporarily turns
light off/on
Rotate to adjust brightness
Press repeatedly to use preset
brightness: 20%, 40%, 60%,
80% and 100%.
Main Menu Bar Sub-menu Bar
Bluetooth Dimming Curve Fan Speed / Device ID Code Switch
■Screen Description
■Controls Description
Parameters
3
SE T
SE T
SE T
Press: go to the next level menu / switch between sub-menu
options
Rotate: move up and down options / switch between modes
Long press: return to the previous level menu
SET Control:
D I M
D I M
Dimmer Control:
ON/OFF Button:
Pressing the Dimmer Control will
exit silent fan mode.

■Special Effect Mode
Adjustable Parameter
Values
Special Effects
Status
In lighting effect mode, rotating the dimmer
control will adjust brightness.
Rotate the dimmer control to
adjust brightness.
In the main menu bar, press SET to select brightness, fixed at colour
temperature 5600K±200 .
Press the dimmer control to cycle
through brightness at 20% increments.
■Light brightness mode
Brightness Percentage
4
D I M
D I M
SET S E T S E T
SET S E T
D I M
SET
There are 8 special effects including:
paparazzi, fireworks, lightening, strobe light,
welding light, faulty bulb, pulsing and explo-
sion. The corresponding parameters can be
adjusted according to the effect being used.
Select FX in
the main
menu
Confirm to
enter light
effect mode
Select the
effect
Enter the
light effect
parameters
Adjust the
light effect
parameters Return to FX
status

Fan speed can be adjusted to suit usage.
There are 2 fan settings: 'Silent' and
'automatic'.
■Fan speed adjustment
■Dimming Curve
5
SETSET
SET
SET S E T
SET
SET S E T
Select menu
from the main
menu
Press to confirm
to enter the sub
menu Select fan
SET
SET Switch fan
mode Return to previous
menu
This is a means of pre-setting the dimming light
function using one of four dimming curves:
linear, exponential, logarithmic and S-curve. Each
one provides an alternative type of dimming.
Linear,Exponential,Logarithmic,S-curve
Select menu
from the
main menu
Confirm to enter
sub-menu
Select curve
Switch to
curve mode Return to previous
menu
Whilst in silent mode, pressing the Dimmer Control will exit silent fan mode.
Note: Do not block or cover the heat sink and always ensure the light
has adequate air circulation.

DC Power Port:DC15-20V
Type-C Port:PD3.0 20V 5A
6
■Language Settings
On the device screen, select Menu→press
SET to enter sub-menu→select language by
rotating SET→press SET to switch between
Chinese and English.
■Restore Factory Settings
On the device screen, select Menu→Press
SET to enter sub-menu→select Restore
Factory Settings by rotating SET→Press SET
to confirm. Restoring factory settings will
delete all data set by the user, so please use
it carefully.
■Power Supply
■Temporary Lamp Shutoff
Press the power button to turn the light
off, and press the power button again to
turn the light on. Temporary light shutoff
is a low-power mode. When the product is
not in use, please check to make sure the
product is fully shut down.
■High Temperature Alert
When the display shows the 'Overheating
Protection’ warning, the brightness will be
reduced. It is recommended to turn the
lamp off, and then continue to use after the
overall temperature of the light has
reduced. Long-term use of this product in
high temperature conditions will affect the
life of the device.
Overheating Protection

■ Bluetooth Connection and Reset
7
Equipment ID
1. For Bluetooth connection: download the iFootage Lumin App to
your mobile device (Smartphone or tablet). Once registered, open the
Lumin App and create a new project. Open the project and search for
devices, select the appropriate device using the device name or code
to connect via Bluetooth. The light will blink three times to show a
successful Bluetooth connection. Via the project device list, select to
control single or multiple devices. The Bluetooth icon will appear on
the status bar after which you can set the internal lighting values. If the
APP shows Bluetooth connection failure, please check to see that your
mobile device is Bluetooth enabled or reset Bluetooth on the product
and try to reconnect.
2. Bluetooth Reset: On the device screen select Menu within the main
menu bar and press SET to enter the sub-menu. Then select Bluetooth
Reset by rotating the control and press SET to confirm.
Note:
1. The 60DN and mobile device connection use Bluetooth BLE5.1
technology. Prior to opening the App to connect please ensure that
Bluetooth has been enabled on your device. If using Android, you will
need to enable Bluetooth on the APP also.
2. The iFootage Lumin App currently supports iOS 12.0 and above. It
also supports mobile devices with Android 8.0 and above.
3. After connecting the device to the Lumin App via Bluetooth please
ensure that, when prompted to make a firmware update, the battery
power for all devices is sufficient to support the duration of the
update.
Icon display after
successful Bluetooth
connection

■APP Overview
8
The Lumin App has multi-light control, keyframes and music mode.
For additional modes please download the iFootage Lumin App or
visit www.ifootagegear.com to access a detailed App user guide. To
download the APP, please scan the QR code or search for iFootage
Lumin App. For more information please visit www.ifootagegear.com
after registering you can operate the product using the APP, however
should you change to another mobile device, the product will be reset
via Bluetooth, after which you can use the APP connection.
■
■
■
■
Keyframes and Sequences
Within the Lumin App you can select the key frame settings within
modes. You can apply key frames to layout, loop method, fade time,
duration etc to achieve a repeatable lighting status or set of lighting
conditions.
Multi-light Control
Within the App's project device list, you can choose to add multiple
lights to a project. By setting key frames on each light you can create a
multiple light sequence.
Music Mode
Music mode has a variety of ambient colours that react and change
according to the music.
Special Effects
The iFootage Lumin APP has 8 internal effects, and more parame-
ters can be set in the APP according to your lighting needs.
APP QR Code Official Website QR Code

■Reflector Removal
Push the reflector release on the lamp head and rotate the reflector
anti-clockwise to remove.
■Reflector Installation
To attach the reflector, the three tabs must be aligned with the lamp
head and then rotated to lock it in place.
9
The SL1 60DN LED light comes with its own Mini Bowens adapter and
can be used with other light accessories which accommodate a Mini
Bowens adapter such as Fresnel attachment, 60cm softbox or beauty
dish etc.
■Adjustable Spotlight Angle
The angle of the light can be easily adjusted by turning the angle
handle anti-clockwise and then locking back in place by turning
clockwise.
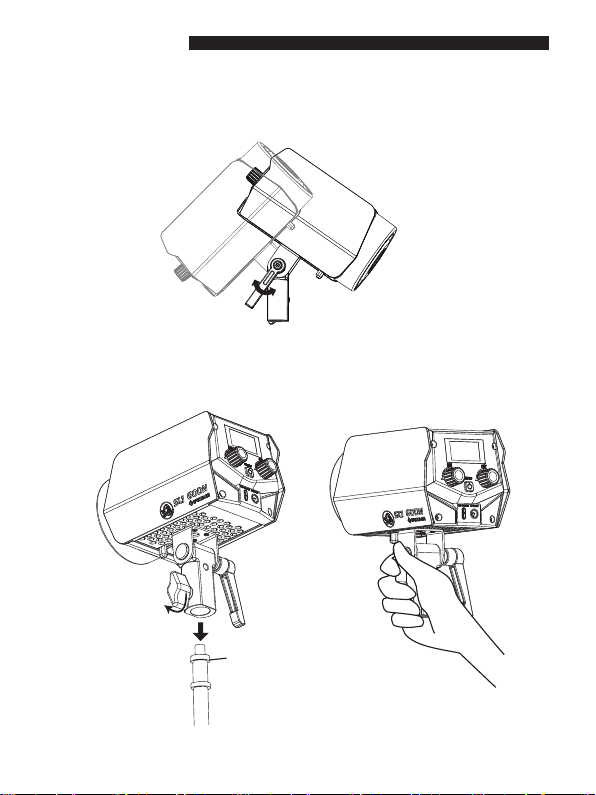
The 60DN can be used hand held or attached to a light stand or other
suitable support accessory.
■Usage
Light stand spigot
Securely place light on
light stand and lock in
place using the light's
locking control.
10
11
*Note: The above data is based on iFootage Lab tests and there may be some variation
in values with data marked with an asterick *
Overall Power
Light output power
Adapter voltage
Materials
Wireless Frequency
Bare Light Net Weight
Bare Light Size
TLCI *
Colour temperature*
Brightness Range
Product Name LED Light
Model SL1 60DN
AC 100V-240V
Light body working voltage
DC 15-20V
86W
70W
CRI *
Display Type
100% Illuminance *
Bluetooth transmission distance
Working Temperature
100% Illuminance *
Control Method
IES TM-30 *
SSI CIE-D55 *84
Rf97 Rg100
97
98
99
0%~100%
CQS *
5600K±200
2.4GHz
Monochrome OLED
Bluetooth APP control, manual button control
15meters (no interference)
≈3000LUX (main lamp, distance 1 meter)
≈12200LUX (with reflector, distance 1 meter)
Aluminum alloy, stainless steel, PC
154 X 152 X 96 mm
760g
-15℃~45℃
SL1 60DN Main Light Body, Reflector, 5m Power Cable, Power Adapter, Light
Stand Adapter Screw, Warranty Card, User Manual, Certificate.

12
1. In order to avoid equipment failure, please do not expose this product to
moisture or use in wet or rainy, sandy or dusty environments.
2. Do not disassemble or modify the product. Mishandling, including drop-
ping the product, may result in permanent damage.
3. Keep this product and its parts out of the reach of children and animals.
4. Please ensure that the product is always free from moisture and is stored
safely. Water and other liquids may contain minerals that can corrode the
internal electronic circuits.
5. Avoid using or placing the product in high temperature environments,
including direct strong, sunlight, as this may shorten the life of electronic
parts, damage the battery or distort plastic parts or casings.
6. Avoid using the product in very low temperature environments as inter-
nal condensation or water particles may damage electronic circuitry as the
temperature rises.
7. Avoid using or storing the product in dirty or dusty environments as this
may damage components.
8. Avoid placing the product on or near hot surfaces or sources of heat such
as lit cigarettes, naked flames or heating systems.
9. During use do not cover the light head with flammable materials.
10. To avoid burns, please do not handle the light if it is hot.
1. To prevent the accumulation of dust particles affecting the performance of
the product, please carefully wipe the exterior of the product with a clean, soft,
dry cloth at regular intervals.
2. The SL160DN LED is covered by a 1-year warranty from the date of original
purchase.
3. Product damage or failure to operate caused by inappropriate or irregular
operation is not covered by the warranty.
4. Unauthorized repair or attempting repair will make the warranty void and
any authorised repair will then be subject to charges.
5. Always use a clean, dry soft cloth to clean the lens on the product. Do not use
harmful chemicals, cleaning agents or liquids to clean the product.
6. In the unlikely event that the product is found to be faulty please contact our
Customer Service team who will be happy to assist you: [email protected]


iFootage and its associates will not be held responsible for the use or misuse
of any of the iFootage products or any direct, indirect, punitive, incidental,
special consequential property or life damage responsibility.The risk of users
or any other person using this product shall be borne by the user. This will not
affect your legal rights.
iFootage reserve the right to amend or rectify all hardware and software
specifications at any time without notice. If there appears to be any difference
between the contents of the instruction manual and the actual product,
please refer to the product itself.
IFOOTAGE INTERNATIONAL (HK) LIMITED
UK Design & Made in China
Origin: China
Website: www.ifootagegear.com
iFootage Lumin
APP QR Code Official Website
QR Code
To download the iFootage Lumin APP,
please scan the QR code or visit our
website. For more information on
operation modes please visit our
website www.ifootagegear.com
13
Other iFootage Lighting Equipment manuals


