iFootage HL1 C4 User manual

HL1 C4 RGBW
Handy Light User Manual
3DK1455001

Thank you for purchasing this iFootage product. This manual provides
important user information for the Anglersh HL1 C4 Handy Light. Please read
the manual carefully before operating the equipment and keep the manual
safe for future reference.
The Anglersh HL1 C4 is a portable, exible,RGBW handy light and features
colour temperature, HSI, special eects and multi-light control. It's the perfect
light for Smartphone recording, interior and exterior video recording, vlogging,
Youtube presenting, wedding and event photography and much more.
CONTENTS
FEATURES 1
PRECAUTIONS 2
COMPONENT DESCRIPTION 3
USER GUIDE 4
APP OVERVIEW 13
BLUETOOTH INTRODUCTION 12
MODE SELECTION 8
LIST OF ITEMS 15
PRODUCT PARAMETERS 15
NOTES 16
MAINTENANCE 17

1
1. The colour temperature range is 2700K~10000K. A CRI RA value of 95 is
achieved when the colour temperature range is between 2700K and 7500K.
2. A customized TIR lens improves LED energy consumption.
3. The rotating lights ensure more realistic shadows.
4. Quickly move between spot light and soft light functions.
5. The rear of the handy light is magnetic allowing the light to be attached to
metal surfaces.
6. The Handy Light is convenient, compact and portable - small enough to t in
your pocket.
7. The light has CCT, HSI, numerous special eects options and can be controlled
using the Lumix APP via Bluetooth to access RGBW, colour co-ordinates XY,
paper colour GEL, keyframes and multi-light control modes.
8 Built-in SOS light signal.
9. Low battery prompt: Battery display ashes to provide low battery warning.
Battery level is constantly shown on the display.
10. Overheat protection: if the product is in use or charging and the temperature
is too high - the 'Overheat Warning' will appear.
FEATURES

2
PRECAUTIONS
1. Do not expose to water or other liquids. This product is not dustproof or
waterproof.
2. Please ensure that you do not apply pressure to the OLED screen as this may
result in permanent screen damage.
3. Do not look directly into the LED bead lights as this may impair vision.
4. When the product is not in use for an extended period of time, it is recom-
mended that it should be discharged and recharged to a minimum of 60%
power in order to preserve the life of the battery.
5. This product's battery contains potentially harmful materials and needs to be
disposed of appropriately. Please follow your local waste management guide-
lines when recycling or disposing of the battery.

1
2
3
4
5
6
78
9
1Display
2On/Off Power Button
3Type-C Charging Port
4SET Button
5Back Cover
71/4”Thread
6Soft cover (detachable)
8“+”Key / Previous
9“-”Key / Next
3
COMPONENT DESCRIPTION

4
Functions: User operation instructions
Key features
USER GUIDE
1. To turn on the HL1 C4, press and hold the power button for 3 seconds, then
release the power button when the screen lights up.
2. To turn o the HL1 C4, press and hold the power button for 3 seconds, then
release the power button when the screen turns o.
3. To temporarily switch the light o, press once and press again to switch the light
back on.
1. Press and hold the SET button to select an operational mode. Press again to
select the chosen mode.
2. Press the SET button to select the parameter.
On/O Power Button
SET Button
Type-C Charging Port
“+”Key / Previous
“- ”Key / Next
On/O Power Button
SET Button
Type-C Charging Port
Power input connector. Input voltage 5V, current 1A.

5
USER GUIDE
“ +” Key / Previous,“ -”Key / Next
1. The value of the corresponding parameter is adjusted.
2. Use "+" and "- " to adjust parameters.
The main display interface shows colour temperature, HSI, special eects,
Bluetooth reset, and additional settings (colour temperature, HSI, eects,
green/ magenta, saturation and brightness are all adjustable).
Display
Example: Automatic switching between
battery life time and device ID
code
Main Interface Colour parameter
interface
Colour parameter interface
Bluetooth
Connection
Indicator
Power Level
Indicator (Low
Power Flashing)
Colour temperature
6
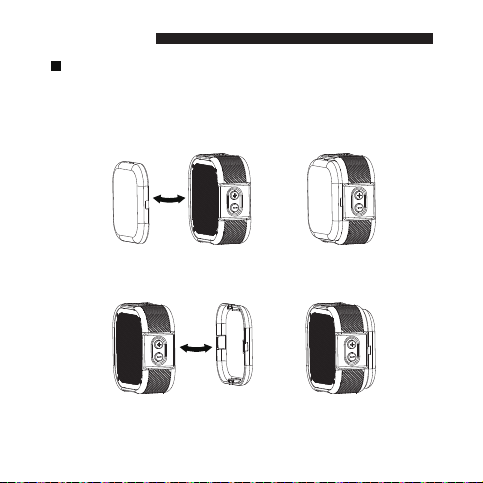
Soft Cover
When the soft cover is removed the light will create a spot light eect. With the
soft cover attached the light will create a soft light or diused eect.
Once removed, the soft cover can be safely housed on the back case.
USER GUIDE
For diused lighting please use the soft cover
For a spot light eect, please remove the soft cover

7
1/4”thread
The base of the light has a 1/4" thread designed for attaching to most accessories.
Built-in magnets in the back case
USER GUIDE
Magnets have been located in the back casing so that the lights can be
securely attached to metal objects.
Metal shelving
For example:
8
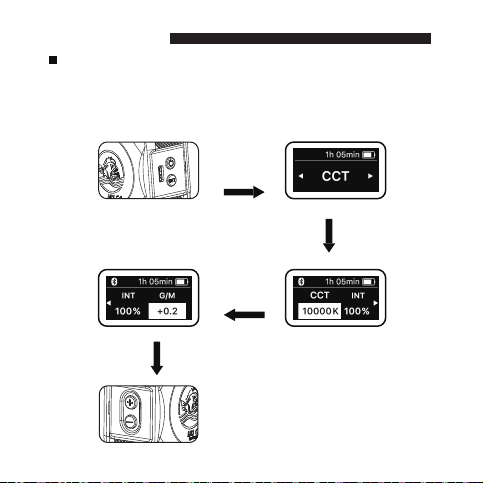
CCT Mode
When CCT mode is selected:
Use the "+,-" button ->
to adjust parameter value
Press the SET
button to
select
The adjustable parameters within colour temperature mode are: colour
temperature range of 2700K ~ 10000K. Brightness range of 0% ~ 100% and a
green/magenta range of -1 ~ +1.
Press and hold the SET button -> Press the SET
button to select the parameters -> Select special
eects mode using "+,-"
Mode Selection
Press to switch
On/Off

9
Press and hold the SET button
→Press the SET button to
select/switch the parameters
→Select the HSI mode with "+, -"
HSI Mode
"+, -" button →
adjust the parameter value
Press the SET
button to
select
The adjustable parameters of the HSI mode are: HSI range 0° ~ 360°,
saturation range 0% ~100% and brightness 0% ~100%.
Mode Selection
On/O Key
Press To
Switch On/O
When HSI mode is selected:
10
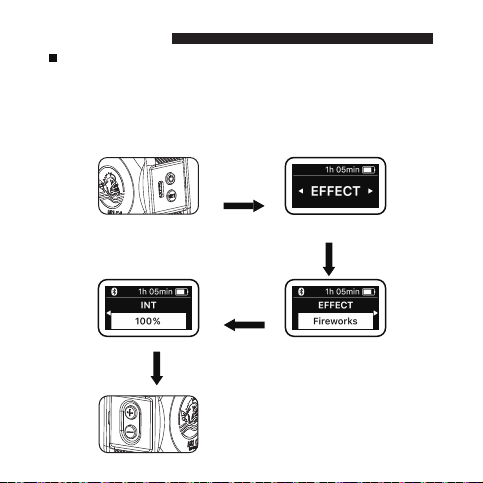
Press and hold the SET button -> Press the SET
button to select the parameters -> Select special
eects mode using "+,-"
Special Eects Mode
Use the "+,-" button ->
to adjust parameter value
Press the SET
button to
select
There are in excess of 18 special effects including: fireworks, SOS,
rainbow, lightening, TV light emission, pulsating light, emergency
vehicle, firelight, nightclub or party, strobe light, welding light, flickering
candlelight, intermittent light bulb, light through clouds and explosion.
Brightness ranges from 0% - 100%.
Mode Selection
On/O Key
Press To Switch
On/O
Please connect to the
iFootage Lumin App for
additional functions
When Special Eects Mode is selected:

11
Overheating protection
If the product temperature is too high during use or whilst charging 'Overheating
Protection' will appear on the display and screen brightness will be reduced. To
preserve the life of the product, it is recommended that the product is not used
until cooling has taken place.
Language selection
To select and set language, access settings on the interface display, press the SET
key for your language and press the SET key to conrm.
Device ID NumberFirmware Version Number
Note:
1. Due to the power discharge characteristics of lithium batteries and the power
requirements of the HL1 C4 Handy Light, it is recommended that the product is recharged
when the power display is ashing - indicating that power is low.
2. Built-in battery: 3.7V/2000mAh high-capacity lithium battery, supports Type-C interface
charging. Does not support quick charging.
Mode Selection

12
Bluetooth Connection and Reset
1. For Bluetooth connection: download the iFootage Lumin App to your mobile device
(Smartphone or tablet). Once registered, open the Lumin App and create a new project.
Open the project and search for devices, select the appropriate device using the device
name or code to connect via Bluetooth. The light will blink three times to show a successful
Bluetooth connection. Via the project device list, select to control single or multiple
devices. The Bluetooth icon will appear on the status bar after which you can set the
internal lighting values. If the APP shows Bluetooth connection failure, please check to see
that your mobile device is Bluetooth enabled or reset Bluetooth on the product and try to
reconnect.
2. To reset Bluetooth on the product, select the Bluetooth reset on the main display, press the
SET button tp conrm and enter Bluetooth reset. To reset, use the "+, -" button then press
the set button to conrm. If you are unable to nd your device name or ID number, please
reset.
Bluetooth Introduction
Please note:
1. The HL1 C4 Handy Light and mobile phone connection use Bluetooth BLE5.1 technology. Prior to
opening the App to connect please ensure that Bluetooth has been enabled on your device. If using
Android, you will need to enable Bluetooth on the APP also.
2. The iFootage Lumin App currently supports iOS 12.0 and above. It also supports mobile devices
with Android 8.0 and above. After connecting the App and HL1 C4 via Bluetooth please ensure that,
when prompted to make a rmware update, the battery power for all devices is sucient to support
the duration of the update.

13
Lumin App Overview
1. The Lumin App has multi-light control, keyframes and music mode. For
additional modes please download the iFootage Lumin App or visit www.ifoot-
agegear.com to access a detailed App user guide. To download the APP, please
scan the QR code or search for iFootage Lumin App. For more information please
visit www.ifootagegear.com
APP Introduction
APP QR Code Official Website QR Code
Keyframes and sequences
Note: First-time connected mobile devices (Smartphones or tablets) can, after
registering, immediately use the App to operate the product.
Note: As previously stated, after registering you can operate the product using
the APP, however should you change to another mobile device, the product will
be reset via Bluetooth, after which you can use the APP connection.
Within the Lumin App you can select the key frame settings within modes. You can
apply key frames to layout, loop method, fade time, duration etc to achieve a
repeatable lighting status or set of lighting conditions.

14
Multi-light Control
APP Introduction
Within the App's project device list, you can choose to add multiple lights to a
project. By setting key frames on each light you can create a multiple light sequence.
Example. Project 1: (A1 - A4) Four lights have been added to the project and each has
been set to dierent key frames. These have been set and recorded so that this can
be stored and used as a playable lighting eect.
Example. Project 2: (A5 - A8) Four lights have been added but each key frame is set
with a dierent name: fade in and out, time and duration. When the sequence is
saved and played the interface will show the current sequence and the progress of
the key frames and lights.
Music Mode
Music mode has a variety of ambient colours that react and change according to
the music.
A1 A2
A3
A4
A5
A6
A7
A8
15
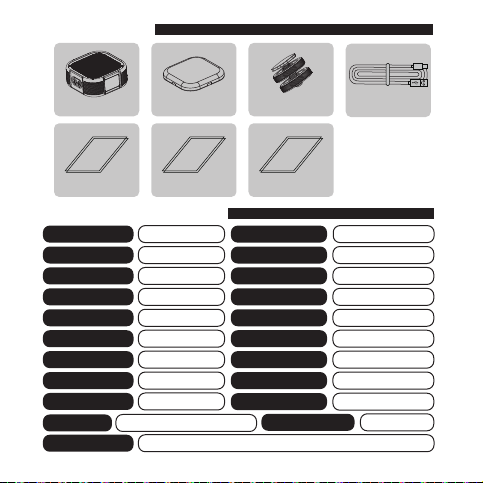
LIST OF ITEMS
HL1 C4
Warranty Card Manual Certicate
Soft Cover Power cable
Cold Shoe Holder
Colour Temp
Saturation
Green/Magenta
Model
Material
Weight
Charging port
Power
Protection Level
70×70×36mm
3.7V/2000mAh
0°~360°
0%~100%
-15℃~ 40℃
5V 1A
BLE5.1
Handy LightHL1 C4
2700K~10000K
0%~100%
-1~+1
ABS+PC
Type-C
4W
IP40
140g
Size
Bluetooth
Battery Capacity
HSI Range
Product name
Brightness
Working Temp
Input
Lighting angle 60°
Charging time ≥90 minutes
≈1070Lux (when CCT is 5600K & distance 0.5 meters)
Run Time 120 minutes
(when CCT is 5600K & brightness is 100%)
100% illumination
PRODUCT PARAMETERS

16
1. In order to avoid equipment failure, please do not expose this product to
moisture or use in wet or rainy, sandy or dusty environments.
2. Do not disassemble or modify the product. Mishandling, including dropping
the product, may result in permanent damage.
3. Keep the product and its parts out of the reach of children and animals.
4. Please ensure that the product is always free from moisture and is stored
safely. Water and other liquids may contain minerals that can corrode the
internal electronic circuits.
5. Whilst the product is charging it is recommended that you do not touch or
handle the product with wet hands as this may cause injury to the operator
or damage the product.
6. Avoid using or placing the product in high temperature environments,
including direct strong, sunlight, as this may shorten the life of electronic
parts, damage the battery or distort plastic parts or casings.
7. Avoid using the product in very low temperature environments as internal
condensation or water particles may damage electronic circuitry as the
temperature rises.
8. Avoid using or storing the product in dirty or dusty environments as this may
damage components.
9. Avoid placing the product on or near hot surfaces or sources of heat such as
lit cigarettes, naked ames or heating systems.
Notes

17
Maintenance
1. To prevent the accumulation of dust particles aecting the performance of the
product, please carefully wipe the exterior of the product with a clean, soft, dry
cloth at regular intervals.
2. The HL1 C4 Handy Light has a 1 year warranty from the date of original purchase.
This applies to the unit and accessories. The battery has a 180 day warranty from
the date of original purchase.
3. Product damage or failure to operate caused by inappropriate or irregular
operation is not covered by the warranty.
4. Unauthorized repair or attempting repair will make the warranty void and any
authorised repair will then be subject to charges.
5. Always use a clean, dry soft cloth to clean the lens on the product. Do not use
harmful chemicals, cleaning agents or liquids to clean the product.
6. In the unlikely event that the product is found to be faulty please contact our
Customer Service team who will be happy to assist you: cs@ifootagegear.com .

18
STATEMENT
To download the iFootage Lumin APP, please
scan the QR code or visit our website. For more
information on operation modes please visit our
website www.ifootagegear.com
iFootage and its associates will not be held responsible for the use or misuse
of any of the iFootage products or any direct, indirect, punitive, incidental,
special consequential property or life damage responsibility.The risk of users
or any other person using this product shall be borne by the user. This will not
affect your legal rights.
iFootage reserve the right to amend or rectify all hardware and software
specifications at any time without notice. If there appears to be any difference
between the contents of the instruction manual and the actual product,
please refer to the product itself.
iFootage Lumin APP
QR Code
Ocial Website
QR Code
Table of contents
Other iFootage Lighting Equipment manuals


Popular Lighting Equipment manuals by other brands


Ecco
Ecco ED5051VDL Series Installation and operation instructions

Milwaukee
Milwaukee M18 Original instructions

VIBIA
VIBIA 5510 Assembly instructions

ELMEKO
ELMEKO AL 900 Assembly and operating instructions

B-Safety
B-Safety V-LUX STANDARD operating instructions

Lightolier
Lightolier PTS6-2 Specification sheet