Ignis Pixel Buugeng 80 User manual

Manual for LED digital Ignis Buugeng 80
Contents:
Assemb ing
1
Contro s
2
3Charging
4“Performance” mode
5B uetooth connection to a ce phone
6Programming and saving
7System menu
8Taking photos and videos
9Maintenance. Temperature recommendations
10 Warranty
11 Contro scheme

Assembling
gnis Buugengs are delivered
disassembled. Assemble them before
using. Before connecting one part to the
other, remove colored protecting caps.
Dear customer,
Thank you for purchasing gnis pixel Buugeng 80. To make its lifetime as long as possible, as well
as to keep the warranty valid, please read the instruction entirely and follow our advice.
Controls
gnis pixel Buugengs have three control buttons placed
near the handle.
in the middle – TURN ON/OFF, PLAY/STOP
Blue button
– DOWN
Red button
– UP
Green button
blue
green
to
red
To turn on the device, hold the button pushed at least 1 second. You will see ascending
- - gradient. Wait until the gradient is full. The buugeng is on, you are in Standby mode.
You see Basic menu with 6 orange and 8 green lights, a blinking cursor lights up.
greenorange
This menu consists of 3 preset timelines of color, and 4 custom timelines of color:
System menu, Submenu
The images in PRESET TIMELINES 1 and 2 change are displayed for 4 seconds on default. You can set the
duration from the application or in System menu of the device (look section below) in
the range from 1 to 8 seconds.
Note 1:
If you run random playback from the app on several devices at the same time, it will pseudo-random
playback. It means that pictures go randomly, but all the props will show the same. If you run preset timeline 2 on
dierent props from the button at dierent time, they all will display dierent images — it's actually random.
Note 2:
PLAY/STOP
PLAY/STOP
UP
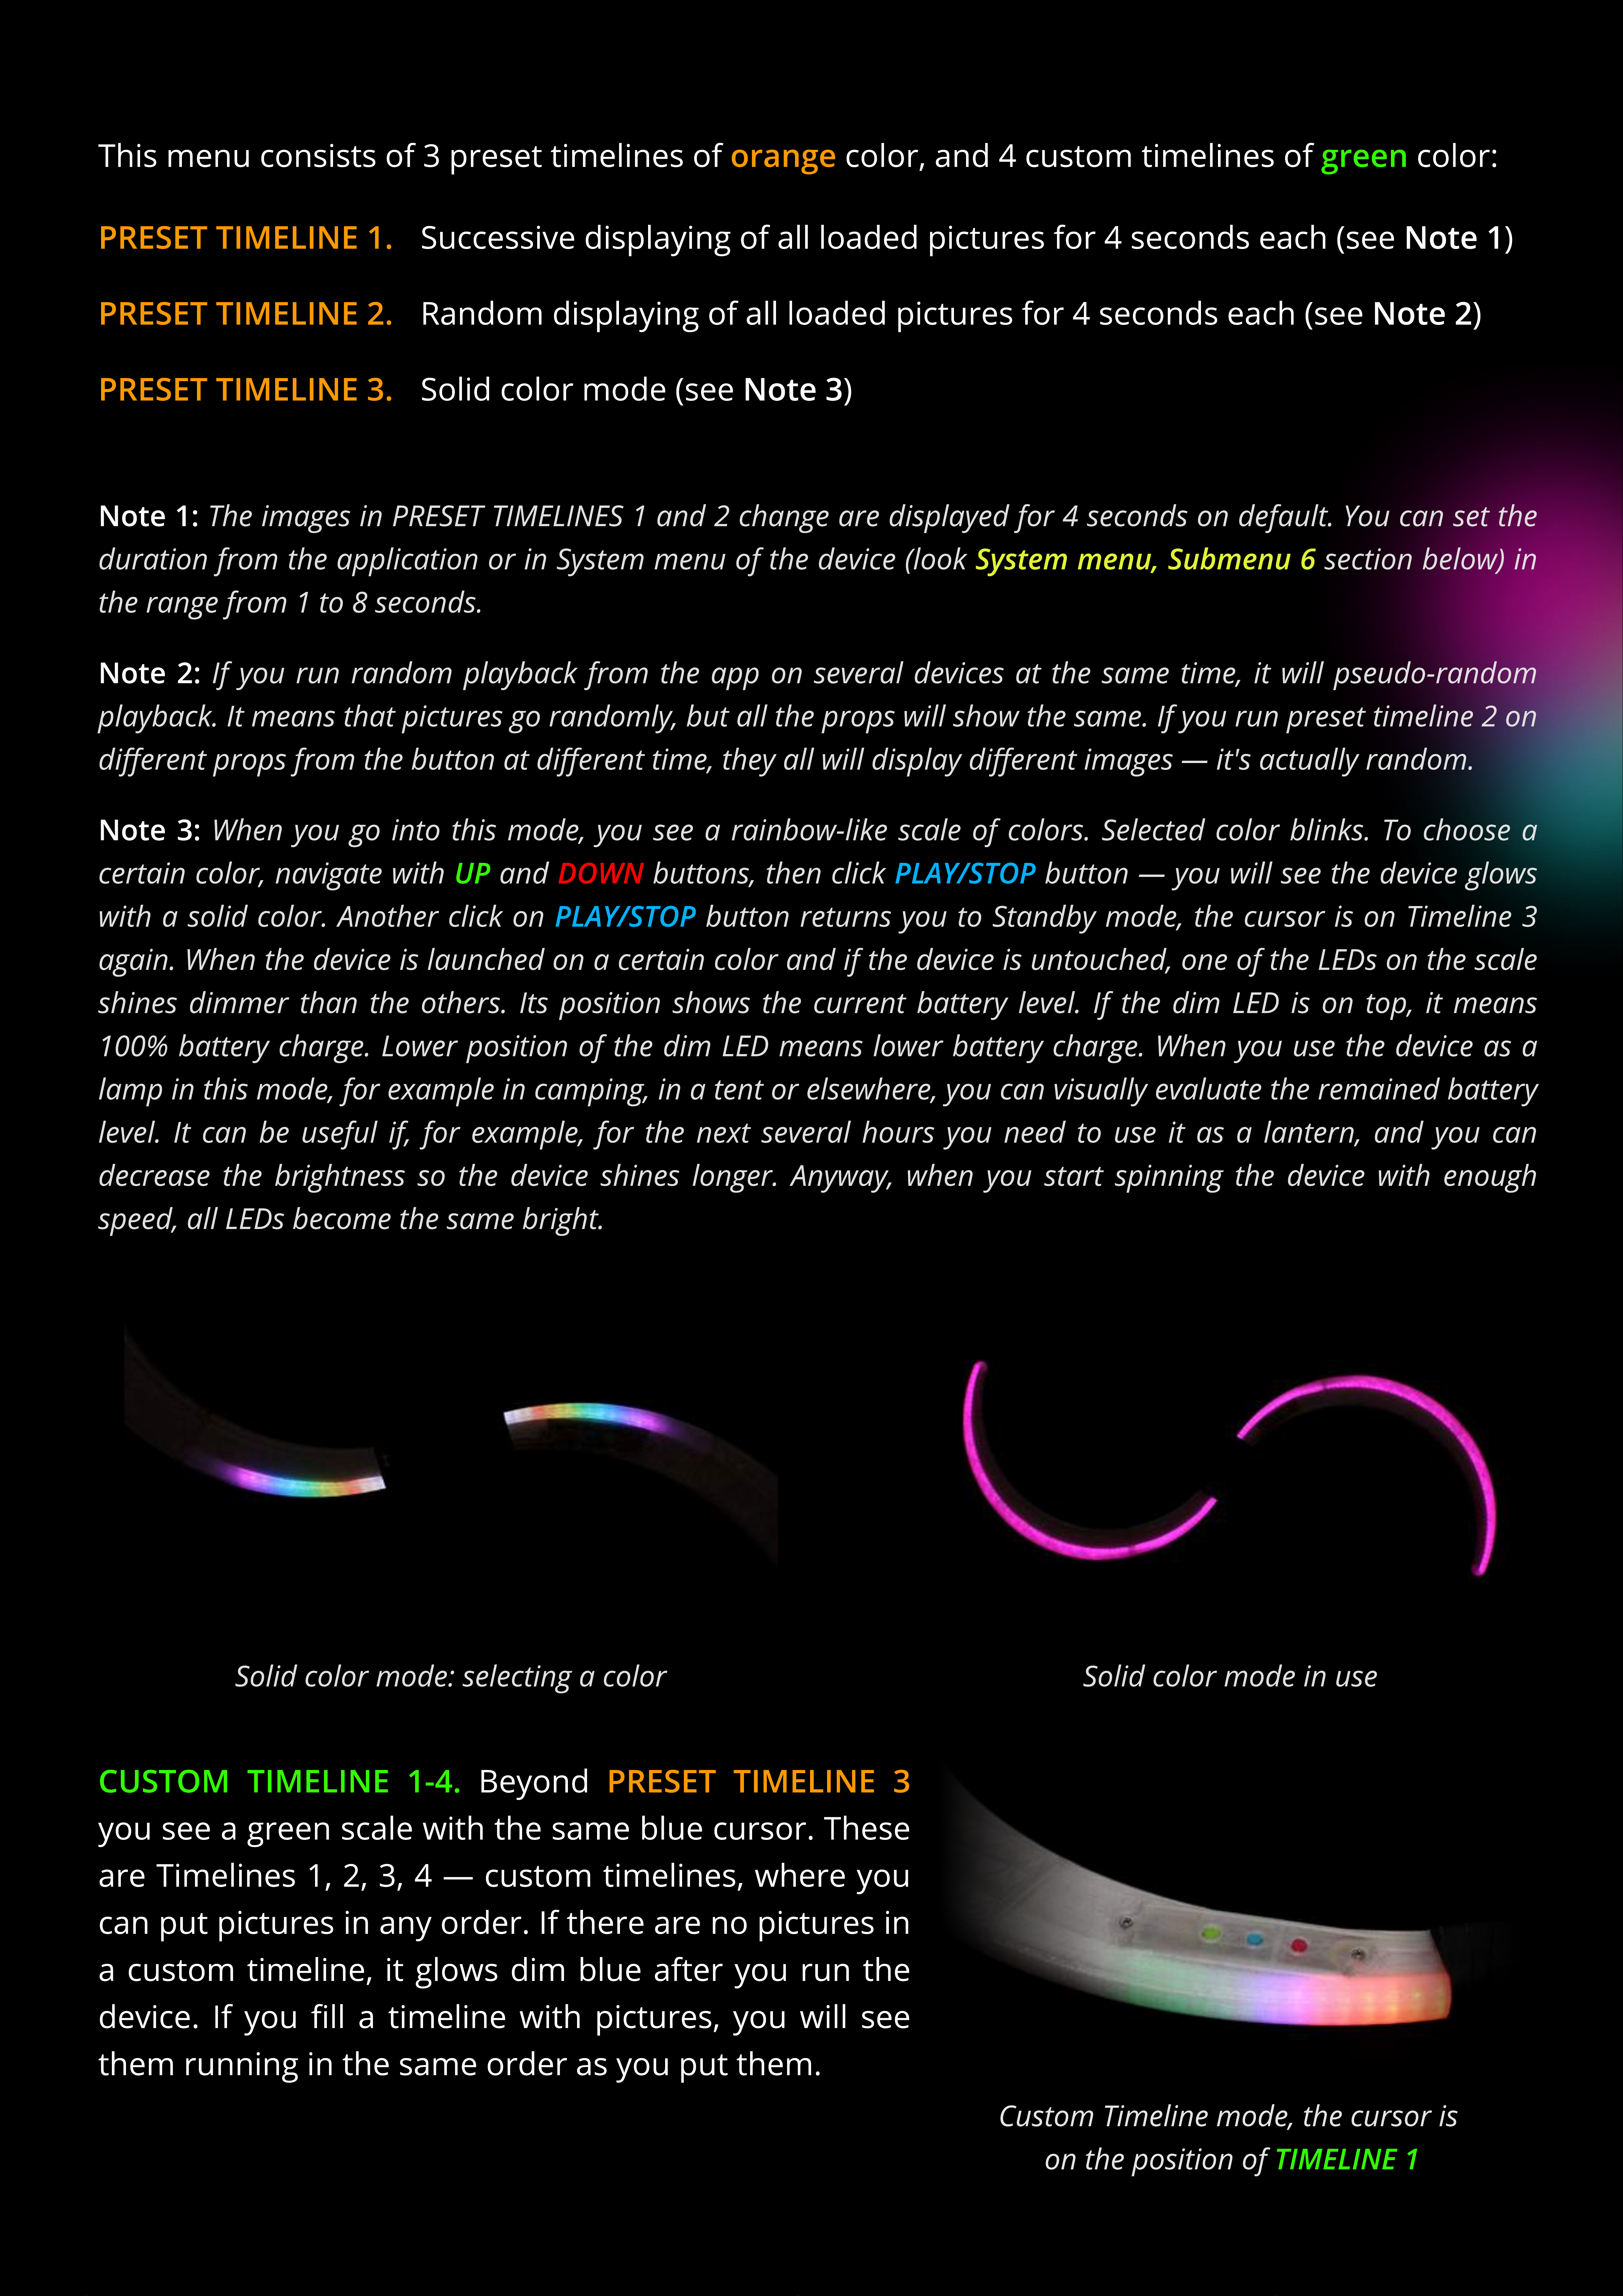
When you go into this mode, you see a rainbow-like scale of colors. Selected color blinks. To choose a
certain color, navigate with and buttons, then click button — you will see the device glows
with a solid color. Another click on button returns you to Standby mode, the cursor is on Timeline 3
again. When the device is launched on a certain color and if the device is untouched, one of the LEDs on the scale
shines dimmer than the others. Its position shows the current battery level. If the dim LED is on top, it means
100% battery charge. Lower position of the dim LED means lower battery charge. When you use the device as a
lamp in this mode, for example in camping, in a tent or elsewhere, you can visually evaluate the remained battery
level. It can be useful if, for example, for the next several hours you need to use it as a lantern, and you can
decrease the brightness so the device shines longer. Anyway, when you start spinning the device with enough
speed, all LEDs become the same bright.
DOWN
Note 3:
PRESET TIMELINE 1. Successive displaying of all loaded pictures for 4 seconds each (see Note 1)
PRESET TIMELINE 2.
R
andom displaying of all loaded pictures for 4 seconds each (see Note 2)
PRESET TIMELINE 3. Solid color mode (see Note 3)
Solid color mode in use
Solid color mode
selecting a color
PRESET TIMELINE 3
B
eyond
you see a green scale
w
ith the same
b
lue cursor
.
These
are Timelines
1
,
2
, 3, 4
—
custom timelines,
w
here you
can put pictures in any order
.
I
f there are no pictures in
a custom timeline, it glo
w
s dim
b
lue after you run the
device
.
I
f you
ll a timeline
w
ith pictures, you
w
ill see
them running in the same order as you put them
.
CU
ST
O
M TIMELINE 1
-4
.
T
IME
L
I
N
E
1
C
ustom Timeline mode, the cursor is
on the position of
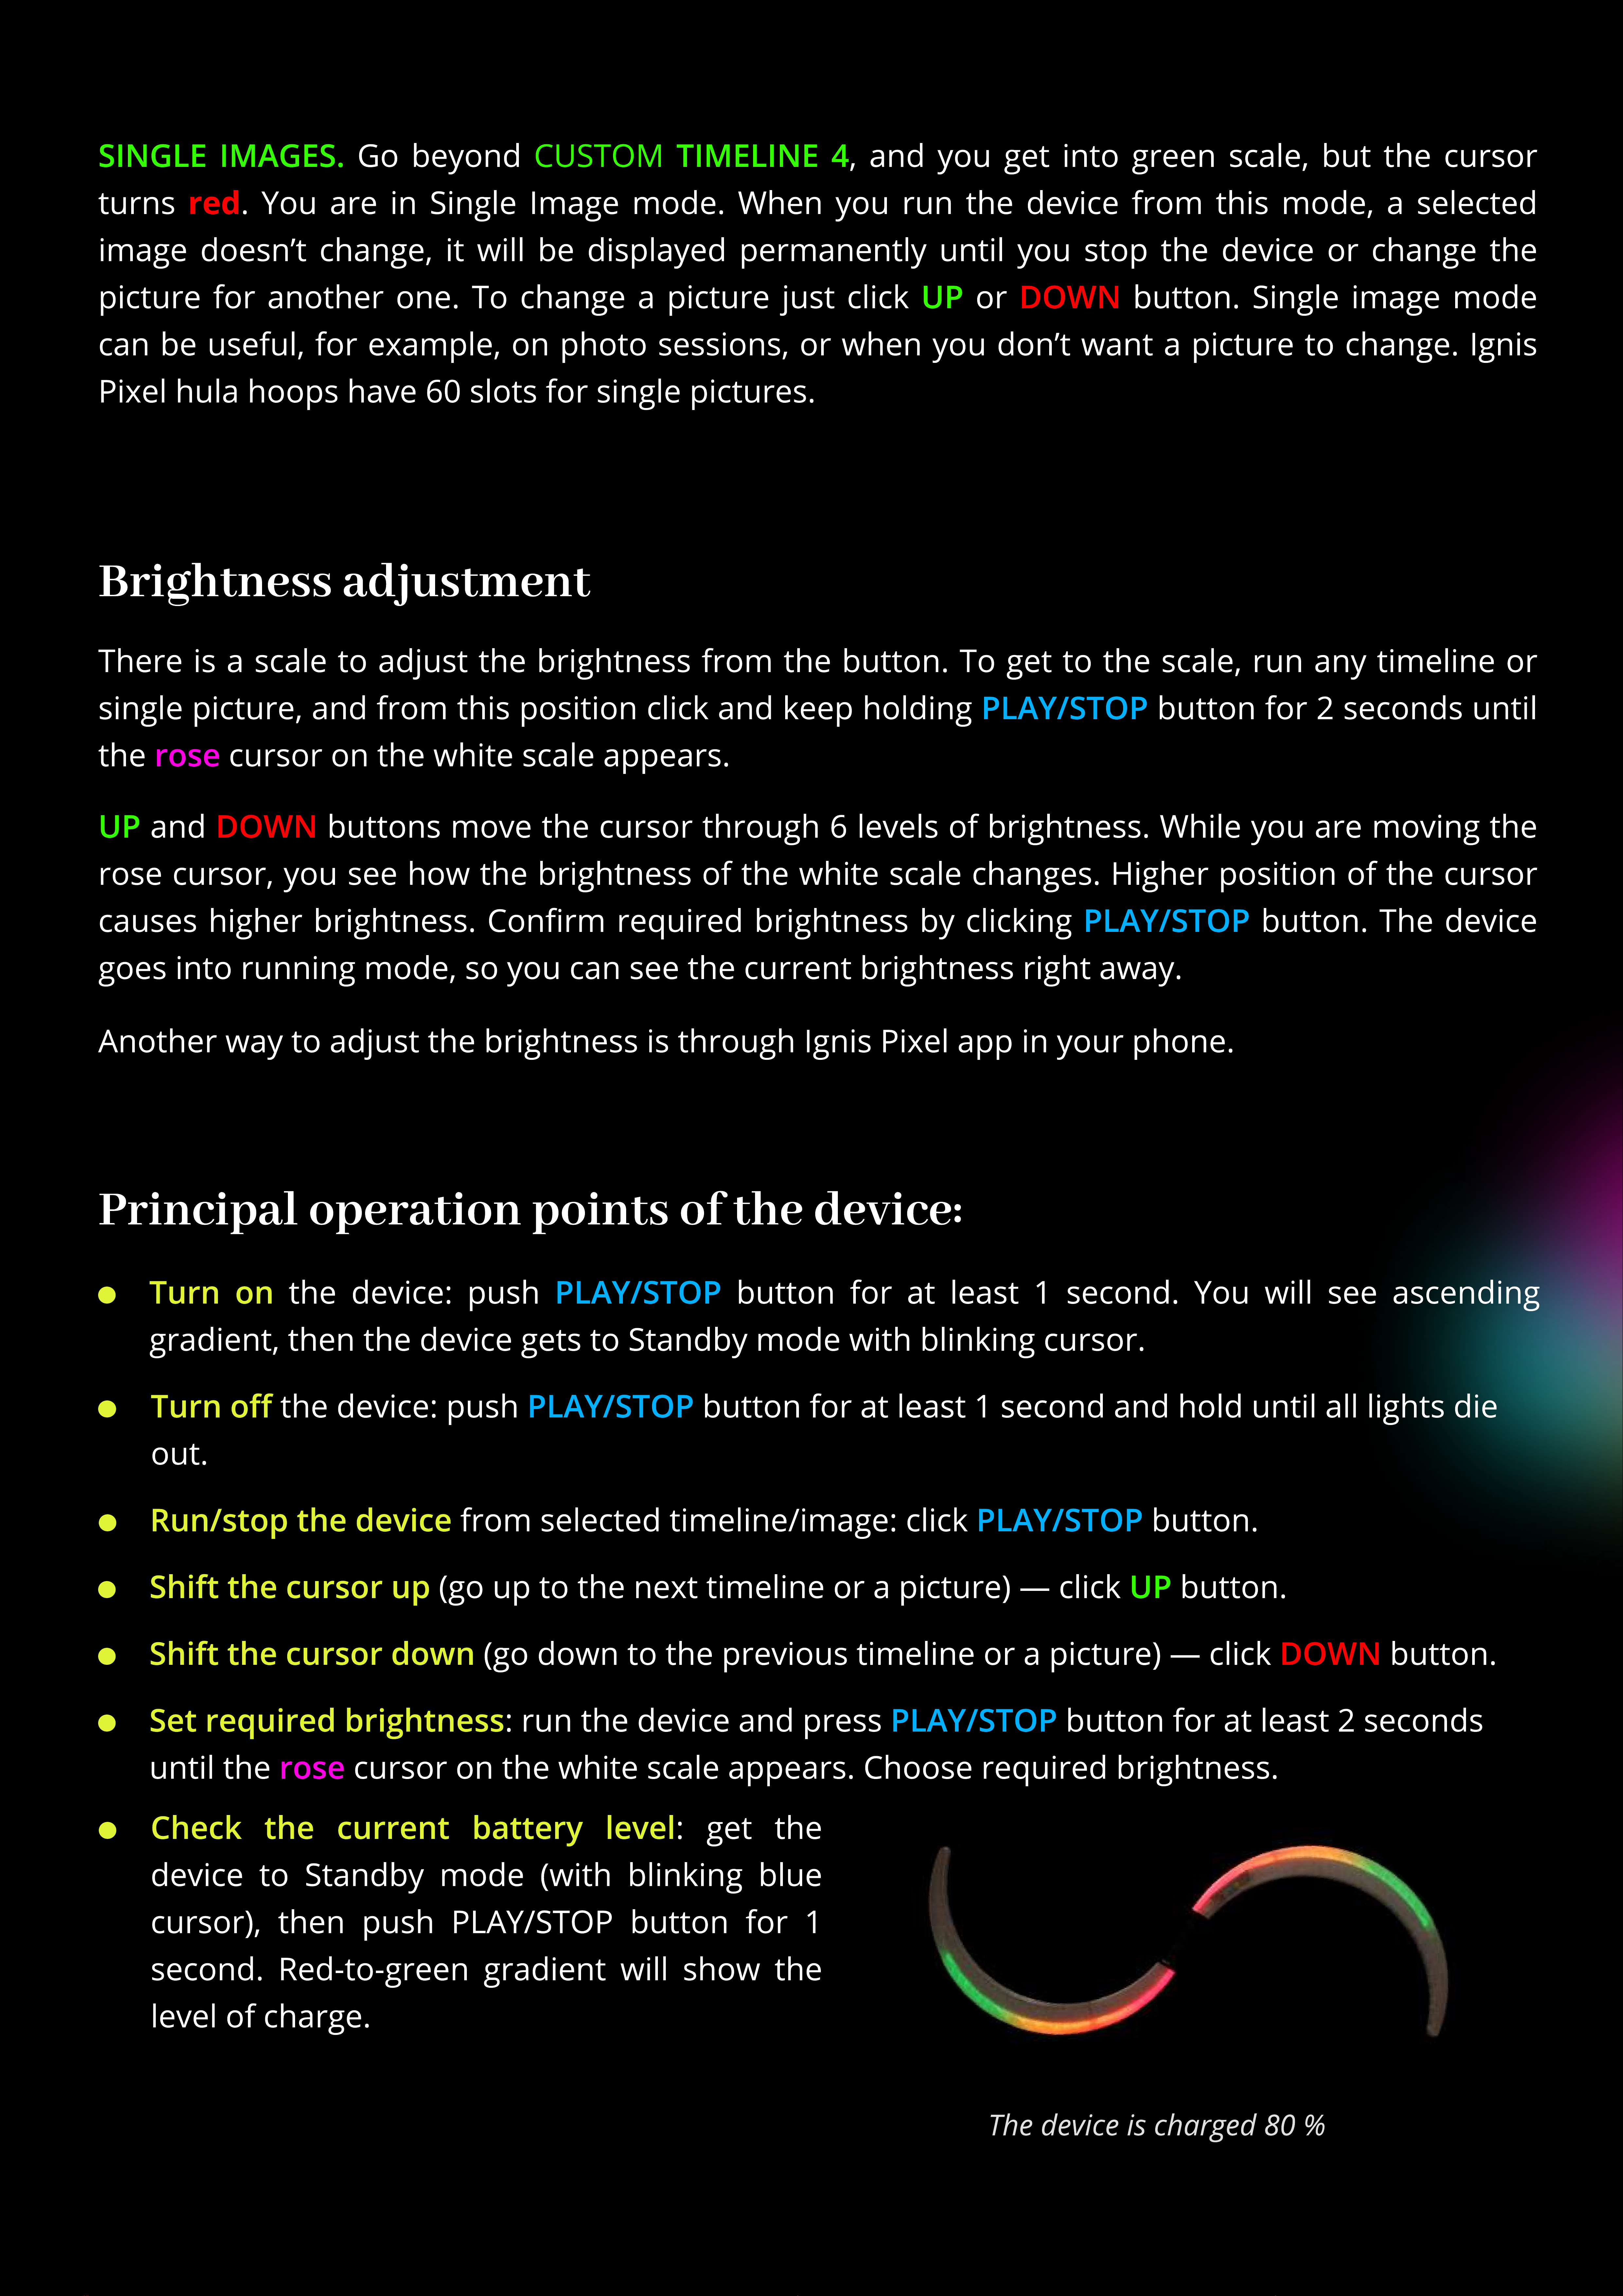
Brightness adjustment
rose
PLAY/STOP
There is a scale to adjust the brightness from the button. To get to the scale, run an timeline or
single picture, and from this position click and keep holding button for 2 seconds until
the cursor on the white scale appears.
DOWN
and buttons move the cursor through 6 levels of brightness. While ou are moving the
rose cursor, ou see how the brightness of the white scale changes. Higher position of the cursor
causes higher brightness. Conrm required brightness b clicking button. The device
goes into running mode, so ou can see the current brightness right awa .
PLAY/STOP
UP
Principal operation points of the device:
PLAY/STOP
the device: push button for at least 1 second. You will see ascending
gradient, then the device gets to Standb mode with blinking cursor.
Turn on
PLAY/STOP
the device: push button for at least 1 second and hold until all lights die
out.
Turn o
PLAY/STOP
from selected timeline/image: click button.
Run/stop the device
UP
(go up to the next timeline or a picture) — click button.
Shift the cursor up
DOWN
(go down to the previous timeline or a picture) — click button.
Shift the cursor down
PLAY/STOP
: run the device and press button for at least 2 seconds
until the cursor on the white scale appears. Choose required brightness.
rose
Set required brightness
: get the
device to Standb mode (with blinking blue
cursor), then push
PLA
Y/ST
OP
button for 1
second.
R
ed
-
to
-
green gradient will show the
level of charge.
C
hec
k
the current b
a
tter
y
l
eve
l
red
DOWN
G
o be ond , and ou get into green scale, but the cursor
turns . You are in Single
I
mage mode. When ou run the device from this mode, a selected
image doesn
’
t change, it will be displa ed permanentl until ou stop the device or change the
picture for another one. To change a picture just click or button. Single image mode
can be useful, for example, on photo sessions, or when ou don
’
t want a picture to change.
I
gnis
P
ixel hula hoops have 6
0
slots for single pictures.
S
I
N
G
L
E
IM
A
GE
S
.
C
U
ST
OM
T
IME
L
I
N
E
4
UP
A
nother wa to adjust the brightness is through
I
gnis
P
ixel app in our phone.
The
device
is
charged
80
%
After 10 minutes of inaction in Standby mode, the device automatically turns itself o. In
timeline/picture mode the device works until the battery is discharged.
When the battery is low, the LEDs blink red for 10 seconds. To maintain the lifetime of the battery
it’s highly recommended charging Ignis buugengs the same day you use it.
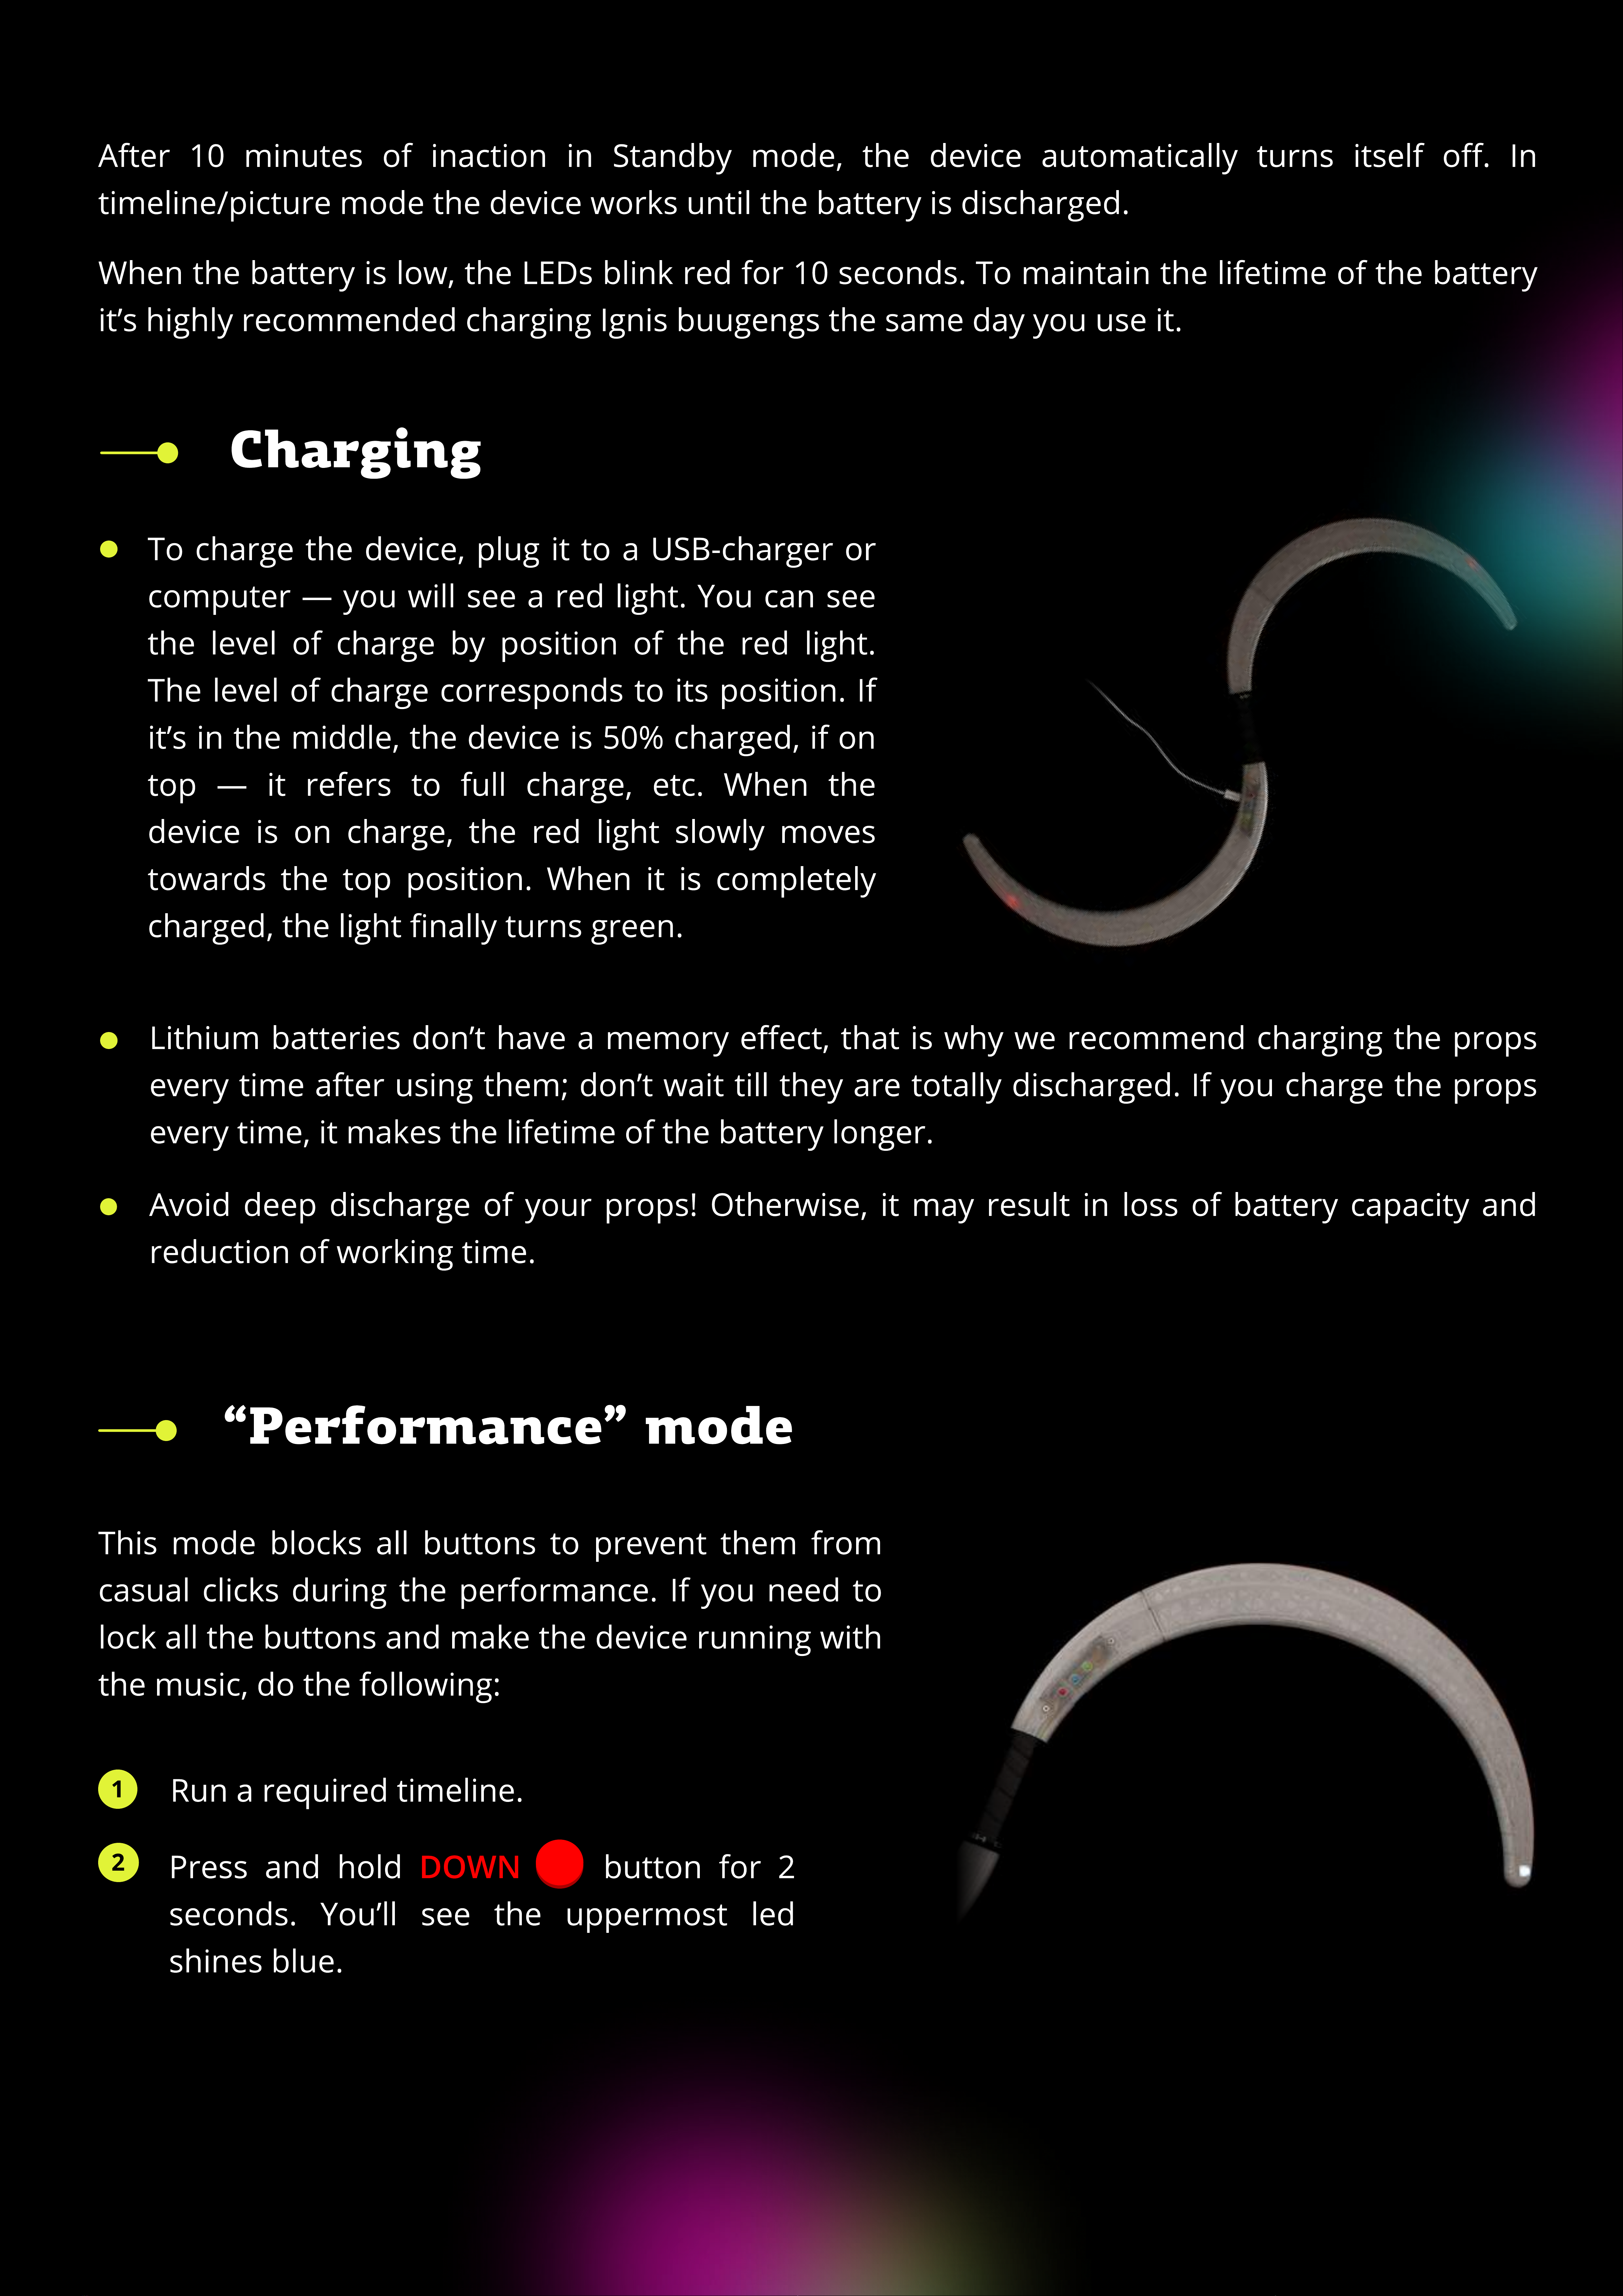
Charging
To charge the device, plug it to a USB-charger or
computer — you will see a red light. You can see
the level of charge by position of the red light.
The level of charge corresponds to its position. If
it’s in the middle, the device is 50% charged, if on
top — it refers to full charge, etc. When the
device is on charge, the red light slowly moves
towards the top position. When it is completely
charged, the light nally turns green
Lithium batteries don’t have a memory eect, that is why we recommend charging the props
every time after using them; don’t wait till they are totally discharged. If you charge the props
every time, it makes the lifetime of the battery longer.
Avoid deep discharge of your props! Otherwise, it may result in loss of battery capacity and
reduction of working time.
“Performance” mode
This mode blocks all buttons to prevent them from
casual clicks during the performance. If you need to
lock all the buttons and make the device running with
the music, do the following:
1Run a required timeline.
2DOWN
Press and hold button for 2
seconds. You’ll see the uppermost led
shines blue.
3ow your device is in a “trigger” state. It means that clicking any button will run the timeline
you selected before. To be exact, the device starts running at releasing any button. So, you
need to press any button, and release it right with the start of the music.
Note: If no button is pressed within 1 hour, the device automatically shuts itself down.
4After the device is launched, all the buttons are locked from accidental clicks.
There are three ways to go out of this mode:
DOWN
holding button gets the props back into “Performance preparation” mode.
PLAY/STOP
holding button turns o the device.
UP
holding button gets the props back to Standby mode.
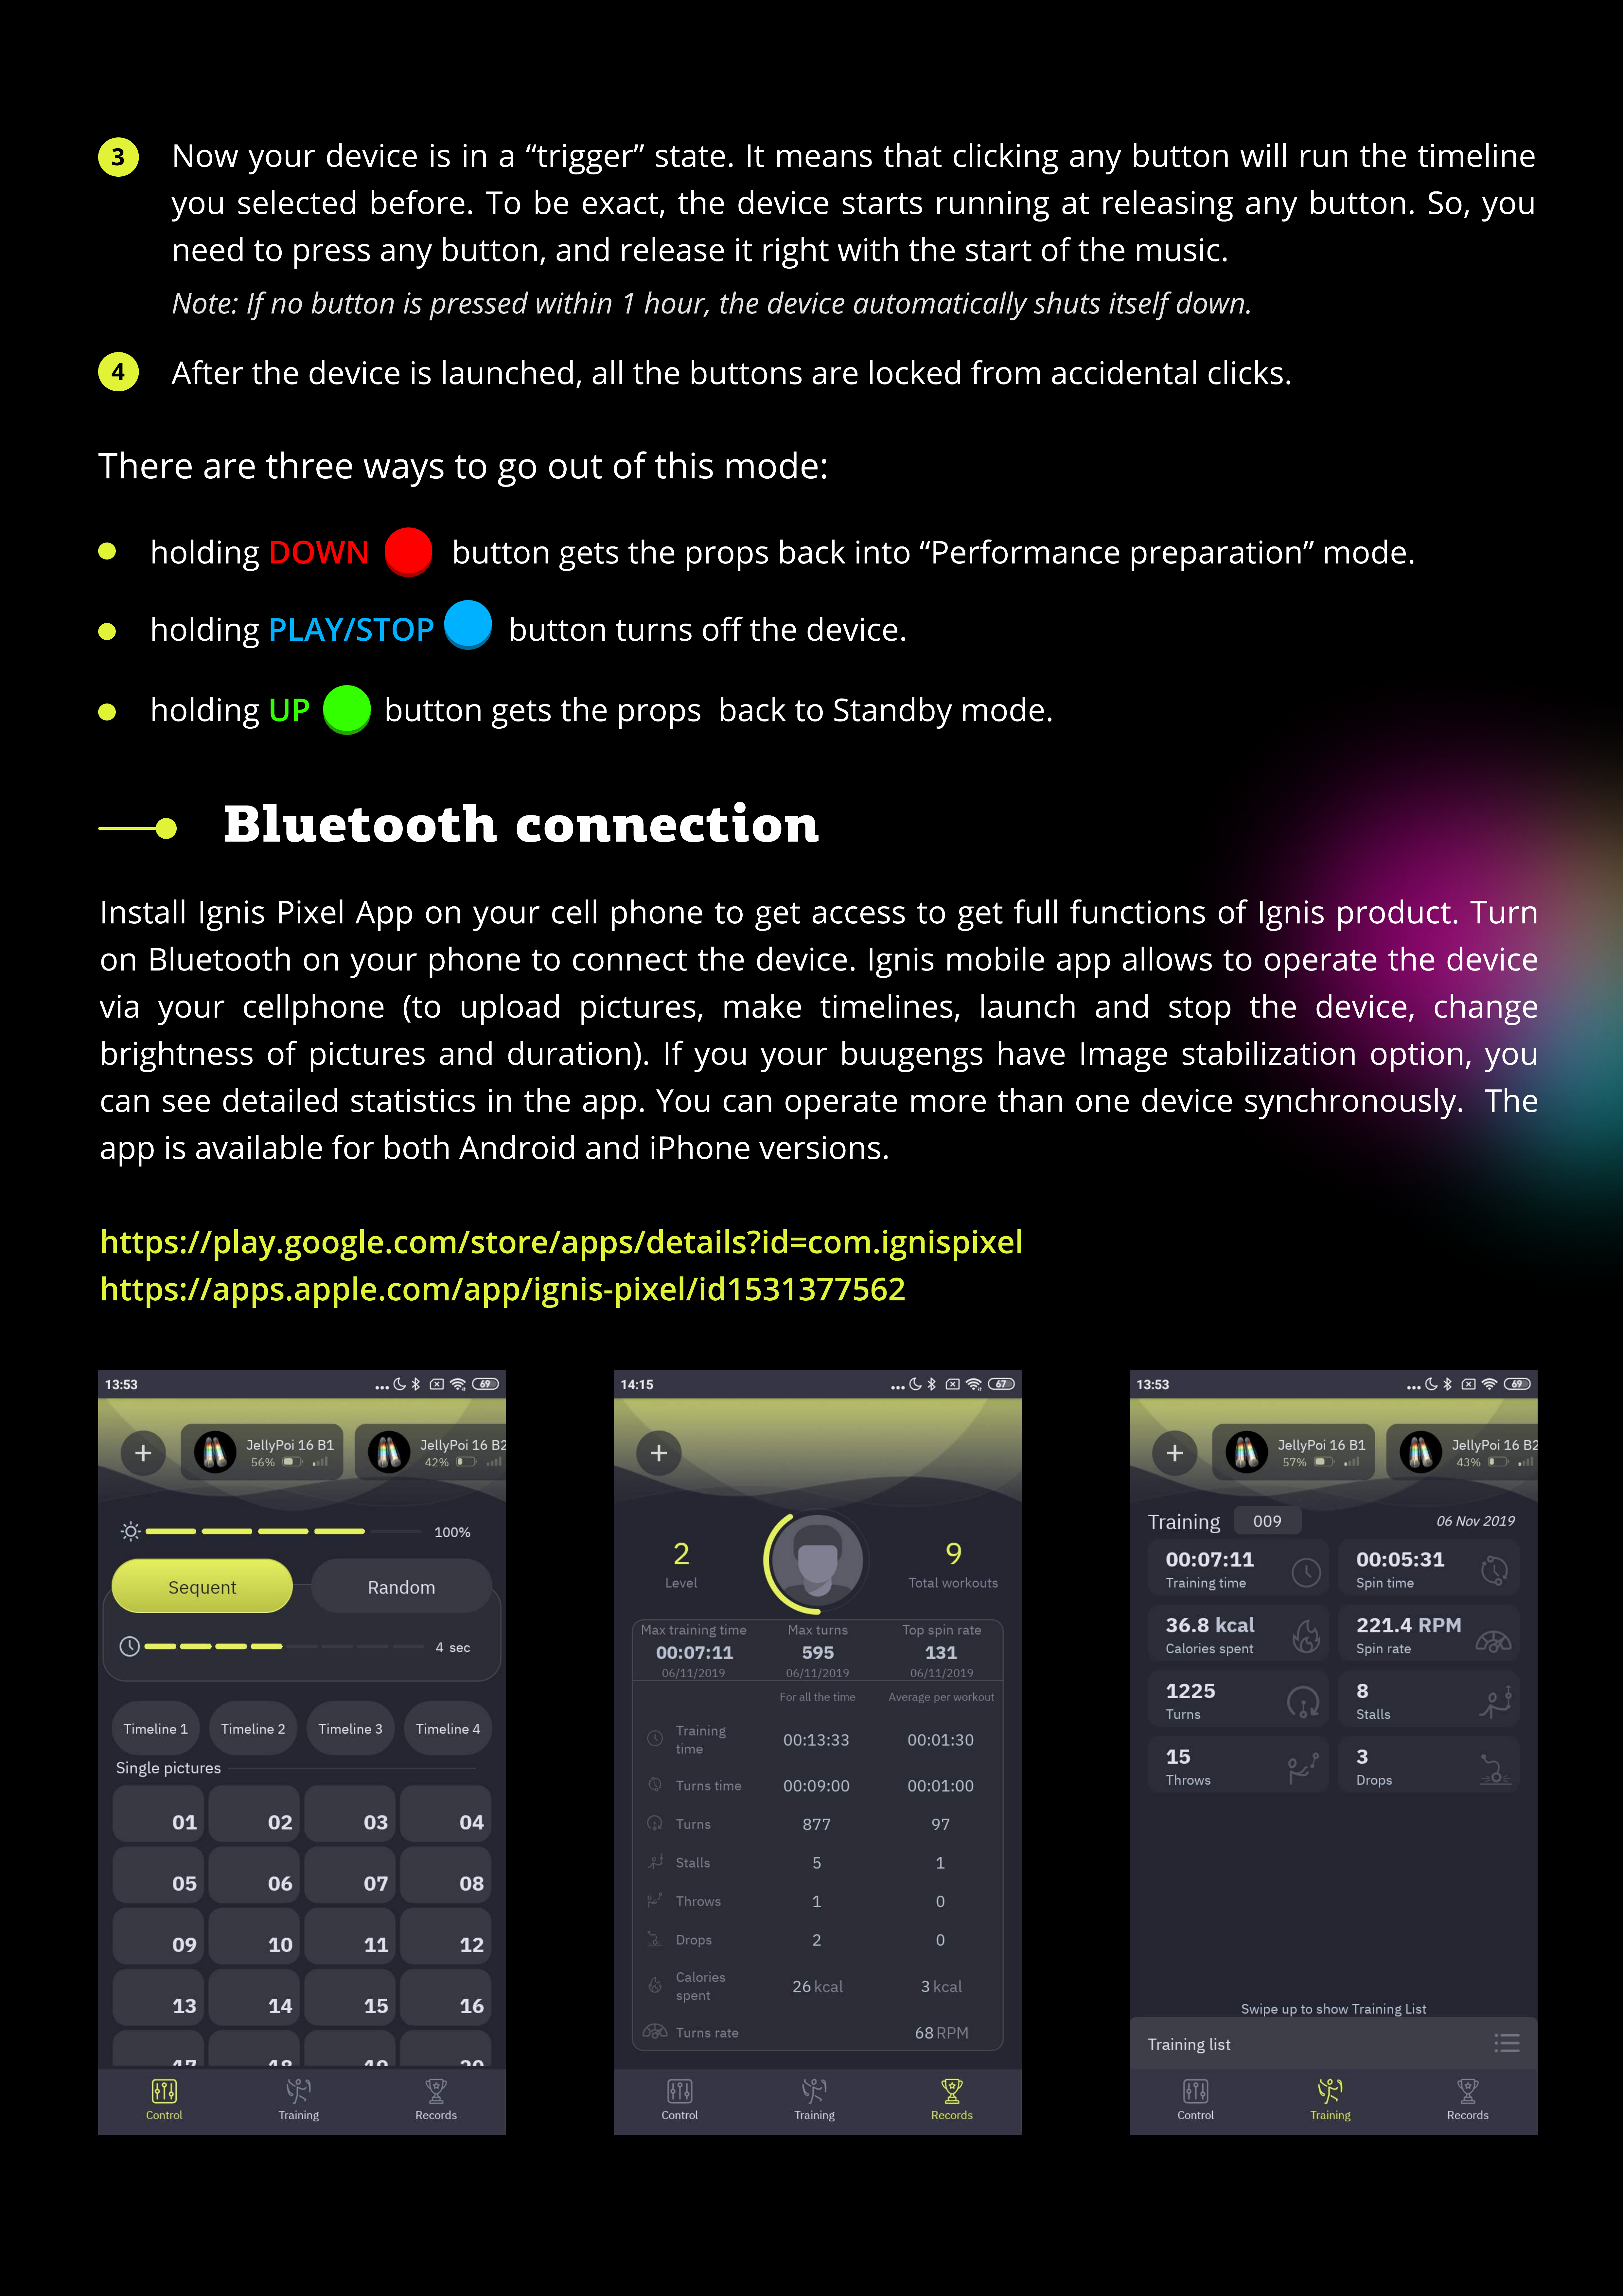
Bluetooth connection
https://play.google.com/store/apps/details?id=com.ignispixe
https://apps.apple.com/app/ignis-pixel/id153137756
Install Ignis Pixel App on your cell phone to get access to get full functions of Ignis product. Turn
on Bluetooth on your phone to connect the device. Ignis mobile app allows to operate the device
via your cellphone (to upload pictures, make timelines, launch and stop the device, change
brightness of pictures and duration). If you your buugengs have Image stabilization option, you
can see detailed statistics in the app. You can operate more than one device synchronously. The
app is available for both Android and iPhone versions

Programming and saving
You c n set the dur tion for e ch uplo ded picture nd put them in order, thus cre ting
sequence of them, synchronized with the music. For Ignis buugengs there re four timeline
custom sequences m rked in the softw re s T1, T2, T3, T4. Note th t the softw re shows 10
timelines, s its interf ce is univers l for ll Ignis props. Buugengs work only with 4 rst timelines,
ll the other will be not ctive for this device.
To congure timeline, do the following
Run Ignis Pixel Utility
Now you see sequence of pictures. You c n ch nge their order nd dur tion by dr gging
them or their borders, like in video editors. Use Ctrl (Cmd for m cOS) button to ch nge editing
method Ripple edit/Rolling edit
Select im ges in Im ge list (upper left section), dr g nd drop them to timeline (T1-T4) to the
lower re of Ignis Pixel Utility
Add
Music
To djust timeline synchronously with music, dd your music le through menu –>
or dr g nd drop n MP3 le to the Music slot of Ignis Pixel Utility (lower re , just
bove the Timelines)
11
2
3
4
5
Add Image
Open single pictures from les through menu –> or dr g nd drop les to the
Im ge list into the left upper re of Ignis Pixel Utility

System menu
Through System me u some parameters ca be adjusted, as well as the state
of the device ca be checked out. You ca adjust parameters of the radio,
choose a group the device belo gs to, set the bright ess of the
“Performa ce” mode i dicator, etc.
System me u is arra ged i to Basic me u a d several Subme us. Blue
backgrou d of the Basic me u a d Subme u shows the total umber of
poi ts i it.
UP DOWN
To e ter i to System me u, press a d hold a d butto s
for 5 seco ds u til i dicatio cha ges.
UP
PLAY/STOP
PLAY/STOP
DOWN
I Basic me u the light-blue bli ki g cursor i dicates the positio . Subme u
also co sists of dark-blue LEDs, but marked by red or gree i dicator. If the
i dicatio is red — the parameter is ot active, if gree – it's active. To go
from Basic me u i to a required Subme u, click butto . To
avigate over System me u or Subme u, use a d butto s.
To go out of Subme u back to System me u, press butto
for o e seco d.
https://www.youtube.com/watch?v=FUdYDPsoVnQ&feature=youtu.be
For better u dersta di g how to use Ig is Pixel Utility, to upload pictures, a d to make projects,
please watch this ma ual video
The software allows you to save the project, a d you ca se d your project by e-mail or USB ash
to a other computer. You do ot eed to se d the origi al pictures of your project. They are
co tai ed i side the project le.
Upload Checked
W
he you cha ge o ly a duratio or a order of pictures i a timeli e to save time, just tick
the required timeli e a d click — the process will take just a few seco ds.
Upload all
C
lick butto — the process ca take up to several mi utes depe di g o the device
model, a umber of pictures, a d height-width ratios of the pictures
Sca
n
C
o ect your device to computer with a micro-USB cable a d press butto i the Device
list
(
right sectio of Ig is Pixel Utility
)
6
7
8

Examples of the indication in System menu.
rom left to right:
indication in the Basic menu, the cursor is on the rst Submenu.
indication in the Basic menu, the cursor is on the third Submenu.
the rst Submenu, total control mode is active.
the rst Submenu, total control mode is inactive.
the second Submenu, 12th channel is selected.
Blue background of the submenu shows the total number of points in it.

System menu description
1Statu and etting of Wirele Sync unit
2Selecting a channel for Wirele Sync unit
3Selecting a group for Wirele Sync unit
4Brightne of the performance preparation indicator
5Sy tem condition
6Duration for picture in pre et timeline (T1, T2)
7Setting for Inertial en or
Submenu description
Submenu 1 — Status and settings of Wireless Sync unit
1Available Not available
Wirele Sync availability: /
2On O
Turning on/o Wirele Sync: /
3On O
Full control mode: /
There are several principal modes for wireless sync operation in the device:
I
n this state the device reacts only
on commands to enter into
“P
erformance preparation
”
mode and to
b
e la
u
nched
in
“P
erformance
”
mode
(
loo
k
pa
g
e
5).
A
ll the other commands are i
g
nored
On O
Wirele Sync i , Full control mode i
.
I
n this state the device totally follows
airin
g
commands
.
Fu
ll control over the device is possi
b
le solely in this state
.
I
t incl
u
des:
On On
Wirele Sync i , Full control mode i
.
navi
g
atin
g
over the men
u
play
/
stop se
qu
ences and sin
g
le ima
g
es
entrance into
“P
erformance preparation
”
mode and la
u
nchin
g
in
“P
erformance
”
mode
g
oin
g
o
u
t of
“P
erformance
”
mode into the men
u
b
attery level chec
k-u
p
total sh
u
tdown of the devices

4On O
Group work: /
In this stat d vic s can b split on s v ral groups
(up to 32), th r by allowing ach group to work ind p nd ntly. Th d vic r sponds only to
commands air d for th group it b longs to.
On On
Wireless Sync is , Group work mode is .
5Not used, reserved
6Slave
/
Master
In this stat th d vic acc pts commands, but do sn't
air any.
On Active
Wireless Sync is , Slave mode is .
7
6Not used, reserved
Submenu 2 — Selecting a channel of the Wireless Sync unit
This subm nu stands for choosing a chann l. Totally, th r ar 12 chann ls, and you can s t th
d vic on any of th s chann ls. If you want both d vic s (of th whol group of th m) to b
synchroniz d with ach oth r, th y should b long to th sam chann l.
UP
DOWN
To choos a chann l, just navigat th blinking cursor by clicking and buttons.
green
PLAY/STOP
Wh n you r ach th r quir d position, click button. Th activ chann l glows
.
PLAY/STOP
To go out of this m nu, hold button for on s cond.
Wh n you go into this m nu th n
x
t tim , th cursor automatically shifts its lf onto th
pr viously s l ct d chann l.
Submenu
3
— Selecting a grou
p
PLAY/STOP
PLAY/STOP
UP
green
Su
b
menu
2
Su
b
menu
1
, point
4
DOWN
This subm nu stands for choosing a group. Totally, th r ar 32 groups, and you can s t th
d vic to any of th s groups. If you want both d vic s (of th whol group of th m) to b
synchroniz d with ach oth r, th y should b long to th sam group and th chann l (look
).
G
roup work point should b
O
n (look ). To choos a group, just
navigat th blinking cursor by clicking and buttons. Wh n you r ach th
r quir d position, click button. Th activ group glows . To go out of this
m nu, hold button for on s cond.
Wh n you go into this m nu th n
x
t tim , th cursor automatically shifts its lf onto th
pr viously s l ct d group.

Submenu 4 — Setting up the brightness of the Performance preparation
indicator
In this submenu a b ightness of the indicato is to be set (as an option, the indicato can be tu ned
o, if the position 1 is selected). Othe positions 2, 3, 4 stand fo the b ightness of “Pe fo mance”
mode indicato . Position 4 makes the indicato the b ightest.
Fo bette obviousness a selected b ightness of the indicato is displayed in the last (the top) LED.
Submenu 5 — System condition
mm
UP
green
DOWN
In this menu pe fection of the device is to be cont olled. Navigate by clicking and
buttons. All positions of the cu so must be . If it is not so, apply to the suppo t team fo
detailed investigation.
Submenu 6 — Duration for pictures in preset timelines (T1, T2)
Set the du ation fo pictu es fo the st two o ange p eset timelines. The numbe in this
submenu (1-8) means how many seconds a pictu e will be displayed befo e changed fo the next
one.
1 stands fo one second, 2 — two seconds, 3 — th ee seconds, and so on up to 8.
Submenu 7 — Settings for Inertial sensor
(supported
in
rmware
version
3.0.7)
1Availabl
e N
ot
availabl
e
I
ner
tial
s
en
so
r
availability:
/
2Succ
e
ss Failu
re
S
e
lf-co
n
t
r
ol
re
sult:
/
light means dec eased p ecision o some failu e.
R
e
d
3
On O
Tu
rn
i
ng
o
n
/o
th
e
S
en
so
r
u
n
it:
/
On O
St
re
tchi
ng
stabilizatio
n
:
/
This function etains the angula si
z
e of the pictu e, no matte how slow o fast you spin the device.
5
On O
Stabilizatio
n
by
phas
e
:
/
This function displays the image in the ai always at the same place, if you spin the device with
constant seed.
6
On O
W
avi
ng
mod
e
:
/
If you wave the device in f ont of you, the image d aws motionlessly elative to the cente .

Taking photos and videos with your buugen
ou will need a camera with manual settings mode and a ash. Find a dark place, the spinner
should be in deep shadow. Set your camera: ISO 200, f6.3, shutter speed = the speed of your trick,
0,3-0,5 sec usually. Turn the ash on. If poi trail is too bright, use f8.0
Video is a trickier thing. ou have to upload images with reduced to 12-25% brightness. This is
necessary to equalize poi luminosity and background brightness to gain correct exposure. ou
should see normally exposed hoop trails and a performer clearly on the camera screen
Camera. We recommend using a cam
with "global shutter", not a "rolling
shutter". Nice result could be on new
DSLR cameras like Canon 5D mark4,
shutter speed 1/25 and 25 FPS
framerate works pretty well. Anyway, a
camera doesn't see light trails like a
human eye does, so some
post-processing is necessary, for
example, Echo eect to make the trail
longer as you can see with your eye
Tips for smartphones. Use "Night"
camera mode if you don’t have manual
settings. This will make the shutter
speed slower and trails longer. Filming
through the sunglasses is a good idea
as well. The best result could be
achieved with camera applications with
enhanced settings, you need to adjust
aperture and ISO manually
Maintenance
Keep the battery charged. Lithium batteries don’t have a memory eect, that is why we
recommend charging the props every time after using them; don’t wait till they are totally
discharged. If you charge them every time, it makes the lifetime of the battery longer. This
advice works for your smartphone, laptop, and for any gadgets with Li-ion batteries inside.
Optimal is to keep your battery above 70%.
Water. The props will be damaged for sure if some water gets inside. If you feel you have no
chance to keep them dry under the rain, for example, take sticky tape and cover US
B
port,
buttons, and other spots where the water may go inside. Water damage is not covered by the
warranty. Feel free to contact us if issues pop up.

Temperature recommendations
Operating te perature to keep and use pixel equip ent is fro -20 °C to 50 °C (fro -4 °F to
122 °F). On low te perature, the ti e of working can be di inished due to reduced battery
capacity when a battery is kept on cold. When you co e back to roo te perature, all
characteristics get back to the nor al level.
If you really need to perfor in freezing cold, keep the devices in a war place and take the
right before the show. In this case the batteries don’t have enough ti e to cool o, and the
working ti e re ains al ost the sa e.
Selfheating by bright odes can also be used when perfor ing in the cold — it doesn’t allow
the battery to freeze during the perfor ance.
Warranty
We give 2-year warranty for our pixel equip ent. If during this ti e so e defect or alfunction
co es out, we either x it or ake a free replace ent of a faulty ele ent. All shipping charges are
laid upon a custo er, except cases when a device ca e initially defected or a failure was revealed
right after using the device.
Ignis pixel equip ent is strong enough to survive collisions on nor al spinning speed (about 2
revs per sec). Anyway, it cannot be called indestructible. Warranty does not cover da ages caused
by hard collisions, drops, and water.
Esti ated lifeti e of Ignis Pixel equip ent is 5-10 years and li ited only by battery life (like in
obile phones). If the battery beco es worthless, get in touch with us to replace it with a new
one, or we can tell how to change it by yourself.
support@ignispixel.com
If the equip ent shows any failure, rst and fore ost reach us out by e ail
and tell what happened. In ost cases, a failure is possible to x on
place, without sending back to us — this will save you a lot of ti e and oney to send it to and
fro.
It’s really i portant for us to know all weak spots of our equip ent, so we could ake it even
ore reliable and durable. We would appreciate if thus you help us to evolve.
To get in touch with us and ask questions about the props, go to contacts area on our website:
https://ignispixel.co /contacts
pixel@ignispixel.com
E ail:
Kindest regards
Ignis team

Для включения устройства удерживайте кнопку более 1 сек.
. Меню
Синий курсор мигает на первой позиции.
Для перемещения курсора вперед удерживайте кнопку 0,5-1 сек.
Для перемещеняdf курсора назад удерживайте кнопку 1-2 сек
до появления уровня заряда. Нажмите кнопку повторно
вы вернетесь в меню и курсор переместится на шаг назад.
Для выключения удерживайте кнопку более 2 сек.
2. Рабочий режим - воспроизведение картинок
Проигрывается выбранная последовательность картино
(таймлайн) или одиночная картинка.
Для выключения удерживайте кнопку более 3 сек.
3. Регулировка яркости
М
игающий курсор показывает выбранный уровень яркости.
К
ороткое нажатие меняет уровень яркости.
Для возврата в мен
удерживайте кнопк
1-2 сек.
К
оротким нажатие
запустите воспроизведени
картинок
Для возврата в режи
воспроизведени
удерживайте кнопк
более 1 сек
У
держивайте кнопк
2-3 сек.
У
ровен
ь
заряда
В
ысота шкалы показывае
уровень заряда батареи.
Для возврата в мен
нажмите кнопку (пр
э
том курсор переместитс
на 1 шаг назад)
У
держивайте кнопку 1-2 сек.
Press
PLAY/STOP
button
to
turn
on
the
buugeng
and
get
to
Standby
Mode
Standby
mode
Blue
blinking
cursor
is
on
the
1
st
position
.
Click
U
an
d
DOWN
buttons
to
navigate
the
cursor
over
menu
To
turn
o
the
buugeng
,
click
an
d
hol
d
LAY/STO
buttons
till
all
LEDs
d
ie
out
.
R
unn
i
ng
mode
:
T
i
me
li
ne
or
S
i
ng
l
e
pic
ture
Selecte
d
mo
d
e
is
launche
d.
To
turn
o
the
buugeng
,
click
LAY/STO
button
to
stop
the
d
evice
running
,
then
click
the
button
again
an
d
hol
d
it
till
all
LEDs
d
ie
out
.
B
r
i
ghtness
ad
j
ustment
osition
o
f
the
cursor
shows
the
level
o
f
current
brightness
To
change
the
brightness
,
click
U
an
d
DOWN
buttons
.
To
return
to
Stan
d
by
mo
d
e
,
click
LAY/STO
button
.
To
run
the
d
evice
,
click
LAY/STO
button
To
return
to
R
unning
mo
d
click
LAY/STO
button
.
To
get
to
Brightness
setting
hol
d
LAY/STO
button
f
or
2
sec
B
attery
l
e
v
e
l
The
position
o
f
the
re
d
cursor
show
the
battery
level
.
G
reen
light
on
the
top
means
f
ull
charge
.
To
return
to
Stan
d
by
,
click
mi
dd
le
button
.
To
get
into
battery
level
scal
press
mi
dd
le
button
f
or
1
sec
.
Control scheme
Other Ignis Pixel Dj Equipment manuals


