logo
Brands
  1. Home
  2. •
  3. Brands
  4. •
  5. IKEA
  6. •
  7. Refrigerator
  8. •
  9. IKEA FARSKHET User manual

IKEA FARSKHET User manual

Other IKEA Refrigerator manuals

IKEA KÖLDGRADER User manual

IKEA

IKEA KÖLDGRADER User manual

IKEA LAGAN FC223/92 User manual

IKEA

IKEA LAGAN FC223/92 User manual

IKEA LAGAN EN 62552:2020 User manual

IKEA

IKEA LAGAN EN 62552:2020 User manual

IKEA FROSTIG SC155 User manual

IKEA

IKEA FROSTIG SC155 User manual

IKEA FROSTIG BC155 User manual

IKEA

IKEA FROSTIG BC155 User manual

IKEA LAGAN User manual

IKEA

IKEA LAGAN User manual

IKEA FÖRKYLD User manual

IKEA

IKEA FÖRKYLD User manual

IKEA TILLREDA 104.969.53 User manual

IKEA

IKEA TILLREDA 104.969.53 User manual

IKEA FULLGORA User manual

IKEA

IKEA FULLGORA User manual

IKEA TILLREDA User manual

IKEA

IKEA TILLREDA User manual

IKEA Svalkas User manual

IKEA

IKEA Svalkas User manual

IKEA Refrigerator User manual

IKEA

IKEA Refrigerator User manual

IKEA BCF228/64 User manual

IKEA

IKEA BCF228/64 User manual

IKEA FRYSA User manual

IKEA

IKEA FRYSA User manual

IKEA Svalkas User manual

IKEA

IKEA Svalkas User manual

IKEA SF98 User manual

IKEA

IKEA SF98 User manual

IKEA Frostig BF91 User manual

IKEA

IKEA Frostig BF91 User manual

IKEA ISANDE User manual

IKEA

IKEA ISANDE User manual

IKEA SUPERKALL User manual

IKEA

IKEA SUPERKALL User manual

IKEA Rakall User manual

IKEA

IKEA Rakall User manual

IKEA BITANDE User manual

IKEA

IKEA BITANDE User manual

IKEA ID5HHEXWS03 User manual

IKEA

IKEA ID5HHEXWS03 User manual

IKEA VINTERKALL User manual

IKEA

IKEA VINTERKALL User manual

IKEA ID3CHEXVS00 User manual

IKEA

IKEA ID3CHEXVS00 User manual

Popular Refrigerator manuals by other brands

Haier HRF-369NAA null

Haier

Haier HRF-369NAA null

Haier HRF-688FR null

Haier

Haier HRF-688FR null

Haier HRF-416KAASS null

Haier

Haier HRF-416KAASS null

Haier HRF-348E null

Haier

Haier HRF-348E null

Bonnet Neve SKYVIEW PLUS User instructions

Bonnet Neve

Bonnet Neve SKYVIEW PLUS User instructions

Zanussi Electrolux ZERB 8441 Instruction book

Zanussi Electrolux

Zanussi Electrolux ZERB 8441 Instruction book

Sharp SJ-BA31IEXW2-EU user manual

Sharp

Sharp SJ-BA31IEXW2-EU user manual

CORBERO CC2300MCW Instruction booklet

CORBERO

CORBERO CC2300MCW Instruction booklet

KitchenAid 2205264 Use and care guide

KitchenAid

KitchenAid 2205264 Use and care guide

NEFF KI181 Series user manual

NEFF

NEFF KI181 Series user manual

Hoshizaki Reach-In instruction manual

Hoshizaki

Hoshizaki Reach-In instruction manual

Amana ASD2524VES00 User instructions

Amana

Amana ASD2524VES00 User instructions

BOMANN KGC 213 instruction manual

BOMANN

BOMANN KGC 213 instruction manual

Danby DAR044A1SLDD Owner's use and care guide

Danby

Danby DAR044A1SLDD Owner's use and care guide

Beko CSA31022 Instructions for use

Beko

Beko CSA31022 Instructions for use

Electrolux ER 6821 D Instruction book

Electrolux

Electrolux ER 6821 D Instruction book

True TS-28 Specifications

True

True TS-28 Specifications

Frigidaire FSC23R5DW9 installation guide

Frigidaire

Frigidaire FSC23R5DW9 installation guide

https://manuals.online logo
https://manuals.online logoBrands
  • About & Mission
  • Contact us
  • Privacy Policy
  • Terms and Conditions

Copyright 2026 Manuals.Online. All Rights Reserved.

FÄRSKHET FR
ES
2 AA- 2215316-1
ENGLISH
Warning! Before proceeding
with installation, read the safety
information in the User Manual.
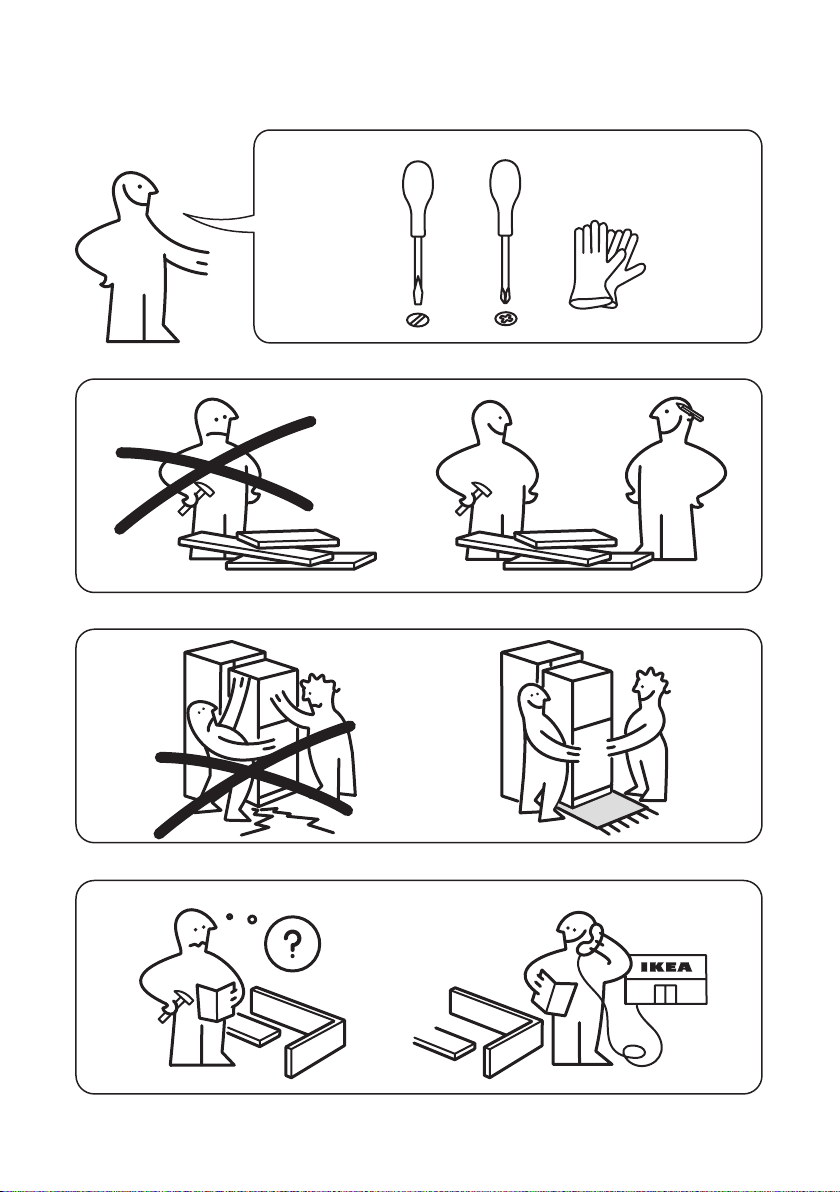
• Before installation,
e.g.reversing the door
(ifneeded), disconnect the
power cable plug from the
power socket.
• At every stage of reversing
the door (if needed), protect
the door from scratching with
durable material.
• The appliance must be
earthed. The power cable plug
is provided with a contact for
this purpose. Ifthe domestic
power socket is not earthed,
connect the appliance to
aseparate earth in compliance
with current regulations,
consulting aqualied
electrician.
• Never install the appliance in
a conned space. Always leave
enough space around the
appliance for ventilation.
• Serious or fatal crushing
injuries can occur from
appliance tip-over. Always
secure this appliance to the
wall using tip-over restraints.
FRANÇAIS
Avertissement! Avant de
procéder à l’installation, veuillez
lire les directives de sécurité du
manuel de l’utilisateur.
• Avant toute installation, pour,
par ex., inverser la porte
(lecas échéant), débranchez
le câble d’alimentation de la
prise de courant.
• À chaque étape de l’inversion
de la porte (le cas échéant),
protégez la porte des rayures
à l’aide d’un matériau
résistant.
• L’appareil doit être mis à
la terre. La che du câble
d’alimentation est munie
d’un contact à cet eet. Sila
prise de courant n’est pas
mise à la terre, branchez
l’appareil à une prise mise à la
terre séparée conforme aux
réglementations en vigueur
àl’aide d’un électricien
qualié.
• Ne jamais installer l’appareil
en un espace conné. Laissez
toujours susamment
d’espace autour de l’appareil
pour assurer une ventilation
adéquate.
• Des blessures graves ou
mortelles peuvent survenir
par écrasement si l’appareil
bascule. Fixez TOUJOURS cet
appareil au mur à l’aide du
dispositif anti-basculement.
ESPAÑOL
¡Advertencia! Antes de proceder
con la instalación, lea la
información sobre seguridad en
el Manual del Usuario.
• Por ejemplo, antes de cambiar
de lado la puerta (si fuese
necesario), debe desenchufar
el electrodoméstico del
tomacorriente.
• En cada etapa del cambio de
lado de la puerta (si fuese
necesario), evite que la puerta
sufra rayaduras.
• Este electrodoméstico debe
estar conectado a tierra.
Para este efecto, el cable de
alimentación viene provisto
con un contacto especíco.
Si el tomacorriente no tiene
toma a tierra, conecte el
electrodoméstico a una
toma de tierra separada en
cumplimiento de las normas.
Póngase en contacto con un
técnico certicado.
• No debe instalar el
electrodoméstico en
un espacio estrecho.
Debe asegurarse dejar
suciente espacio de
ventilación alrededor del
electrodoméstico.
• Si el refrigerador cae, puede
causar lesiones graves o
fatales por aplastamiento.
SIEMPRE asegure este
electrodoméstico a la pared
usando los dispositivos
anti-caídas.
3
4 AA- 2215316-1
2x 2x 4x
66.9“
135°
2.0”
11.8“
3.0“
21.5”
24.4”
23.4“
73.8“
“3
.
9
2“6.
2
4
ABC
5
ENGLISH
If needed, the upper and lower
doors can be reversed to open
from the right side.
Remove all items from the
appliance before reversing the
doors.
FRANÇAIS
Le cas échéant, les portes
supérieure et inférieure peuvent
s’inverser pour s’ouvrir sur le
côté droit.
Retirez tout ce qu’il y ait dans
l’appareil avant d’inverser les
portes.
ESPAÑOL
Si es necesario, puede cambiar
de lugar las puertas superior e
inferior para abrirlas del lado
derecho.
Retire todos los elementos del
refrigerador antes de cambiar de
lado las puertas.
1
18
1
ENGLISH
Remove three hinge screws,
then remove the top hinge and
the hinge pin sleeve.
FRANÇAIS
Retirez les trois vis de charnière,
puis retirez la charnière
supérieure et le manchon de l’axe
de charnière.
ESPAÑOL
Retire los tres tornillos de bisagra
y retire la bisagra superior y
el manguito del pasador de la
bisagra.
6 AA- 2215316-1
2
ENGLISH
1. Lift the upper door o
the center hinge pin,
thenremove the door.
2. Carefully place the upper
door on the padded surface
to avoid damage.
FRANÇAIS
1. Soulevez la porte du haut
pour la retirer de l’axe
de charnière centrale,
puisretirez la porte.
2. Posez soigneusement la
porte supérieur sur une
surface rembourrée pour
éviter de l’endommager.
ESPAÑOL
1. Levante la puerta superior
del pasador de la bisagra del
medio y retírela.
2. Coloque con cuidado la
puerta superior en una
supercie acolchada para
evitar que se dañe.
7
3
A
ENGLISH
On the bottom of the upper
door, do the followings.
1. Loosen the screw.
Thenremove the door stop
andthe pin sleeve.
Set aside the door stop.
2. On the opposite side, attach
the pin sleeve and another
supplied door stop then x
both with the screw.
FRANÇAIS
Au bas de la porte supérieure,
procédez comme suit.
1. Desserrez la vis. Puis retirez la
butée de porte et la goupille.
Mettez de côté la butée de
porte.
2. Du côté opposé, xez le
manchon de goupille et une
autre butée de porte fournie,
puis xez les deux avec la vis.
ESPAÑOL
En la parte inferior de la puerta
superior, haga lo siguiente:
1. Aoje el tornillo. Luego retire
el tope de la puerta y el
manguito del pasador.
Aparte el tope de la puerta.
2. En el lado opuesto, junteel
manguito del pasador
con otro tope de la puerta
provisto, y je ambos con los
tornillos.
2
1
1xA
8 AA- 2215316-1
4
ENGLISH
Loosen two screws. Then remove
the center hinge, and remove
the pin from the center hinge.
FRANÇAIS
Desserrez deux vis. Retirez
enduite la charnière centrale et
retirez la goupille de la charnière
centrale.
ESPAÑOL
Aoje dos tornillos. Luego retire
la bisagra del medio y retire el
pasador de la bisagra del medio.
9
5
ENGLISH
1. Lift the lower door o the
bottom hinge pin, then
remove the door.
2. Carefully place the lower
door on the padded surface
to avoid damage.
FRANÇAIS
1. Soulevez la porte inférieure de
l’axe de charnière inférieure,
puis retirez la porte.
2. Placez soigneusement la
porte inférieure sur la surface
rembourrée pour éviter tout
dommage.
ESPAÑOL
1. Levante la puerta inferior
del pasador de la bisagra del
medio y retire la puerta.
2. Coloque con cuidado la
puerta inferior en una
supercie acolchada para
evitar que se dañe.
10 AA- 2215316-1
6
ENGLISH
On the top of the lower door,
dothe followings.
1. Remove the pin sleeve.
2. Remove the pin hole plug.
3. Fix both again by swapping
the location.
FRANÇAIS
En haut de la porte inférieure,
procédez comme suit.
1. Retirez le manchon de l’axe.
2. Retirez la che du trou de l’axe.
3. Remettez les deux en
échangeant l’emplacement.
ESPAÑOL
En la parte superior de la puerta
inferior, haga lo siguiente:
1. Retire el manguito del
pasador.
2. Retire el tapón del oricio del
pasador.
3. Vuelva a colocar ambos
cambiándolos de lugar.
1
2