ILIS StrainMatic M1 User manual

StrainMatic
®
User Manual
ilis gmbh Konrad-Zuse-Str. 12 D-91052 Erlangen
Phone: +49 (91 31) 9 74 77 90 Fax: +49 (91 31) 9 74 77 99
E-Mail: info@ilis.de Internet: www.ilis.de
Basic Operation and Working Procedures

Copyright © 2001-2007 ilis gmbh. All rights reserved.
Version 2007.2 (October 2007)
Noresponsibility is accepted for the accuracy of the information and data contained in this
documentation which can be changed without prior announcement.
The ilis gmbh cannot be made liable for incorrect use or incorrect operation of the instrument.
Correct use requires among other things knowledge of the contents of this manual. Therefore
the instructions in this manual and all other technical documentation belonging to the
instrument must be complied with.
Based on the current state of the art, it is not possible to produce software that works free of
errors in all application combinations. ilis gmbh is therefore not liable for damages arising
through the use of the software or the hardware delivered with it.
The names of products and companies cited in this documentation may be protected by trade
marks of their respective proprietors.

USER MANUAL Introduction 3
Table of contents
Table of contents ........................................................................................... 3
1Introduction ............................................................................................ 4
1.1 Overview ....................................................................................................4
1.2 Device variants ............................................................................................4
1.3 Conventions ................................................................................................4
1.4 Customer support ........................................................................................5
2General safety instructions........................................................................ 6
2.1 Use in accordance with the regulations ...........................................................6
2.2 Transport and installation..............................................................................6
2.3 Safety information for the operating personnel ................................................7
2.4 Safety instructions for operation ....................................................................7
2.5 Information and danger symbols used ............................................................8
2.6 Safety devices .............................................................................................9
3Assembly and function ............................................................................12
4Operation ..............................................................................................14
4.1 Principles of operation ................................................................................ 14
4.2 Loading and saving files .............................................................................. 16
4.3 Starting StrainMatic.................................................................................... 18
4.4 Ending StrainMatic ..................................................................................... 19
4.5 Selecting measuring methods ...................................................................... 20
4.6 Installing sample holders ............................................................................ 22
4.7 Performing measurements .......................................................................... 23
4.8 Analysing measuring results ........................................................................27
4.9 Archiving measuring results......................................................................... 33
4.10 Setting up measuring methods .................................................................... 34
4.11 Setting up basic parameters ........................................................................42
5Validation ..............................................................................................45
5.1 General procedure...................................................................................... 45
5.2 Performing validation procedure 1 ................................................................ 46
5.3 Performing validation procedure 2 ................................................................ 47
5.4 Performing validation procedure 3 ................................................................ 48
6Inspection and cleaning ...........................................................................49
7Troubleshooting......................................................................................50
7.1 Error messages in the status bar.................................................................. 50
7.2 Trouble shooting ........................................................................................ 52

4Introduction USER MANUAL
1Introduction
This user manual is designed for the operating personnel of the STRAINMATIC.It describes the
function and the operation of the STRAINMATIC.You will find a complete description of the
operating interface in the Reference Manual.
NOTE: The STRAINMATIC device and the corresponding operating software is constantly being
developed and improved. The illustrations in this documentation therefore may differ slightly
from your version. It is also possible that some of the functions described in this manual are
not applicable to your version.
1.1 Overview
In the General safety instructions section you will find generally valid information on the safe
operation of the STRAINMATIC.Every operator must have read and understood this section and
should work through it again at regular intervals.
The Construction and function section describes the basic construction of the STRAINMATIC and
its mode of operation.
The Operation section describes all essential operating procedures on the STRAINMATIC,from
the performance of measurements through setting up a measuring method up to setting
basic parameters.
In the Validation chapter you will find the instructions for performing validation procedures.
The Inspection and cleaning section provides an overview of the necessary cleaning and
inspection activities which the operating personnel should perform at regular intervals to
assure correct operation of the STRAINMATIC.
In the Troubleshooting section the operating personnel finds an overview of possible
malfunctions during operation, their cause and the measures required for their removal.
1.2 Device variants
At the time of the release of this manual the STRAINMATIC is available in the two variants M2
and M3. Differences in functionality or operation are pointed out in this manual.
1.3 Conventions
To make distinctions more clearly, different fonts and icons are used in the text:
Annotations and file names
User inputs
Cross-references
Enumerations
User actions

USER MANUAL Introduction 5
1.4 Customer support
If you have questions on operation or functionality of the STRAINMATIC,please contact the
following address. We will be pleased to provide you with further assistance!
ilis gmbh
Konrad-Zuse-Str. 12
91052 Erlangen
Germany
Phone: +49 (9131) 974779 0
Fax: +49 (9131) 974779 9
E-Mail: support@ilis.de
Internet: www.ilis.de

6General safety instructions USER MANUAL
2General safety instructions
NOTE: This section contains important information on the safe operation of the STRAINMATIC
in accordance with the regulations. Read this section carefully. All persons who work with the
STRAINMATIC must have read and understood this section of the manual and should work
through this section anew at regular intervals.
If generally valid safety regulations and the instructions in this section are not observed, the
operating permission of the instrument expires. In addition to the safety instructions in this
section, all applicable general legal and statutory regulations for avoiding accidents and for
protecting the environment have validity.
This manual and all further information and documentation relevant for the operation must
always be accessible in the vicinity of the instrument.
2.1 Use in accordance with the regulations
The STRAINMATIC has been developed for the automatic measurement and display of
birefringence in glass and other transparent materials. Use the STRAINMATIC in accordance
with the regulations results from the contents of the technical documentation and, where
necessary, additional documents.
Nothing on the instrument which could impair the safe operation of the instrument may be
changed, added or removed mechanically or electrically without the written permission of the
ilis gmbh. The operating software may not be changed in any way. If not approved changes
are made to the instrument, the operating permission expires automatically.
2.2 Transport and installation
The instrument may be transported over longer distances only in the original packaging. A
hoist with a lifting force of at least 150 kg must be used for a transport of the instrument.
The instrument may be lifted only with the handles included in delivery by at least two
persons.
When the unit is installed care must be taken that there is no risk of stumbling due to
connected cables. The unit should be placed on a suitable workbench for better operation.
The workbench must have a minimum load capacity of 150 kg. The workbench should not be
higher than 72 cm for the unit type M2.
The installation location of the unit must fulfill the following requirements:
The unit must always stand on a clean, level surface.
The unit must not be subjected to any vibrations.
Existing fans on the unit must not be blocked or covered. Maintain sufficient distance
from the relevant wall on all sides of the unit.
The main switch with emergency-off function must be well visible and quickly
accessible at any time.
The unit must not be installed in humid, dusty or oily ambient air.

USER MANUAL General safety instructions 7
To avoid overheating, the unit must not be exposed to direct solar radiation or an
ambient temperature of more than 30°C.
To avoid disturbing scattered light influence, direct incidence of light in the
compartment, especially from pulsating light sources, must be avoided.
Before starting up the unit must have assumed ambient temperature to avoid
formation of condensation.
The supplied power cable with integrated residual current circuit breaker must always
be used for connecting the unit to the power supply.
2.3 Safety information for the operating personnel
Only correspondingly trained and experienced personnel may operate the instrument. Only
correspondingly trained and authorized personnel may perform repair or maintenance work
on the instrument.
Persons who do not yet have the corresponding training and experience may receive access
to the instrument only under the constant supervision of an experienced operator. The legal
minimum age of the operating personnel must be complied with.
Only trained electricians or correspondingly trained personnel under the instruction and
supervision of an electrician may work on the electrical system of the instrument.
Only correspondingly trained and authorized personnel may change settings in the operating
software.
2.4 Safety instructions for operation
The machine may be put into operation only if all covers and safety devices are present,
intact and installed properly at the correct position on the machine.
All functional disturbances or changes in the operating behaviour of the instrument (for
example the production of unusual noises) must be examined and rectified immediately. If
necessary stop the instrument immediately, secure it against unintentional switching back on
and inform the responsible person about the malfunction.
No working procedures which circumvent the safety devices or require changes to the
machine are allowed.
The instrument may be used only for the intended purpose.
Check the instrument regularly for visible damage. If recognizable damage exists, have this
rectified immediately by a correspondingly authorized person.
Keep all safety-relevant documents at an easily accessible place on the instrument or in its
vicinity.
To avoid damage in the electrical system of the instrument, the operating personnel may not
be statically charged when operating the instrument.
To avoid injuries or damage to the instrument/the sample, it must be assured before moving
the measuring head that the sample compartment is empty (M2 only). Close the sample
compartment door before a measurement or before moving the measuring head (M2 only).
Do not look directly into the light source.

8General safety instructions USER MANUAL
2.5 Information and danger symbols used
Information and danger symbols the meaning of which is explained below are used on the
machine and in this manual. These symbols must be observed absolutely both on the
machine and in the documentation!
Symbol Meaning
Wear protective gloves
Wear protective goggles
Pull out the mains plug before opening
General warning about hazardous situation
Danger of crushing
Danger due to electricity

USER MANUAL General safety instructions 9
2.6 Safety devices
NOTE: Depending on the STRAINMATIC type and the serial number of your device the safety
devices can be located in different positions than shown in this manual. Please familiarize
yourself with the location of the safety devices before starting up the instrument! If
necessary, consult the documentation that accompanied the device on delivery.
The STRAINMATIC has the following safety devices for protection against injuries or damage to
the instrument. The following figure exemplarly shows the safety devices of the STRAINMATIC
M2 type:
(1) Emergency stop linear unit drive (2) Main switch
(3) Sample compartment door
Emergency stop for linear unit drive (M2 as of M2-005)
Astop button (1) with which the drive of the linear adjustment of the measuring head is
switched currentless is located on the front of the instrument. In order to restart the
STRAINMATIC after having resolved the dangerous situation unlock the emergency stop switch
and perform a self test of the device in the Service Status area or restart the operating
software.
Main switch
The main switch (2) for switching the instrument power on and off is located on the right-
hand side of the instrument. In Off position the power supply of the instrument is completely
disrupted. Always switch the instrument off and secure the main switch against unintended
switching on before maintenance work.

10 General safety instructions USER MANUAL
Sample compartment door
If the sample compartment door (3) is open the following changes in the operating behaviour
of the instrument are activated to prevent potential dangers:
The intensity of the light source is reduced.
The measuring head moves at lower speed (M2 only).
No calibration and, according to default settings, no measurement is possible.
Sample compartment monitoring (M2 as of M2-005)
The M2 type is optionally equipped with a switching light grid for checking the sample
compartment. The sample compartment monitoring is activated by default. It prevents the
measuring head from moving down if an object is detected in the level of the light grid.
Line cord with residual current circuit-breaker (as of M2-005/M3-006)

USER MANUAL General safety instructions 11
The STRAINMATIC is provided with a residual current circuit-breaker integrated in the line cord
that immediately disconnects the current entry to the device when residual current occurs.
Use only this line cord to connect the device to the power supply.

12 Assembly and function USER MANUAL
3Assembly and function
The following figure shows the basic construction of the STRAINMATIC (M2 type):
The sample in the sample compartment is illuminated with linearly polarized light which is
generated by a quasi monochromatic light source and a polarizer. This linearly polarized light
is converted into elliptically polarized light by birefringence in the sample. A retarder
converts the elliptically polarized light back into linearly polarized light.
After the retarder the polarization plane is rotated compared with the original polarization
direction by an angle from which the different birefringence values of the sample can be
derived.

USER MANUAL Assembly and function 13
The polarizer can be rotated during a measurement. The intensity over the entire measuring
range is recorded with a CCD-camera under different polarizer settings:
Intensity distribution at different polarizer settings
The result images are evaluated automatically and the resulting stress distribution over all
measuring directions is displayed color-coded in the operating software:
14 Operation USER MANUAL
4Operation
4.1 Principles of operation
You can operate the STRAINMATIC by onscreen keyboard or, for instance with an externally
connected PC, with mouse and keyboard. As standard according to the nature of the selected
cell (data, text, list entries) different entry windows for entering text, numbers or for
selecting a value open. You can toggle between the two operating modes under Service
System Setup General.
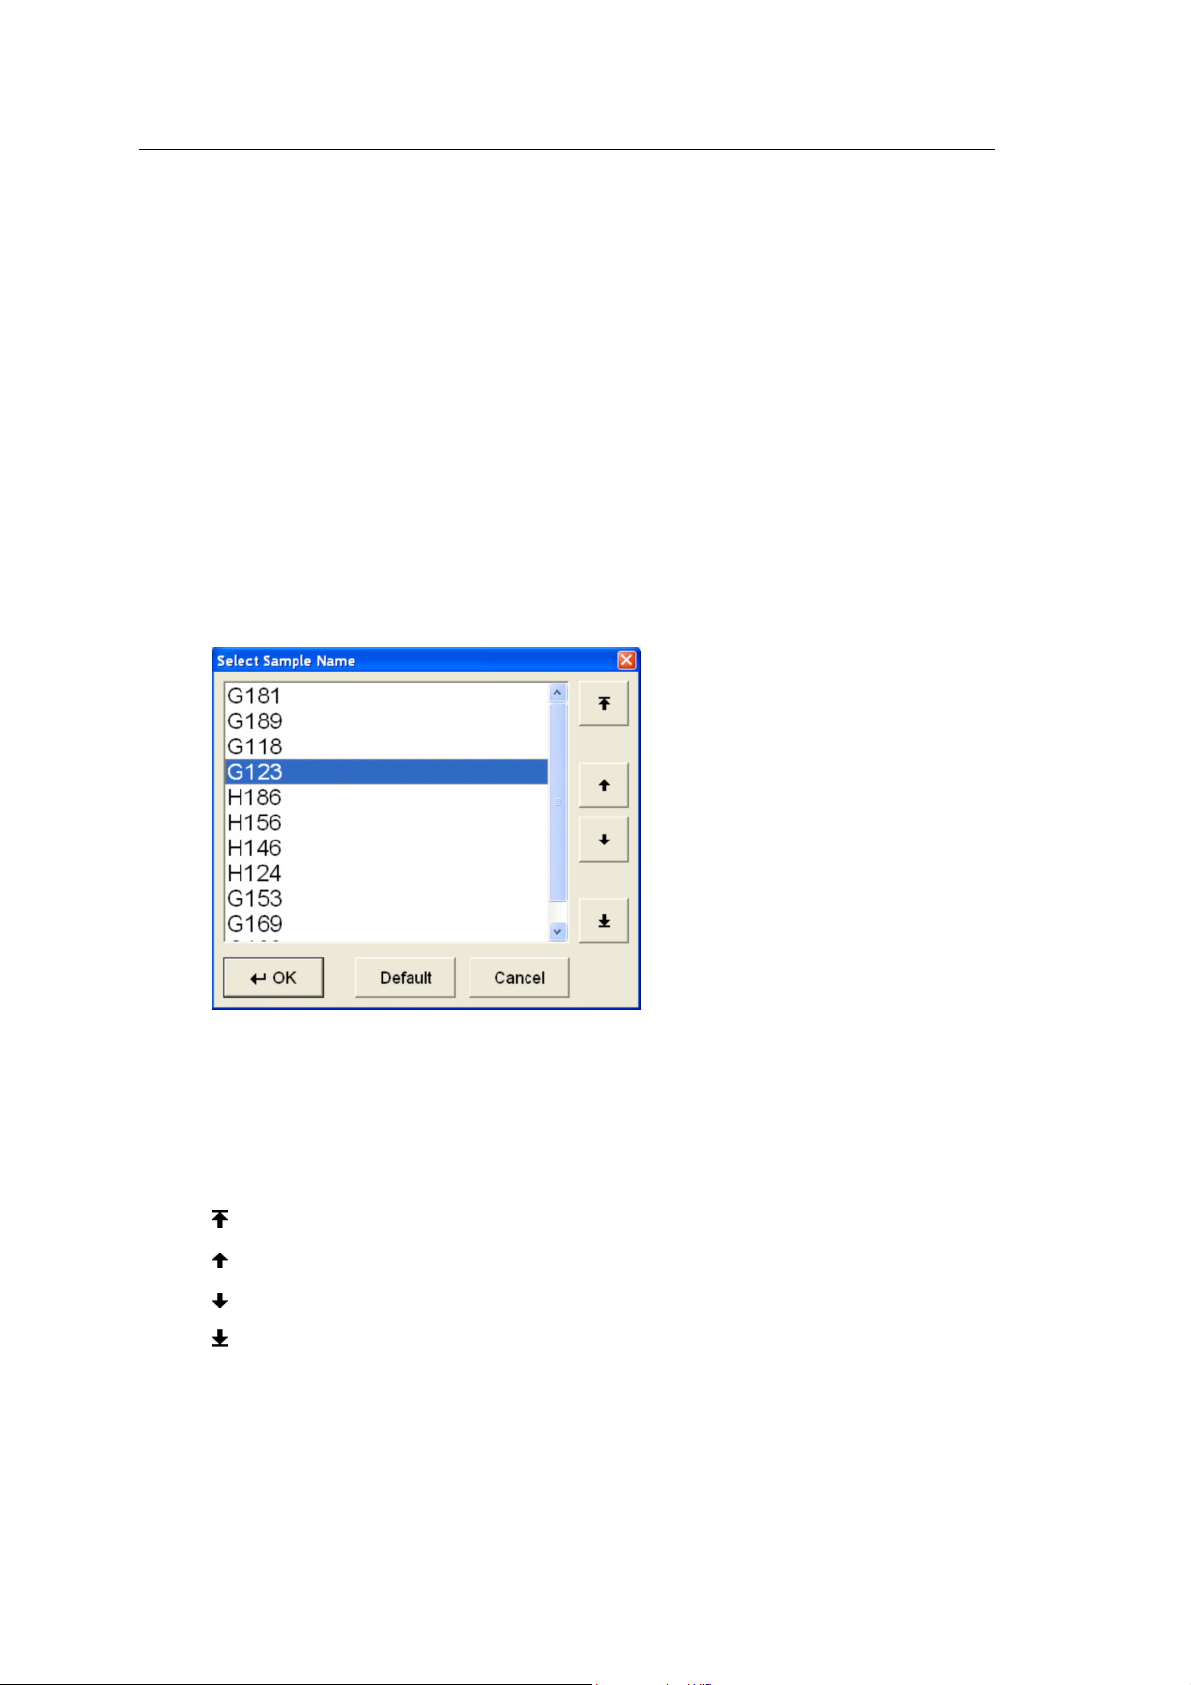
4.1.1 Selection from lists
On selection from a list of preset entries, the following window opens for example after
selection of the input field:
OK: Accepts the selection and closes the window.
Default:Marks the default value of the list, if present.
Cancel:Cancels the entry and closes the window.
The arrow buttons are visible only if more than ten entries are present in the list.
:Marks the first entry of the list.
:Moves the marking by one entry up.
:Moves the marking by one entry down.
:Marks the last entry of the list.

USER MANUAL Operation 15
4.1.2 Entering numbers
The following window opens for entering numbers after selection of the input field:
If present, the minimum and maximum value possible as well as the default value is
displayed below the input field. If an invalid value is entered, the input field turns red and
the entry cannot be completed.
OK:Accepts the entry and closes the window.
Default:Sets the value in the input field to the default value, if available.
Cancel:Cancels the entry and closes the window.
:Deletes the last digit in the input field.
Clear:Deletes the contents of the input field.
:Incrementally increases the value in the input field.
:Incrementally reduces the value in the input field.
4.1.3 Entering text
The following window opens for entering text after selection of the input field:

16 Operation USER MANUAL
OK:Accepts the entry and closes the window.
Cancel:Cancels the entry and closes the window.
Default:Enters the default value in the input field, if present.
Clear:Deletes the contents of the input field.
:Deletes the character left to the cursor or the marked characters.
:Moves the cursor one position to the left.
:Moves the cursor one position to the right.
:Changes the keyboard mapping for the entry of the next character.
:Changes the keyboard mapping until it is pressed again.
4.2 Loading and saving files
You can save, load, import or export data in different areas of the STRAINMATIC,for example:
Saving images of measuring results as JPG, BMP or EMF files
Saving and reloading measuring results as SMX files or exporting measuring results
as TXT, ZIP or SLX files
Importing and exporting measuring methods as SMT files
Importing and exporting thickness profiles as TXT files
Saving files
Independently of which type of file you want to save, the following save file dialog always
appears after you activate the corresponding button:
You select the desired folder in the left half of the dialog. You can create a new folder
under the marked folder with the Create Directory button. You can delete entire
folders with the Delete Directory button. You can rename directories with the

USER MANUAL Operation 17
Rename Directory button. If you want to delete or rename an individual file, select
the file in the right half of the dialog. The button labels change to Delete File and
Rename File,respectively.
Enter a meaningful designation for the file in the File name field.
Select the required file format if necessary under File type.
Activate the Save button to save the data in the corresponding format.
Loading files
Independently of which type of file you want to load, the following open file dialog always
appears after you activate the corresponding button:
Select the folder in which the desired file is located in the left half of the dialog.
Select a file format if necessary under File type,to display only files of this type.
Mark the required file in the list on the right.
Activate the Open button.
NOTE: Depending on the file type the software keeps the last accessed directory and
activates this directory by default when saving or loading a file of the same type again. The
following directories are used by default:
Result files (SMX): C:\StrainMatic\Custom\Results
Images (BMP, JPG, EMF): C:\StrainMatic\Custom\Images
Reports (PDF): C:\StrainMatic\Custom\Reports
Exchange files (SMT, TXT, SLX): C:\StrainMatic\Custom\Exchange
Database (MDB): C:\StrainMatic\Custom\History
Backup files (SBK): C:\StrainMatic\Custom\Backup
Polarimeter recording (RAW): C:\StrainMatic\Custom\Recorder

18 Operation USER MANUAL
4.3 Starting StrainMatic
WARNING: Risk of damage on overheating the instrument! Before operation make sure that
the fans of the instrument, if existing, cannot be covered and are functioning.
CAUTION: Put the STRAINMATIC into operation only if all covers and protective devices have
been installed correctly.
WARNING: Risk of injury and damage! Start the instrument only if the sample compartment
is free and the cover of the measuring head is closed.
To start the STRAINMATIC:
Switch the instrument on with the main switch on the right-hand side (I-On
position).
The POWER ON lamp at the front side of the instrument turns on.
If the device is controlled with an external operating PC, switch on the operating PC
and the monitor.
The operating computer boots automatically and the operating software is started.
Confirm the start of the self test with OK.
NOTE: If the self-test does not run free of error, save the log file with the corresponding
button and send this to the manufacturer.
After the self test has been completed the Select method window appears.
Select the desired measuring method from the list of methods and confirm your
selection with OK.
USER MANUAL Operation 19
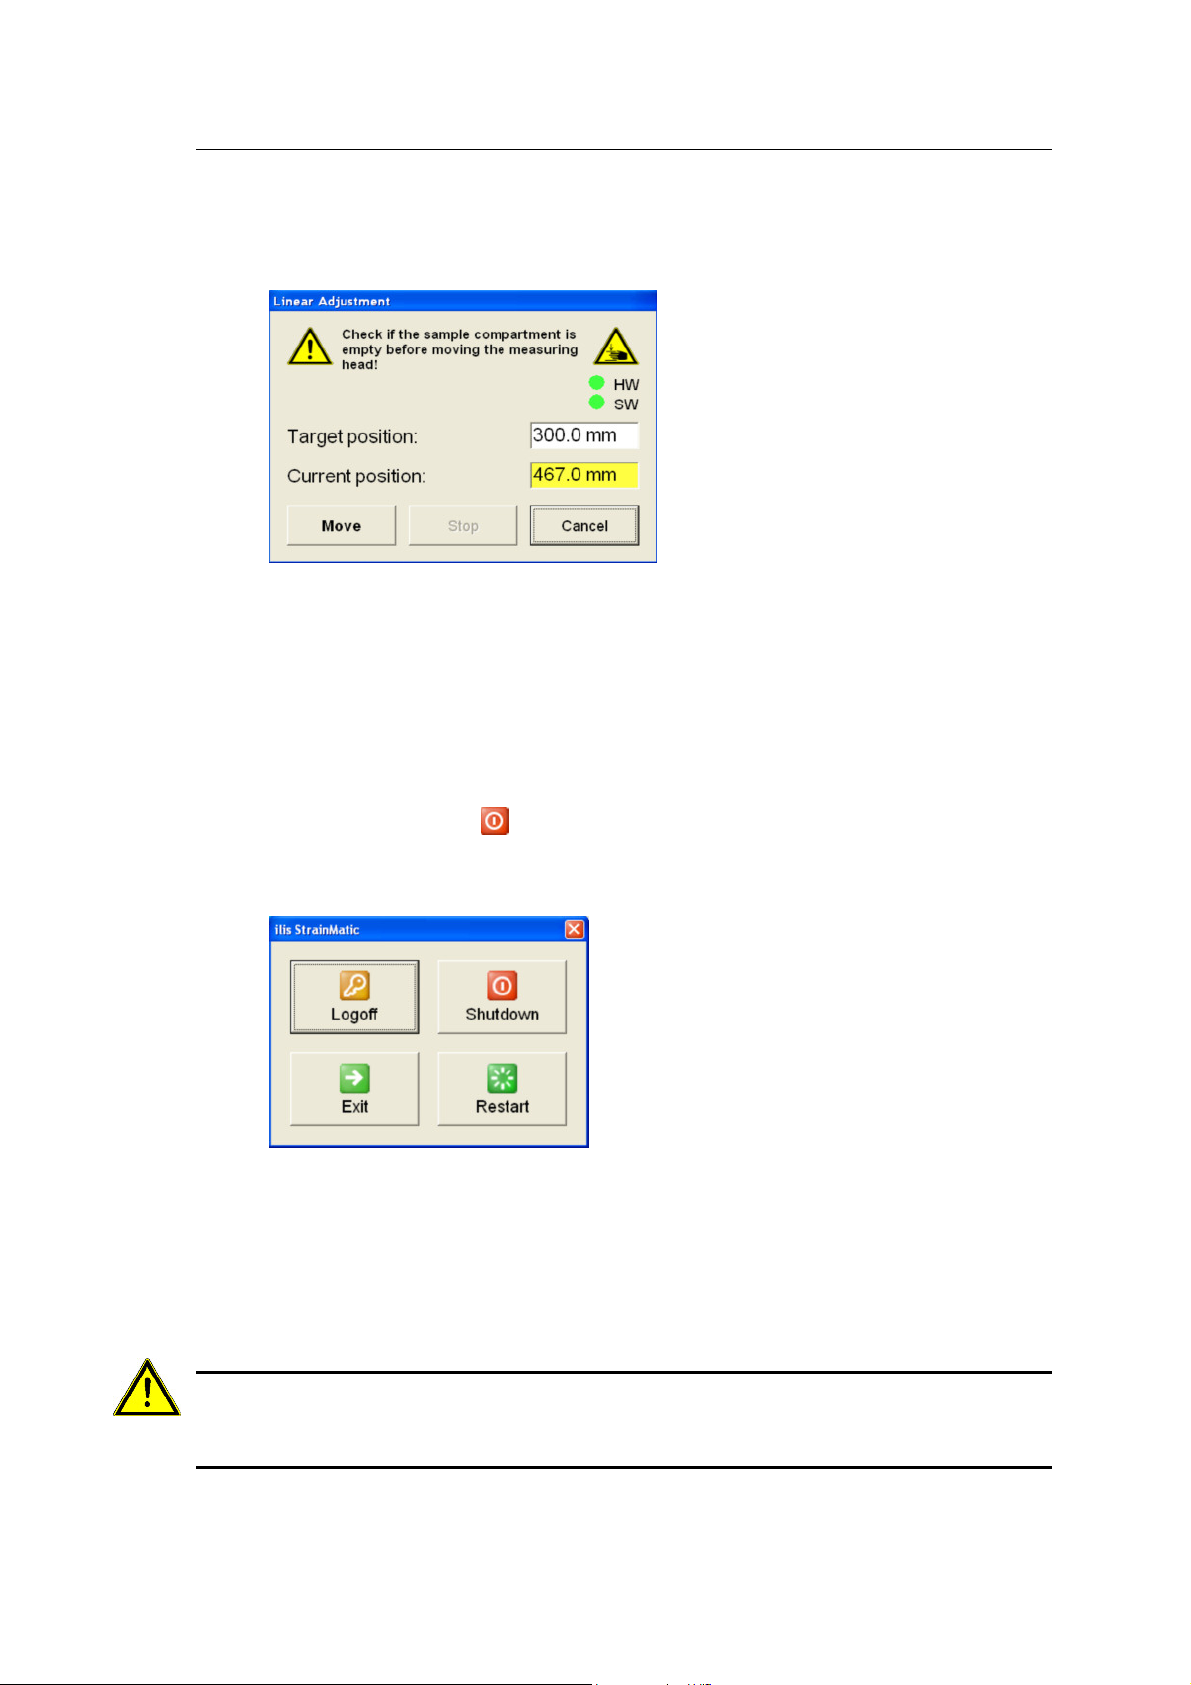
If the measuring method requires a new position of the measuring head the Linear
Adjustment window appears (M2 only):
Confirm the adjustment of the measuring head with Move.
After the measuring head has reached its target position the Linear Adjustment
window closes automatically and the instrument is ready for operation.
4.4 Ending StrainMatic
To switch the instrument off:
Activate the Off button in the right upper corner of the operating software.
The following window appears:
Activate the Shutdown button to exit the operation software and to shut down the
operating computer.
Wait until the message "It is now safe to turn off the computer"appears or the
display has switched off automatically.
Set the main switch to O-Off to disconnect the instrument from the power supply.
CAUTION: To prevent data loss and damage of the software and the operating computer
always shut down the operating computer as described above before switching off the main
switch (M2 only).
20 Operation USER MANUAL
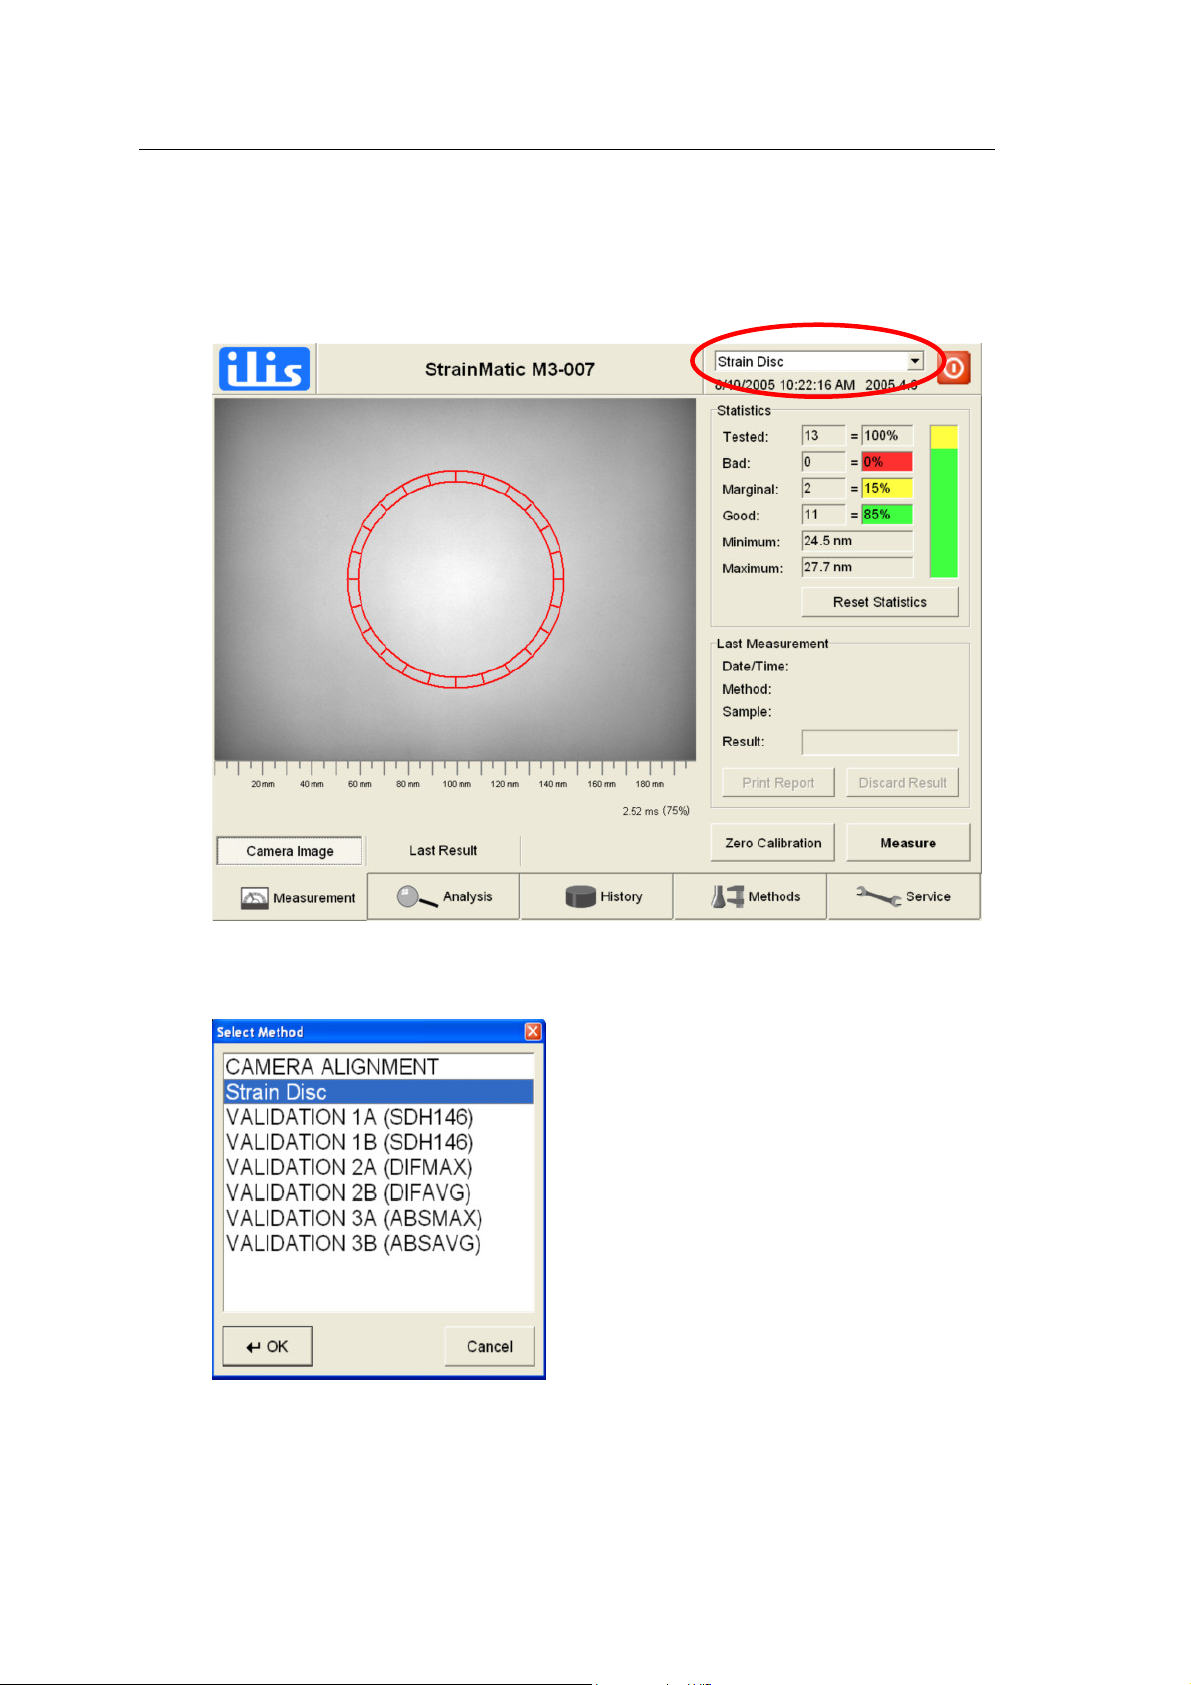
4.5 Selecting measuring methods
To activate a new measuring method for the measurement:
Click on the drop down list of measuring methods in the status bar:
The list of available measuring methods appears:
Select the appropriate measuring method from the list and confirm your selection
with OK.
The selected measuring method is displayed in the status bar.
This manual suits for next models
3
Table of contents
Popular Laboratory Equipment manuals by other brands


VERDER
VERDER Carbolite Gero HTMA 5/95 Installation, operation and maintenance instructions

Tuttnauer
Tuttnauer 1730EK Operation & maintenance manual

overhoff
overhoff 357RM Operation & maintenance manual

Rainin
Rainin GlassMaster GM-100 Operator instructions

AAG
AAG Solo user manual

Diesse
Diesse VES MATIC 5 installation guide

Millipore
Millipore Direct Detect user guide

YOKOGAWA
YOKOGAWA DL850E user manual

LumaSense technologies
LumaSense technologies MIKRON MCL640 manual

PHI
PHI VersaProbe Operations

Cardinal Health
Cardinal Health CAX1230LA Installation and operation manual

Horizon Fitness
Horizon Fitness FCSU-023 instruction manual