imes-icore ione scan User manual

User Manual
.com/imes-icore be

Small Scanner. Great Comfort.

1.
Introducing the ione scan Solution
1.1.
Introduction ...............................................................................................6
1.2
Indications supported ................................................................................6
1.3
Certification and compliance .....................................................................6
1.4
Regulatory .................................................................................................. 7
1.5
Intended Use..............................................................................................7
1.6
Classifications............................................................................................. 7
2.
What’s in the Box
3.
System Requirements and Specifications
3.1
System Specifications.................................................................................9
3.1.1
Scanner ...................................................................................................9
3.1.2
Scanning Process.....................................................................................9
3.1.3
Software & Lab Integration...................................................................10
3.2
Computer Requirements.........................................................................10
3.2.1
Required Software and Misc. . ..............................................................10
3.2.2
Required Hardware ...............................................................................10
3.3
Environment Conditions...........................................................................11
3.4
Power Input.............................................................................................. 11
3.5
Reusable Tips ........................................................................................... 11
3.6
Scanner – Base and Handpiece ................................................................11
4.
How to Connect & Set up the ione scan Solution
4.1
Setting Up and Connecting the ione scan ................................................12
4.2
ione scan Components Overview.............................................................14
4.3
Settings.....................................................................................................14
4.4
cloud storage............................................................................................16
5.
Operating the ione scan Solution
5.1 Getting Started .........................................................................................18
5.1.0
Communication with the Lab ................................................................19
5.1.1
Case Management Software Overview.................................................19
5.2 Indication workflows................................................................................23
5.2.1
Create new order
........................................................................................
24
5.3 Important things to know before scanning ..............................................26
5.4
Operating the scanner .............................................................................26
5.4.1
Scanning................................................................................................26
5.4.2
Mandibular and Maxillary Scanning......................................................27
5.4.3
Bite Alignment ......................................................................................28
5.4.4
Tip .........................................................................................................29
5.5
Scanning Tools..........................................................................................30

6.
Maintenance
6.1
Cleaning the Handpiece ...........................................................................31
6.2
Cleaning and Sterilization of Tip...............................................................31
6.3
Disposal ....................................................................................................33
6.4
Calibration................................................................................................33
7.
Safety Guidelines and Warnings
7.1
Warnings and Symbols.............................................................................33
7.2
General Guidelines...................................................................................34
7.3
General Warnings
...........................................................................................
34
7.3.1
System Modification .............................................................................34
7.3.2
Approved Software
.....................................................................................
34
7.3.3
Equipment Failure.................................................................................35
7.4
Mechanical Hazards .......................................................................................
35
7.4.1
Moving Parts .........................................................................................35
7.4.2
Dropped Equipment..............................................................................35
7.4.3
Base.......................................................................................................35
7.5
Electrical Safety .......................................................................................36
7.5.1
Electrical Shock .....................................................................................36
7.5.2
Stress on Cables ....................................................................................36
7.6
Eye Safety.................................................................................................36
7.7
Hygiene ....................................................................................................36
7.8
During Systems Operation
.............................................................................
37
7.9
Symbols on the ione scan and Transport Case.........................................38
8.
Support, Warranty and Repair Service
8.1
Support ....................................................................................................39
8.2
Standard Warranty...................................................................................39
8.3
Repair Service...........................................................................................39
8.4
Out of Warranty Repair Service ...............................................................40
8.5
Troubleshooting……………………………………………………………………………………40


Page 6
1.
Introducing the ione scan Solution
1.1 Introduction
Thank you for purchasing the ione scan solution from imes-icore.
The ione scan solution is designed and developed to produce high-quality digital
intraoral scans, or models, for dental restoration or analysis.
The ione scan solution is designed with you as a dentist and your patient in mind. The
scanner is lightweight, small and easy to use, enabling a fast, accurate scanning and
great patient experience. The Case management application is order management as
you know it and designed for easy and intuitive use. Enjoy your new intraoral scanner
solution!
1.2
Indications supported
ione scan can be used for the following indications:
·
Anatomic crowns
·
Copings
·
Provisional crowns
·
Anatomical pontics
·
Reduced pontics
·
Provisional pontics
·
Inlays/Onlays
·
Implant abutments
·
3-unit implant bridges
·
Up to 5-unitbridges
·
Orthodontic aligners
·
Nightguards
·
Splints
·
Retainers
·
Bleach trays
·
Sleep appliances
1.3
Certification and compliance
The system has been tested and conforms to the following standards:
•
IEC 60601-1, Medical electrical equipment - Part 1: General requirements for basic
safety and essential performance
•
IEC 60601-1-2, Medical electrical equipment - Part 1-2: General requirements for
basic safety and essential performance - Collateral Standard: Electromagnetic
disturbances
- Requirements and tests
•
IEC 62471, Photobiological safety of lamps and lamp systems

Page 7
CAUTION: Rx only - Federal law restricts this device to be sold by or on
the order of a Dentist.
WARNING: Unintended use of the system can result in physical injury
to the patient and operator, and damage to the system.
1.4
Regulatory
The ione scan is manufactured and marketed in accordance with US FDA
Regulations and EU Medical Device Directive 93-42-EEC.
1.5
Intended Use
The ione scan is an optical impression system. It is used to record the topographical
characteristics of teeth, dental impressions, or stone models for use in the computer-
aided design (CAD) and computer-aided manufacturing (CAM) of dental restorative
prosthetic devices.
1.6
Classifications
The ione scan system has the following classifications
•
Protection against electrical shock: Type B Applied Part
•
Protection against harmful ingress of water: Ordinary equipment (IPX0)
•
Safety of application in the presence of a flammable anesthetic material with air
or with oxygen or nitrous oxide: Equipment not suitable for use in the presence of a
flammable anesthetic mixture with air or with oxygen or nitrous oxide.

Page 8
2.
What’s in a Box
The ione scan system includes the following
Name Part Number
ione scan System (Inkl. 3 spitzen) IOS-FP-71-001
USB 3.0 Cabel IOS-CP-00-043
AC/DC Power Adapter IOS-CP-00-088
Save the Box: It is highly recommended that you store the box in a safe place and do
not throw it away. The box is optimal for any necessary transportation or shipment
of the ione scan.

Page 9
3.
System Requirements and Specifications
3.1
System Specifications
3.1.1
Scanner
Scanner Type Hand-held (chairside) scanner that creates
optical impressions for dental restorations.
Design Compact, lightweight, ergonomic – designed
to be operated with little physical effort.
Dimensions Base Size: L 306mm, W 98mm, H 72mm
Dimensions Scanner
Weight: 150 grams
Size: L 256mm, W 43mm, H 43mm
Power Requirement
DC5.0V / 4A (Power supply included)
Scanner Tip
Reusable, sterilize using steam autoclave
Heating Element
Prevents formation of fog on the optics
Acquisition Method Intraoral camera – active stereo imaging
Color Scanning
24-bit (8-bit per channel)
3.1.2
Scanning Process
Tooth Preparation
No powder or spray required
Scanning Principle
Continuously scanning and accumulating
(stitching) depth and color data
Distance Scanner - Tooth
0 – 12mm
Possible contact duration by
operator
10 min ≤t Note: May vary with hardware
configuration
Operator Accessible Part Handpiece
Possible contact duration by patient
10 min ≤ t
Patient accessible part
(Type B Applied Part)
Tip
Computer – Scanner Interface USB 3.0

Page 10
NOTE: AMD GPU’s are NOT compatible with the ione scan. Not
meeting minimum hardware requirements will affect the
performance of the scanner.
3.1.3
Software & Lab Integration
Output File Format
STL, PLY, OBJ
Compatibility with CAD/CAM Systems Open Architecture Output format STL,
PLY, OBJ Compatible with most Dental
CAD systems
Case Management application Interface
Touchscreen support
3.2
Computer Requirements
3.2.1
Required
Software and Misc.
Operating System Windows 10 (Excluding Windows 10 S,
now defunct) Administrative rights
required
Disk Space
100 GB of free disk space or greater
Ports 1 x USB 3.0 port (SuperSpeed) 2 x USB
port
3.2.2
Required Hardware
CPU Type
Intel i7 - 4 Cores or greater (e.g. i7 8700)
CPU Clock
2.8 GHz clock or greater
Memory
16 GB of RAM or greater (DDR4 or better)
GPU NVIDIA GeForce Graphics Processor000
Series (GTX): 1070 or Greater 1000 Series
(GTX): 1070 or greater - At least 6 GB
video memory
2000 Series (RTX): 2060 or greater - At
least 6 GB videomemory

Page 11
3.3
Environment Conditions
Operating Temperature
10°C ~ 40°C
Operating Relative Humidity 10% ~ 80% (non-condensing)
Storage Temperature
- 20°C ~ 60°C
Storage Relative Humidity 10% ~ 80% (non-condensing) Indoor
use only
Installation Category
1
Pollution Degree
2
Ingress of Liquids
IPXO
Protective Class Class IIIb
Overvoltage category I (Supplied from output DC source, max.
5 V. dc, 600 mA) of notebook or non-me-
dical grade PC certified by IEC60950-1
Max. working condition Continuous cycles with image
capture and transmission from/to
Notebook or non-medical grade PC.
Other possible accessories
(IEC60601-1 3rd, Cl. 16)
Notebook with AC/DC Adapter.
Equipment Maintenance
No user maintenance is required, and
no user service is allowed. Please
contact technical support if there is a
problem.
Cleaning Do not try to clean the inside of the de-
vice. Refer to Chapter 6 for cleaning and
sterilization.
3.4
Power Input
The power adapter input is 5V DC, 100-240V AC, 50-60Hz.
3.5
Reusable Tips
Scanner tip is autoclavable up to 50 times in a steam autoclave. See chapter 6.
3.6
Scanner – Base and Handpiece
The scanner body consists of the Base and Handpiece, which are connected by a
flexible, non-detachable cable.
Page 12
NOTE: Using a USB cable other than the one provided may result in
system malfunction or reduced performance.
4.
How to Connect & Set up the ione scan
Solution
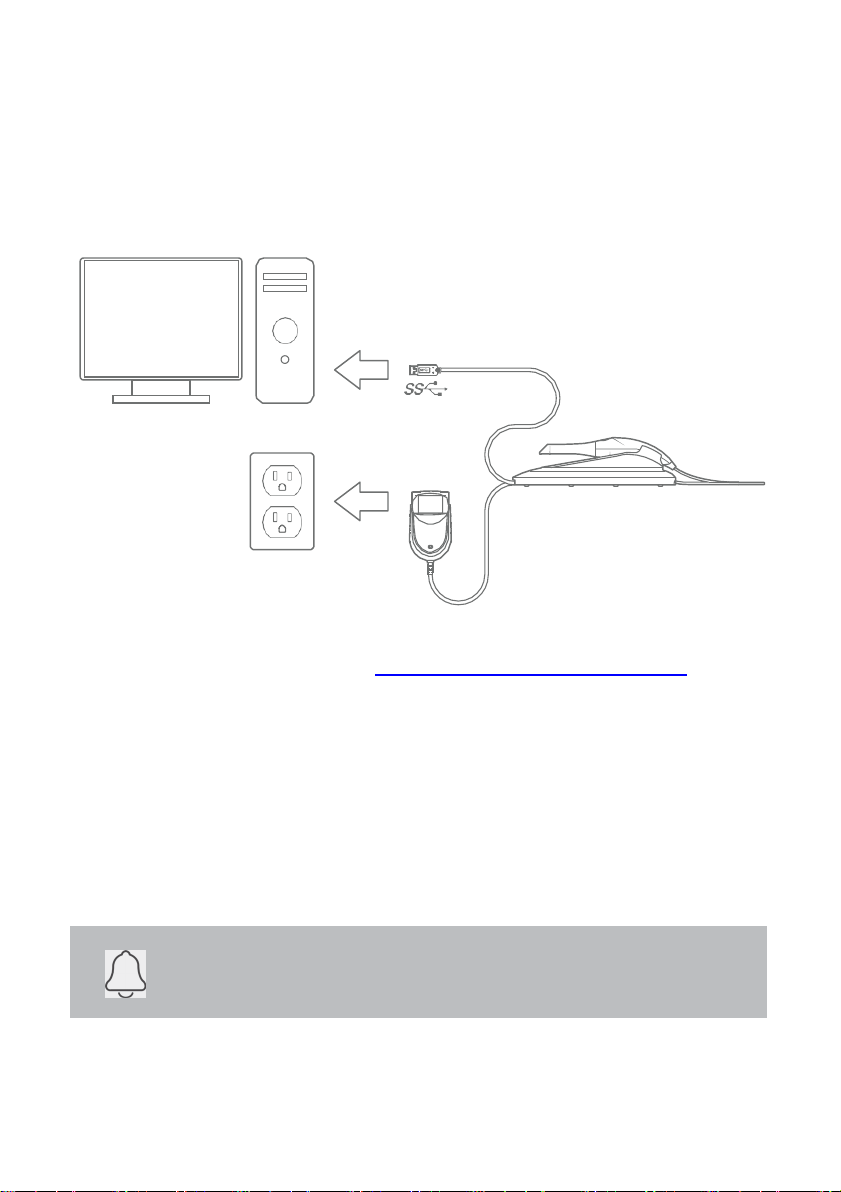
4.1
Setting up and Connecting the ione scan
Install
the system according to the following steps
You can download the software from https://www.imes-icore.com/support/
Step 1: Place the base on a flat, stable surface and place the ione scan handpiece
securely in its base.
Step 2: Connect the AC/DC power adapter cable to the Base; the connector socket
is located underneath the Base.
Step 3: Connect the provided USB 3.0 cable to the Base; the connector socket is
located underneath the Base.
Step 4: Connect the other end of the USB cable to the computer.

Page 13
WARNING: Unsuitable Installation sites
•
Locations with excessive humidity ordust
•
Locations subject to high temperature
•
Locations subject to shaking orvibration
•
Locations exposed to considerable electrical ormagnetic
noise, or other forms of electromagnetic energy
Step 5: Connect the AC/DC power adapter to a power outlet.
NOTE: It is strongly recommended to plug the USB cable to a
USB port located at the back of the computer; not doing so may
result in system malfunction or reduced performance.
Make sure to use a USB port that is compatible with USB 3.0
(SuperSpeed), usually indicated by the following symbol:
not doing so may result system malfunction or reduced
performance.
If using a laptop computer, make sure the power supply is
connected to an outlet and not running on battery power.

Page 14
4.2
ione scan Components Review
Please review the ione scan features shown in this section. This will help you locate the
features when they are described in sections 5-7.
1.
The base and scanner
2.
Tip
3.
Scan Button
4.
Handpiece
5.
USB 3.0 Cable
6.
AC/DC Power Adapter
4.3
Settings
General:
•
Language, Currently only English.
•
3D Output format can be STL,PLY, OBJ.
•
Picture formats can be PNG,JPG.
•
Preferred start page can be chosen to be Recent Patients or Recent Cases.
•
The workflow Fast Scan can be enabled if Patient or Case is not needed.
•
View Software version (Copy function to the right)
•
View Scanning module version (Copy function to the right)
•
Manual software Update check. Automatic check is done at every launch.
•
Link to User manual and to imes-icore support homepage.
6
1
3
2
4
5
6
1
3
2
4
5

Page 15
System
Under system the option to export
or import the patient database.
Sounds
Select to use the sound during
scanning or not. Pre select volume
and select between different sound
effects.
Users
Add, edit and delete users with E-
mail name and picture Also
Passwords can be added on the
user.
Lab Connections
Setup and select connections with
Labs. Also setup the preferred Lab
as default.
Order Form
Select Tooth numbering system.
Shade system can be selected.
Patient names can be hidden in
case needed. New materials can be
imported and exported. Also
special materials can be created
and edited.
Page 16
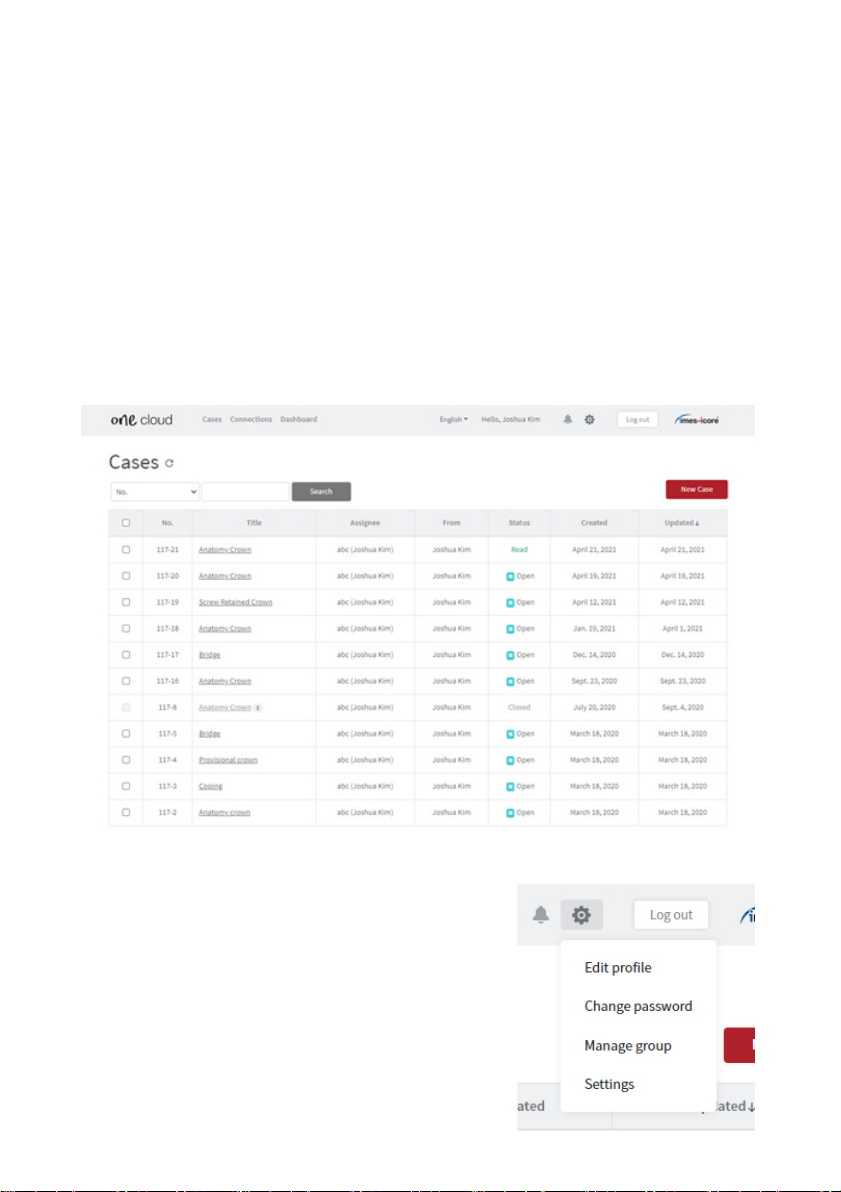
4.4
Cloud Storage
One cloud is the file transfer cloud supplied with your one system. It can be found on
onecloud.imes-icore.com
Labs and users create an account and share the files free via the cloud. Logging in will
give an overview of the cases created by the user or cases sent to the user with current
status.
The interface supports the following languages: English, Danish, German, Spanish,
French, Chinese, Korean
Connectionswith Labs and dentists is managed by clicking the connections button
Options for the Cloud
1.
Edit Profile enables to edit name, mail and soon.
2.
Possibility to Changepassword.
3.
Groups can becreated.
4.
Settings can change the look of the Case view.
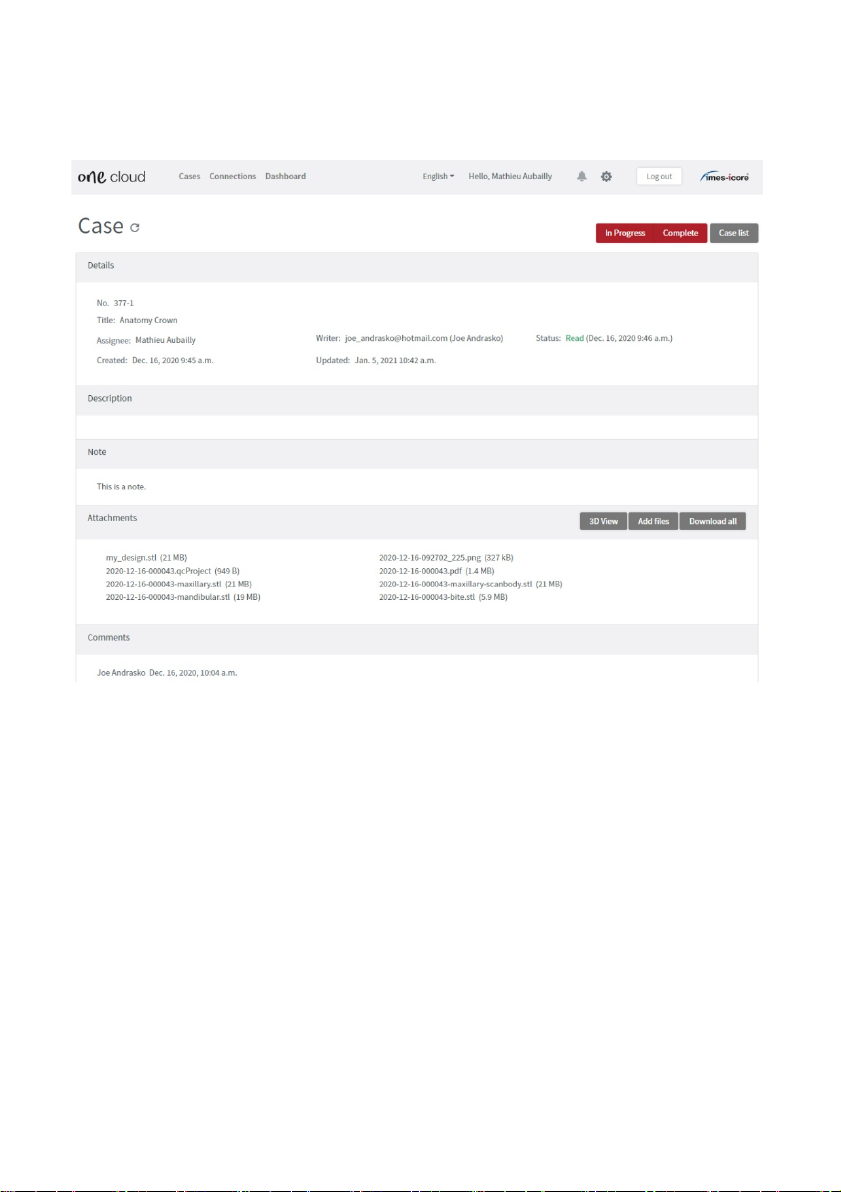
Page 17
Opening a case from the list will show all the information needed. Possibilities for
changing status, looking at scans in 3D Viewer, downloading files and adding files are
found here.

Page 18
5.
Operating the ione scan Solutions
5.1
Getting Started
Sign in and Creating a new account
A new account needs to be created before it can be linked to a user in the software. On
onecloud.imes-icore.com click “Create New Account”. Fill in the required fields
(marked with a red *) and click“Create”.
A mail will be sent to confirm the mail address. Click the confirmation link and you are
ready to log in to the cloud.
.
Page 19
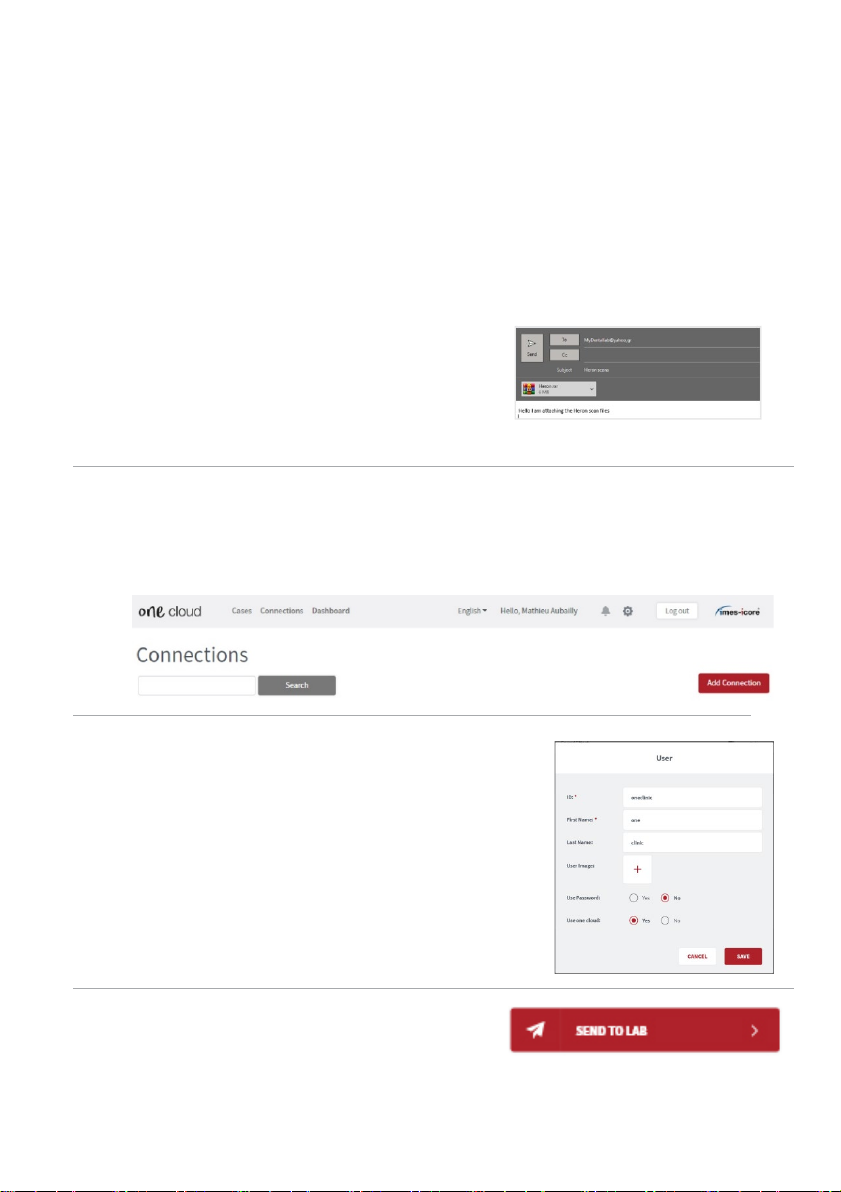
5.1.0
Communication with the Lab
The Case Management application, one clinic, contains two built-in methods for
communicating with the lab. You can either:
1.
Access the scans directly by clicking the “export files” tab, select desired files
and drag and drop in your desired platform.
2.
Use one cloud
1a.
Share
files directly by locating the file in
the “open in Explorer” tab and copying
the file into
Dropbox, wetransfer.com,
email
etc.
2b.
After you have created your account you
can now connect with a lab by going to
connections menu and adding connection.
2c.
Add your one cloud connection to settings,
your
connected labs will now appear as
options.
2d.
Send the cases via one cloud in the finalize
page.

Page 20
Login screen
User login page is the first page when the software is started. Select the user and type
in password if the user is set up with that.
5.1.1
Case Management Software Overview
Start Screen Patients
When logged in you will have Patients or Cases as default view (selected in settings).
Select an already created patient, in the left side of the screen, to view and/or create
new cases for the patient.
Create new Patient or case by using the buttons in the main part of the screen. Settings
are found in the upper right corner by clicking the gearwheel. Clicking on the user in
the upper right corner will give the option to log out.
Table of contents
Other imes-icore Medical Equipment manuals

Popular Medical Equipment manuals by other brands


Getinge
Getinge Arjohuntleigh Nimbus 3 Professional Instructions for use

Mettler Electronics
Mettler Electronics Sonicator 730 Maintenance manual

Pressalit Care
Pressalit Care R1100 Mounting instruction

Denas MS
Denas MS DENAS-T operating manual

bort medical
bort medical ActiveColor quick guide

AccuVein
AccuVein AV400 user manual


