IMMI Driver Knee Airbag User manual

18881 IMMI Way
Westfield, IN 46074 USA
T: 866.765.5835
F: 317.896.2142
imminet.com
Driver Knee Airbag
Installation
1
Important Facts
PLEASE READ THIS ENTIRE GUIDE BEFORE
INSTALLING THE DRIVER KNEE AIRBAG.
1. The driver knee airbag is to be used in a specific vehicle and
seating position. Check the part number on the module to ensure
correct application.
2. Always follow the vehicle manufacturer’s installation guide. Use
this guide in addition to the vehicle manufacturer’s guide.
3. DO NOT PUNCTURE, DRILL OR APPLY HEAT to the driver knee
airbag. This may result in accidental knee airbag deployment
which could cause serious injury or death.
4. DO NOT MOUNT ANYTHING NEAR the driver knee airbag that
could interfere with the inflation of the airbag. Obstructions to the
airbag deployment could reduce the airbag’s effectiveness.
5. The driver knee airbag is only designed to activate once. If the
driver knee airbag is activated or damaged, unit must be replaced
by authorized personnel.
DO NOT APPLY HEAT
Temperatures over 150° C (257° F) could cause the unit to deploy. The
deploying knee airbag could cause serious injury or death.
Stowed
Deployed
Driver knee airbag location
What is the driver knee airbag and how does it work?
The driver knee airbag is a part of the 4Front frontal collision protection system by IMMI -- the leading provider of advanced safety systems for fire
apparatus. During a frontal crash, the knee airbag is inflated. The inflated knee airbag provides a cushion for the driver’s knees during a frontal
impact.
DISCONNECT THE BATTERY
With battery disconnect in the OFF position,
disconnect and isolate the battery negative cable before
beginning knee airbag installation. Allow system capacitor to
discharge for two minutes before beginning installation. Failure
to disconnect the battery could result in accidental airbag
deployment and could cause serious injury or death.
WARNING
WARNING
2
©2015 IMMI. All rights reserved.
PN926280 rev. 02 4830P
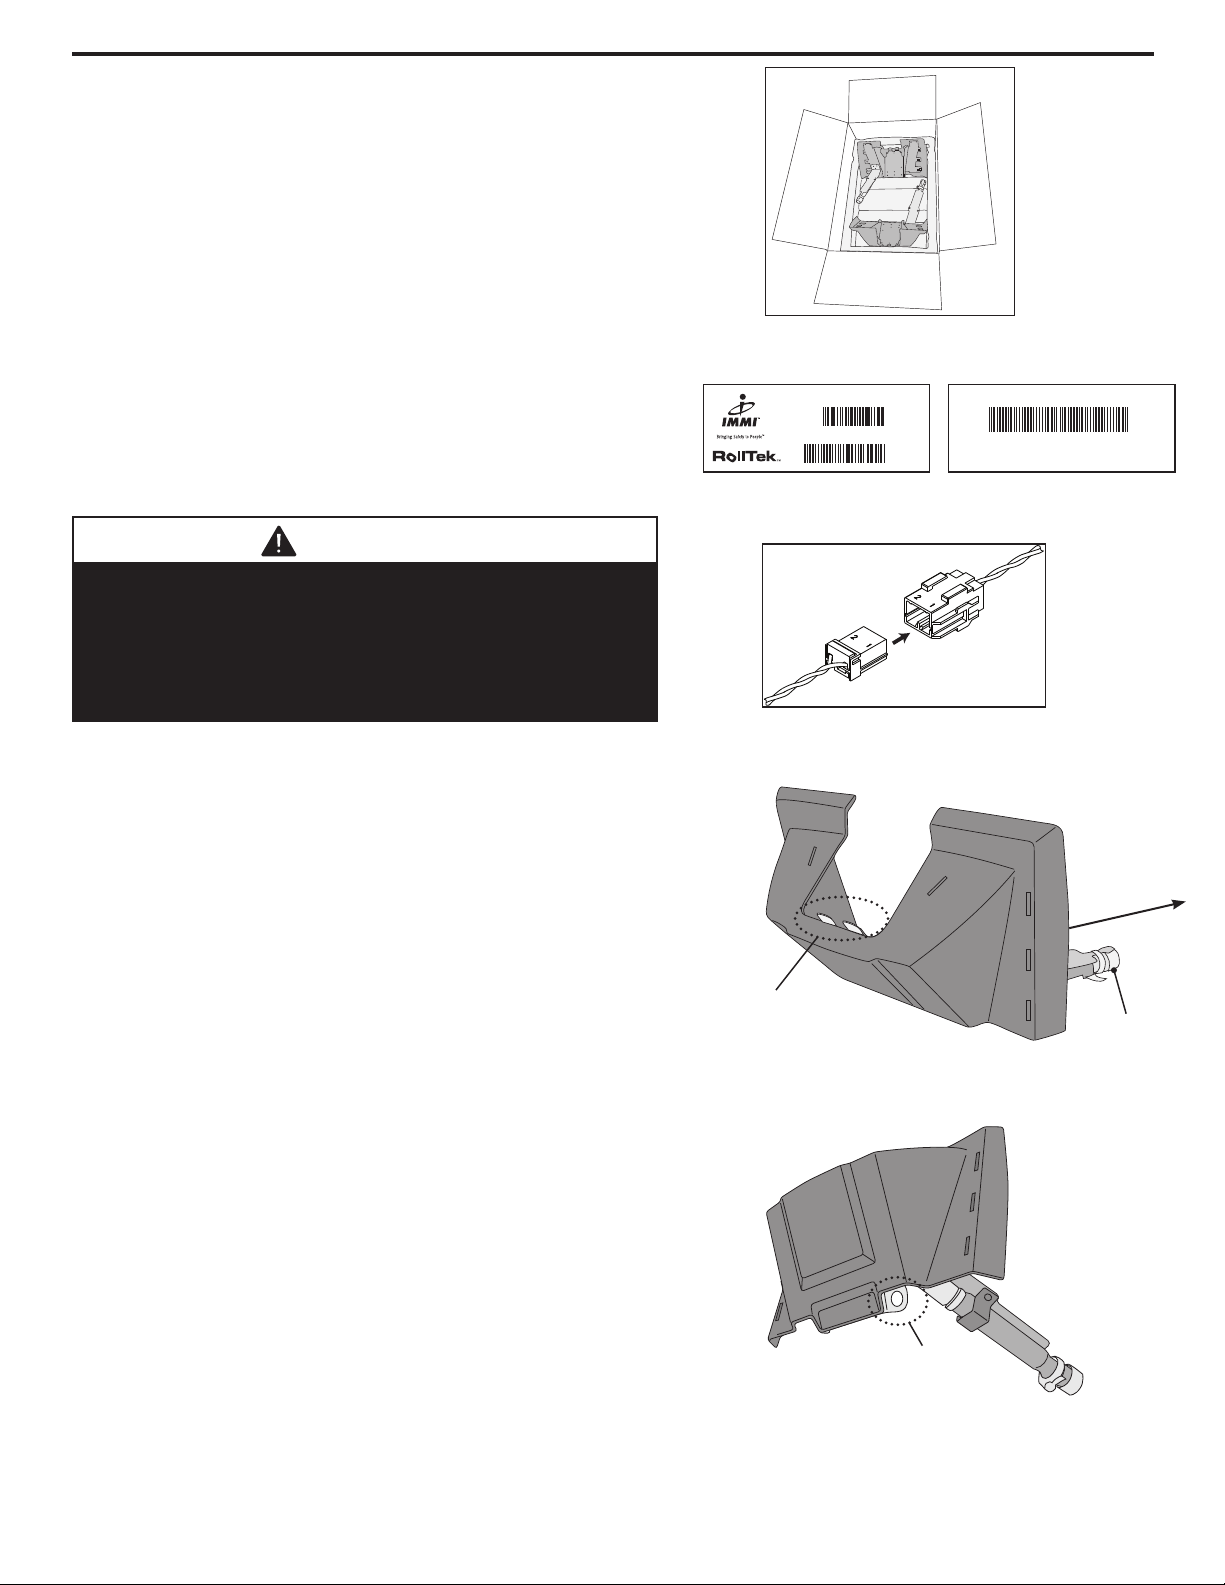
Unpacking the driver knee airbag
1. Remove unit from main carton. There are 2 units per carton.
See Figure 1.
2. If parts need to be returned, they must be returned in the original
packaging.
Product Identification
1. Locate the product identification labels on driver knee airbag system
(A103303). See Figure 2.
2. Verify your unit is the proper part number for your configuration.
3. Scan or manually record unit serial number located on the product
identification label. Retain this record for 20 years.
Electrical Connection, Installation, and Test
1. With the vehicle battery OFF, make connection between the vehicle
wiring harness and the driver knee airbag. See Figure 3.
2. Verify that the electrical connectors are latched together.
3. Position the driver knee airbag assembly with the inflator located at the
bottom right corner and positioned toward the instrument panel
(Figure 4).
4. Interlock the center upper tabs (Figure 4) to the existing steering column
bracketry; assuring that the tabs of the airbag assembly are located
behind the steering column brackets. Align the two holes at the bottom
of the airbag assembly (Figure 5) with the two 3/8-16 J-nuts which are
attached to the steering column bracketry.
5. Secure the driver knee airbag to the steering column brackets with two
3/8-16 x 3/4 long socket head cap screws, torqued to 27-30 lbf.
6. EXIT VEHICLE AND ENSURE NO ONE IS IN VEHICLE AND EVERYONE IS
CLEAR OF OCCUPANT PROTECTIVE DEVICES.
7. After verifying that no one is in vehicle, connect the battery negative
terminal cable. Turn the battery disconnect switch to the ON position.
8. Lower vehicle side window and turn ignition key/vehicle switch to ON
position.
9. The warning light on the dashboard should illuminate and then go out
within 6-10 seconds.
Figure 2
Figure 1
Figure 3
DRIVER KAB
DISCONNECT THE BATTERY
With battery disconnect in the OFF position, disconnect and isolate the
battery negative cable before beginning driver knee airbag installation.
Allow system capacitor to discharge to two minutes before beginning
installation. Failure to disconnect the battery could result in accidental
airbag deployment and could cause serious injury or death.
WARNING
Figure 4
Center Upper
Tabs Inflator
Toward
instrument
panel
Figure 5
Align with 3/8-16
J-nuts
Table of contents
Other IMMI Automobile Accessories manuals


Popular Automobile Accessories manuals by other brands

Havis-Shields
Havis-Shields C-D2300-FL1 Specification sheet

Waeco
Waeco PerfectView LCD250 Installation and operating manual

Ranger design
Ranger design 1525-FTL installation guide

GEV
GEV KIT 5 Assembly instructions

ROMANO
ROMANO MP48 installation manual

Westfalia
Westfalia 314 386 300 107 Installation and operating manual

Monster
Monster iCruze MPC FX IM-NIS1 user guide

Dakota Digital
Dakota Digital LED Tail Lights for 1969 Firebird LAT-NR291 installation instructions

B&G electronics
B&G electronics PW-150 Installation and operation manual

PAC
PAC BCI-CH41 user manual

ClipperCreek
ClipperCreek PEDESTAL installation guide

Steinhof
Steinhof F-139 FITTING AND OPERATION MANUAL


