IMMI S4S User manual

What is the S4S?
S4S stands for Suspension Seat Safety System.
How does it work?
In the event of a side roll, the S4S unit is deployed by the master
roll sensor, pretensioning the seat belt, then pulling the seat to
its lowest position. The S4S is only effective when you wear your
seat belt. ALWAYS WEAR YOUR SEAT BELT.
Important Facts
PLEASE READ THIS ENTIRE GUIDE BEFORE STARTING TO
INSTALL S4S SYSTEM.
1. TheS4Sistobeusedinaspecicvehicleapplicationandseating
position,andonlywithaspecicmodelseat.
2. Always follow the vehicle manufacturer’s installation guide. Use this
installation guide in addition to the vehicle manufacturer’s guide.
3. Always disconnect vehicle batteries and turn off vehicle switch
before accessing electrical connection.
4. DO NOT PUNCTURE DRILL OR APPLY HEAT TO S4S.
5. DO NOT MOUNT ANYTHING NEAR THE S4S that could inter-
fere with travel path of the device.
6. The S4S is only designed to activate once. If the system is activated
or is damaged, unit must be replaced by authorized personnel.
Please Note
Thisinformationisnotallinclusiveandwillnotcovereveryseat,pedestalandvehicleconguration.Installersshallhavesole
responsibility for proper selection, application, installation and testing of the seat belt in accordance with FMVSS207, 208 and 210
asamended,oranyotherapplicableoradditionalspecicationsuchasforuseoutsidetheU.S.,andforprovidinginstructionstothe
ultimate user concerning proper use and periodic maintenance of the seat belts.
S4S Unit
Installation Instructions
18881 IMMI Way
Westeld,IN46074
U.S.A
imminet.com
Before After
DO NOT APPLY HEAT
Temperatures over 85° C (185° F) could cause the
unit to deploy. The deploying S4S could cause
injury.
HAZARDOUS OPERATION
Applying power prematurely could deploy occupant protective
devices, causing serious injury to installer. Disconnect and tag out
power. Always make connections to Roll Sensor last. Keep clear of
protective devices when rst applying power.
1
INSTALLATION
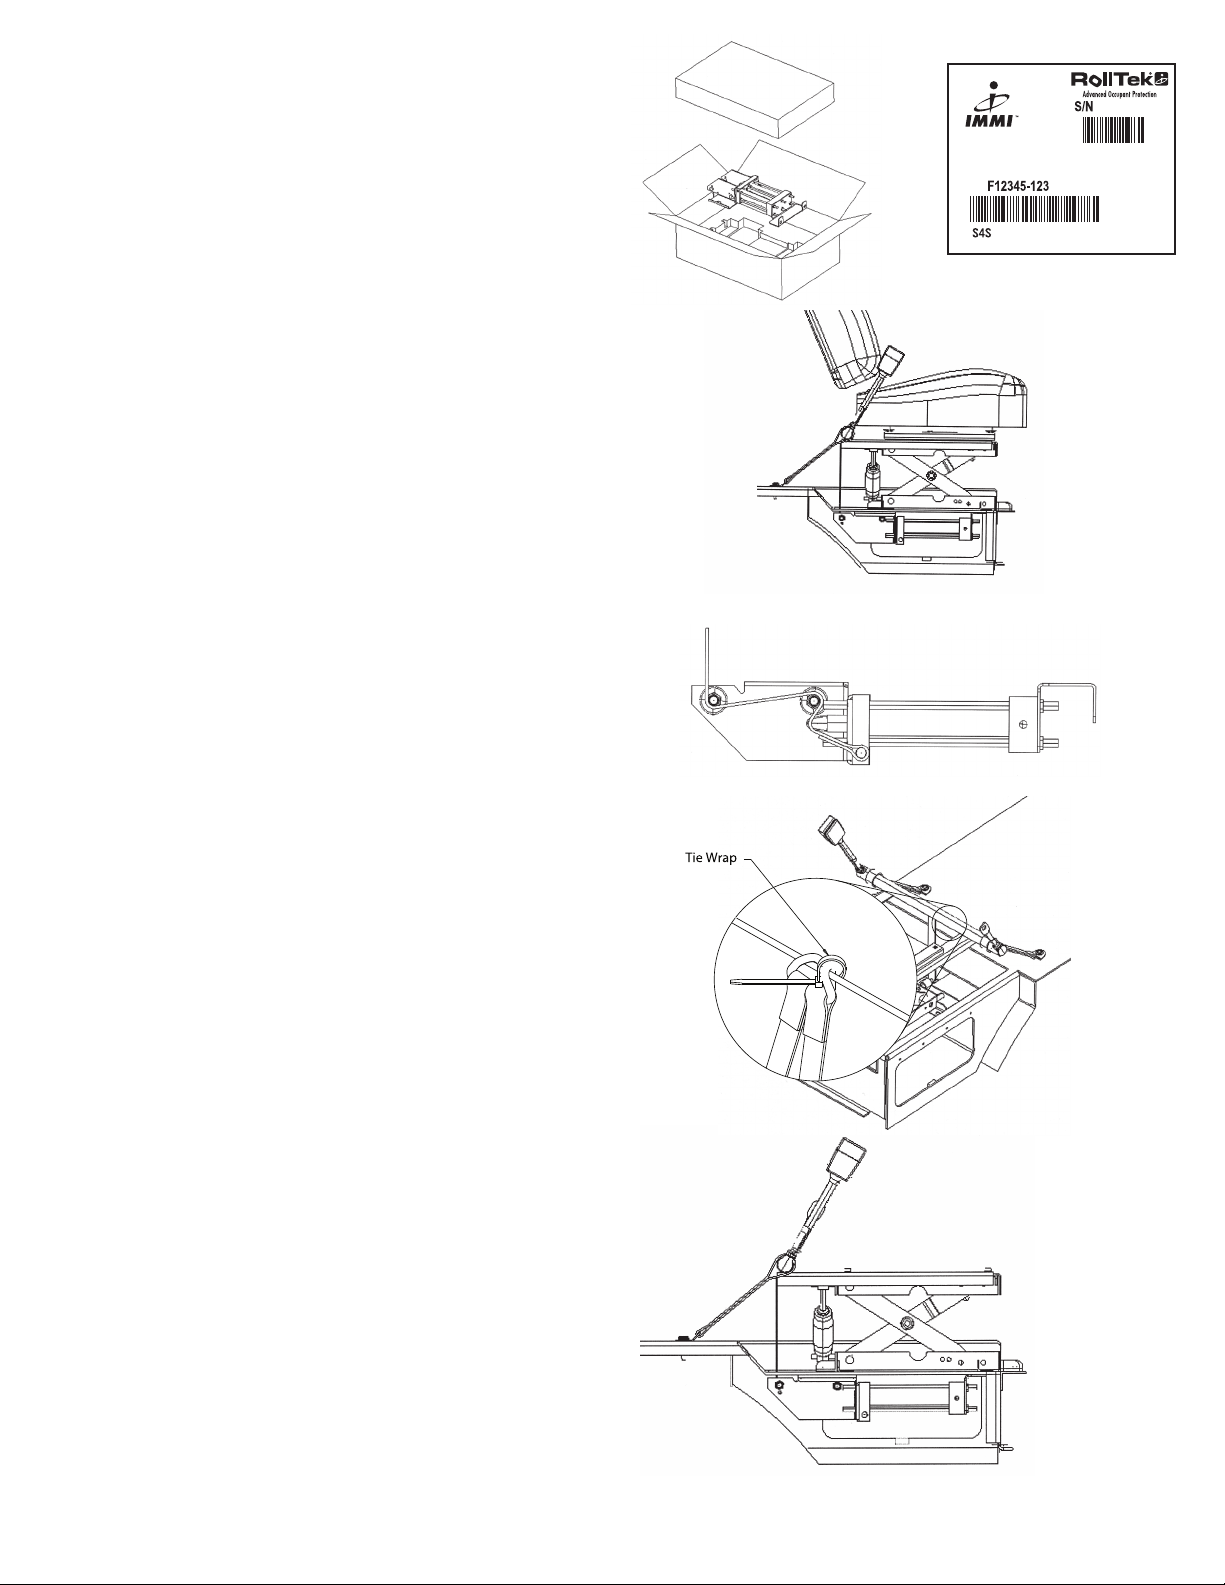
Unpacking the S4S Unit (FIGURE 1)
1. Remove unit from the main carton. There is 1 unit per carton.
2. If parts need to be returned, they must be returned in the original
packaging.
Product Identication
1. Locateproductidenticationlabel.Thisislocatedonthetopsurfaceof
the unit. See FIGURE 2.
2. Verifyyourunitisthepropersystemforyourconguration.
Mounting the S4S Unit to Vehicle Floor
1. Use only pre-drilled mounting holes.
2. Metal to metal contact is mandatory on all mounting points.
3. Position the unit in place. See FIGURE 3.
4. Makesurewiringharnessisfreeandnotpinched.DONOTMAKE
WIRINGHARNESSCONNECTIONTOUNITATTHISTIME.
5. Positiontheunitonthecaboorandaligntheholesintheoorwiththe
4 mounting holes on the unit. Use only the bolts provided.
6. Handstartall4boltsintotheirmountingholes.UseaTorxT-50,tighten
bolts.
7. Torque each mounting bolt (4) on S4S to 35 to 40 ft.-lbs.
ICP (InterConnect Point Bar)/Tether Connection
1. Make sure web tethers are routed per diagram on S4S, and not twisted,
pinched or damaged before unit is torqued. See FIGURE 4.
2. Remove rubber band from tether-hook assembly and pull tether taut
to check for twists, pinches or damage. Make sure hook is oriented as
shown.
3. Make sure seat is fully lowered.
4. ConnecthookintoICPcableasshown.See FIGURE 5.
5. Place two tie wraps (supplied) around hook and cable as shown in detail
in Figure 5 and pull tightly. The tie-wraps assures hook maintains
engagement with the cable.
6. Install seat belt. Reference the Belt & ADM Installation Instructions.
Seat Tether
1. Position SEAT in lowest position. See FIGURE 6.
2. Pull tether tight and position end bracket over pre-drilled holes behind
seat.
3. Make sure tethers are not twisted.
4. Handthreadboltsintoholes.
5. Torque bolts to 35-40 lb.-ft.
Electrical Connection and Test
1. Ensure battery switch is OFF.
2. Make connection between cab wiring harness and S4S.
3. Verify that plug and connector are latched together.
Important Final System Inspection
1. CheckICPmountingonbothsidesoftheseat.
2. Checkforproperbuckleangle.Buckle’scableshouldnotdroop
or be kinked.
3. Checkshoulderloopand/orseatbeltheightadjuster(optional)forfull
rangeofadjustment.
4. Inspect for twisting of seat belt.
5. Checkbuckleforproperlatching.
6. Checkforinterferences.Seatbeltmustfullyretract.
©2015IMMIAllrightsreserved.PN80271_Rev0112/152358P
Figure 1
Figure 2
Figure 3
Figure 4
Figure 5
Figure 6
Seat not shown for clarity
2
Table of contents
Other IMMI Automobile Accessories manuals


Popular Automobile Accessories manuals by other brands


ULTIMATE SPEED
ULTIMATE SPEED 279746 Assembly and Safety Advice

SSV Works
SSV Works DF-F65 manual

ULTIMATE SPEED
ULTIMATE SPEED CARBON Assembly and Safety Advice

Witter
Witter F174 Fitting instructions

WeatherTech
WeatherTech No-Drill installation instructions

TAUBENREUTHER
TAUBENREUTHER 1-336050 Installation instruction