manuals.online logo
Brands
  1. Home
  2. •
  3. Brands
  4. •
  5. GEV
  6. •
  7. Automobile Accessories
  8. •
  9. GEV KIT 5 User manual

GEV KIT 5 User manual

KIT 5
ISTRUZIONI DI MONTAGGIO
ASSEMBLY INSTRUCTIONS
INSTRUCTIONS POUR L’ASSEMBLAGE
MONTAGEANWEISUNGEN
INSTRUCCIONES PARA EL MONTAJE
MONTERINGS VEJLEDNING
A
I
È consigliabile montare il portatutto con l’aiuto
di una persona affinché le brugole siano avvitate
progressivamente con circa lo stesso numero di
giri.
-
It is advisable to assemble the roof rack with the
help of another person, so that screws will be
progressively screwed down with about the same
number of turnings.
F
On conseille d’assembler le porte charge à l’aide
d’une autre personne ainsi que les vis soient
vissées progressivement avec à peu près le même
nombre de tours.
D
Es ist ratsam, den Autodach-Gepäckträger mit
Hilfe einer anderen Person zu montieren, damit
die Schrauben schrittweise mit der gleichen
Anzahl von Drehungen angeschraubt werden.
e
Es preferible que las barras sean montadas por
dos personas para que los tornillos
sean atornillados progresivamente con
aproximadamente el mismo número de vueltas
)
Det anbefales at samle systemet med hjælp fra
en anden person, således at alle skruer bliver
spændt ens og på samme tid.
I
Inserire le staffe nella barra “BASE”. Inserire la vite facendo in modo che la parte terminale della barra coincida con la lettera indicata nella
Tabella di adattabilità. (Esempio nel disegno le lettere sono G + G)
.
-
Insert the stirrups in the “base” bar. Insert the screw so that the terminal part of the bar coincides with the letter shown on the Adaptability list
(ex. in the drawing the letters shown are G + G).
F
Insérer les étriers sur la barre “base”. Insérer la vis ainsi que la partie terminale de la barre coincide avec la lettre indiquée sur la liste
d’affectation (ex.: dans le dessin les lettres indiquées sont G + G).
D
Setzen Sie die Bügel in die Montage-Stange ein. Platzieren Sie die Schrauben und ziehen Sie die Stange mit dem Bügel an, sobald
der Buchstabe, der auf dem Bügel erscheint, übereinstimmt mit dem auf der Liste zur Anpassung. Beispiel: Bei der danach folgenden
Zeichnung erscheint der Buchstabe G auf einer Seite und G auf der anderen Seite.
E
Poner las abrazaderas en la barra “base”. Poner los tornillos y hacerlo de manera que la parte terminal de la barra corresponda con la letra
indicada en la lista de adaptabilidad. (por ejemplo: en el dibujo las letras son G + G).
)
Indsæt adapterkittet i lastholderstængerne. Monter skruerne og fastspænd lastholderstængerne til lastholderkittet når bogstavet som er vist på
lastholderkittet er sammenfaldende med det som er vist i den medfølgende kompatibilitets liste. For eksempel: i den nedenstående tegning er
det viste bogstav G på den ene side og G på den anden side.
CONTENUTO DEL KIT - CONTENTS OF THE KIT - CONTENU DU KIT
INHALT DES MONTAGE-SETS - CONTENIDO DEL KIT - INDHOLD AF SAMLESÆTTET
KIT
MonTAge-SeT
SAMleSæT
KIT
MonTAge-SeT
SAMleSæT
G F E D C B A
A B C D E F G G F E D C B A
A B C D E F G
BArrA “BASe” - “BASe” BAr -
BArre “BASe” - grundAuSSTATTung -
BArrA “BASe” - lASTholderSTænger
I
Fare scorrere i terminali in plastica sulle
estremità della barra e chiudere.
-
Move the plastic terminal parts to the
extremity of the bar and lock.
F
Déplacer les parties terminales en plastique
jusqu’à extrémité des barres et serrer.
D
Bringen Sie die Kunststoffendstücke an
den Stangenenden an und rasten Sie diese
ein.
e
Mover los terminales de plástico hasta los
extremos de las barras y cerrar.
)
Flyt plastik enderne til det yderste punkt på
lastholderstængerne og luk dem.
A
A
A
AAA A
A
I
Montare le 4 staffe A, inserire la brugola
con il dado e avvitare.
-
Assemble the 4 stirrups A, insert screw and
nut and screw down.
F
Assembler les 4 étriers A, insérer les vis avec
le dé et visser.
D
Setzen Sie 4 Bügel Azusammen, fügen Sie
die Schrauben und Muttern ein und ziehen
Sie die Schrauben an.
e
Montar las 4 bridas A, insertar tornillos y
tuercas y atornillar.
)
De 4 lastholderbeslag A, skrue og møtrik
monteres og skrues fast.
I
ATTenZIone
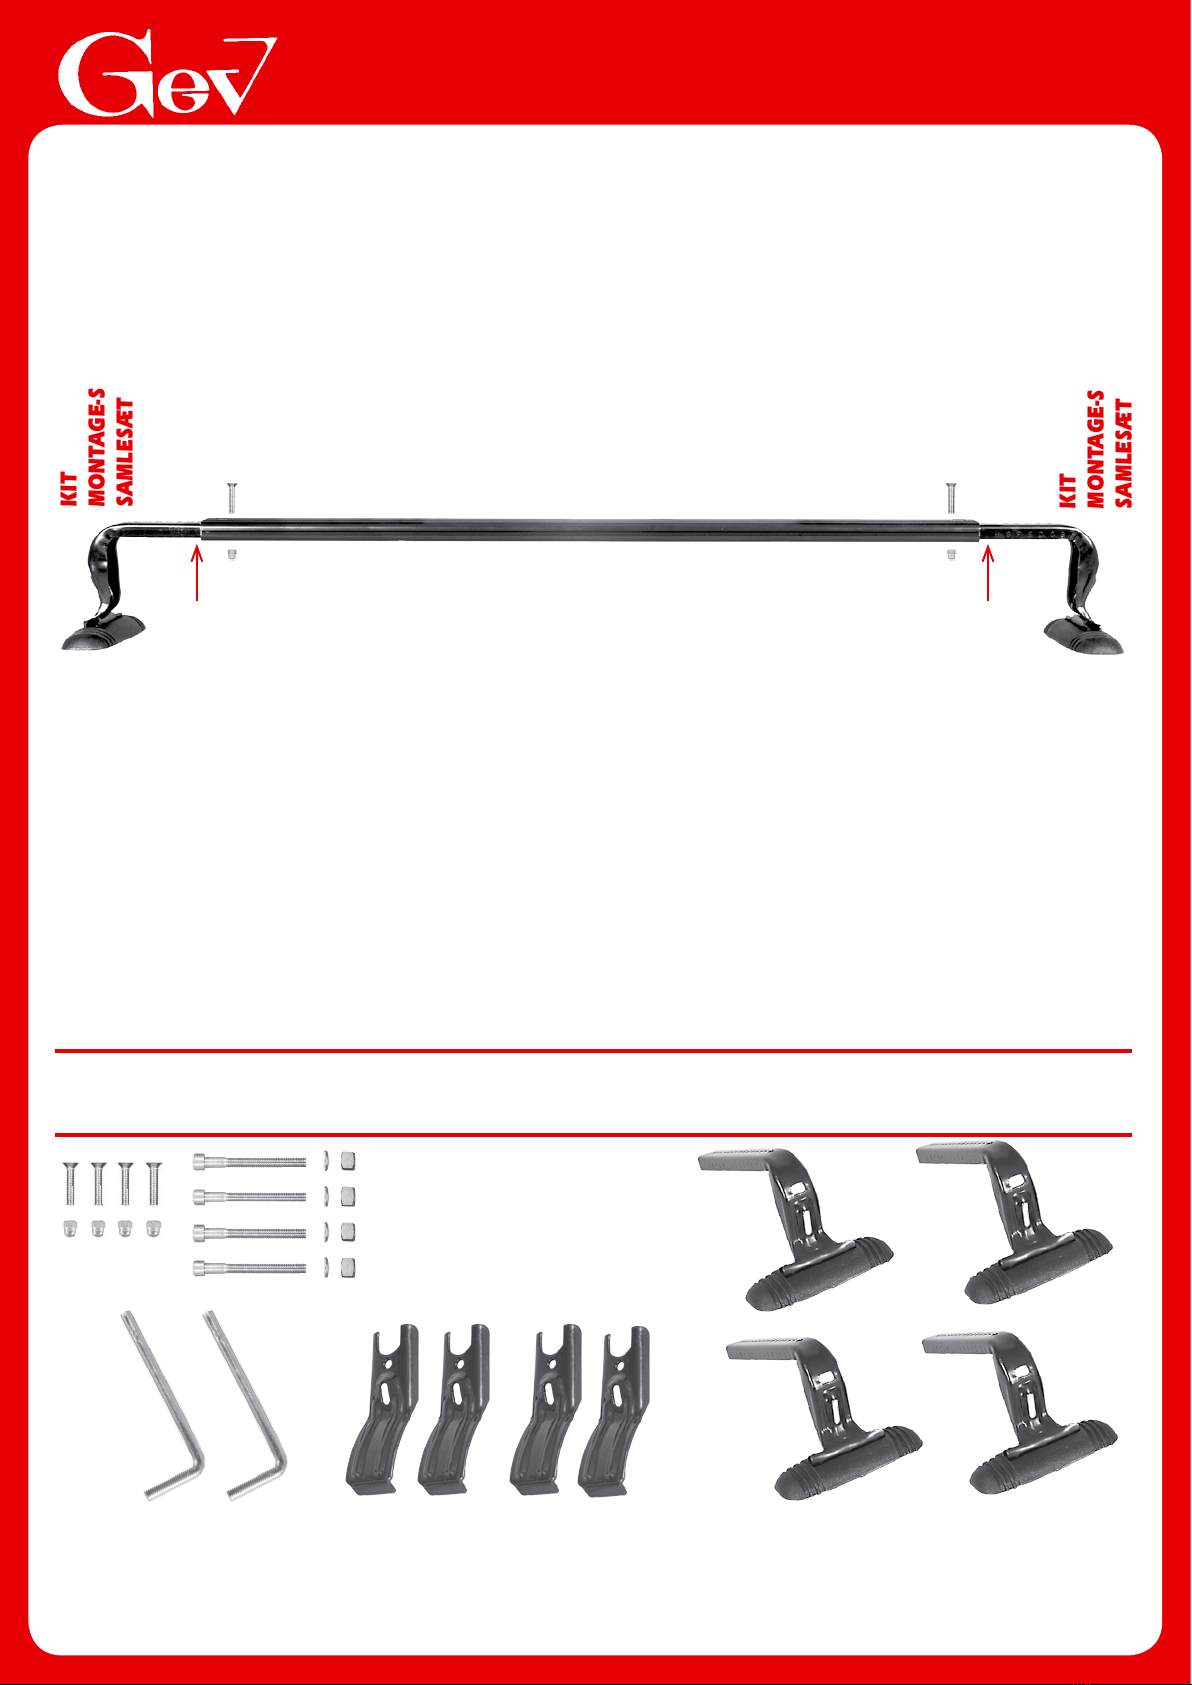
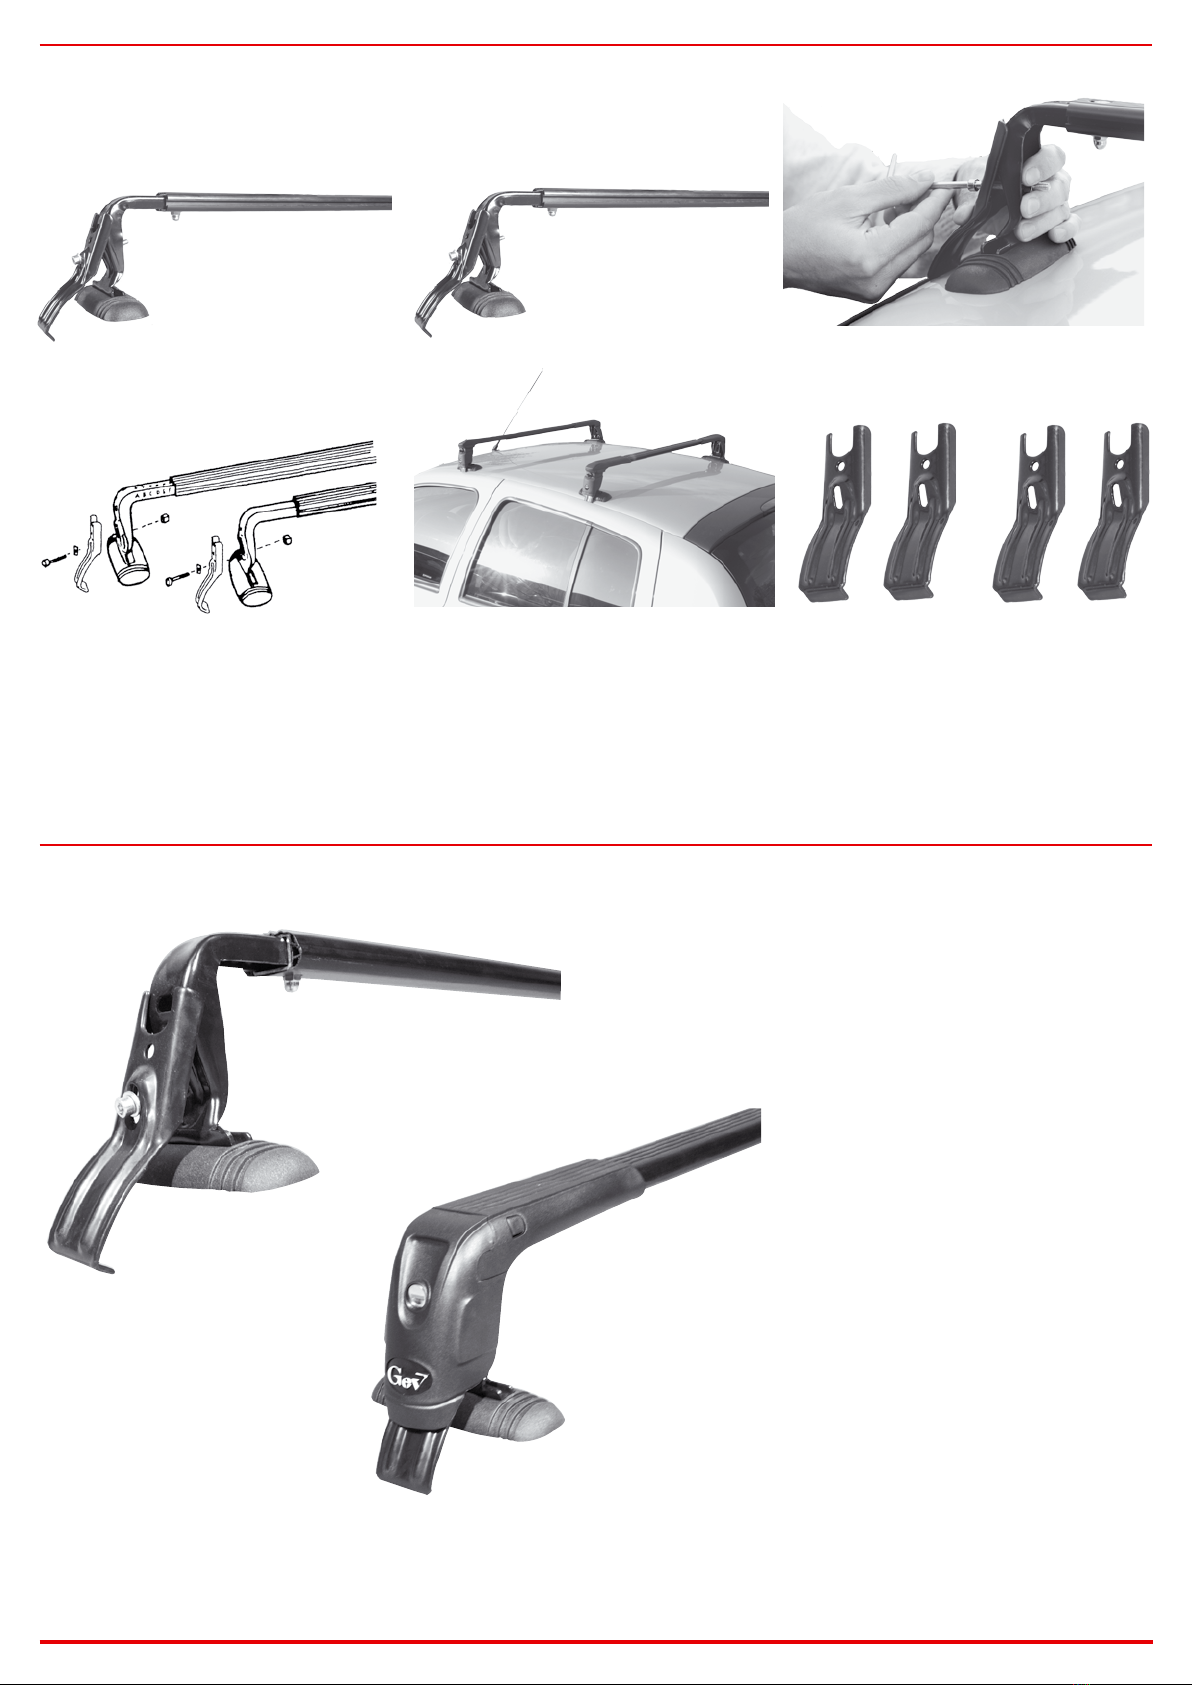
Tagliare la parte inferiore del terminale in plastica (vedi dise-
gno a destra) solo per:
FORD: Fiesta 5 porte (barra ant. e post.)
FORD: Fiesta 3 porte (solo barra anter.)
HONDA: Prelude - Civic (tutti i modelli) (barra ant. e
post.)
TOYOTA: Yaris (5 porte) (solo barra anteriore)
SUBARU: Justy (solo barra posteriore)
-
ATTenTIon
Cut the lower part of the plastic terminal part (see drawing)
only for:
FORD: Fiesta 5 doors (both rear and front bar)
FORD: Fiesta 3 doors (only front bar)
HONDA: Prelude - Civic (all models) (both rear and front
bar)
TOYOTA: Yaris (5 doors) (only front bar)
SUBARU: Justy (only rear bar)
F
ATTenTIon
Couper la partie inférieure du terminale en plastique (voir
dessin à gauche) seulement pour:
FORD: Fiesta 5 portes (avant et arrière)
FORD: Fiesta 3 portes (seulement barre avant)
HONDA: Prelude - Civic (tous les modèles) (barre avant
et arrière)
TOYOTA: Yaris (5 portes) (seulement barra avant)
SUBARU: Justy (seulement barre avant)
D
AChTung
Schneiden Sie das untere Teil des Kunststoffendstücks ab
(siehe Zeichnung) nur für:
FORD: Fiesta 5-türig (sowohl Rück-wie Vorderstange)
FORD: Fiesta 3-türig (nur Vorderstange)
HONDA: Prelude - Civic (sowohl Rück-wie Vorderstange)
TOYOTA: Yaris (5-türig) (nur Vorderstange)
SUBARU: Justy (nur Hinterestange)
e
ATenCIÓn
Cortar la parte inferior del terminal de plástico (ver dibujo)
sólo para:
FORD: Fiesta 5 puertas (ambas barras trasera y delantera)
FORD: Fiesta 3 puertas (sólo barra delantera)
HONDA: Prelude - Civic (todos modelos) (ambas barras
trasera y delantera)
TOYOTA: Yaris (5 puertas) (sólo barra delantera)
SUBARU: Justy (sólo barra trasera)
)
VIgTIgT
Den nederste del af plastik terminalen skæres af (se teg-
ning) kun ved:
FORD: Fiesta 5 døre (både den bagerste og forreste last-
holder)
FORD: Fiesta 3 døre (kun Vorderstange)
HONDA: Prelude - Civic (både den bagerste og forreste
lastholder)
TOYOTA: Yaris (5 døre) (kun Vorderstange)
SUBARU: Justy (kun bagerste lastholderstang)
I
AVVerTenZe
La vostra sicurezza e quella degli altri in caso di incorretto utilizzo è
sotto la vostra completa responsabilità. Dovete essere prudenti. At-
tenzione ai seguenti punti:
1) Leggere e rispettare le istruzioni di montaggio.
2) Ridurre la vostra velocità (max 110 km/h) particolarmente su
autostrade e con avverse condizioni atmosferiche (vento...).
Attenzione alle brusche frenate.
3) Prima di ogni partenza assicurarsi che le parti di fissaggio siano ben
bloccate.
4) Non lasciate montare le vostre barre per lunghi periodi senza
utilizzarle: invecchiano prematuramente.
5) Utilizzare cinghie di fissaggio di sicurezza per assicurare il vostro
bagaglio.
-
ATTenTIon
IMPORTANT ADVICES FOR YOUR SAFETY - In case of wrong
or thoughtless use your and other people safety is on your own
responsibility. You have to be careful. We must draw your attention
especially on the following points:
a) Read and carefully follow the assembly instructions
b) Gear down your speed (110 km/h max ), particularly on highways
and with bad weather (wind…). Pay attention to sudden brake
c) Before each departure check all the connections are properly
fastened in order to avoid they could accidentally open
d) Do not leave the empty bars on your car-roof. They are a useless
petrol waste and they get old before time.
Make use of luggage security fasteners to secure your load.
F
ATTenTIon
NOTE TRES IMPORTANTE POUR VOTRE SECURITE.
Votre sécurité et celle d’autrui sont engagées sous votre entière
responsabilité en cas d’utilisation incorrecte ou irréfléchie. Vous devez
être prudents. Votre attention est particulièrement attirée sur les points
suivants.
1) Lisez et respectez la notice de montage.
2) Réduisez votre vitesse (110 Km/h maxi) particulièrement sur
autoroutes et par mauvais temps (vent…). Attention aux freinages
brusques.
3) Assurez-vous avant chaque départ que les fixations soient
correctement bloquées pour éviter toute ouverture accidentelle.
4) Ne laissez pas à demeure vos barres porte charge montées
sur votre véhicule: à vide, elles augmentent inutilement votre
consommation et « vieillissent » prématurément.
5) Utilisez des sangles de fixation de sécurité pour assurer votre
chargement.
D
AChTung
WICHTIG FÜR IHRE SICHERHEIT!
Im Falle falscher oder gedankenloser Verwendung sind Sie
verantwortlich für Ihre Sicherheit und die anderer Personen. Sie
müssen achtsam sein. Wir machen besonders auf folgende Punkte
aufmerksam:
a) Lesen Sie die Montageanweisungen und befolgen Sie diese
sorgfältig. b) Gehen Sie mit der Geschwindigkeit herunter (max.
110 km/h), insbesondere auf Autobahnen und bei schlechten
Wetterbedingungen (Wind ...). Vorsicht bei plötzlichen
Bremsmanövern. c) Prüfen Sie vor jeder Fahrt sorgfältig, ob alle
Verbindungen gut geschlossen sind, um auszuschließen, daß diese
sich versehentlich öffnen können. d) Lassen Sie leere Stangen nicht
auf Ihrem Autodach. Diese verursachen einen höheren, unnötigen
Benzinverbrauch und altern zu schnell. e) Verwenden Sie Gepäck-
befestigungselemente, um die Ladung zu sichern.
e
AdVerTenCIAS
Usted se hace responsable de su seguridad y la de los otros en caso
de utilización no correcta del producto.
1) Usted tiene que ser prudente, respetar el montaje y las siguientes
advertencias.
2) Velocidad max.110/km/h especialmente con condiciones
meteorológicas adversas. No superar la velocidad indicada por el
código estatal. Atención a las paradas bruscas
3) Antes de partir asegurarse que las fijaciones estén bien sujetas
4) No dejar las barras montadas en el techo por un periodo de
tiempo demasiado largo sin utilizarlas : pueden deteriorarse prem
aturamente.
5) Utilizar cintas de seguridad para asegurar su equipaje
)
VIgTIgT
VIGTIG INFORMATION OM SIKKERHED
Ved forkert eller tankeløst brug er din og andres sikkerhed dit ansvar.
Du skal være forsigtig.
Der skal ofres ekstra opmærksomhed ved følgende punkter:
A) Læs og følg instruktions manualen nøje
B) Nedsæt din fart til max. 110 km/t, specielt på motorveje og
når der er dårligt vejr (vind mm). Vær opmærksom på kraftige
opbremsninger.
C) Før hver køretur, tjek alle samlinger er korrekt lukket for at forhindre
at de springer op ved et uheld.
D) Kør aldrig med lastholdersæt uden last, det er spild af brændstof og
lastholderstættet vil ældes før tid
Brug bagage sikkerheds holder for at sikre bagagen.

Other GEV Automobile Accessories manuals

GEV SKI PASS 1 User manual

GEV

GEV SKI PASS 1 User manual

GEV KIT 58 User manual

GEV

GEV KIT 58 User manual

GEV KIT 73 User manual

GEV

GEV KIT 73 User manual

GEV KIT 65 User manual

GEV

GEV KIT 65 User manual

GEV KIT 8 User manual

GEV

GEV KIT 8 User manual

GEV BASE KIT 48 User manual

GEV

GEV BASE KIT 48 User manual

GEV Base KIT 61 User manual

GEV

GEV Base KIT 61 User manual

GEV 56 User manual

GEV

GEV 56 User manual

GEV KIT 47 User manual

GEV

GEV KIT 47 User manual

GEV KIT 41 User manual

GEV

GEV KIT 41 User manual

GEV KIT 9 User manual

GEV

GEV KIT 9 User manual

GEV KIT 14 User manual

GEV

GEV KIT 14 User manual

GEV KIT 6 User manual

GEV

GEV KIT 6 User manual

GEV KIT 30 User manual

GEV

GEV KIT 30 User manual

GEV KIT 49 User manual

GEV

GEV KIT 49 User manual

Popular Automobile Accessories manuals by other brands

Trailboss HD86 Fitting instructions

Trailboss

Trailboss HD86 Fitting instructions

INNO TR163 installation instructions

INNO

INNO TR163 installation instructions

IOGear GBHFK231 installation guide

IOGear

IOGear GBHFK231 installation guide

Peruzzo 710 manual

Peruzzo

Peruzzo 710 manual

XtremeMac INCHARGE AUTO LT PLUS user guide

XtremeMac

XtremeMac INCHARGE AUTO LT PLUS user guide

RIDGID STEALTH installation instructions

RIDGID

RIDGID STEALTH installation instructions

Feniex CANNON H-2209 instruction manual

Feniex

Feniex CANNON H-2209 instruction manual

Choetech TC0005 user manual

Choetech

Choetech TC0005 user manual

Utemaster Load-Lid GWM Cannon Double Cab instructions

Utemaster

Utemaster Load-Lid GWM Cannon Double Cab instructions

Whispbar K677W Fitting instructions

Whispbar

Whispbar K677W Fitting instructions

Parrot CK3100 LCD quick start guide

Parrot

Parrot CK3100 LCD quick start guide

Whispbar K308W Fitting instructions

Whispbar

Whispbar K308W Fitting instructions

Tuffy 285 installation instructions

Tuffy

Tuffy 285 installation instructions

LEGENDEX ROGUE M.O.L.L.E MR-MP-COL-1 manual

LEGENDEX

LEGENDEX ROGUE M.O.L.L.E MR-MP-COL-1 manual

ARKSEN 005-TH-RR84 owner's manual

ARKSEN

ARKSEN 005-TH-RR84 owner's manual

Whispbar K089W Fitting instructions

Whispbar

Whispbar K089W Fitting instructions

Whispbar K762W Fitting instructions

Whispbar

Whispbar K762W Fitting instructions

Aries 3044 installation instructions

Aries

Aries 3044 installation instructions

manuals.online logo
manuals.online logoBrands
  • About & Mission
  • Contact us
  • Privacy Policy
  • Terms and Conditions

Copyright 2025 Manuals.Online. All Rights Reserved.