Imperial DABMAN 110 User manual

GB
User Manual
IMPERIAL DABMAN 110
portable DAB+ / VHF receiver
GB

2222
GB
Table of Contents
1. Introduction ................................................................................................ 3
1.1. Preliminary Note ................................................................................... 3
1.2. Service and Support ...................................................................... 3
2. Safety Instructions ......................................................... 4
2.1. Basic Safety Instructions ..........................................................4
2.2. Explanation of Safety Instructions ............................................ 5
2.3. Intended Use ......................................................... 6
3. Scope of Delivery ................................................................................... 6
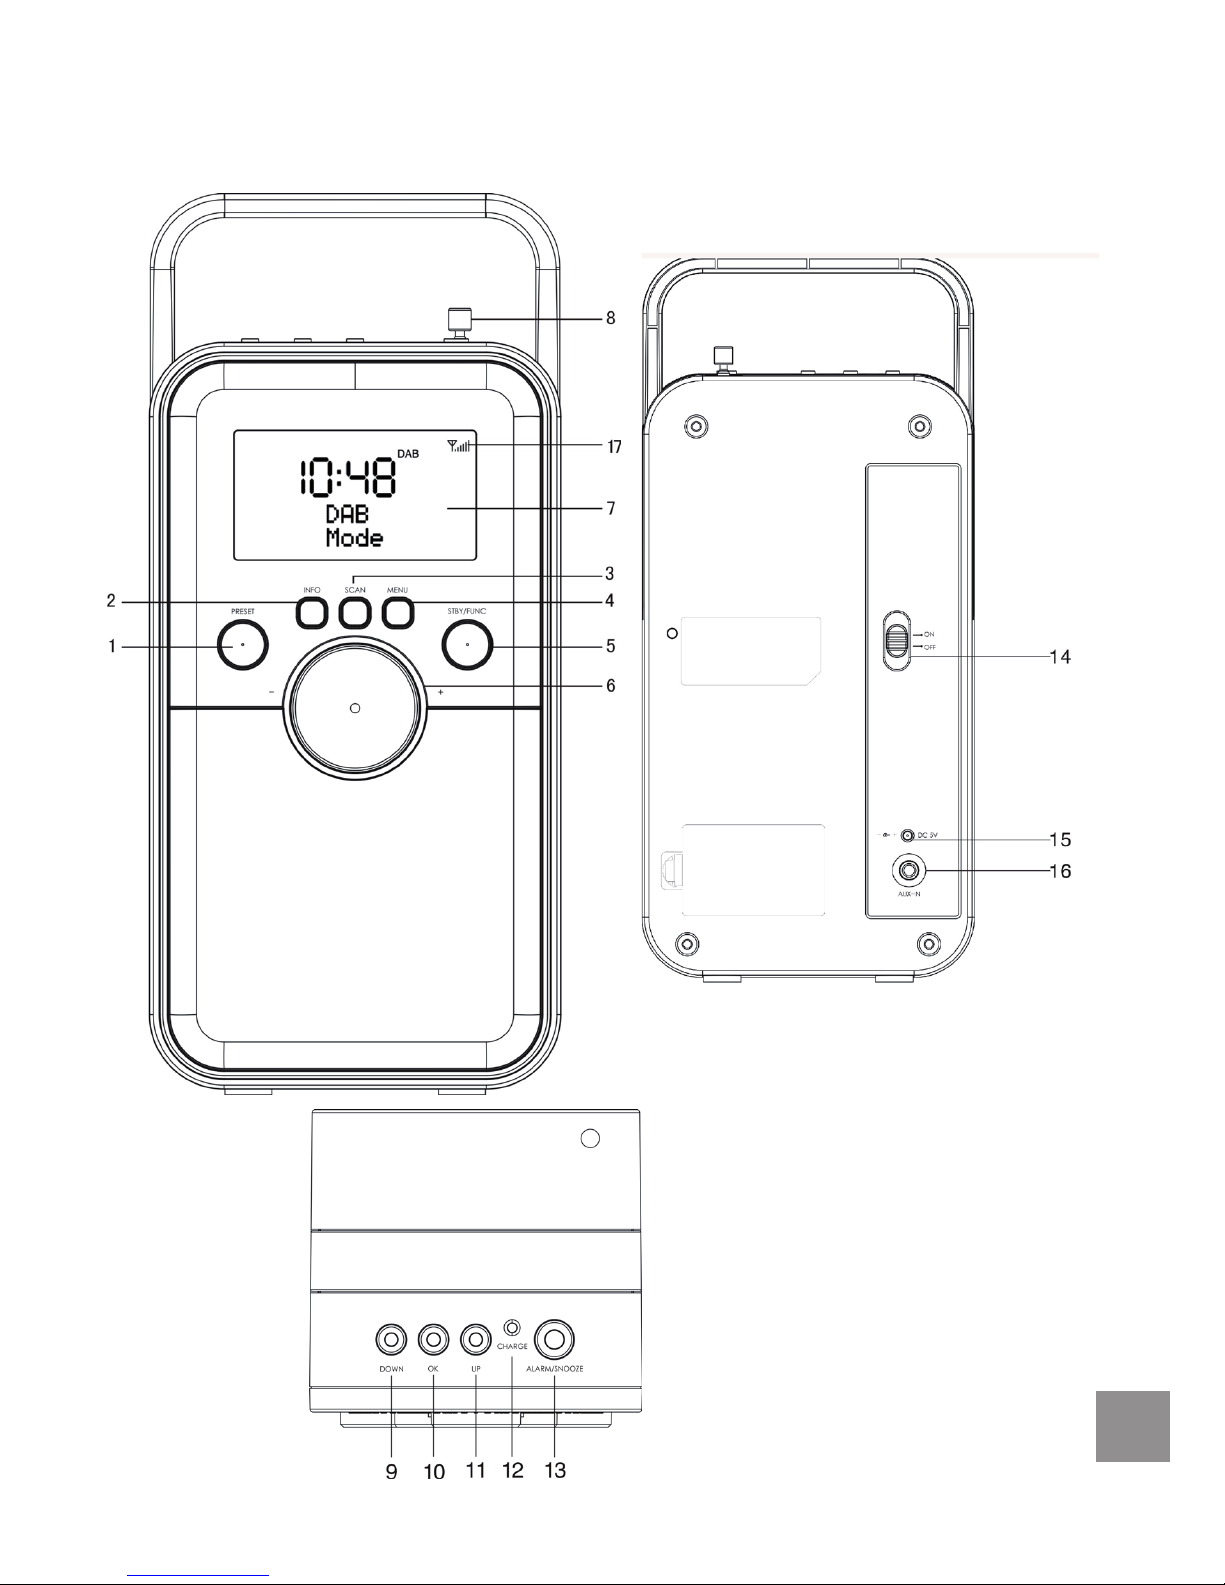
4. Figures and Description ......................................................... 7
5. Installation ............................................................................................... 9
5.1. Power Supply ...................................................................... 9
5.1.1. Operation with Power Supply ......................................................... 9
5.1.2. Operation with Integrated Battery ......................................................... 9
5.2. Switching On and off .................................................................... 10
6. DAB+ Mode ................................................................................. 10
6.1. Automatic Search .................................................................... 10
6.2. Full Station Scan ....................................................... 11
6.2.1. SCAN Button ....................................................... 11
6.2.2. MENU Button ....................................................... 11
6.3. Manual Search ....................................................... 11
6.4. DAB+ Station Presets .................................................................... 12
6.5. LCD Display in DAB+ Mode ....................................................... 12
6.6. DRC - Dynamic Range Control ....................................................... 12
7. FM Mode .............................................................................................. 13
7.1. Turn on FM Mode .................................................................... 13
7.2. FM Station Presets .................................................................... 13
7.3. LCD Display in FM Mode .................................................................... 13
8. AUX Mode .............................................................................................. 13
9. Alarm and Sleep Functions ..................................................................... 14
9.1. Sleep Timer .................................................................... 14
9.2. Alarm Clock ................................................................................. 14
10. System Settings .................................................................... 15
10.1. Language .................................................................... 15
10.2. Time and Date Settings .................................................................... 16
10.3. Factory Settings .................................................................... 17
10.4. Software Version ................................................................................. 17
11. Troubleshooting Guide .......................................................................... 17
12. Technical Data ................................................................................. 18

2323
GB
1. Introduction
1.1. Preliminary Note
Thank you for choosing our DAB+ / VHF Radio IMPERIAL DABMAN 110. If you
are using the radio for the rst time, please read these instructions carefully and
keep them for future reference. Please follow the instructions for optimal and full
enjoyment of the various functions of the DAB+/VHF Radio.
This manual will help you with the
• intended
• safe
• advantageous
use of the DAB+ / VHF IMPERIAL DABMAN 110. We assume that the operator
of the radio has general knowledge in handling consumer electronics.
Any person, who
• assembles
• connects
• operates
• cleans
• disposed of
this radio, must have taken notice of the full content of this operating manual.
Always keep this operating manual in close vicinity of the radio.
1.2. Service and Support
Should your DAB+ radio not function properly, that does not automatically mean
that it is defective. Please do not immediately send in the unit, but give us a call
rst!
Technical Hotline
for Germany: +49 (0) 2676 / 9520101
Alternatively, please send an e-mail to service@telestar.de or a fax to
+49 (0) 2676 / 9520159.
Should it not be possible to solve the problem in this way, please send the devi-
ce to our service center at the following address:
For Germany: TELESTAR Service Center, Am Weiher 14, 56766 Ulmen
For Austria: fsms GmbH, Welser Straße 79, A-4060 Leonding

2424
GB
2. Safety Instructions
Read the safety instructions carefully before initial operation of the radio.
Please observe all warnings and instructions on the device and in the
operating manual.
2.1. Basic Safety Instructions
• In the event of malfunctions, disconnect the radio from the power
source. Note: The switch on the back does not disconnect the device from
the mains.
• To avoid re hazards and the risk of electrical shock, do not expose the
radio to rain or moisture.
• Do not open the body. If you do, there is a danger of electric shock.
• Only connect the radio to a properly installed mains socket of 220-240 V~,
50-60 Hz.
• Disconnect the external power supply from the socket when you are not
using the device for an extended period of time. Only pull at the plug, not
at the cable.
• In the event of a thunderstorm, unplug the power adaptor of the radio from
the socket.
• Should any foreign objects or liquid enter the radio, immediately unplug the
power adaptor from the socket. Have the device checked by professionally
qualied personnel before it is put back into operation. Otherwise there is a
danger of electric shock.
• Make sure that the power source (socket) is easily accessible.
• Do not bend or squeeze the cable connections.
• If the power cable is damaged, the radio must be repaired by an expert
before using it again. Otherwise there is a risk of electric shock.
• Do not leave children unattended while using the radio.
• Always leave maintenance works to professionally qualied personnel.
Otherwise, you are putting yourself and others at risk.
• In the event of malfunctions, disconnect the radio from the power source.
• Spare parts must be ordered directly from the manufacturer.
• Changes to the device will result in the expiration of the manufacturer's
responsibility.
• Remove the protective lms.
Caution!
Disconnection from the mains. In addition, the device takes up electricity when
in standby mode. To completely disconnect the device from the mains, the
power adaptor must be unplugged from the socket.

2525
GB
Proper location
• Place the radio on a rm, level surface.
• Avoid proximity of: heat sources, such as radiators, open ames, such as
candles, devices with strong magnetic elds, such as speakers.
• Do not place any objects lled with liquid (e.g. vases) on the radio.
• Avoid direct sunlight and places with excessive dust.
• Do not cover the ventilation slots. Provide adequate ventilation of the radio.
• Do not place heavy objects on the radio.
• If you move the radio from a cold to a warm location, moisture may
condense inside the radio. In this case, wait for about an hour before putting
it into operation.
• Lay the power cable in a way that no one can step on or trip over it.
The proper handling of batteries
• Batteries may contain toxic substances. Ensure that batteries are out of the
reach of children. Children may put batteries in their mouth and swallow
them. Should a battery be swallowed, immediately seek medical help.
• Leaking batteries can cause damage to the radio. Remove the batteries if
the radio is not in use for a long time.
• Batteries may contain toxic substances. Therefore, dispose of the
batteries in accordance with applicable regulatory requirements and in an
environmentally friendly manner. Do not dispose of the batteries in the
normal domestic waste.
• Do not expose the batteries to open re or extreme heat, as this will cause
a danger of explosion.
• Always replace the batteries with the same type.
2.2. Explanation of Safety Instructions
In this manual you will nd the following categories of safety instructions:
DANGER!
Instructions with the word DANGER warn of possible personal injury.
CAUTION!
Instructions with the word CAUTION warn of possible property or environmental
damage.
These instructions contain special information for economic use of this receiver.

2626
GB
2.3. Intended Use
The radio is designed to receive DAB+ and FM and is additionally equipped
with a connection for external audio equipment, such as MP3 player or iPod, for
private application. It is solely intended for this purpose and must always be
used according to this intended use. This includes the compliance with all
information in this manual, in particular the safety instructions. Any other use is
considered improper and can lead to property damage or even personal injury.
Improper use also results in the immediate loss of warranty. The manufacturer
does not accept any liability for damages caused by improper use.
Check the scope of delivery after purchase. Contents can vary depending on
the model, refer to the information on the packaging.
3. Scope of Delivery
1x DABMAN 110 (depending on model in black or white-gray), 1x 5V power
adapter, 1x 3.5mm audio jack cable, 1x user manual, 1x warranty card.

2727
GB
4. Figures and Description
Front View Rear View
Top view

2828
GB
No. Designation Function
1 PRESET Button • Selecting saved DAB+ / FM radio
stations (each with 20 presets)
• Saving of radio stations
2 INFO Button • Navigation through information in
DAB+ / FM mode
3 SCAN Button • Automated station scan (DAB+ and FM
mode)
4 MENU Button • On/Off Button for Sleep Timer
• Accessing various sub-menu items
5 STBY/FUNC Button • Turning the radio on/off in standby
mode
• Selection of operating mode (FM and
DAB+ radio, AUX for playback of
external devices)
6 Volume control • Knob to control volume
7 LCD Display • Display of station information and time
8 Telescopic antenna • Pivotable and turnable antenna (max.
length: 50cm)
9 Down • Navigation through DAB+ / FM station
list (down)
• In FM mode: to ne-tune the frequency
(50kHz down)
• Automated search down the frequency
range (hold key)
10 OK • Conrmation of selected input / option
11 Up • Navigation through DAB+ / FM station
list (up)
• In FM mode: to ne-tune the frequency
(50kHz up)
• Automated search up the frequency
range (hold key)
12 Charging indicator • Species charger status when
operating with battery

2929
GB
No. Designation Function
13 Alarm/Snooze • For turning on sleep mode in alarm
function
• Allows to set the alarm with exact date
and time (hold key during operation)
• Dimmer switch for LCD display (press
briey, options: bright, dim, off)
14 On/Off switch • Slide switch for turning the radio on/off
15 DC Connection • Connection for external power supply
16 3.5mm AUX input • 3.5mm jack input for connecting
external playback devices
17 Signal indicator • Display of signal quality in DAB+ and
FM radio reception (the stronger the
signal, the more bars are displayed)
5. Installation
Please remove the parts carefully from the packaging. Make sure that all
components are included.
5.1. Power Supply
5.1.1. Operation with Power Supply
Connect the power adaptor 220V 50hz (DC 5V) with the radio and a 220V
socket. Now set the On/Off switch (see chapter 4, table 14) to "On".
5.1.2. Operation with Integrated Battery
If you wish to operate the radio with the built-in battery, you rst have to charge
it with the power adaptor. For this, use the included power adaptor and connect
the radio as described in 5.1.1.
• keep the On/Off switch set on "off".
• The charging of the battery is shown by a yellow light in the charge indicator
(see chapter 4, table 12).
• When the battery is fully charged, the charge indicator will change from
yellow to green. Please charge the battery completely before initial
operation.
• Do not leave the radio unattended during the charging process.
• The duration of the charging process depends on the battery's charge, but
is max 2 hours.

3030
GB
CAUTION: please unplug the radio completely from the mains, should it not
be in use over a longer period.
5.2. Switching On and off
• Turn the device on by operating the slide switch (see chapter 4, table 14)
on the rear of the device (position "ON").
• The display lights up and the message "Welcome to Digital Radio" is
displayed briey.
• Subsequently, the time display ashes showing 00:00, with the message
"No Time Setting" underneath.
• To switch the DABMAN 110 to standby mode, press and hold the
button STBY/FUNC (see chapter 4, table 5). The device switches to stan-
dby mode. By pressing the button again, the radio is turned back on.
• To turn the device off, operate the slide switch on the rear (position "OFF").
Note: when the DABMAN 110 is turned on for the rst time, it starts up in
FM mode. Briey press the STBY/FUNC to toggle between the different
operating modes (AUX-In, DAB+, FM). The time is set automatically once you
switch to DAB+ mode. Alternatively, the time can be set manually in every
operating mode. Refer to item "Time" in the chapter "System Settings."
6. DAB+ Mode
In DAB+ mode, the DABMAN 110 receives digital radio signals and provides
appropriate radio text information in the display. To ensure optimum reception,
extend the telescopic antenna to the maximum length before you turn on the
radio.
6.1. Automatic Search
• If the radio is turned on for the rst time and set to DAB+ operating mode
using the STBY/FUNC button, the radio automatically performs a channel
search. In this case, the complete frequency spectrum (174-240 MHz) is
scanned.
• The note "search" appears on the display. A progress bar underneath
indicates how far advanced the channel search is.
• If the search process is complete, the display shows the current time. In
addition, the radio playback will start with the rst station that was found.
• To change channels, press the Up/Down buttons (see chapter 4, table 9
& 11). The display shows the name of the selected station. If you wish to
switch to this station, conrm your selection by pressing the OK button (see
chapter 4, table 10).
• Should no DAB+ reception be possible or no station be received, the
display will show the message "No reception".

3131
GB
Note: depending on the location, there may be considerable differences in the
reception of DAB+ programms. For the rst scan we recommend you set up
the radio near a window, extend the telescopic antenna completely and align it.
From time to time you should also perform a new search to keep the station list
up to date. If a station can no longer be received, the display shows a question
mark ("?") in front of the station name.
6.2. Full Station Scan
There are two options to start a station scan again:
6.2.1. SCAN Button
• Briey press the SCAN button (see chapter 4, table 3), the search starts
again, as described in 6.1. In addition, the display shows the message
"Scan" and a progress bar is displayed.
• After completion, the current time is displayed, and the radio playback starts
with the rst station that was found.
• This is the fast way to perform a station search.
6.2.2. MENU
• Press the Menu button (see chapter 4, table 4).
• Use the Up/Down buttons (see chapter 4, table 9 & 11) to select "Full Scan"
and conrm the selection with OK (see chapter 4, table 10).
• The search starts anew, as described in 6.1. In addition, the display shows
the message "Scan" and a progress bar is displayed.
• After completion the current time is displayed, and the radio playback starts
with the rst station that was found.
6.3. Manual Search
In addition to automatic search you can also scan individual stations and
frequencies manually. This is useful if you want to achieve the best possible
reception or want to expand the station list by a specic station, of which you
know the frequency, without performing a full scan.
• Press the Menu button (see chapter 4, table 4).
• Use the Up/Down buttons (see chapter 4, table 9 & 11) to select "manual
adjustment" and conrm the selection with OK (see chapter 4, table 10).
• Now select the desired channel/frequenzy you wish to scan/set manually
with the Up/Down buttons and conrm the selection with OK.
• The display now shows the actual signal strength of the received
channel (highlighted rectangle). By carefully aligning the antenna, the
reception quality can be increased.

3232
GB
6.4. DAB+ Station Presets
The DABMAN 110 is equipped with 20 station presets, which can be
programmed according to your preferences. To save a station in the list,
proceed as follows:
• Select the station to be saved by using the Up/Down buttons and conrm
the selection with OK.
• Now press and hold the PRESET button (see chapter 4, Table 1), until the
note "save the programme" appears in the display.
• Now select the memory slot by using the Up/Down buttons and conrm the
selection with OK to conrm the saving. The message "programme saved"
will appear in the display.
• To select preset stations, briey press the PRESET button. The note "select
programme" appears in the display. Now you can use the Up/Down buttons
to select a programme from the station memory. By pressing the OK button
you switch to the selected programme.
6.5. LCD Display in DAB+ Mode
6.5.1. Station Information and DLS
During DAB+ operation the LCD display of the DABMAN 110 will display
station information. This includes, in addition to the current time, the name
of the selected radio station, as well as other information that is transmitted
through DLS (Dynamic Label Segment) by the broadcaster. The LCD display
will, for example, show the name of the song and artist, or contact details, or
further information provided by the broadcaster. Where the information exceeds
a length of 16 characters, the information will be displayed as ticker text.
6.5.2. Info Button: access further information
By repeatedly pressing the info button (see chapter 4, table 2) you can scroll
through the info menu and access various information (DLS text info, DL plus
info (if available), signal strength, channel number & frequency, time, date).
6.6. DRC - Dynamic Range Control
DRC decreases the difference in volume between the loudest and quietest
signal of a transmission - this means in practice that quieter sounds are
transmitted louder in relation, and loud sounds are transmitter quieter in relation.
You can turn DRC on/off, in accordance with your listening habits, as follows:
• Press the Menu button (see chapter 4, table 4).
• Use the Up/Down buttons (see chapter 4, table 9 & 11) to select "DRC" and
conrm the selection with OK (see chapter 4, table 10).
• Use the Up/Down buttons to select the desired DRC mode between "high"
(recommended for use of the radio with high ambient noise), "low" and "off".
Conrm the selection with OK (see chapter 4, table 10).

3333
GB
• The factory setting for DRC is off.
7. FM Mode
In this mode, the DABMAN 110 receives analog radio signals from the FM band
(between 87.5 and 108 MHz) and RDS signals, provided they are transmitted.
To ensure optimum reception, extend the telescopic antenna to the maximum
length before you turn on the radio.
7.1. Turn on FM Mode
• Turn on the radio by pressing and holding the STBY/FUNC button.
• Select the FM mode by briey pressing the STBY/FUNC button, the display
shows the message "FM Mode".
• Now press and hold the SCAN button to scan the frequency range from
bottom to top for a receivable radio station. The search will stop
automatically when a radio station is received.
• Use the Up/Down buttons to ne-tune the reception, here the frequency is
adjusted in steps of 50 kHz up or down.
• Should the reception be weak or superimposed by strong noise, you can
increase the reception quality by carefully aligning the antenna.
7.2. FM Station Presets
Analogous to the DAB+ mode, the DABMAN 110 is also equipped with 20
station presets in FM mode, which can be programmed according to your
preferences. To save a station, proceed as described in chapter 6.4. above.
7.3. LCD Display in FM Mode
7.3.1. RDS station information
In FM mode, the LCD display will show background information about the
received programme, if sent by the broadcaster. These include, in addition to
the current time, the name of the selected radio station and further information,
such as the name of the song and the artist. Where the information exceeds a
length of 16 characters, the information will be displayed as ticker text.
7.3.2. Info Button: access further information
By repeatedly pressing th info button (see chapter 4, table 2) you can scroll
through the info menu and access various information (genre, frequency, audio
mode, time, date).
8. AUX Mode
In AUX mode, you can play MP3 les stored on external devices, such as MP3
players or smartphones, on the DABMAN 110.
• Connect an external device, such as an MP3 player, with a 3.5mm audio
cable (included) to the AUX-In jack (see chapter 4, table 16) on the back of

3434
GB
• the radio.
• Turn on the MP3 player and start the playback.
• Turn on the radio by pressing and holding the STBY/FUNC button.
• Select the AUX mode by briey pressing the STBY/FUNC button. The
message "AUX Mode" will appear in the display.
• The volume of the playback can be controlled with the volume control
of the DABMAN 110 (see chapter 4, table 6). All other functions, such as
forward or rewind, pause playback, etc., can be controlled with the externally
connected device.
9. Alarm and Sleep Functions
The time-bound functions of the DABMAN 110 are summarised under this point.
In addition to the sleep timer, the radio also has two alarm clocks.
9.1. Sleep Timer
The DABMAN 110 is equipped with a sleep timer. If this function is activated, the
radio automatically switches off after a certain period of time (1/20/30/60/90/120
minutes). The sleep timer is disabled in the factory settings. To activate this
feature, please proceed as follows:
• Press and hold the menu button during operation (see chapter 4, table 4)
to open the sleep timer menu. The message "time setting sleep" will appear
in the display.
• Use the Up/Down buttons (see chapter 4, table 9 & 11) to select the
desired time period after which the sleep timer should come on. The following
options are available: (off/1/20/30/60/90/120 minutes). Conrm your
selection with OK, the sleep timer is now activated. A bubble icon with "ZZZ"
will be displayed next to the time.
• To deactivate the sleep timer, access the sleep timer menu again, select the
option "off" by using the Up/Down buttons (see chapter 4, table 9 & 11) and
conrm with OK. The sleep timer is now disabled.
9.2. Alarm Clock
In addition to displaying the time and date the DABMAN 110 has 2 alarms that
can be set independently. Setting each alarm (alarm 1 and alarm 2) follows the
same scheme. To set the alarm, proceed as follows:
• Press and hold the Alarm/Snooze button during operation (see chapter 4,
table 13), until the message "set alarm 1" appears in the display. In addition,
a bell symbol with the number 1 will ash in the display to the left of the time.
• Now press and hold the OK button, the alarm time assistant will guide you
through the other settings. First, select the desired alarm time in hours
and minutes by using the Up/Down buttons (see chapter 4, table 9 & 11).
Conrm each entry with OK. The following items are also set by using the
Up/Down buttons and by conrming the selection with OK.

3535
GB
• Then select the time period for which the alarm will be active. If the alarm is
not turned off during this time, it automatically returns to standby mode after
the time has elapsed.
• Under "source" you can select the alarm mode by using the Up/Down
buttons. DAB, FM, buzzer and AUX are available.
• In the next item, you can, if DAB or FM are selected in "source", set the
station to be played when waking. Here you can choose "last heard" or a
station saved in the channel list.
• Now you can choose how many times the alarm should be set: through
the Up/Down buttons you select between the options daily (every day),
working days (Monday-Friday), weekend (Saturday-Sunday), or once. If
you selected the option "once" you will then have to choose the desired
date.
• Finally, turn the alarm on or off. When the alarm is switched on, the
message "alarm saved" is displayed, and the bell symbol will appear to the
left of the time.
• Snooze: when the alarm is active, it can be turned off by pressing the Alarm/
Snooze button (see chapter 4, table 13), so that it will ring again after a
certain period of time (10 minutes). The display shows the time remaining
until the next alarm.
• If the alarm is to be turned off completely, press and hold the Alarm/Snoo-
ze button.The display will show the message "alarm off".
To set the second alarm, press and hold the Alarm/Snooze button twice during
operation (see chapter 4, table 13), until the message "set alarm 2" appears on
the display. In addition, a bell symbol with the number 2 ashes in the display to
the left of the time. Setting the alarm is done as described in 9.2.
10. System Settings
The item System Settings summarises functions, which are controlled via the
main menu of the DABMAN 110. They are generally controlled with the menu
button(see chapter 4, table 4), and the selection is made with the Up/Down
buttons (see chapter 4, table 9 & 11), the individual menu items are accessed
and the settings conrmed with the OK button (see chapter 4, table 10).
10.1. Language
The DABMAN 110 supports multiple languages (German, English, French,
Italian). To select the language, please proceed as follows:
• Press the menu button.
• Use the Up/Down buttons to select "System", and conrm your selection
with OK.
• Now select "Languages" and conrm with OK.
• Use the Up/Down buttons to select the desired language, then conrm your

3636
GB
• selection with OK. The menu now switches to the selected language.
10.2. Time and Date Settings
Time and date can also be set manually. The manual setting is only necessary
if the DABMAN 110 cannot be used in DAB+ or FM mode, as the time and
date synchronisation usually happens automatically here. The automatic time
recognition is enabled in the factory and can be deactivated in this menu item.
10.2.1. Setting time and date manually
To set date / time manually, proceed as follows:
• Press the menu button.
• Use the Up/Down buttons to select "System", and conrm your selection
with OK.
• Now select "Time" and conrm with OK. Pressing the OK button again
opens the menu for manual input of the time. By using Up/Down you can
set the selected time in hours and minutes, conrm the input with OK.
Proceed with the date input the same way as with the time input.
• Once you entered the time and date manually, the message "time saved"
appears in the display. You automatically return to radio mode.
10.2.2. 12-/24-hour mode
To switch the time display between 12- and 24-hour mode (factory setting: 24-
hour mode), proceed as follows:
• Press the menu button.
• Use the Up/Down buttons to select "System", and conrm your selection
with OK.
• Now select "Time" and conrm with OK,then select "set 12/24 hours".
• Press OK - using Up/Down you can now select the desired display mode,
then conrm the selection with OK.After entering, the time display changes
to the selected mode, you will automatically return to radio mode.
10.2.3. Change date display
The format of the date display can also be adjusted, please perform the
following steps:
• Press the menu button.
• Use the Up/Down buttons to select "System", and conrm your selection
with OK.
• Now select "Time" and conrm with OK, then select "date settings".
• Press OK - using Up/Down you can select the desired display mode (DD-
MM-YYYY or MM-DD-YYYY), then conrm the selection with OK. After
entering, the date display will change to the selected mode, you will
automatically return to radio mode.

3737
GB
•
10.3. Factory settings
In this menu item you can reset the DABMAN 110 to its factory settings. This
may be necessary if changes in the basic settings triggered an impairment of
the functions of the DABMAN 110.
Important note: by accessing the factory settings, all individual settings,
such as preset station lists or alarms, are lost!
To access the factory settings, please proceed as follows:
• Press the menu button.
• Use the Up/Down buttons to select "System", and conrm your selection
with OK.
• Use the Up/Down buttons to select "factory settings", conrm the selection
with OK.
• Now select "Yes" by using the Up/Down buttons and conrm with OK.
• The message "restart" appears in the display - the radio was reset to the
factory settings, time and date are ashing.
10.4. Software Version
Through the system menu you can display the operating software available
on the DABMAN 110. This can be useful if you wish to contact our technical
support for example. To access the software information proceed as follows:
• Press the menu button.
• Use the Up/Down buttons to select "System", and conrm your selection
with OK.
• Use the Up/Down buttons to select "SW version", and conrm your
selection with OK.
• The display now shows the name of the software available on the device
as ticker text.
11. Troubleshooting Guide
Problem Poss. Cause Solutions
No operation possible The device is hung up Unplug the device for
about 5 seconds from
the power supply and
turn off the device via
the slide switch. Then
reconnect and turn on.
No sound The volume is too low Increase the volume by
using the corresponding
controller

3838
GB
Problem Poss. Cause Solutions
Audio quality is poor • The broadcast
signal is too weak
• The battery is
almost empty
• Adjust the antenna
or perform a new
scan
• Charge the battery
using the included
power adapter
FM reception: noise
DAB+ reception:
interruption of the
sound signal or display
message "no reception"
weak signal • Check the antenna
• Realign the antenna
or move the radio to
a different location
• Run the a new scan
12. Technical Data
power adapter (included) Input voltage: 100-240V AC, 50-60
Hz
Output voltage: 5V DC, 2A
Battery capacity 1000 mAh
Maximum operating time (battery) 3 hours
Battery charging time 2 hours
Power consumption Operation: 8W
Standby:<1W
DAB+ frequency band 174-240 MHz
VHF frequency range 87.5-108 MHz
Recommended ambient temperature -5°C ~ + 40°C.
Recommended ambient humidity 20%~ 80%
Dimensions of device (WxHxD) 110 x 200 x 100mm
Weight approx. 700g

3939
GB

4040
GB
Your device carries the CE mark and complies with all relevant
EU standards. Changes and printing errors reserved.
Version 04/14
Copy and reproduction only with approval of the
publisher.
©TELESTAR-DIGITAL GmbH 2014
Table of contents
Other Imperial Receiver manuals
Popular Receiver manuals by other brands

Sony
Sony IFT-R10 operating instructions

Topfield
Topfield TF-T6211HDPVR User reference guide

Sony
Sony STR-D790 - Fm Stereo / Fm-am Receiver operating instructions

Pioneer
Pioneer VSX-LX503 instruction manual

Jensen
Jensen CDR362 Installation & owner's manual

SY Electronics
SY Electronics XSQ Technology Skew62 Quick installation guide