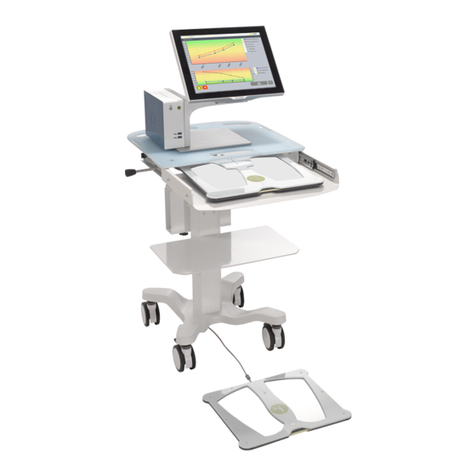
Impeto Medical SUDOSCAN User manual

1
User guide
Version 3
13/01/2017

2
TABLE OF CONTENTS
1INTRODUCTION........................................................................................... 5
1.1 PATENT ...............................................................................................................................5
1.2 USE ....................................................................................................................................5
1.3 PRINCIPLE ............................................................................................................................5
1.4 INSTALLATION.......................................................................................................................5
2POWER UP THE SYSTEM ................................................................................ 6
3HOME PAGE............................................................................................... 7
3.1 LIST OF AVAILABLE FUNCTIONALITIES ........................................................................................7
3.2 FOR USER NOT LOGGED IN......................................................................................................7
3.3 FOR A LOGGED IN USER..........................................................................................................8
4LOG IN PAGE .............................................................................................. 9
4.1 LIST OF CONTROLS .................................................................................................................9
4.1.1 OTHER CONTROLS .........................................................................................................9
4.2 PASSWORD VALIDATION ...................................................................................................... 10
4.3 PASSWORD MODIFICATION .................................................................................................. 11
5QUALITY CHECK PAGE................................................................................. 13
5.1 OVERVIEW ........................................................................................................................ 13
5.2 LIST OF CONTROLS.............................................................................................................. 13
5.3 DURING A QUALITY CHECK TEST ........................................................................................... 14
5.4 QUALITY CHECK RESULT INTERPRETATION............................................................................... 15
5.5 TO HAVE MORE DETAILS ON THE QUALITY CHECK RESULTS ........................................................ 17
5.6 OTHER CONTROLS .............................................................................................................. 17
6TOOLS &SETTINGS PAGE(S) ........................................................................ 18
6.1 STANDARD USER –LIST OF CONTROLS.................................................................................... 18
6.1.1 OTHER CONTROLS ...................................................................................................... 18
6.2 STANDARD USERS –CONFIGURATION (2) TAB......................................................................... 19
6.2.1 OTHER CONTROLS ...................................................................................................... 19
6.3 SUPERVISOR USERS –ADDITIONAL LIST OF CONTROLS............................................................... 20
6.3.1 OTHER CONTROLS ...................................................................................................... 20
6.4 SUPERVISOR USERS –CONFIGURATION (2) TAB ....................................................................... 21
6.4.1 OTHER CONTROLS ...................................................................................................... 22
6.5 SUPERVISOR USERS –ADDITIONAL SERVICES ........................................................................... 23
6.5.1 OTHER CONTROLS ...................................................................................................... 24
6.6 SUPERVISOR USERS –INTERPRETATION MESSAGES................................................................... 25
6.6.1 OTHER CONTROLS ...................................................................................................... 25
6.7 IMPORT DATA FOR A SELECTED PHYSICIAN .............................................................................. 26
6.8 EXPORT DATA ON A USB KEY FOR A SELECTED PHYSICIAN .......................................................... 29
6.9 PATIENT RECONCILIATION &PATIENT DEMOGRAPHIC DATA MODIFICATION.................................. 31
7SCAN PAGES............................................................................................. 34
7.1 LIST OF CONTROLS .............................................................................................................. 34

3
7.1.1 OTHER CONTROLS ...................................................................................................... 34
7.2 PATIENT SETUP &START A SCAN ........................................................................................... 35
7.3 DURING THE SCAN.............................................................................................................. 37
8PATIENT HISTORY PAGE .............................................................................. 39
8.1 LIST OF CONTROLS .............................................................................................................. 39
8.1.1 OTHER CONTROLS ...................................................................................................... 39
8.2 SELECTION OF PATIENT(S)AND EXAM(S) ................................................................................ 40
8.3 HOW TO START A NEW SCAN FOR A PATIENT ........................................................................... 42
8.4 HOW TO DISPLAY RESULTS FOR A SINGLE EXAM ....................................................................... 42
8.5 HOW TO DISPLAY FOLLOW-UP FOR A PATIENT ......................................................................... 43
8.6 HOW TO EXPORT DATA........................................................................................................ 45
9RESULT PAGE ........................................................................................... 48
9.1 LIST OF CONTROLS .............................................................................................................. 48
9.1.1 OTHER CONTROLS ...................................................................................................... 48
9.2 RESULTS ........................................................................................................................... 49
9.2.1 ASYMMETRY ............................................................................................................. 49
9.2.2 QUALITY OF MEASURE ................................................................................................ 49
9.3 QUICK INTERPRETATION OF THE RESULTS................................................................................ 51
9.3.1 DISCLAIMER .............................................................................................................. 51
9.3.2 PATIENT WITH NO SUDOMOTOR DYSFUNCTION ............................................................... 51
9.3.3 PATIENT WITH INTERMEDIATE SUDOMOTOR DYSFUNCTION ............................................... 51
9.3.4 PATIENT WITH HIGH SUDOMOTOR DYSFUNCTION............................................................. 52
10 PHYSICIAN AND PATIENT REPORT SCREENS ...................................................... 53
10.1 PHYSICIAN REPORT ............................................................................................................. 53
10.1.1 OTHER CONTROLS ...................................................................................................... 53
10.2 PATIENT REPORT ................................................................................................................ 54
10.2.1 OTHER CONTROLS ...................................................................................................... 54
10.3 ADD COMMENTS ON PHYSICIAN AND/OR PATIENT REPORTS....................................................... 55
11 CLEANING THE SENSOR PLATES ..................................................................... 56
12 REPLACE THE ELECTRODES ........................................................................... 57
13 USB PRINTER DRIVERS INSTALLATION ............................................................. 58
14 INSTALL SOFTWARE UPDATES ....................................................................... 59
15 TROUBLESHOOT THE SYSTEM........................................................................ 59
15.1 USB CONNECTION.............................................................................................................. 59
15.2 TEST THE HARDWARE.......................................................................................................... 59
16 ANNEXES ................................................................................................ 60
16.1 IMPORT A PATIENT LIST VIA A CSV FILE .................................................................................. 60
16.1.1 REQUIRED DATA......................................................................................................... 60
16.1.2 OPTIONAL DATA......................................................................................................... 60
17 HOW TO ................................................................................................. 61
17.1 FOR A STANDARD USER ....................................................................................................... 61
17.2 FOR A SUPERVISOR USER ONLY ............................................................................................. 62

5
1Introduction
The SUDOSCAN device is powered by the Windows 7 Embedded SP1 operating system.
1.1 Patent
The SUDOCAN® device is covered by following patents : "Electrophysiological analysis system and
method" (Patent 1 898 783 and 2 124 736), and "Procédé d'analyse physiologique par stabilisation
d'une surtension" (PCT2014/069479)..
1.2 Use
The SUDOSCAN device is a digital chrono-amperometric analyzer used for early identification and
follow-up of peripheral autonomic neuropathies.
1.3 Principle
SUDOSCAN measures the capacity of the sweat glands to release chloride ions in response to an
electric stimulus. It is a dynamic test equivalent to a stress test.
Description:
The SUDOSCAN device consists of the following:
A control panel and display
A pair of foot sensor plates
A pair of hand sensor plates
A power cable
1.4 Installation
Carefully follow instructions in the corresponding manual to ensure correct installation.
Complete installation should take no more than 15-20 minutes.
Impeto Medical is able to provide a printed version of this user guide within 7 business days following
the receipt of the request.
NOTE

6
2Power up the system
1
Open the hinged cover located below the screen at the front of the Master Unit.
Inside on the right there are 2 USB ports and power button.
2
Press and release the power button to power on.
NO MODIFICATION OF THIS EQUIPMENT IS ALLOWED.
WARNING
Power
button
Front
USB ports

7
3Home page
3.1 List of available functionalities
Please note that a summary of all functions is in the “How to”section on (ref. p61).
3.2 For User not logged in
Figure 1 : Home page –no user logged in
1
Click on the Log in button. The “Log in” panel appears (ref. p9).
2
Click on Quality Check to launch the system “Quality check” (ref. p13).
3
Click on Shut down to shut down the system.
REMOVING THE POWER CORD FROM THE MASTER UNIT OR FROM THE OUTLET BEFORE
COMPLETE UNIT SHUT OFF MAY IRREMEDIABLY CORRUPT DATA ON THE UNIT’S HARD
DISK DRIVE.
4
Click on User manual to display the electronic version of the user manual.
WARNING

8
3.3 For a logged in User
Figure 2 : Home page –user logged in
1
Click on Log out to log out the current user.
2
Click on Quality Check to launch the system “Quality check” (ref. p13).
3
Click on Shut down to shut down the system.
4
Click on User manual to display the electronic version of the user manual.
5
Click on Tools & Settings to enter the configuration page(s) (ref. p18).
6
Click on New patient to initiate a scan for a new patient (ref. p34).
7
Click on Patient history to access to the patient history (ref. p39).

9
4Log in page
4.1 List of controls
Figure 3 : Log in page
1
Select the physician in the Physician list.
2
Enter your password in the Password field using the on-screen keyboard. The initial
password is provided by your system supervisor. Default password: impeto.
3
Click on Log in button to validate the current password for the selected physician (ref.
p10).
4.1.1 Other controls
Click on the Home button ( ) to reach the home page (ref. p7).
Click on the Help button ( ) button to reach the contextual help.
Click on Change password if you want to modify your current password (ref. p11).
After the current password is entered in the password field.
Home
button
Help button

11
4.3 Password modification
1
Enter your current password in the Current password field.
Click Change password to show the new password fields.
Fill the two new password fields with the same new password then click on Save
password.
Figure 4 : Log in page –new password fields displayed
When the button Save password is clicked, a check is performed on the different passwords. Then,
-If the old password is not correct, the following message appears:

12
-If the new passwords are not identical, the following message appears:
-If the old password is correct and the new passwords are identical, the following message
appears and you are automatically logged in.

13
5Quality check page
5.1 Overview
The Quality Check allows the operator to test the internal electronic circuitry of the system.
5.2 List of controls
Figure 5 : Quality Check page –empty
1
Click on the hands (left) and feet (right) Electrode test buttons to check the connectivity
with the electrodes. The appropriate electrode LED will light up if the connectivity is Ok.
2
Enter an Operator name to be displayed in the Quality Check report.
if the Operator name is not set, the Physician’s name is displayed in the Quality
Check report instead
3
Click on the Run test button to launch a full Quality Check sequence (ref. p15 for Quality
Check results interpretation).
The electrodes must be carried out without patient (nobody on contact with the electrodes).
NOTE
Home
button
Help button
Electrode test
buttons
Operator name
field

14
5.3 During a Quality Check test
Figure 6: Quality Check page -During the Quality Check
1
Click on the Cancel test button to stop the Quality Check test.
NOTE: It may take up to several minutes for the test to cancel.

15
5.4 Quality Check result interpretation
When the Quality Check is complete and no error occurred, green checkmarks are displayed for
every lines as follows:
Figure 7: Quality Check page - Complete and valid Quality check
If a problem occurs during the Quality Check, some warning icons appear in place of the green checks.
In that case, please contact Impeto technical support (ref. p76).

16
Figure 8 : Quality Check page -Complete and invalid Quality check
1
Click on the Print button to print or export the Quality Check report.
2
Click on the More details button to display more information regarding to the Quality
Check results.
Problem observed
during the test.

17
5.5 To have more details on the Quality Check results
When an error occurred during the execution of a Quality Check, you can display more information by
clicking on the More Details button to know the error source.
Figure 9: Quality Check page -More details on the Quality check results
1
Click on the X at the top right corner to close the window.
5.6 Other controls
Click on the Home button ( ) to reach the home page (ref. p7).
Click on the Help button ( ) button to reach the contextual help.

18
6Tools & Settings page(s)
6.1 Standard user –List of controls
If you are logged in as Supervisor, please see p20.
Figure 10 : Configuration page
1
Enter hospital information in the hospital data fields.
2
Enter the physician information in the physician data field
3
Select the printer from the dropdown list of installed printers (ref. p58 to check how to
install a printer driver).
6.1.1 Other controls
Click on the Configuration (2) tab to access to additional settings (ref. p19).
Click on the Home button ( ) to reach the home page (ref. p7).
Click on the Help button ( ) button to reach the contextual help.
Hospital
data
Home
button
Help
button
Physician
data

19
6.2 Standard users –Configuration (2) tab
Figure 11: Standard users - Additional settings
1
Change your password using the Password management settings.
2
Change your print settings:
Check “Direct print” to display results and automatically print physician and patient
reports after a successful scan. (Preferred setting)
Uncheck “Direct print” to display the results only. End user can select manual print
from the Physician report or Patient report tabs (ref. p53).
3
Change the report settings for the selected physician:
Activate or deactivate the duplication of comments on both reports.
Activate or deactivate the display of reports for the previous exams (when existing)
4
Select optional data (all options may not be available).
6.2.1 Other controls
Click on the Home button ( ) to reach the home page (ref. p7).
Click on the Help button ( ) button to reach the contextual help.

20
6.3 Supervisor users –Additional list of controls
All settings that are available for standard users are also manageable by a supervisor.
Figure 12: Configuration page - Additional controls for supervisor
1
Select the physician you want to modify the settings of.
2
Select the language for the selected physician.
3
Click on Windows Desktop button to close the application and access the Windows OS
desktop.
6.3.1 Other controls
Click on the Configuration (2) tab to access to supervisor settings (ref. p21).
Click on the Services tab to access to additional services (ref. p23).
Click on the Interpretation messages to modify messages that appear as interpretation on
the Results screen and on the reports. (ref. p25)
Click on the Home button ( ) to reach the home page (ref. p7).
Click on the Help button ( ) button to reach the contextual help.
Home
button
Help
button
Change the physician
Languages
selection
Table of contents
Other Impeto Medical Medical Equipment manuals
Popular Medical Equipment manuals by other brands

Bio Compression Systems
Bio Compression Systems IC-1545-DL Multi-Flo DVT Combo operating instructions

Drive
Drive Deluxe 13016-2 Assembly instructions

ELMASLAR
ELMASLAR HEALTHTIME user guide

Omron
Omron HEM-RML31-B instruction manual

Active Key
Active Key AK-PMH12 user manual

Sunrise Medical
Sunrise Medical JAY 247795 owner's manual

Bitmos
Bitmos sat 801 Instruction for use, installation and assembly

NOVAFON
NOVAFON Pro user manual

Liko
Liko Universal SlingBar 350 Instructions for use

LINET
LINET ELEGANZA 5 Instructions for use and Technical description

Welch Allyn
Welch Allyn 88000A Operating instructions manual

Arjo
Arjo Evenda EV-ACC09 Accessories Instructions