IMPETUS IE480 User manual


3
5
5
6
15
15
16
17
18
18
19
19
19
20
20
21
21
22
23
24
25
26
26
2
TABLE OF CONTENTS
INTRODUCTION / IMPORTANT INFORMATION
PACKING LIST
HARDWARE PACK PACKING LIST
ASSEMBLY INSTRUCTIONS
HOW TO MOVE THE TRAINER
HOW TO ADJUST THE BALANCE OF THE TRAINER
CONSOLE DESCRIPTION
OPERATION PROCEDURE
USING THE MANUAL PROGRAM
USING THE BEGINNER PROGRAM
USING THE ADVANCE PROGRAM
USING THE SPORTY PROGRAM
USING THE CARDIO (H.R.C.) PROGRAM
USING THE WATT CONTROL PROGRAM
USING THE RECOVERY PROGRAM
USING THE BODY FAT CALCULATION PROGRAM
TELEMETRIC HEART RATE CHEST STRAP
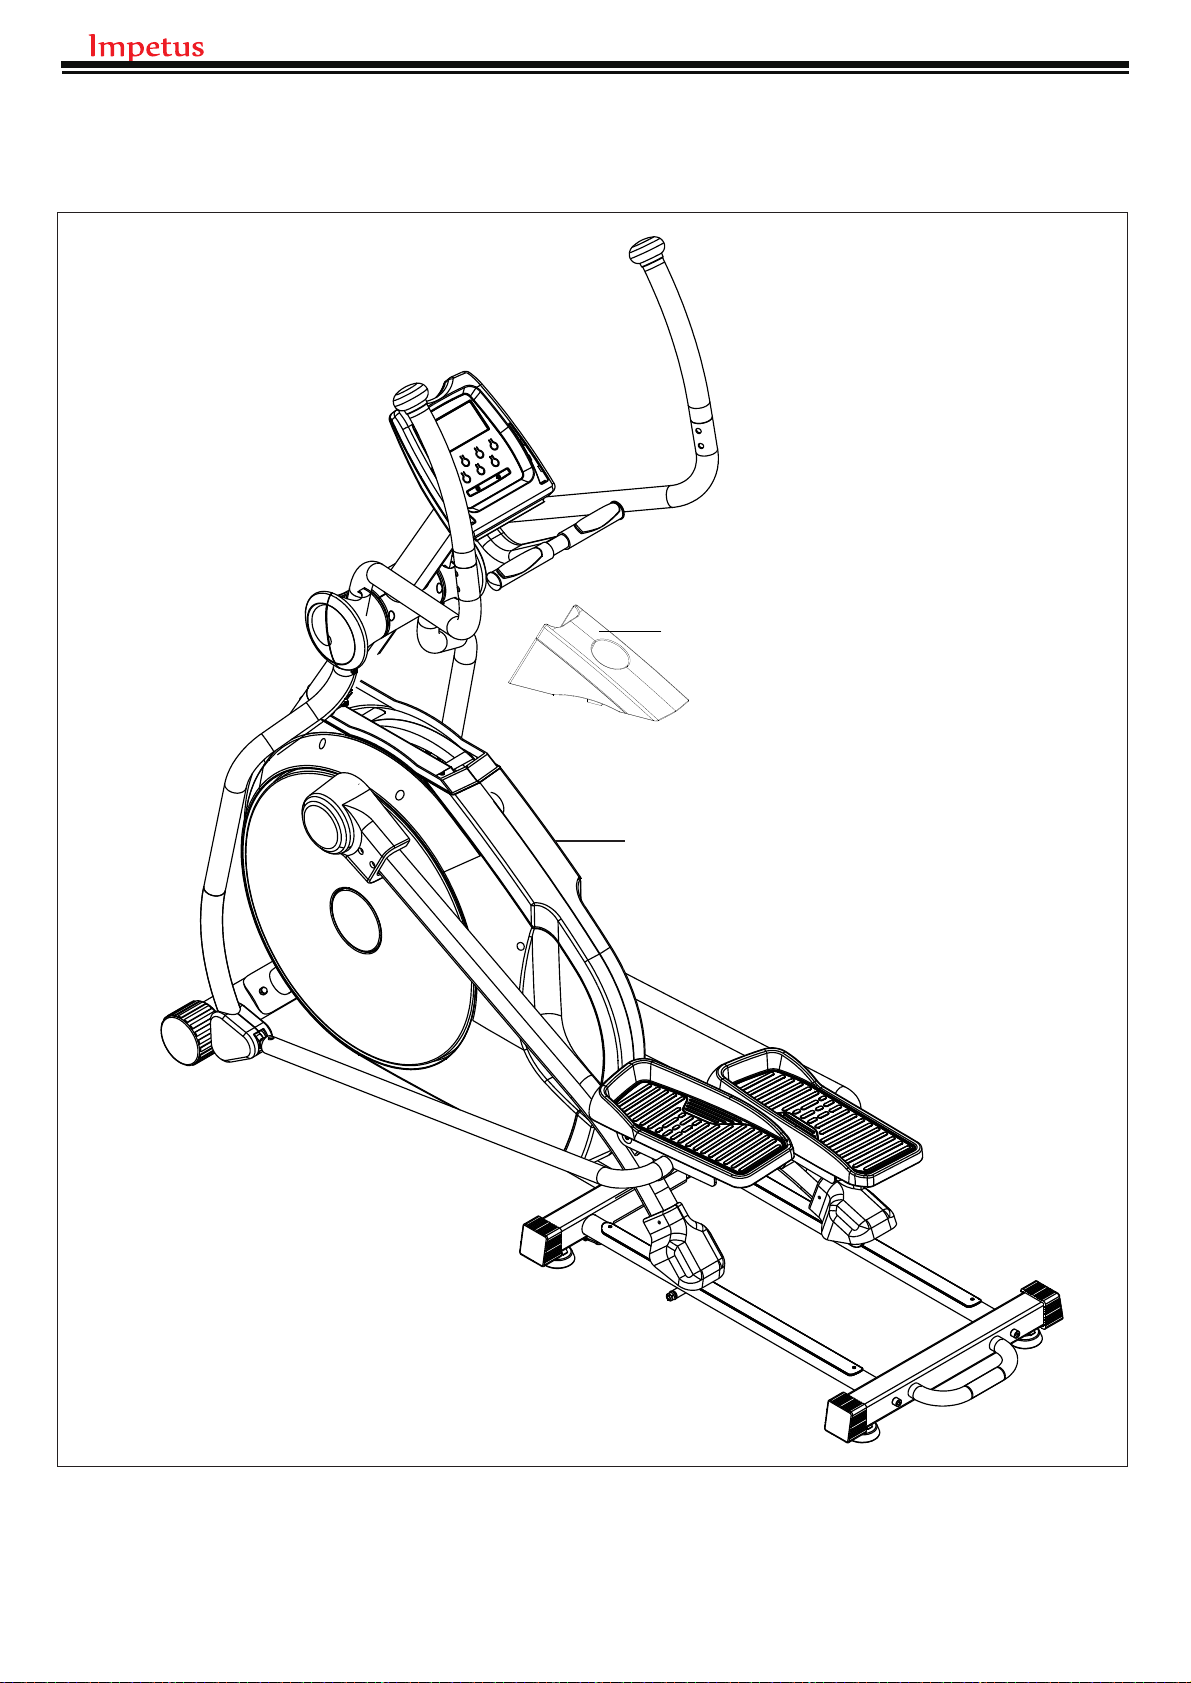
EXPLODED VIEW
PART LIST
WARM UP / COOL DOWN
CLEANING & MAINTENANCE
RECYCLING INFORMATION
CONSOLE
GENERAL
PROGRAM PROFILES

A. Introduction
This user manual contains assembly, operation, maintenance and safety
information.
Please read and retain this manual for future reference.
B. Safety guidelines
a. Read the user manual and all accompanying literature. Follow it carefully
before using your machine.
b. This machine is intended for indoor home or commercial location use only.
c. Inspect your exercise machine prior to exercising to ensure that all parts are
tightened.
d. Make sure the trainer is stable on the floor. Avoid uneven surfaces.
e. Keep children under age of 14 and pets away from the exercise trainer at all
times.
f. Exercise equipment has moving parts. Keep others, especially children, at a
safe distance while exercise.
g. Make sure all devices are fully adjusted before use to avoid injury.
h. Remove all jewelry, including rings, chains and pins before exercising.
i. Always wear suitable clothing and footwear during exercise. Do not wear
loose fitting clothing that could become caught in the moving parts of your
exercise machine.
j. Warm up 5 to 10 minutes before each workout and cool down 5 to 10 minutes
afterward. This allows your heart rate to gradually increase and decrease and
will help prevent muscle strain.
k. Never hold your breath while exercising. You should breathe at a normal rate
in conjunction with the level of exercise being performed.
l. Rest adequately between workouts. Muscles tone and develop during these
rest periods.
3

IMPORTANT:
THE MAXIMUM RECOMMENDED WEIGHT CAPACITY FOR YOUR
EQUIPMENT IS KGS.
WARNING:
Before commencing with any exercise program, please consult your
family physician. If at any time during exercise you feel faint, dizzy or
experience pain, stop and consult your family physician.
The safety level of the equipment can be maintained only if it is examined
regularly for damaged and wear.
The appliances are not for children under age of 14.
IMPORTANT:
Read all instructions carefully. Assemble the unit in accordance with the
steps in the manual. Lay out all parts on the floor and check if you have all
the parts included completely before beginning assembly. In case of a
discrepancy, please contact the customer service department
150
4

Main frame
Handlebar post (85) Lower link arm (L&R, 83 & 73)
Pulse grip set (89)
Guide rail set (55)
Rear stabilizer set (51)
Upper handlebar
(L&R,93 & 103)
Lower handlebar
(L&R, 98&104)
Water bottle holder (45)
Post cover (90&91)
Handlebar cover
(front & rear, 96&97)
Disk bearing cover (72)
Lower handlebar cover
(99&100)
Console (105)
#75 (2pc)
Shaft
Φ17*111mm
#11 (8pcs)
Screw
M4*16mm
#76 (4pcs)
Washers
M8
#115 (2pcs)
Washer
M10
#31 (2pcs)
Locknut
M10
77 (4pcs)
Screw
M8*20mm
#101 (2pcs)
Screw
M8*40mm
#18 (2pcs)
Nut
M8
#82 (4pcs)
Oil bushing
Wrenches with screw driver
#113 (2pcs)
Lug washer
M18
# (2pcs)
Washer
M8
5

ASSEMBLY INSTRUCTIONS
STEP 1
1. Attach the DISK BEARING COVER (72) to the CONNECTING ARM ASSEMBLY (2A)
using 2 SCREW (#11).
2. Repeat the above steps on the other side.
72
11 2A
3A
STEP 2
1. Slide the GUIDE RAIL under the WHEELS as shown in Figure#1-A
2. Attach it to the MIDDLE STABILIZER as shown in Figure#1-B using 2 SCREWS (54), and
do not tighten the screws for now.
6

STEP 3
1. Attach the GUIDE RAILS to the REAR STABILIZER (E) with 2 SCREWS (54), and do not
tighten them for now.
2. Adjust the GUIDE RAILS until the ALUMINUM RAILS on the GUIDE RAILS are facing up.
3. Tighten all 4 SCREWS (54) when the adjustment is complete.
7

STEP 4
1. Attach the LOWER LINK ARM (F) to the PEDAL ARM BRACKET (B) using 1 SHAFT
(75), 1 LUG WASHER, 2 PRE-INSTALLED WASHERS (76) and 2 PRE-INSTALLED
SCREWS (77).
2. Repeat the above step on the other side.
113
Place the LUG WASHER onto the
LOWER LINK ARM as the picture shown
8

STEP 5
1. Connect the UPPER CONSOLE CABLES (86&39).
2. Slide the HANDLEBAR POST (H) onto the MAIN FRAME (A) using 2 PRE-INSTALLED
SCREWS (92), 2 PRE-INSTALLED SCREWS (109) and 4 PRE-INSTALLED WASHERS
(114).
92
109
114
9

STEP 6
1. Slide the UPPER HANDLEBAR (I) onto the HANDLEBAR POST (H) using 1 WASHER
(115) and 1 NUT (18).
2. Attach the LOWER HANDLEBAR (J) to the UPPER HANDLEBAR (I) using 5 PRE-
INSTALLED SCREWS (102).
3. Attach the LOWER HANDLEBAR (J) to the LOWER LINK ARM (83) using 1 BOLT (101),
1 WASHER (120), 2 OIL BUSING (82) and 1 NUT (18).
4. Repeat the above steps on the other side
115 31
82
120
!!Make sure this
screw is tightened
83
10

11
STEP 7
1. Attach the UPPER FRONT and UPPER REAR HANDLEBAR COVERS (96&97) to the
joints of the UPPER HANDLEBARS (K&I) as the picture shown.
2. Attach the FRONT HANDLEBAR POST COVERS (90&91) to the HANDLEBAR POST (H)
using 4 SCREWS (11).
3. Attach the LOWER FRONT and LOWER REAR HANDLEBAR COVERS (99&100) to the
joints of the LOWER HANDLEBARS (K&I) as the picture shown.
11

STEP 8
1. Insert the PULSE WIRE upward through the HANDLEBAR POST (H).
2.Attach the PULSE GRIP SET (M) to the HANDLEBAR POST (H) using 4 PRE-
INSTALLED SCREWS (77).
77
!!Make sure the wires go through
and comes out from this end
12

88 86
STEP 9
1. Remove top 2 PRE-INSTALLED SCREWS from the CONSOLE 105, Figuire. A), and
loosen the bottom 2 PRE-INSTALLED SCREWS.
2. Connect CONSOLE CABLES (86&88) to the CONSOLE (105).
3. Carefully tuck the CONSOLE CABLES into the HANDLEBAR POST (H), and Attach the
CONSOLE (105, Figure. B) with 4 PRE-INSTALLED SCREWS.
(
H
105
13
STEP 10
Attach the WATER BOTTLE HOLDER (45) to the MAIN FRAME (A) as the picture shown.
45
A
14

HANDLE
TRANSPORT WHEEL
Make sure the trainer is placed on the flat floor, and rotate the leveling foot clockwise or
counter-clock wise, so the leveling foot touches the floor.
1. Hold the handle and lift the trainer up, so the transport wheels touch the floor.
2. Move the trainer to your designated position while lifting the trainer.
3. Carefully let down the trainer.
15

CONSOLE DESCRIPTION
START/STOP
DOWN
UP
ENTER
RESET
RECOVERY
BODY FAT
START/STOP To start or stop workout.
RESET In stop mode, press the button to back to main menu.
UP To select training mode and adjust function value up.
MODE/ENTER In stop mode, the mode is to confirm all exercise data setting, and enter into program.
DOWN To select training mode and adjust function value down.
RECOVERY To test hear rate recovery status.
BODY FAT For body fat measurement
INSTRUCTION MANUAL OF SM2744-67
BUTTON FUNCTION
TIME Display range 0:00~99:99 ; Setting range 0:00~99:00 minutes
DISTANCE Display range 0.00~99.99 ; Setting range 0.00~99.90km
CALORIES Display range 0~9999 ; Setting range 0~9990 Cl
PULSE Display range P-30~230 ; Setting range 0-30~230
WATT Display range 0~999 ; Setting range 10~350
SPEED 0.0~99.9km/H
RPM 0~999
DISPLAY EXERCISE DATA
16

OPERATION PROCEDURE
POWER ON
Plug in the adapter, the console turns on and display all segments on LCD for 2 seconds
(Fig.01).
WORKOUT SELECTION
Press UP or DOWN key to select programs, Manual (Fig.02), Beginner (Fig.03), Advance
(Fig.04), Sporty (Fig.05), Cardio (Fig.06), Watt (Fig.07).
Fig.01
Fig.02 Fig.03
Fig.04 Fig.05
Fig.06 Fig.07
17

USING THE MANUAL PROGRAM
For a quick start, press START in the main menu, or follow the following steps for target
goals:
1. Use UP or DOWN key to select the program, choose Manual and press MODE / ENTER to
enter.
2. Use UP or DOWN key to set TIME (Fig.08), DISTANCE (Fig.09), CALORIES (Fig.10),
PULSE (Fig.11) and press MODE / ENTER to confirm.
3. Press START/STOP key to start the workout. Use UP or DOWN key to adjust the load
level.
4. Press START/STOP keys to pause the workout. Press RESET to reverse to the main
menu.
Fig.08 Fig.09
Fig.10 Fig.11
Fig.12
USING THE BEGINNER PROGRAM
1. Use UP or DOWN key to select the program, choose Beginner mode and press MODE /
ENTER to enter.
2. Use UP or DOWN key to select Beginner program 1~4 (Fig.13) and press MODE / ENTER
to comfirm.
3. Use UP or DOWN key to set TIME.
4. Press START/STOP key to start the workout. Use UP or DOWN key to adjust the load
level.
5. Press START/STOP key to pause the workout. Use RESET to reverse to the main menu.
Fig.13
18

USING THE ADVANCE PROGRAM
1. Use UP or DOWN key to select the program, choose Advance mode and press MODE /
ENTER to enter.
2. Use UP or DOWN key to select Advance program 1~4 (Fig.14) and press MODE / ENTER
to comfirm.
3. Use UP or DOWN key to set TIME.
4. Press START/STOP key to start workout. Use UP or DOWN key to adjust the load level.
5. Press START/STOP key to pause the workout. Use RESET to reverse to the main menu.
Fig.14
USING THE SPORTY PROGRAM
1. Use UP or DOWN key to select the program, choose Sporty mode and press MODE /
ENTER to enter.
2. Use UP or DOWN key to select Sporty program 1~4 (Fig.15) and press MODE / ENTER to
confirm.
3. Use UP or DOWN key to set TIME.
4. Press START/STOP key to start workout. Use UP or DOWN key to adjust the load level.
5. Press START/STOP key to pause the workout. Use RESET to reverse to the main menu.
Fig.15
USING THE CARDIO (H.R.C.) PROGRAM
1. Use UP or DOWN key to select the program, choose CARDIO and press MODE / ENTER
to enter.
2. Use UP or DOWN key to set Age (Fig.16).
3. Use UP or DOWN key to select 55% (Fig.17), 75%.90% or TAG (TARGET H.R.) (default:
100).
4. Use UP or DOWN key to set workout TIME.
5. Press START/STOP key to start or stop the workout. Use RESET to reverse to the main
menu.
Fig.16 Fig.17
19

USING THE WATT CONTROL PROGRAM
1. Use UP or DOWN key to select the program, choose WATT and press MODE / ENTER to
enter.
2. Use UP or DOWN key to set the target WATT (default: 120, Fig.18).
3. Use UP or DOWN key to set TIME.
4. Press START/STOP key to start the workout. Use UP or DOWN key to adjust the Watt
level.
5. Press START/STOP key to pause the workout. Use RESET to reverse to the main menu.
Fig.18
USING THE RECOVERY PROGRAM
1. After exercising for a period of time, keep holding on the hand grip or wear a chest strap
and press the RECOVERY key.
2. All function display will stop except the “TIME” starts counting down from 00:60 to 00:00
(Fig.19).
3. After the count down, the screen displays your heart rate recovery status, F1, F2…. to F6.
F1 is the highest rating, F6 is the lowest (Fig.20). User may keep exercising to improve
the heart rate recovery status. (Press the RECOVERY key again to return the main
menu.)
Fig.19 Fig.20
20
Table of contents
Other IMPETUS Fitness Equipment manuals


Popular Fitness Equipment manuals by other brands


BH FITNESS
BH FITNESS G6176E Instructions for assembly and use

Merrithew Health & Fitness
Merrithew Health & Fitness Cardio-Tramp Rebounder owner's manual

Fitness Doctor
Fitness Doctor Titan Manual instruction

Vision Fitness
Vision Fitness S60 Service manual

SKLZ
SKLZ STAR-KICK Getting started

Impex
Impex Marcy PT-5740 owner's manual


