IMPETUS IE6800 AM User manual

User's manual
IE6800/impetus
WEEE WARNING:
Do not dispose of electrical appliances as unsorted municipal waste, use
separate collection facilities.
Contact your local government for information regarding the collection
systems available.
If electrical appliances are disposed of in landfills or dumps, hazardous
substances can leak into the groundwater and get into the food chain,
damaging your health and well-being.
When replacing old appliances with new ones, the retailer is legally
obligated to take back your old appliance for disposal at least for free of
charge.
Testing specification :
Low voltage Directive - EN60335 - 1
E&E Directive - EN62233
EMC Directive - EN55014 - 1
EN55014 - 2
EN61000 - 3 - 2
EN61000 - 3 – 3
Features of product with CE mark:
Mechanical and electrical safety.
Symbol of high quality.
Reliability assurance

Introduction/Safty Guideline...................................................................1 2
Exploded View..........................................................................................
Parts List..............................................................................................4-5
Assembly instruction...........................................................................
-
3
6-13
14-18
Warm-up...........................................................................................18-19
Cleaning & maintenance..........................................................................19
Monitor Instruction............................................................................
INDEX
IE6800/impetus

A. Introduction
This user's manual contains assembly, operation, maintenance and safety
information.
In the interest of safety, please make certain that you read and understand all
the information below.
B. Safety guideline
a. Read the user's manual and all accompanying literature. Follow it carefully
before using your machine.
b. This machine is intended for indoor home or light commercial location use
only.
c. Inspect your exercise machine prior to exercising to ensure that all nuts and
bolts are fully tightened.
d. Make sure machine is stable on the floor. Avoid uneven surfaces.
e. Most exercise equipment is not recommended for small children.Children
should not use the machine. Keep unsupervised children away from the
equipment.
f. Exercise equipment has moving parts. Keep others, especially children, at a
safe distance while exercise.
g. Make sure all devices are fully adjusted before use to avoid injury.
h. Remove all jewelry, including rings, chains and pins before exercising
i. Always wear suitable clothing and footwear during exercise. Do not wear
loose fitting clothing that could become caught in the moving parts of your
exercise machine.
j. Warm up 5 to 10 minutes before each workout and cool down 5 to 10 minutes
afterward. This allows your heart rate to gradually increase and decrease and
will help prevent muscle strain.
k. Never hold your breath while exercising. You should breathe at a normal rate
in conjunction with the level of exercise being performed.
l. Rest adequately between workouts. Muscles tone and develop during these
rest periods. Beginners should workout twice a week and increase gradually
to 4 or 5 times per week.
1
INTRODUCTION / SAFETY GUIDELINE
IE6800/impetus

m. Do not “over train” Incorrect or excessive training may result in injury.
n. Warning that any of the adjustment devices should not be left projecting.
IMPORTANT :
THE MAXIMUM RECOMMENDED WEIGHT CAPACITY FOR YOUR
EQUIPMENT IS KGS.
Warning :
Before commencing with any exercise program, please consult your family
Physician. If at any time during exercise you feel faint, dizzy or experience pain,
stop and consult your family physician, the manufacturer may use same as a
defense to any claim for injuries, damage or loss. The above warnings are in no
way intended to limit or modify the consumer's remedies for breach of
warranties pursuant to applicable Federal and State laws of regulations. They
are being supplied strictly to ensure the safety of the individuals using this
product.
The safety level of the equipment can be maintained only if it is examined
regularly for damaged and wear.
The appliances are not for children under 14 years of ages.
Safe distance :
Front and back : 100cm
Left and right sides : 100cm
Important:
Read all instructions carefully. Assemble the unit in accordance with the steps
in the manual. Lay out all parts on the floor and check if you have all the parts
included completely before beginning assembly. In case of a discrepancy, pls
call the customer service department of the store for assistance.
Replace defective components immediately and keep the equipment out of use
until repaired.
150
2
IE6800/impetus

3
Exploded View
B1
B11
B10
B2
B4
B5
B6
A10
D12
D11
B2
B9
B7
B8
B7
B9 A6
F5 D7
D8
A10
A10
D9
D10
D11
D14
D9
D10
B2
B3
D1R
D7 D8 F3
F7
F6
A30
D11
D10
D9
F4
F1R
F2
E8
D10
F10 F9
F2
E1R
E4
D14
A4
E3
D5
E5
E7
A25
A28
A26
D2
D3
D4
C6
E6
C7
D14
C8
C9
A27X30PIEZAS
A29
A23R
A10
D13
C2
C1
C3
C4
C5
C11
C1
C2
C7
D13
D14
A2
G2
A19
A22R
A20
A3
A10
C6
G1
A22L
A19
A20
A23L
A10
A24
A28
F2
F2
E9
F10
F9
D10
F1L
A10
A27X30PIEZAS
A18
A14
A15
A15
A17
A16 A13
A11
A12
A5
A4
A8 A1
A7
D4
D3
A30
D2
D5
D1L
F5
D8
D7
D6
D7
D8
A10
D12
D11
D10
D9
D14
A9
F8
F7
F6
F3
E8
E1L
E3
E5
A4
D14
E4
E7
E6
A21
E9
D6
F8
E2
E2
A31
A3
A10
C10
C12
C12
E9
E9
IE6800/impetus

4
PARTS LIST
NO. NAME SPECIFICATION Q'TY NO. NAME SPECIFICATION Q'TY
A1 Main frame 1 B4 Fixed foot pad Φ76.2 pipe use 2
A2 Fan wheel Φ450 1 B5 Flat washer M5×Φ13×1.5T 2
A3 Tension motor 1 B6 Self-tap screw M5×16mm 2
A4 Ball bearing 6004ZZ 4 B7 Moving wheel Φ76 2
A5 Nut 6-10T 1 B8 Allen bolt M8×40mm 2
A6 Allen bolt M10×16mm 2 B9 Dome nut M8 2
A7 Allen bolt M10×65mm 4 B10 Aluminum rail
trimming 4
A8 Spacer Φ25.1×Φ21.1×
58.5mm 1 B11 Allen bolt M6×10mm 8
A9 Sensor fixing 1 C1 Crank set 2
A10 Self-tap screw M4×12mm 15 C2 Crank cover 2
A11 Nut 3-26×6T 2 C3 Belt pulley Φ310 1
A12 Nylon lock nut M6 1 C4 Shaft 1
A13 J-type bolt M6×60mm 1 C5 Belt 498J8 1
A14 Idle frame 6T 1 C6 Nut for shaft M10 2
A15 Flat washer Φ10×Φ23×2T 4 C7 Tri-crank cover 2
A16 Ball bearing 6200ZZ 2 C8 Spacer Φ24×Φ20.4×5mm 2
A17 Flat screw M10×35mm 1 C9 Allen bolt M8×20mm 4
A18 Flat screw M8X16mm(1.4mm 1 C10 Nut M8 4
A19 Hand pulse set 2 C11 Magnet Φ15×7 1
A20 Cap Φ31.75 4 C12 Allen bolt M6×10mm 4
A21 Foam grip Φ31.75×3T 2 D1R Pedal arm
assembly ( R ) 1
A22R Handle
trimming cover 1 D1L Pedal arm
assembly ( L ) 1
A22L Handle
trimming cover 1 D2 Ball sleeve Without flange 2
A23R Fan cover ( R ) 1 D3 Universal ball
head 2
A23L Fan cover ( L ) 1 D4 Ball sleeve With flange 2
A24 Fan outlet 1 D5 C-clip C type R45 2
A25 Fan disk 2 D6 Spacer Φ15×Φ12.35×
67mm 2
A26 Stretch net 6 D7 Bearing sleeve 4
Ball Bearing
A28 Self-tap screw M4×15mm 12 D9 PU wheel 4
A29 Self-tap Philips
screw M4×25mm 7 D10 Flat washer M8×Φ20×2T 6
A30 Self-tap Philips
screw M4×10mm 4 D11 Nut M8 4
A31 Hand pulse 2 D12 PU roller cover 2
B1 Guide rail set 1 D13 Nut M8 2
B2 End cap 4 D14 Flat washer M8*2.0T*23 2
B3 Adjustable pad Φ50 M12+ nut 2 E1R Hand rail ( R ) 1
4A27 Self-tap screw M4×8mm 30 D8 6201ZZ
IE6800/impetus

5
NO. NAME SPECIFICATION Q'TY NO. NAME SPECIFICATION Q'TY
E1L Hand rail ( L ) 1
E2 Nut 4-20UNF 8T 2
E3 Ball bearing 6905ZZ 2
E4 Flat washer 4×2.0T×Φ28 2
E5 Flat cap Φ38 2
E6 Spacer sleeve 2
E7 Foam grip Φ31.75 pipe use 2
E8 Cap 30×70 2
F1R Pedal fixed
assembly ( R ) 1
F1L Pedal fixed
assembly ( L ) 1
F2 Ball bearing 6003ZZ 4
F3R Pedal ( R ) 1
F3L Pedal ( L ) 1
F4 Allen bolt M12×109mm 2
F5 Nut M12×P1.25 2
F6 Flat washer M6×Φ16×1.5T 8
F7 Allen bolt M6×40mm 8
F8 Cap Φ31.75 2
F9 Hex. bolt M8×12mm 2
F10 Bushing Φ42 2
G1 Monitor 1
G2 Philips screw (With monitor) 4
IE6800/impetus

Assembly instruction:
Packing list
6
BE1R E1L
F1R
F1L
A
G1 F3L
F3R
C12
E9 F1 0
Nylon lock nut
(4 X20UNF 8T E10 )
Fl at washer
(4 X2.0X∮28)
Flat washer
(M8X2.0TX∮20)
Al len bolt
(M8X12mm) Allen bolt
Al len bolt
(M 10X65mm)
Ph ilips screw
(M 5X8mm) Flat w as her
(M6X1.5TX∮16)
Al len bolt
(M6X40mm) 5MM
6MM
8M M
IE6800/impetus

7
STEP 1:
Attach the Main Frame (A1) to the Guide Rail Set (B1) with the 10X16L
(A6) Allen Bolt and the M10X65L Allen Bolt.
Assembly:
B1
A6
A1
A7
IE6800/impetus

8
STEP 2:
Remove the ties from both Pedals (D1L) and (D1R), and place them on top
of the Guide Rail Set (B1).
D1R
D1L
B1
IE6800/impetus

9
STEP 3:
Firmly attach the Left Hand Rail (E1L) to the Main Frame (A1) with the
4×2.0T×Φ28 Flat Washer (E4) and the 4-20UNF 8T Nut (E10), the insert
the Φ50.8 Plug (C12). Continue the same process with the Right side.
E1L
E10
E4
A1
C12
E1L
IE6800/impetus
10
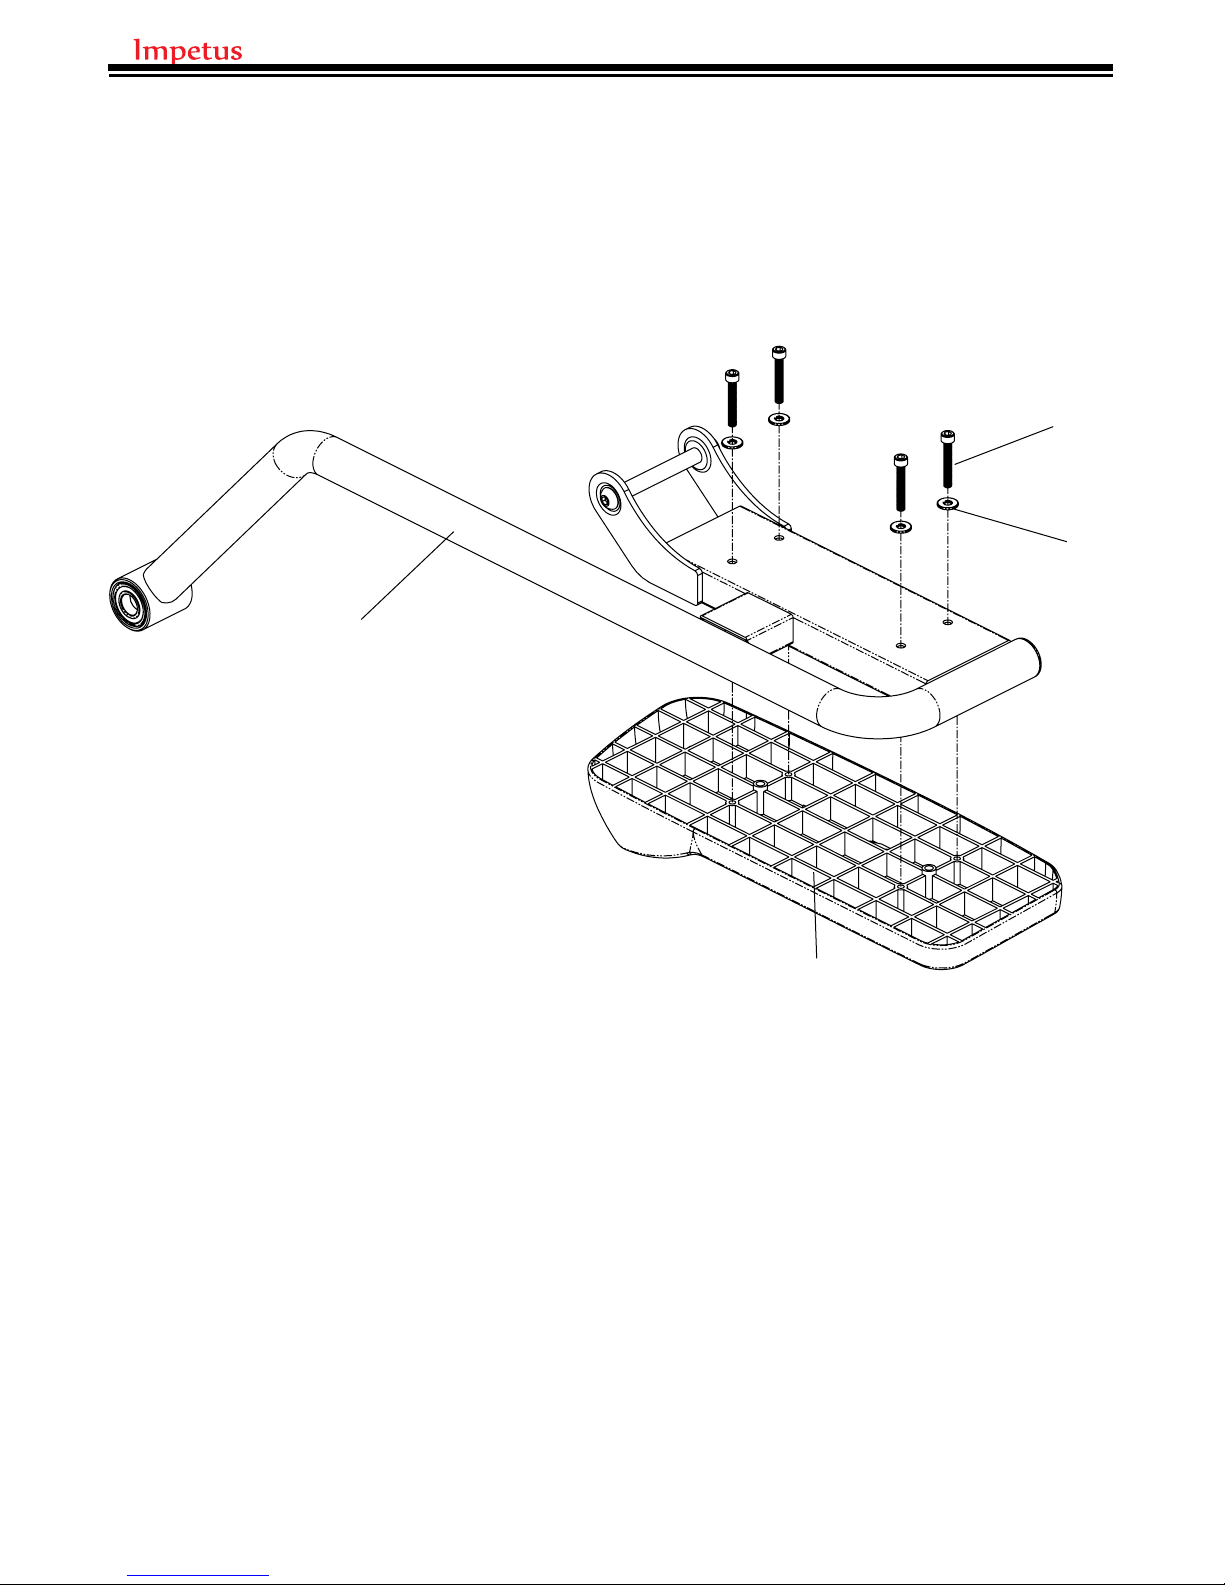
STEP 4:
Attach the Pedal (F3) to the Pedal Fixed Assembly (F1) with the
M6×Φ16×1.5T Flat Washer (F6) and the M6X40L Allen Bolt (F7). Continue
the same process with the other side.
F3
F6
F7
F1
IE6800/impetus
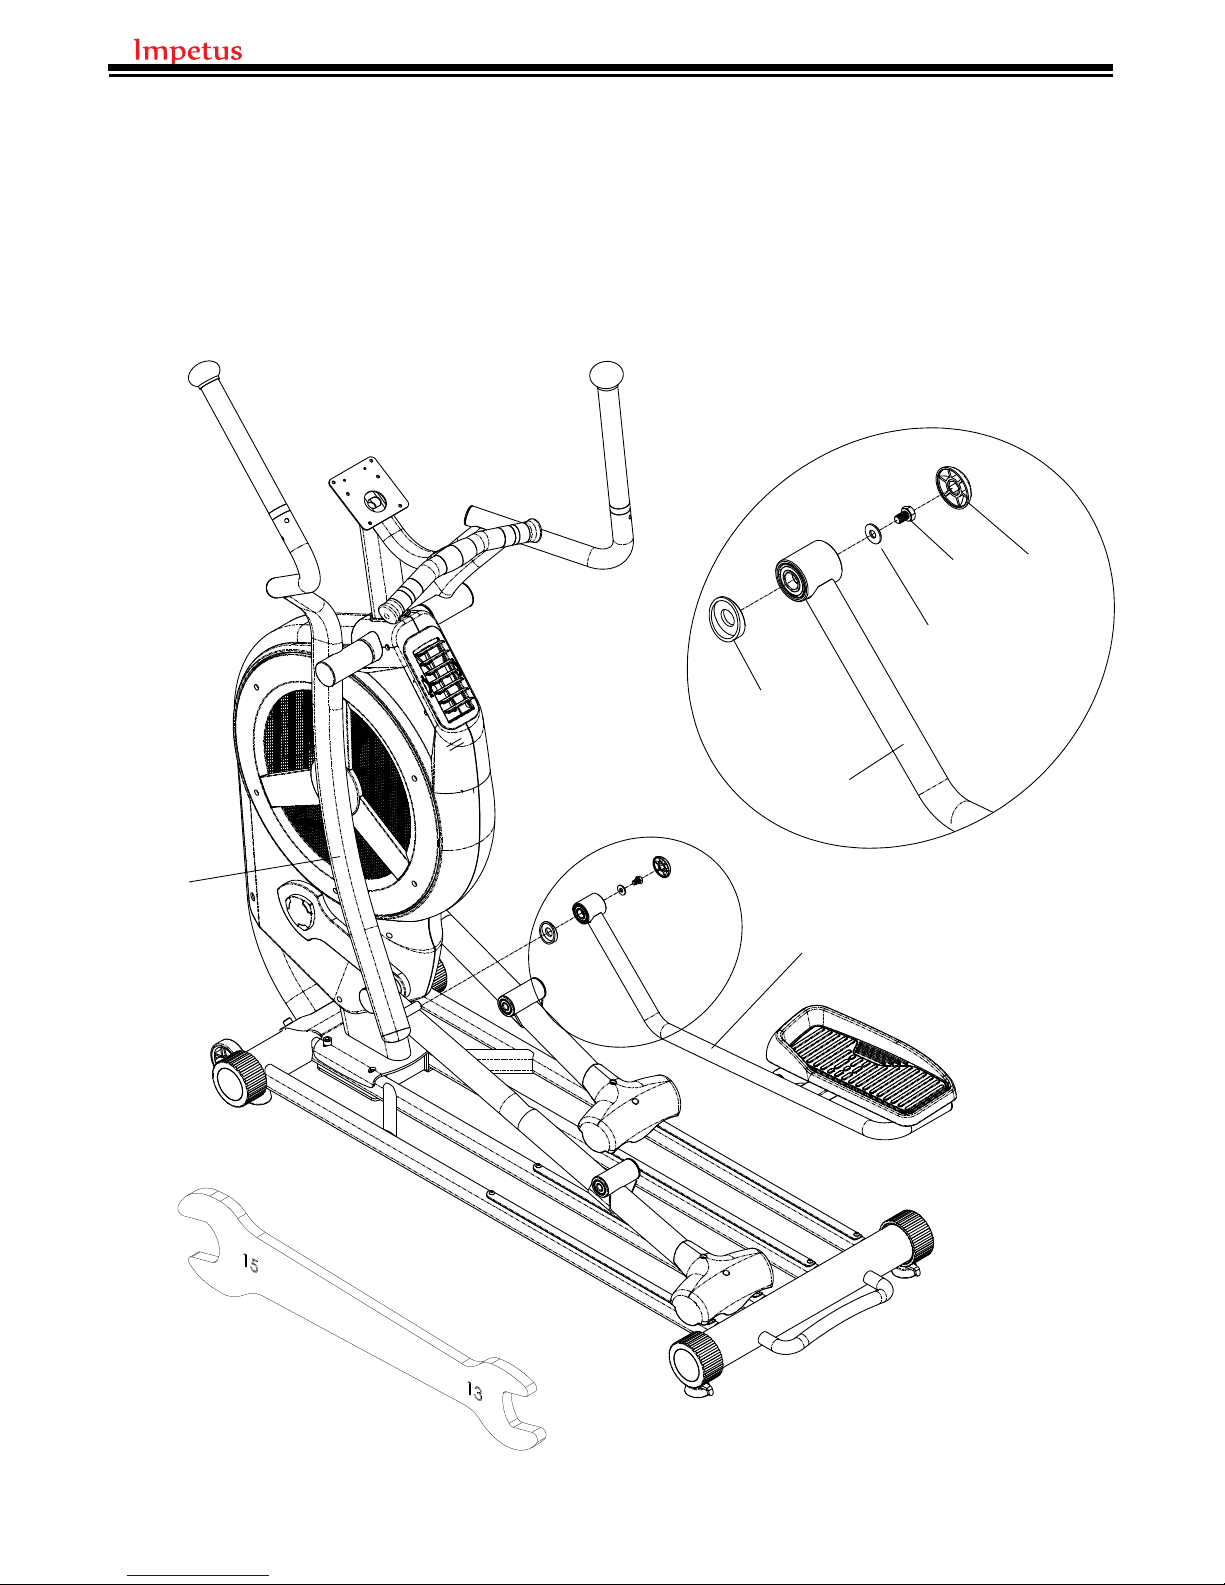
STEP 5:
Place the Spacer Sleeve (E9) to the Left Hand Rail (E1L) and attach the
Left Pedal Fixed Assembly (F1L) to the Hand Rail with the M8×Φ20×2.0T
Flat Washer (D10) and M8X12L Allen Bolt (F9), then cover it with the
Bushing (F10); Continue the same process with the other side.
11
F1L
E1L
F10
F9
E9
D10
F1L
F1
IE6800/impetus
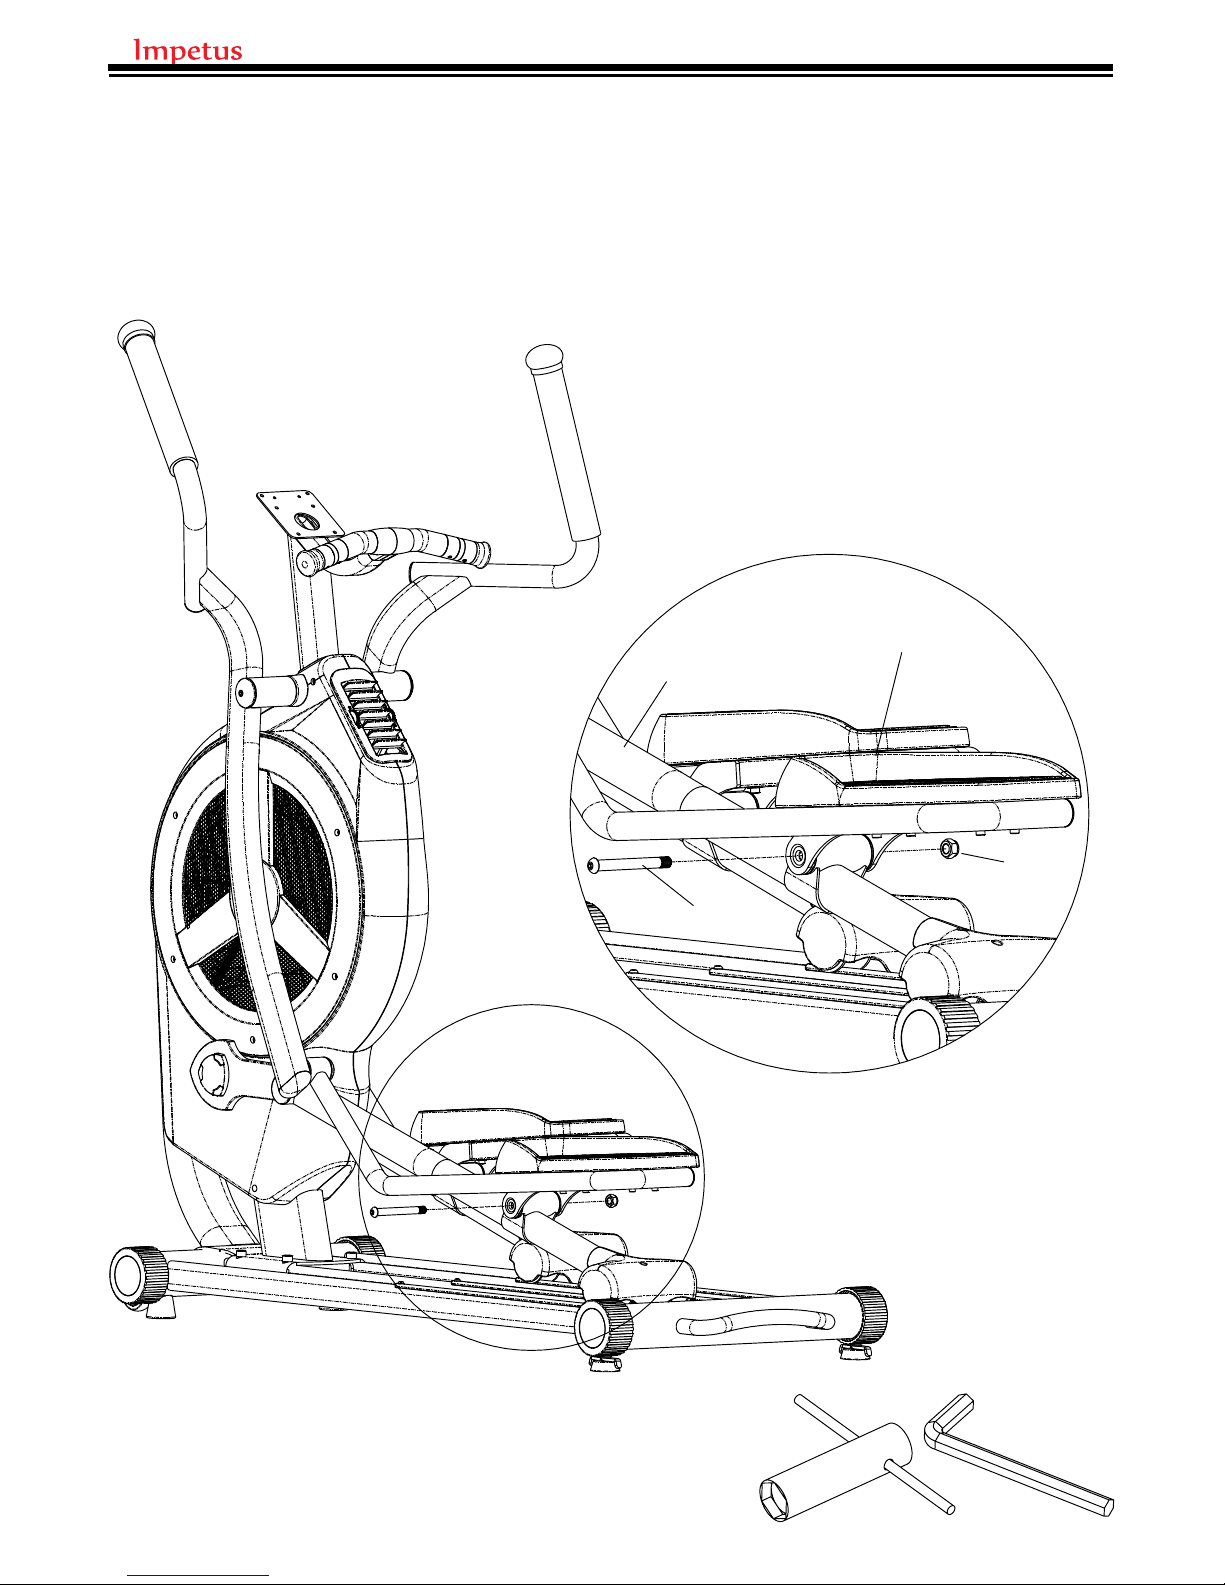
STEP 6:
Remove the M12X109L Allen Bolt (F4) and the M12 Nut (F5) from the Left
Pedal Fixed Assembly (F1L), and firmly attach them to the Left Pedal Arm
Assembly (D1L) .Continue the same process with the other side.
12
F5
F4
D1L F1L
6MM
IE6800/impetus

G2
G1
A1
A31
A3
STEP 7:
.First remove the Philip Screw (G2) from the Monitor Assembly (G1).
Connect the 9-Pin female adapter with the Tension Motor (A3), and
connect the 2-Pin male adapter with the Hand Pulse Wire (A31). Then
attach the Monitor (G1) to the Main Frame (A1) with the Philip Screw (G2)
previously removed.
IE6800/impetus
13

14
MONITOR INSTRUCTION
DISPLAY FUNCTION:
BUTTON FUNCTION:
START/STOP To start or stop workout.
RESET In stop mode, press the button to back to main menu.
UP To select training mode and adjust function value up.
MODE/ENTER In stop mode, the mode is to confirm all exercise data setting, and enter into program.
DOWN To select training mode and adjust function value down.
RECOVERY To test hear rate recovery status.
BODY FAT For body fat measurement.
TIME Display range 0:00~99:99 ; Setting range 0:00~99:00 minutes
DISTANCE Display range 0.00~99.99 ; Setting range 0.00~99.90km
CALORIES Display range 0~9999 ; Setting range 0~9990 Cl
PULSE Display range P-30~230 ; Setting range 0-30~230
WATT Display range 0~999 ; Setting range 10~350
SPEED 0.0~99.9km/H
RPM 0~999
IE6800/impetus

15
OPERATION PROCEDURE
1. Power On -
Connect power supply and console will power on with a long beep sound,
LCD display all segments (Drawing A) for 2 seconds and than enter into
personal data setting mode
Drawing A
2. User Profile Set up -
Press MODE button each time when value's determined for SEX, AGE,
HEIGHT, and WEIGHT setting and all entered data will be saved in user
profile (Drawing B).After user data set up, console will display main menu
(Drawing C).
Drawing B Drawing C
3. Program Selecting-
In main menu, first exercise program MANUAL will flash, user may press UP
and DOWN button to select MANUAL PROGRAM (Drawing D)USER
PROGRAMH.R.C(Drawing E)WATT.
IE6800/impetus

16
Drawing D Drawing E
3.1.Quick Start and Manual --
After power on, user may press START/STOP button to start exercise in
MANUAL immediately without any setting.
Before exercise in Manual mode, user may set up TIME, DISTANCE,
CALORIES and PULSE target and press MODE button to confirm. After
set up all the targets, press the START/STOP button to start workout.
Level can be adjusted during exercise by press UP or DOWN button.
3.2.PROGRAM (12 profiles):
Before exercise in Program mode, user may set up TIME target.
Press UP and DOWN to select Program with 12 profiles and then press
MODE to set up exercise time. Press the START/STOP button to start
workout.
Level can be adjusted during exercise by press UP or DOWN button.
3.3.USER PROGRAM --
User may press UP and DOWN button and then press MODE to create his
own profile. (from column 1 to column 20) User may hold on pressing
MODE button for 2 seconds to quit profile setting.
3.4.H.R.C.(Heat Rate Control)--
There will be 4 programs: H.R.C55, H.R.C.75, H.R.C.90 and H.R.C. TAG;
use the UP and DOWN button to select one program and press the MODE
button to set up exercise time. Press the START/STOP button to start
workout.
If user selects H.R.C.55/75/90, the setting heart rate will be displayed in
the PULSE column according to the user's AGE inputted (Drawing F). .
IE6800/impetus

If user selects H.R.C. TAG (press the MODE button to enter), preset
PULSE value “100” will be shown in flashing text and then user can press
the UP and DOWN button to adjust target range from 30~230(Drawing G)
Drawing F Drawing G
3.5. WATT --
The preset watt value 120 is flashing on screen in WATT setting mode. User
may use UP, DOWN button to set target value from 10 to 350. Press MODE
button for confirm.
1. BODY FAT:
4.1.In STOP mode, press the BODY FAT button to start body fat
measurement.
4.2.During measuring, user have to hold both hands on the handgrip. The
LCD will display “--” “--“ for 8 seconds until console finish measuring.
4.3.LCD will display BODY FAT advice symbol, BODY FAT percentage, BMI
for 30 seconds.
5.RECOVERY :
5.1.After exercising for a period of time, keep holding on handgrips and
press “RECOVERY” button. All function display will stop except “TIME”
starts counting down from 00:60 to 00:00.
5.2.Screen will display your heart rate recovery status with the F1,F2….to
F6. F1 is the best, F6 is the worst.(Press the RECOVERY button again to
return the main display.)
6. USB power charger
The console provides USB power charger for tablet and smart phone only.
IE6800/impetus
17
This manual suits for next models
1
Table of contents
Other IMPETUS Fitness Equipment manuals


