In-Ex Gardenmate 20 User manual
OWNER’S MANUAL
FOR
In-Ex Gardenmate 20
12V SPRAYER
In-Ex™
PO Box 1010, 145 Harts Road
Tiritea, Palmerston North
Ph:06 354 6060
Fax:06 355 3199
E-Mail: sales@c-dax.co.nz
www.c-dax.co.nz

2
In-Ex Gardenmate 20
OWNER’S MANUAL
(Pt.No.2400-7105 Issue 5, Jan 2016)
TABLE OF CONTENTS
INTRODUCTION .......................................................................................................................................3
DESCRIPTION ...........................................................................................................................................3
SPECIFICATIONS......................................................................................................................................3
WARRANTY AND LIABILITY ................................................................................................................3
INSTALLATION.........................................................................................................................................5
INSTALLING THE BATTERY..................................................................................................................5
THEORY OF OPERATION .......................................................................................................................7
OPERATING INSTRUCTIONS.................................................................................................................7
OPERATING HINTS..................................................................................................................................7
MAINTENANCE........................................................................................................................................8
TROUBLESHOOTING...............................................................................................................................9
FLOJET SPRAY PUMP RELACEMENT PARTS ..................................................................................10
GARDENMATE 20 PARTS DIAGRAM.................................................................................................11
Throughout this manual there are highlighted text boxes containing warnings, cautions and notes.
Warnings are mandatory instructions to prevent serious injury or permanent damage.
Cautions are advisory instructions to ensure reliable operation of the equipment.
Notes are for convenient operation.
WARNING
Making pesticides is a most dangerous time as it involves handling the concentrated material. For toxic
compounds, use protective clothing such as overalls, hat, gloves, boots and respirator.
When using concentrated sprays, full protection is necessary.
When using diluted sprays, wear at least a hat, long-sleeved cotton overalls and boots. If you use pesticides
regularly it is a good idea to always wear a respirator to avoid cumulative effect … other protection may be
required –check the label. It may have specific directions for that particular chemical.
Protective clothing should always be properly cared for. Rinse heavily contaminated clothes in the open before
washing in the laundry.
Wash and dry these clothes every day –but keep them separate from other washing.
Respirators need special care … clean respirator after spraying. Use soapy water then rinse and allow to dry
completely before storing in a clean plastic bag. Replace canisters in respirator after every 8 hours use.

3
INTRODUCTION
Congratulations. You have just purchased a Gardenmate 20L sprayer from In-Ex. These units are specifically
developed for the accurate placement of liquid pesticides and fertilisers on turf, flowers and shrubs or any other
area where maintenance of carefully cultured turf is important.
DESCRIPTION
The Gardenmate 20 sprayer is a garden/lifestyle sprayer ideal for small area use. Each unit comprises a non-
corrosive polyethylene tank, a 12V pump and a spray gun with adjustable nozzle.
SPECIFICATIONS
(Specifications subject to change without notice)
Dry Weight / Dimensions / Capacity (all approx)
Power Consumption Flojet: ~3Amps (at 20PSI)
Pump 12 VDC Flojet 7.6 Lpm
Tanks Non-Corrosive, medium density, UV stabilised polyethylene
Filtration Triple filter system comprising; fine mesh tank strainer, large capacity 50 mesh
suction filters, and spray gun filter
Controls Toggle ‘on/off’ switch located on unit
Spray gun Flexible lance-style spray gun with adjustable nozzle
Hose Each unit is supplied with 5m of spray hose
Battery 12 Volt, 10 Amp-hour,
NOTE: Charger supplied as optional extra
1. WARRANTY AND LIABILITY
Use of the equipment
1.1 You must satisfy yourself as to the suitability of the equipment for your intended use(s) of the
equipment.
Your relationship with the retailer
1.2 Where you consider you have a warranty claim (or any other claim) in relation to the equipment,
you must contact the retailer who sold you the equipment, not C-Dax directly. The retailer is
responsible for liaising with C-Dax in respect of your claim.
Warranty
1.3 C-Dax warrants to the original purchaser that the equipment is sold free from defects in materials
and workmanship for a period of 12 months from date of first retail sale (6 months from date of
first retail sale if the equipment is sold in the U.K.) subject to the terms set out below.
1.4 C-Dax will at its option repair or replace the defective equipment (or part of the equipment) or
notify the retailer of the equipment to refund the purchase price for such defective equipment to
you in the event of a breach of this warranty, subject to the terms set out below.
Unit
Dry Weight
(Kg)
Capacity
(L)
Width
(mm)
Height
(mm)
Length
(mm)
GardenMate 20
12.5
20
400
1020
520

4
Liability
1.5 Except for the warranty set out in clause 1.2 above, all warranties and representations (including
those expressed or implied by law) in respect of the equipment or advice relating to the
equipment provided to you by C-Dax are excluded to the extent permitted by law.
1.6 Notwithstanding anything else in this manual, C-Dax’s maximum liability to you (in the event that
such liability exists) in respect of any breach of warranty, any matter set out in this manual, or for
defective equipment or advice relating to the equipment provided is limited at C-Dax’s option to:
(a) repairing or replacing the equipment (or part of the equipment); or
(b) notifying the retailer of the equipment to refund the price for the equipment paid by you.
1.7 Notwithstanding anything else in this manual, in no event will C-Dax be liable, whether in
contract, tort (including negligence) or otherwise:
(a) where you have altered or modified the equipment, misused or misapplied the equipment,
or the equipment has been subjected to any unusual, excessive or non-recommended use,
service or handling (including as set out in this manual);
(b) where the equipment is not transported, stored, handled or used in accordance with any
directions given by C-Dax (or the retailer) to you (including as set out in this manual);
(c) where the equipment:
(i) has been subject to neglect, accident or hireage, or the damage arises from fair wear
and tear, battery damage or chemical attack;
(ii) has been built to a customer’s specifications; or
(iii) has been dismantled, repaired or serviced other than by an authorised service agent
of C-Dax;
(d) for loss or damage caused by any factors beyond C-Dax’s control; or
(e) for any loss of profit or revenue, or for any special, indirect, incidental or consequential
damage, loss or injury of any kind suffered by you.
1.8 Where C-Dax elects to repair or replace the equipment it will use reasonable endeavours to do so
as soon as practicable but will not be liable for any delay in doing so.
1.9 You agree that the transactions entered into between you and the retailer (and C-Dax) are for the
purposes of trade and that, having regard to all relevant circumstances of the transactions, it is
fair and reasonable that the provisions of the Consumer Guarantees Act 1993 (NZ) do not apply to
those transactions to the fullest extent permitted by law.

5
INSTALLATION
For transport purposes, units are sent partially disassembled –hence some assembly by the user is required. The
following parts are included with each unit:
GardenMate 20
- Handle Assembly - Battery
- Wheel (x2) - Tank, Frame & Hose
- Spray gun Lance - Owner’s Manual
- Battery Cable - 2 x Washers
- 2 x R-Clips - 1 x M5x25 Screw
- 1 x M5x30 Bolt
NOTE
Exploded parts diagrams of the unit can be found at the end of this manual.
GardenMate models are supplied with 12V batteries. If the unit you have purchased is supplied with a battery,
please read the following section carefully.
INSTALLING THE BATTERY
The standard battery fitted is a sealed lead-acid type rated at 12 Volts 10 Ampere-Hours. The battery is shipped in
a charged state. For maximum life the battery must be serviced in accordance with the following instructions.
Failure to comply with these instructions will result in premature failure of the battery.
Charging:
Charge the battery with a current as described in the table below. If using a manual charger the charger must be
monitored during the charging process. The battery charger should be disconnected when the charging has been
completed. Spray switch must be in the ON position in order for the charging circuit to be completed.
Place the battery in the recess or bracket on the unit. Using the supplied battery cable, connect the black wire to
the negative (-) terminal on the battery. Connect the red wire to the positive (+) terminal on the battery. Join the
female 2-pin connector from the switch to the male connector on the pump.

7
THEORY OF OPERATION
Spray fluid is prepared and placed in the tank via the lid opening and strainer basket. Foreign matter is trapped in
the strainer mesh for disposal after the tank has been filled.
When the pump is switched on power is applied to the pump motor from the battery. When the pump operates,
fluid is drawn through the filtered suction line into the pump head.
With each rotation of the pump motor, fluid is forced via valves into a high-pressure chamber in the pump head.
Fluid exits from the chamber and passes through the delivery hose to the handgun.
OPERATING INSTRUCTIONS
Place fluid in the tank through the strainer basket. Turn the switch on. The pump will run. Place the end of the
spray gun in the tank and press the trigger until all of the air has been expelled from the hose. The pump will stop
running when the trigger is released.
Operate the spray gun and adjust the tip until the pump runs smoothly and the desired spray pattern is obtained.
OPERATING HINTS
Pump
If a slight leak develops from between the pumphead components, gently tighten the pumphead screws. If
however, the leak persists or if a leak is observed from between the pumphead and the motor itself, cease
operation immediately and have the pump serviced.
CAUTION
Do not run the pump dry unnecessarily
Spray Gun
Turn the switch on. The pump should build up pressure then automatically switch off. If the pump switches on and
off repeatedly when the spray gun is NOT being used, a leak has occurred either in the delivery housing or the
pump. Repair the problem immediately.

8
CHEMICAL APPLICATION
CAUTION
The Turf and Garden range of 12V sprayers are not high volume sprayers nor ultra low volume. As a general rule
for most spotting applications, label rates under the heading “knapsack rates” would apply.
As no control can be exercised over the use of the equipment or over weather, plant or soil conditions, or over the
storage, handling, mixing, use or application of sprays or chemicals, In-Ex will not accept any liability for loss or
damage (consequential or otherwise) arising directly or indirectly from the use of this equipment.
Chemical Advice
In-Ex or their agents cannot make recommendations or give advice as to the use of chemicals and cannot accept
responsibility for any damage, injury or other consequence for disregarding this warning notice. Contact your
chemical supplier for advice.
WARNING
Mixing chemicals is a most dangerous activity as it involves handling the concentrated material. For toxic
compounds, use protective clothing such as overalls, hat, gloves, boots and respirator.
When using diluted sprays, wear at least a hat, long-sleeved cotton overalls, and boots. If you use pesticides
regularly, it is a good idea to always wear a respirator to avoid accumulation of toxins in the body. Other protection
may be required. Check the label for specific directions for the particular chemical.
Purchasers must ensure that operators of these machines are fully aware of the dangers of spraying chemicals.
MAINTENANCE
Keep the sprayer in good condition. Cleanliness and maintenance are essential for safe and trouble free
operation.
Cleaning
Flush the unit out after each use with a mild detergent solution. Leave fresh water in the pump system for storage.
Filters
Check the filters regularly and clean/replace if necessary.

9
Pressure Switch Adjustments
The pump pressure switch is factory set to 60PSI. Adjustment should not be necessary under normal operating
conditions. Increasing the pressure setting will not increase pump flow but may reduce pump life. To adjust the
switch, rotate the adjustment screw with an Allen key.
TROUBLESHOOTING
In-Ex and their distributors have a comprehensive parts inventory and capable service staff.
Repairs should only be undertaken by In-Ex, or an authorised In-Ex service centre.
Switch on but pump does not
operate
1. Blown fuse
Check wiring and replace
15A fuse
2. Pressure switch operated
Operate spray gun trigger
3. Pressure switch failed
Replace pressure switch
4. On/Off switch failed
Replace switch
Pump runs but does not stop.
1. Spray gun trigger open
Close trigger
2. Air lock in pump
Operate spray gun trigger
until all air is expelled from
the pump and hose.
3. Suction hose loose
Check and tighten all
suction hose connections
between pump inlet and
tank.
4. Dirt or spray residue in
pump valves
Replace valves.
5. Blocked suction filter mesh
Clean filter mesh.
Pump runs but pulses while
pumping
1. Spraying pressure higher
than the pump shut off
pressure
Reduce spraying pressure
by opening the adjustable
spray tip.
2. Pump shut off pressure too
low
Increase pump shut off
pressure. Refer
maintenance.
Fluid leaks from drain holes in
pump
1. Internal leak within pump
head
Remove pump for
servicing.
10
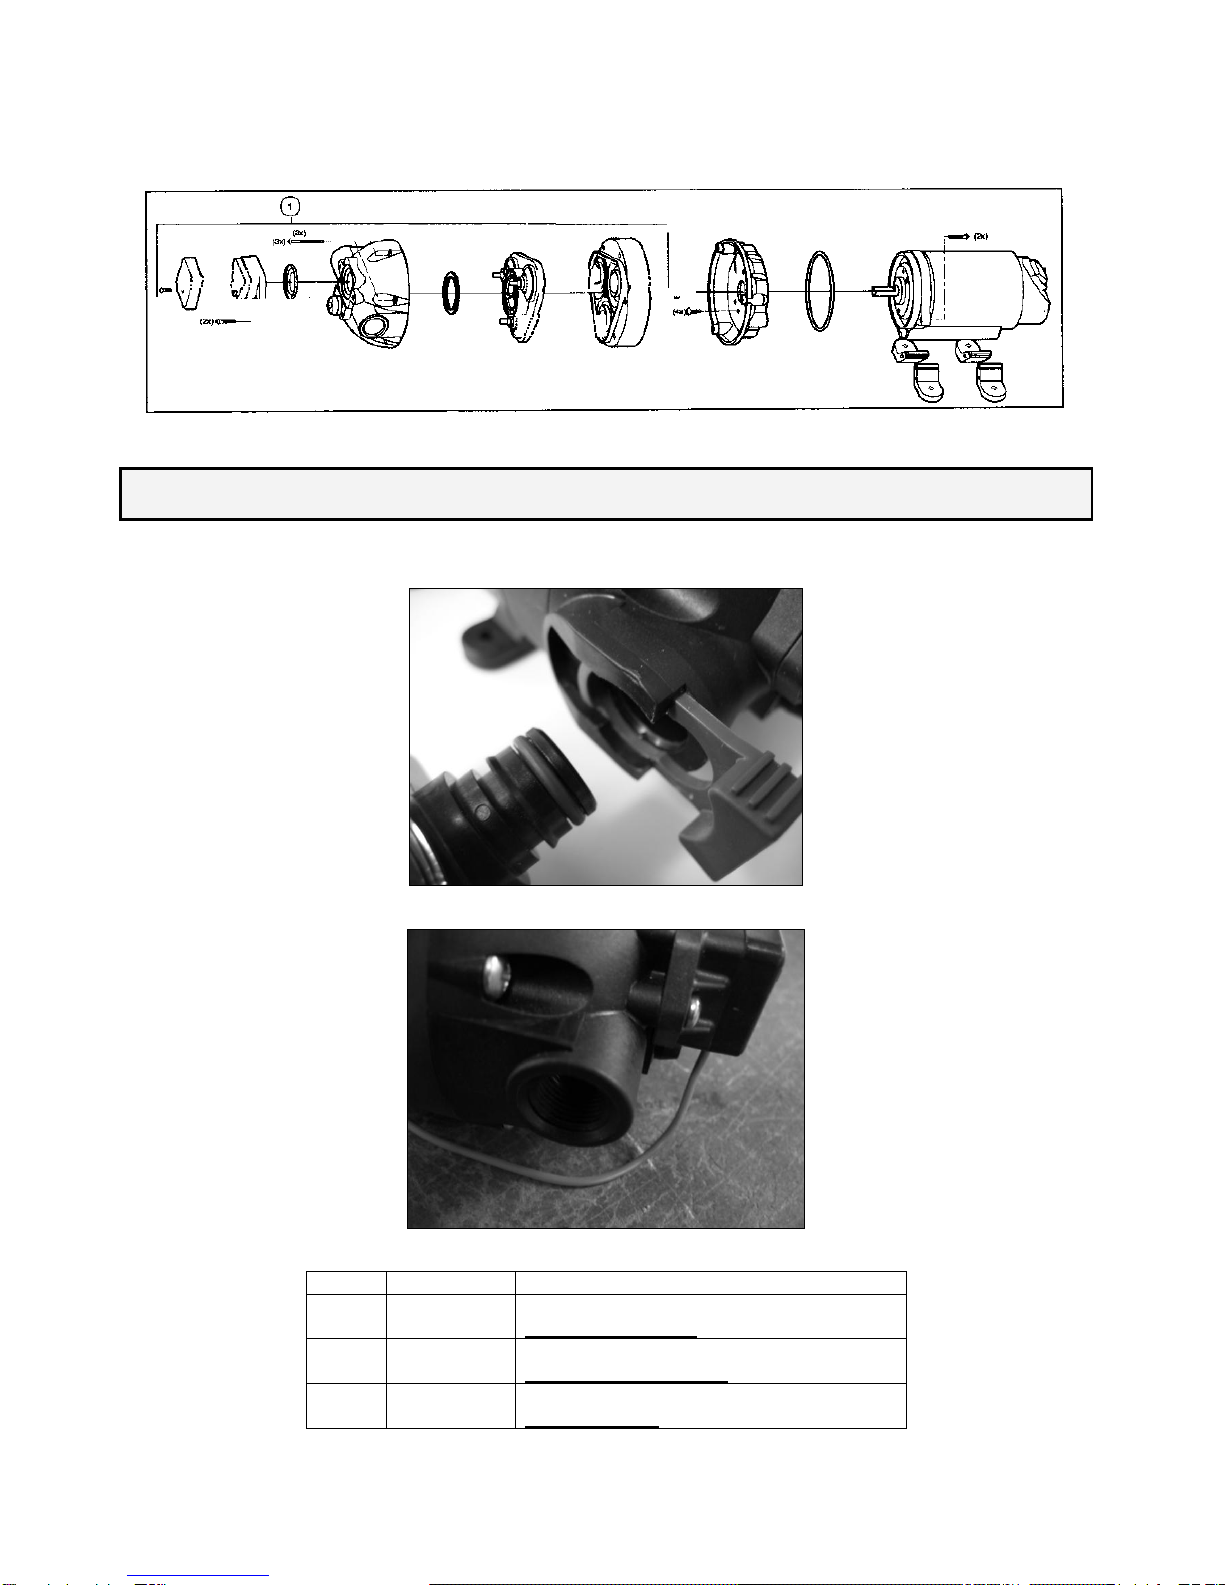
FLOJET SPRAY PUMP RELACEMENT PARTS
The following replacement parts for the 12V Flojet 7.6 L/Min pump are available from any INEX dealer:
NOTE
Please select the correct hose connection type for your pump
Quadport Type:
Screw Type:
ITEM
PART NO.
DESCRIPTION
1
6800-5170
Pumphead Kit (includes pressure switch)
To suit Screw Type
1
6800-5160
Pumphead Kit (includes pressure switch)
To Suit Quadport Type
6800-5000
Replacement Pump
Quadport Type

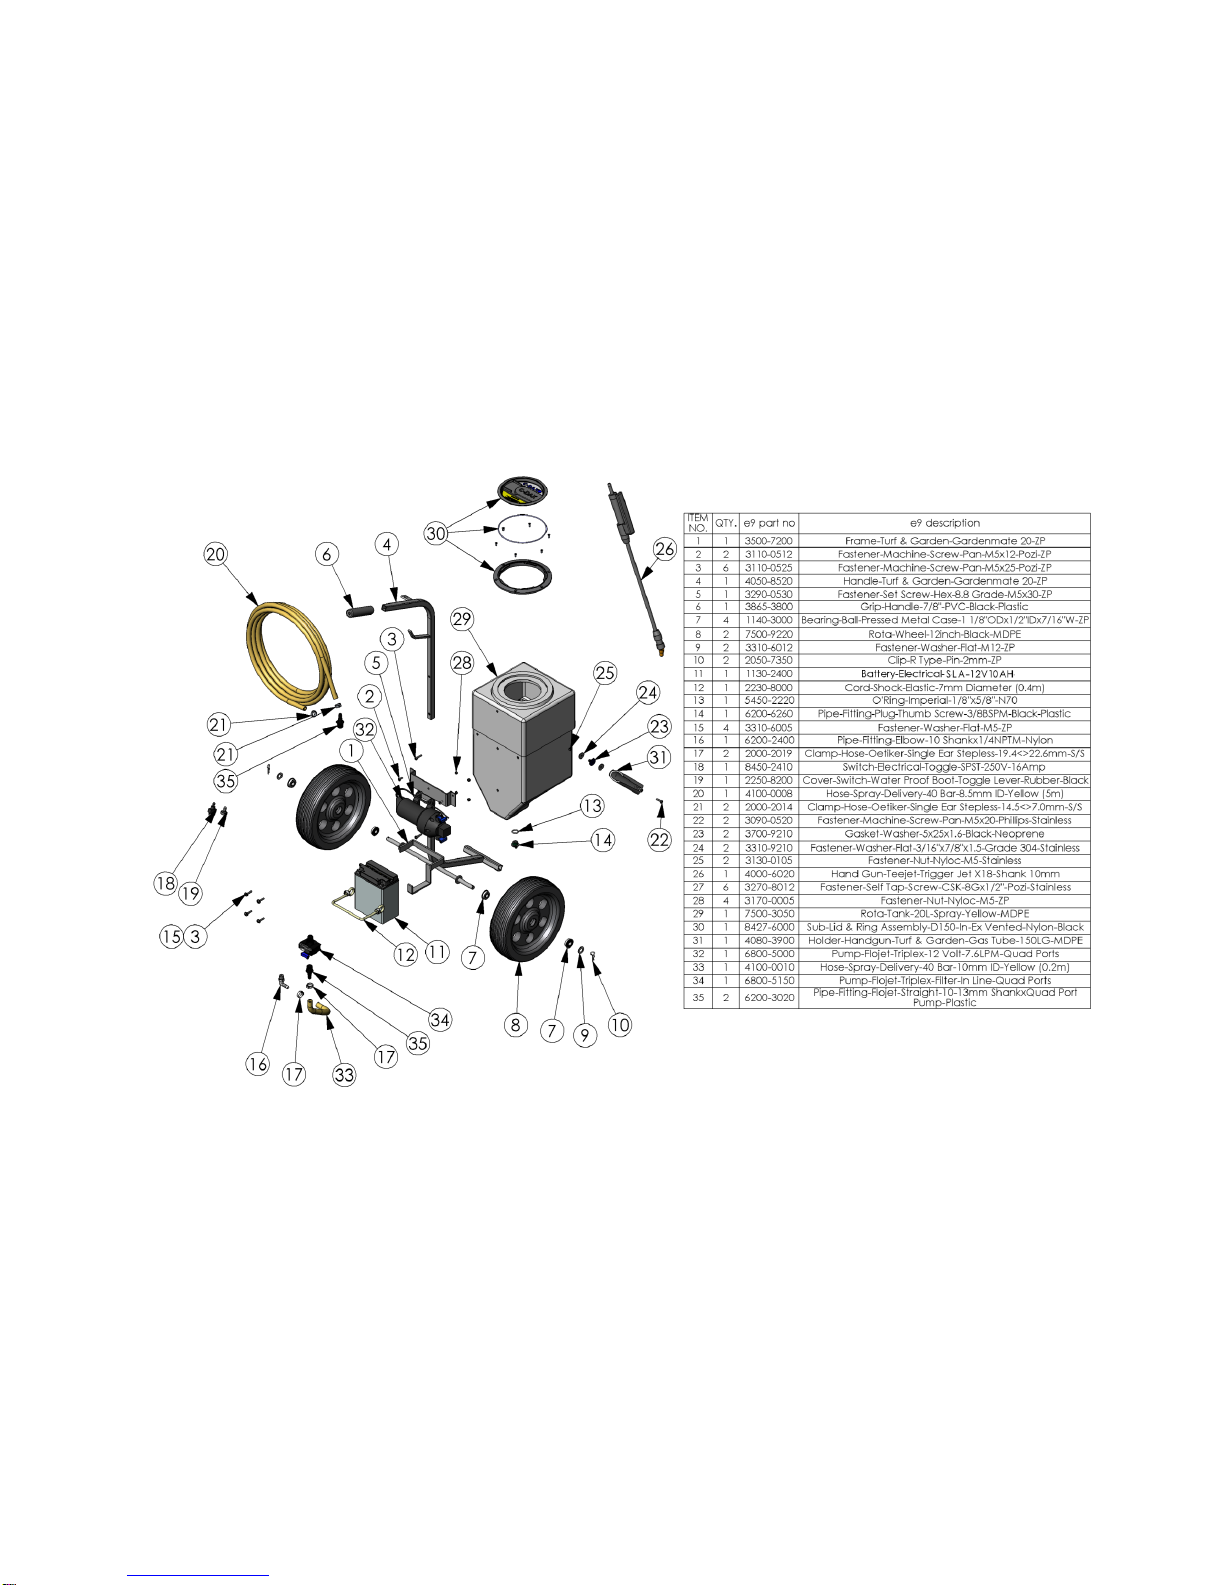
11
GARDENMATE 20 PARTS DIAGRAM
Table of contents
Other In-Ex Paint Sprayer manuals


Popular Paint Sprayer manuals by other brands


Nordson
Nordson Trilogy AS product manual

Iwata
Iwata Full Finish G-Series G6 Operating instructions manual

Anest Iwata
Anest Iwata KIWAMI-1-14B2 instruction manual

Ryobi
Ryobi P2806 Operator's manual

Tornador
Tornador S-100C Operator's safety & operating instruction manual

Carlisle
Carlisle BINKS 115 Service manual


