Inateck BCST-50 User manual

User Guide
BCST-50 Barcode Scanner
English · Deutsch · 日本語 · Français · Italiano · Español


1
English
1. Use of BCST-50
When using BSCT-50 to scan the barcode, please focus the red light on the barcode
to scan。The red light is to help the user to aim at the bar code; The white light is to
help the user to scan barcodes under the condition of insucient light.
How to Charge
The scanner enters low-battery mode after long-beeping for 3 times, which means it
requires charging.
The required voltage for charging the scanner is 5V, and current below 1000mA.
Current controller chip is set inside the scanner to filter excessive current - for
any current above 1000mA, it filters the excessive current and inputs 1000mA for
charging. As long as the charging voltage is at 5V, the scanner should function
without issue. You can charge the scanner with a regular phone charger for the
voltage output of a regular phone charger or a laptop USB port is also 5V.
How to Start
You can power on the scanner by pushing the scan button. The indicator will ash
green when the scanner is switched on with a beep.
How to Power O
Long press the scan button if you want to power o the scanner immediately.
How to Use
Note: When the scanner is connected both via cable and wirelessly, it transmits data
through cable by default
Wired Mode:
1. Connect the barcode scanner with computer via USB cable
2. Open a le on computer and move cursor to the blank where scanning output
should be placed. Scanning results can be displayed on computer then.
This is a brief version of BCST-50 manual instruction. For more detailed function
illustration, please go to www.inateck.com to download the detailed user manual or
contact us via [email protected]. We’ll try our best to help solve your problem in
time.
If you have any problem or suggestion with our product, please contact us via

2
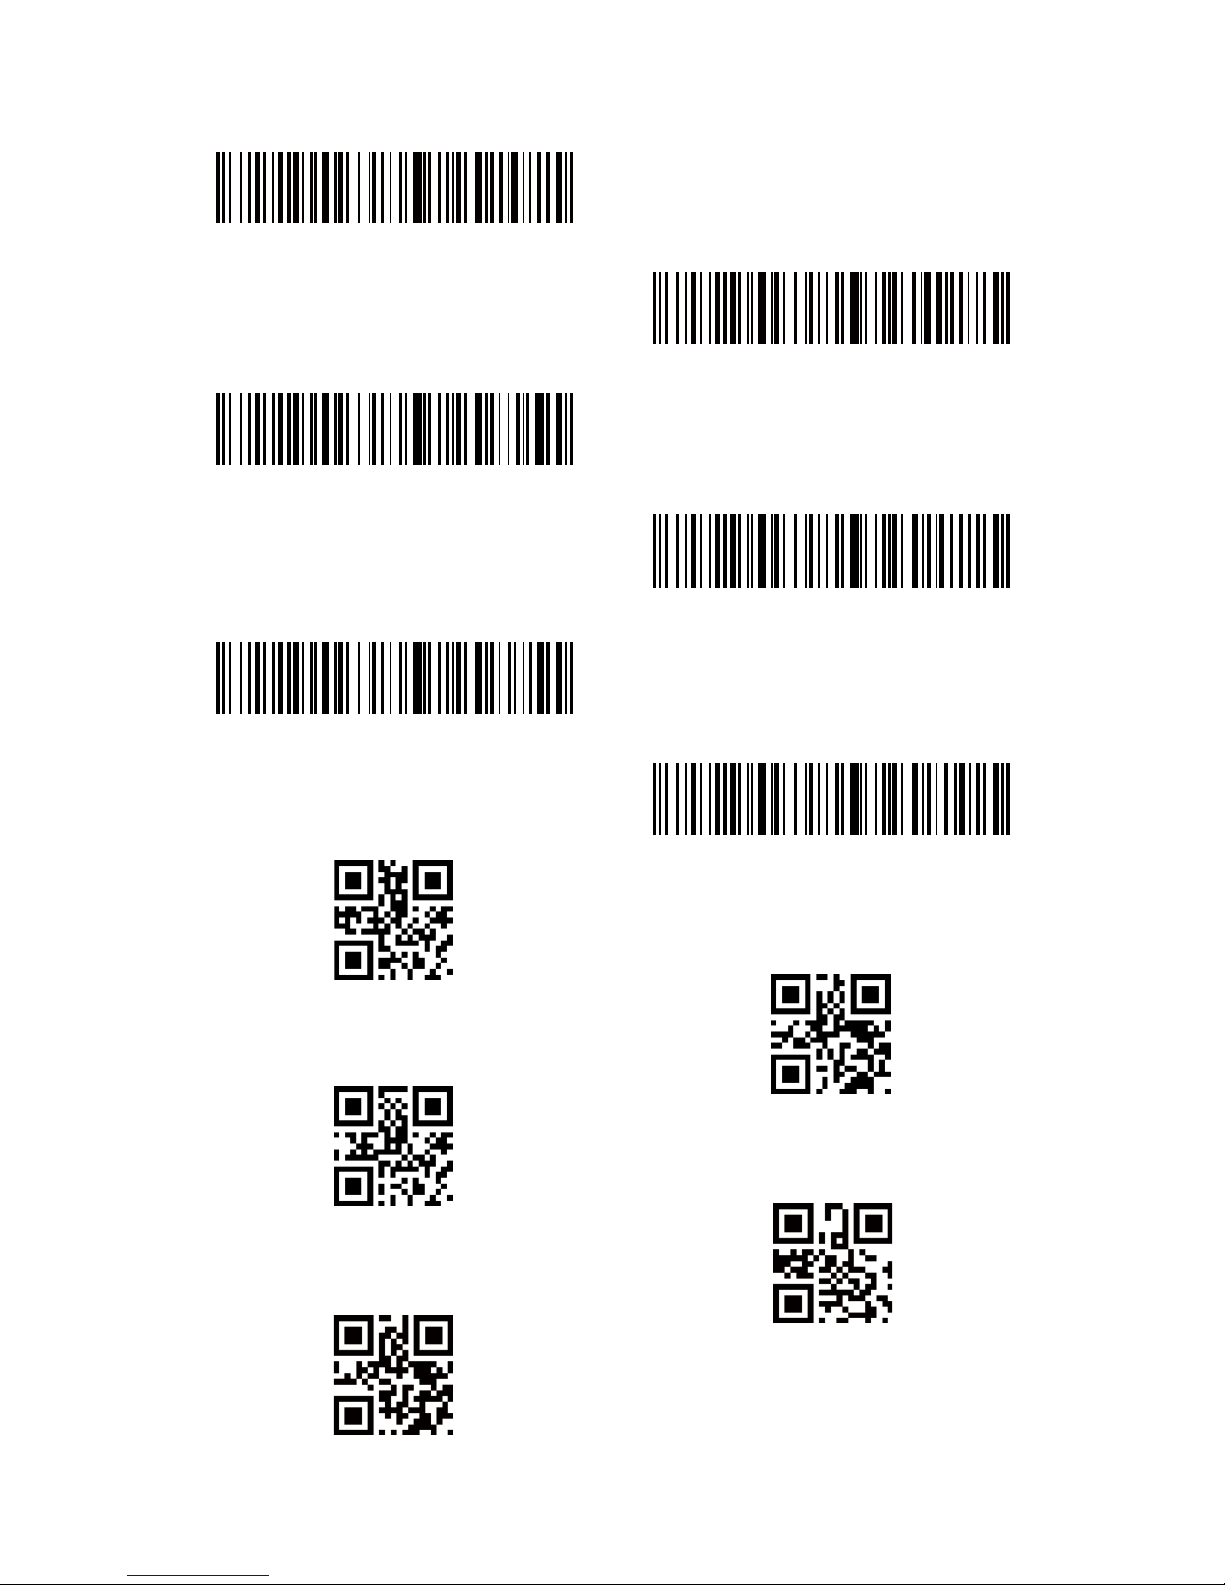
Wireless Bluetooth Mode(HID)
1. Scan “Bluetooth Mode (HID)” barcode, and then “Match” barcode to notice the
indicator ashes blue and green alternately. The scanner enters Bluetooth pairing
mode.
2. Enable the Bluetooth of the device to be connected, e.g. PC, cellphone or tablet.
3. You can do that like below.
Windows XP: Click Control Panel->Printers and Other Hardware->Add Bluetooth
Device
Windows 7/8/8.1: Click Control Panel->Add Devices
Windows 10: Click Setting->Devices->Bluetooth
macOS: Click System Preference->Bluetooth
iOS: Click Setting->Bluetooth
android: Click Setting->Bluetooth
4. Enable the Bluetooth on host device and it will automatically search for BCST-50.
5. After a few seconds ‘Inateck BCST-50’ will appear in the list of available devices. Pair
the two devices. The blue LED is lit when the scanner is paired successfully.
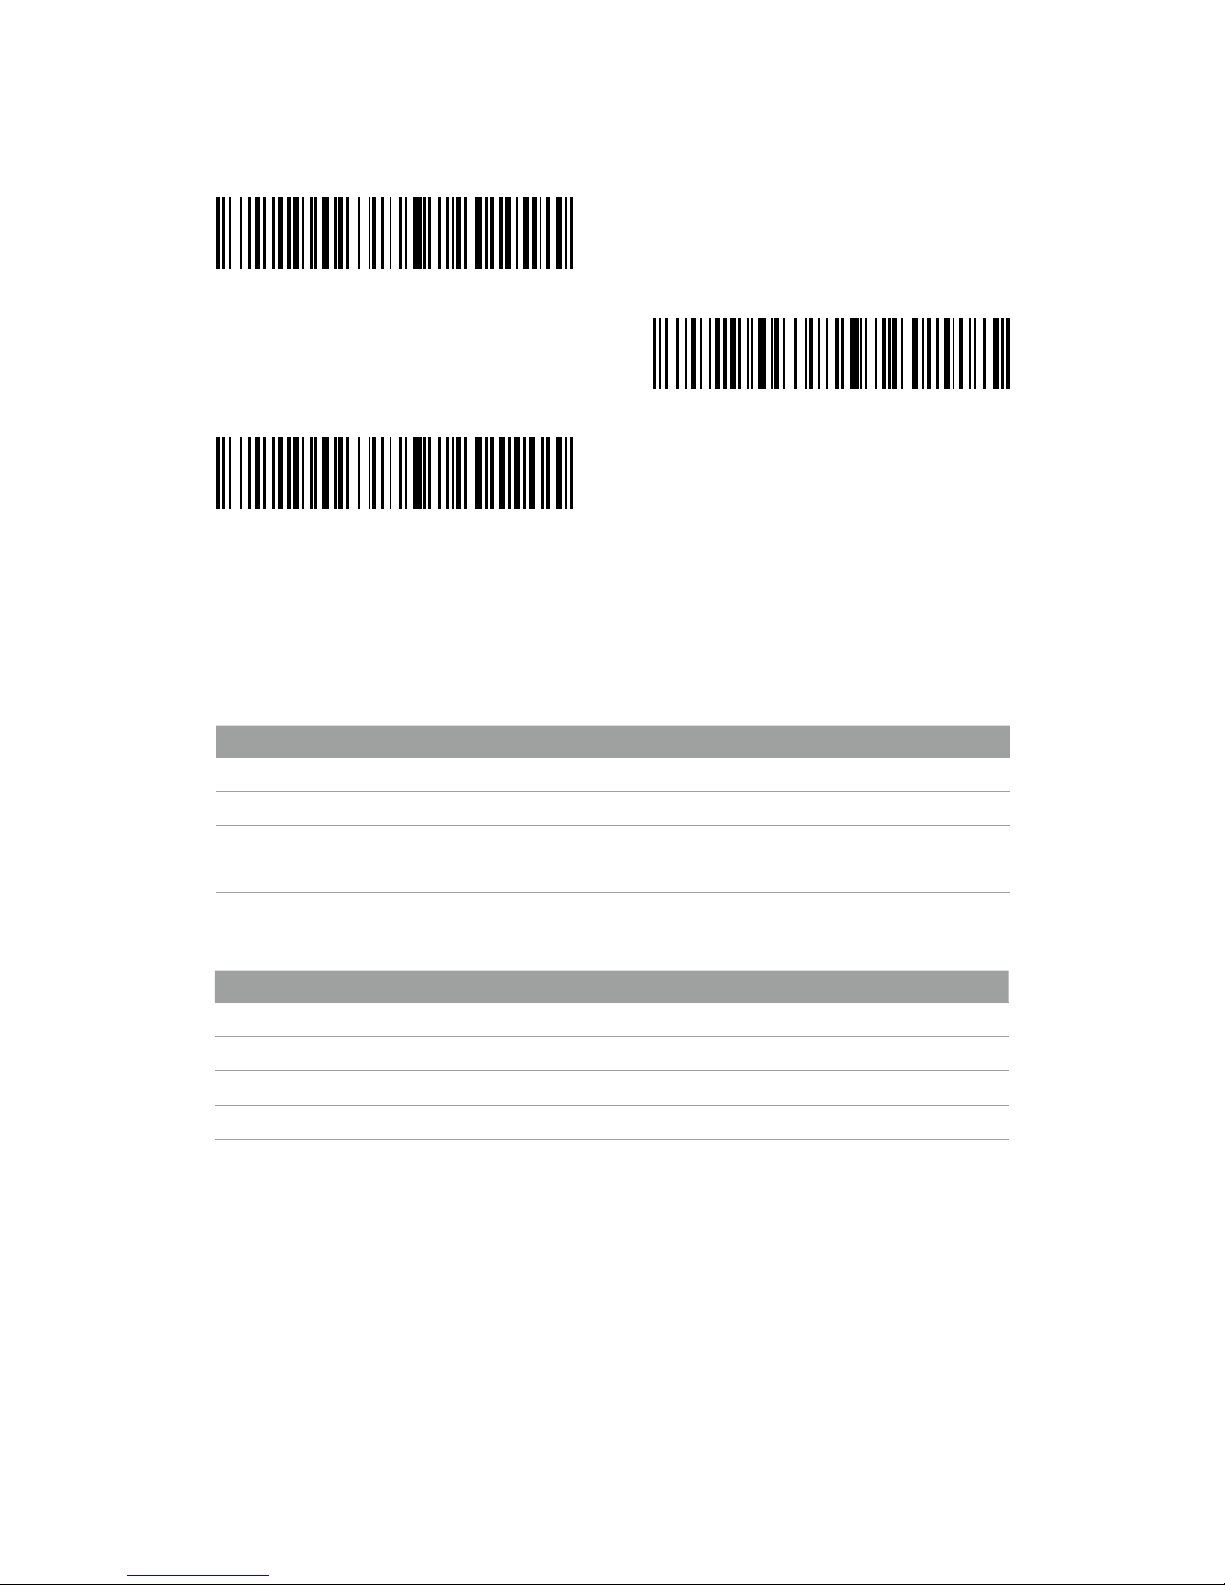
Wireless Dongle Mode
The dongle is paired with the scanner automatically when leaves factory.
1. Connect the wireless dongle to the USB port on your laptop, and the laptop will
begin installing the drive for scanner automatically.
2. Press the power button on the scanner, and the scanner is paired successfully with
the dongle with the blue LED lit.
Note: If you can’t upload data via the dongle, please rst unplug the dongle from
your laptop, and then scan the “dongle mode” and “Match” barcodes in turn till the
LED ashes green which represents that the scanner is under pairing mode. Then,
plug the dongle into the USB port again when you could hear two beeps from
the scanner with the LED ashing blue. At the time, the dongle has been paired
successfully with the scanner and the scanner is ready for data input. If there’s still
a problem, please contact our customer service via [email protected].
Bluetooth Mode(HID)
Match
Dongle Mode
Match

3
3. Setting for Prex/Sux
Users can add prex/sux to scanning result. The prex/sux can have 1 to 32 digits.
More details are as below.
1. Scan “Prex Setting” or “Sux Setting”
2. Language Settings
English (default setting)
Italian
French
Japanese
Prex Setting
Sux Setting
Spanish
German
Note: BCST-50 should set up the language in accordance with the PC language,
otherwise error may occur.
2. Scan the character barcode you need as prexes or suxes (32 characters at the
most). Please refer to Appendix I for prexes/suxes barcodes.

4
Activate/Hide virtual keyboard on iOS device
(iPhone or iPad)
Enable the function of Double-click Activate/Hide HID
Keyboard on iOS device (default setting)
Switch O Double-click Activate/hide HID
keyboard on iOS devices.
4.2 Double-click to activate HID keyboard
Scan the below barcode, and then press the scan button on the scanner for twice
quick to activate HID keyboard on iOS devices. Press for another twice to hide it.
Please scan the below barcode to disable the function of Double-click Activate/Hide
HID Keyboard on iOS devices.
4. HID Keyboard Display /Hide(iOS)
4.1 Activate HID keyboard
Scan the below barcode once to activate the virtual keyboard on iOS devices, and
scan for another time to hide it.
5. Transmission Speed Setting
High Speed (default setting)
Low Speed
Medium Speed
Ultra-low Speed

5
Note: When there’s a partial data loss during transmission to iPad or iPhone, please
adapt the transmission speed to Ultra-Low Speed.
6. Delete Character(s) on Output Result
The barcode scanner can help users delete character(s) on output result, either
beginning characters or the ending ones. 0 to 4 digits can be deleted. As default
setting, no character is deleted as output result. More details are as below.
1. Scan “Delete Beginning Character(s)” Barcode or “Delete Ending Character(s)”
Barcode
1 byte
3 bytes
Delete Beginning Character(s)
2 bytes
4 bytes
Delete Ending Character(s)
2. Scan the numbers you want to delete,and the maximum is 4 bytes

6
Restore Factory Setting
CR Sux
CRLF Sux
Output Software Version
LF Sux
No Sux
7. Frequently Used Barcodes
Manual Scan (default setting)
Continuous Scan
All Barcode Types On
Default Barcode Types On
Auto-sensing Scan

7
8. Powers O automatically Time setting
To prolong battery life, the scanner powers o automatically after left unused for 10
minutes. You can adjust the time period by scanning the below barcodes.
30 Seconds
2 Minutes
10 Minutes (default setting)
NO Powers O automatically(means the
scanner never goes o automatically)
1 Minute
5 Minutes
30 Minutes

8
10. Status indication
Buzzer Indication
Beeping Meaning
Three long beeps Low battery, requires charging
Long beep for 0.4s(low) Bluetooth connection unsuccessful
Short beep once Successful upload
Enter settings
Successful Bluetooth reconnection
Indicator color Meaning
LED lit blue Successful Bluetooth connection
LED lit red Charging, lights out upon full battery
Flashes green and blue Bluetooth waiting for pairing
Flashes green intermittently Dongle is waiting for pairing
LED Indication
9. Buzzer Setting
Scan the below barcode to adjust the beep volume of the scanner
Low Volume
High Volume (default setting)
Medium Volume

9
Model BCST-50
Material ABS+PC+PVC
Power Supply DC 5V ± 5%
Battery 3.7V 2000mAh 18650 lithium battery
Charging Time 3.5h
Weight 170g ± 5g
Dongle Eective Distance 30m
Bluetooth Eective Distance 10m
LED Red LED focus + White LED lighting
Memory 2M
Supported Barcode Types Codabar,Code11,Code39/Code93,UPC/EAN,Code128/EAN128,InterLeaved2of5,Matrix
2of5,MSI CODE,Standard2of5.
QR CODE,DATE MATRIX,PDF417
Decode Speed 200 ops
Scan Modes Manual Scan, Auto-sensing
Scan Area 5 * 5 cm² -- 30 * 30 cm²
Print Contrast Above 35%
Scan Angle Turning 0-360° , elevation ± 65° , deection ± 60°
Wireless Operating Frequency 2402-2480KHz
Wireless Transmission Power 5dBm
11. Product Specication
12. Packing list
Inateck BCST-50*1
USB Cable*1
Dongle*1
Instruction Manual*1
13. FAQ
1. Why part of data input to certain software is lost when connect the scanner with
iPhone or iPad via Bluetooth? How to x it?
A: Please refer to the 5th point “Transmission Speed Setting”, and adapt the
transmission speed to Ultra Low Speed.

10
2. Why the scanner fails to upload data to or reconnect devices that have been paired
previously? What should I do?
A:
1)Delete the pairing history and turn o the Bluetooth on your device.
2)Restore factory settings for the scanner.
3)Pair the scanner with your device for another time according to the instruction.
3. How to activate virtual keyboard on iPad or iPhone?
A: Please refer to the 4th point “HID Keyboard Display/Hide (iOS)” to activate the
keyboard.
Support
Please feel free to email [email protected] if you have any query regarding
Inateck BCST-50 barcode scanner. We will gladly assist you.

11
Deutsch
1. Verwendung des BCST-50
Wenn Sie den Barcode mit BSCT-50 scannen, fokussieren Sie bitte das rote Licht
auf den zu scannenden Barcode. Das rote Licht wird dem Benutzer helfen, auf den
Barcode zu richten; das weiße Licht wird dem Benutzer helfen, Barcodes unter der
Bedingung von unzureichendem Licht zu scannen.
Auaden des Scanners
Mit drei Pfeiftönen signalisiert der Scanner, dass er in den Batteriesparmodus geht
und aufgeladen werden muss.
Es werden eine Ladespannung von 5 V und ein Ladestrom von maximal 1000 mA
benötigt. Der Controller-Chip im Scanner verhindert eine Überladung und Fehlströme
von über 1000 mA, so dass eektiv der benötigte Strom auf 1000 mA geltert wird.
Solange die Ladespannung bei 5 V liegt, sollten sich keine Probleme beim Laden
ergeben. Somit lassen sich handelsübliche USB-Ladenetzteile für Telefone oder
USB-Ausgänge am Rechner ohne Probleme verwenden, um den Scanner mit 5 V
aufzuladen.
Einschalten
Drücken Sie einfach den Abzug, um den Scanner einzuschalten. Die LED leuchtet
dann grün und ein langes Pfeifsignal ertönt.
Ausschalten
Drücken Sie den Abzug lang, wenn Sie den Scanner sofort ausschalten möchten.
Verwendung des Scanners
Achtung: Bei simultaner Kabel- und Drahtlosverbindung wird vom Scanner die
Übertragung per Kabel priorisiert.
Kabelverbindung:
1. Verbinden Sie den Scanner mit dem PC per USB-Kabel.
2. Önen Sie eine Datei oder ein Textprogramm auf dem PC und setzen den Cursor
dorthin, wo die Ausgabe der Codes erfolgen soll.
Die ist die Kurzfassung der BCST-50 Bedienungsanleitung. Für eine detaillierte
Beschreibung laden Sie die Vollanleitung von unserer Seite www.inateck.de herunter
oder nehmen unter [email protected] Kontakt zu uns auf. Wir helfen Ihnen
schnellstmöglich weiter.
Bei Fragen und Problemen nehmen Sie bitte Kontakt zu uns auf via support@inateck.
com.

12
Bluetooth-Verbindung (HID)
1. Scannen Sie den Barcode “Bluetooth-Modus (HID)” und danach “Verbinden”, bis
die LED am Scanner abwechselnd blau und grün blinkt. Der Scanner ist nun im
Bluetooth-Kopplungsmodus.
2. Aktivieren Sie nun Bluetooth am Stammgerät (PC, Tablet, Smartphone o.ä.).
3. Folgende Schritte können je nach System verwendet werden:
Windows XP: Klick auf “Systemsteuerung” -> “Drucker und andere Hardware” ->
“Bluetooth-Gerät hinzufügen”
Windows 7/ 8/ 8.1: Klick auf “Systemsteuerung” -> “Geräte hinzufügen”
Windows 10: Klick auf “Einstellungen” -> “Geräte” -> “Bluetooth”
Mac OS: Klick auf “Systemberichte” -> “Bluetooth”
iOS: Klick auf “Einstellungen” -> “Bluetooth”
Android: Klick auf “Einstellungen” -> “Bluetooth”
4. Aktivieren Sie Bluetooth am Stammgerät, damit es automatisch nach BCST-50
suchen kann.
5. Nach einigen Sekunden sollte der “Inateck BCST-50” in den verfügbaren Geräten
auftauchen. Führen Sie nun die Kopplung über diesen Eintrag durch. Nach einer
erfolgreichen Kopplung leuchtet die LED blau auf.
Drahtlosverbindung über USB-Adapter
Der USB-Dongle ist bereits ab Werk mit dem Scanner gekoppelt.
1. Stecken Sie den Dongle an Ihrem PC an, das System installiert den Treiber
automatisch.
2. Drücken Sie den Abzug am Scanner, um ihn einzuschalten. Bei erfolgreicher
Verbindung des Scanners mit dem Dongle leuchtet die LED blau auf.
Achtung: Wenn keine Daten über den Dongle übertragen werden, ziehen Sie den
USB-Dongle bitte vom PC ab und scannen die beiden Codes “Dongle-Modus” und
“Verbinden” hintereinander, bis die LED grün blinkt, um den Kopplungsmodus
anzuzeigen. Binden Sie nun den USB-Dongle wieder an den PC an. Wenn Sie nun
zwei Pfeiftöne vom Scanner hören und die LED blau blinkt, ist der Scanner wieder
mit dem Dongle verbunden und wartet auf Eingaben. Bei anhaltenden Problemen
nehmen Sie bitte Kontakt mit uns auf über [email protected].
Bluetooth-Modus (HID)
Verbinden
Dongle-Modus
Verbinden

13
3. Einstellung von Prä- und Suxen
Nutzer können Prä- und Suffixe einrichten, die bei der Ausgabe mit ausgegeben
werden. Die Prä- und Suxe können jeweils 1-32 Stellen haben. Mehr Details siehe
unten.
1. Scannen Sie “Präx-Einrichtung” oder “Sux-Einrichtung”.
2. Spracheinstellungen
Englisch (Normalmodus)
Italienisch
Französisch
Japanisch
Präx-Einrichtung
Sux-Einrichtung
Spanisch
Deutsch
Bitte beachten: Die Tastaturbelegung BCST-50 sollte gemäß der auf dem Rechner
verwendeten Eingabemethode eingerichtet werden, um Ausgabefehler zu
vermeiden.
2. Scannen Sie nun die Codes für die gewünschten Zeichen der Prä- oder Suffixe
(maximal jeweils 32 Zeichen). Die Zeichencodes entnehmen Sie bitte dem Anhang I.

14
Aufrufen/ Verbergen der virtuellen Tastatur
(iPhone oder iPad)
Aktivieren der Doppelklickfunktion zum Aufrufen/
Verbergen der iOS-Tastatur (Normalmodus)
Deaktivieren der Doppelklickfunktion zum
Aufrufen/ Verbergen der iOS-Tastatur.
4.2 Aktivieren der Doppelklickfunktion zum Aufrufen/ Verbergen der HID-Tastatur
unter iOS
Scannen Sie den folgenden Code, um dann auf Wunsch die virtuelle Tastatur unter
iOS mittels schnellen Doppelklicks auf den Abzug des Scanners zu aktivieren oder zu
deaktivieren.
Bitte scannen Sie den folgenden Code, um die Doppelklickfunktion zu deaktivieren.
4. HID-Tastatur aufrufen/ verbergen (iOS)
4.1 Aktivierung der HID-Tastatur
Scannen Sie den folgenden Code einmal zum Aufrufen der virtuellen Tastatur unter
iOS-Scan und noch einmal, wenn Sie die Tastatur wieder verbergen möchten.
5. Einstellung der Ausgabegeschwindigkeit
Schnell (Normalmodus)
Langsam
Mittel
Extrem langsam

15
Achtung: Sollte es zu Ausgabefehlern bei iPad oder iPhone kommen, stellen Sie die
Ausgabegeschwindigkeit über den obigen Code auf “Extrem langsam” ein.
6. Zeichen bei Ausgabe löschen
Der Scanner kann auf Wunsch auch Zeichen bei der Ausgabe der Codes löschen,
sowohl Zeichen am Anfang oder Ende des Codes. Es können jeweils 0-4 Zeichen
verborgen werden. In den Werkseinstellungen werden keine Zeichen verborgen.
Weitere Details siehe unten.
1. Scannen Sie den Barcode “löschen von Anfangszeichen” oder “löschen von
Endzeichen”.
Ein Zeichen
Drei Zeichen
löschen von Anfangszeichen
Zwei Zeichen
Vier Zeichen
löschen von Endzeichen
2. Scannen Sie nun die Anzahl der zu löschenden Zeichen, maximal vier Zeichen

16
Auf Werkseinstellungen zurücksetzen
CR Sux
CRLF Sux
Ausgabe der Firmware-Version
LF Sux
Kein Sux
7. Häug verwendete Einrichtungscodes
Manueller Scan (Normalmodus)
Kontinuierlicher Scan
Alle Barcodes aktivieren
Automatische Codeerkennung

17
8. Einstellung automatisches Ausschalten
Um den Akku zu schonen, schaltet sich der Scanner nach zehn Minuten Inaktivität
automatisch aus. Mittels der folgenden Codes können Sie die Zeit bis zum
Ausschalten einstellen.
30 Sekunden
2 Minuten
10 Minuten (Normalmodus)
Ausschalten deaktiviert (Der Scanner bleibt
permanent eingeschaltet)
1 Minute
5 Minuten
30 Minuten

18
10. Statusanzeigen
Tongeber
Pfeifsignal Bedeutung
Drei lange Pfeiftöne Niedriger Ladestand, Auaden erforderlich
Langer Ton für 0,4 s (tief) Bluetooth-Kopplung fehlgeschlagen
Kurzer Ton Upload erfolgreich
Einstellungen vornehmen
Erfolgreiche Bluetooth-Wiederverbindung
LED-Anzeige Bedeutung
LED leuchtet Blau Erfolgreiche Bluetooth-Verbindung
LED leuchtet Rot Ladevorgang, LED erlischt bei voller Ladung
LED blinkt Grün und Blau Bluetooth-Kopplungsmodus
LED blinkt sporadisch Grün USB-Dongle auf die Kopplung warten
LED-Anzeige
9. Einstellung des Tongebers
Scannen Sie die folgende Codes, um die Lautstärke des Tongebers einzustellen.
Niedrige Lautstärke
Hohe Lautstärke (default setting)
Mittlere Lautstärke
Other manuals for BCST-50
2
Table of contents
Languages:
Other Inateck Barcode Reader manuals

Inateck
Inateck P6 User manual

Inateck
Inateck P7 User manual

Inateck
Inateck BCST-20 User manual

Inateck
Inateck P7 User manual

Inateck
Inateck BCST-70 Quick guide

Inateck
Inateck BCST-54 User manual

Inateck
Inateck BCST-10 User manual

Inateck
Inateck BCST-55 User manual

Inateck
Inateck BCST-53 User manual

Inateck
Inateck BCST-20 User manual

Inateck
Inateck P6 User manual

Inateck
Inateck BCST-55 User manual

Inateck
Inateck BCST-33 User manual

Inateck
Inateck P7 User manual

Inateck
Inateck BCST-10 User manual

Inateck
Inateck BCST-43 User manual

Inateck
Inateck BCST-70 User manual

Inateck
Inateck P6 User manual

Inateck
Inateck BCST-33 User manual

Inateck
Inateck BCST-41 User manual