Index FGR-ST-DL210A User manual

FGR-ST-DL210A Fingerprint Door Lock
Deadbolt User Manual V4.0
Guardian DL210A Operation Manual V4.0 © Copyright 2004 Index Security Inc.
1
Index
Access

FGR-ST-DL210A Fingerprint Door Lock
Deadbolt User Manual V4.0
Guardian DL210A Operation Manual V4.0 © Copyright 2004 Index Security Inc.
2
Index
Access
Table of Contents for the Guardian 210A
1. Specification Callout’s............................................ 4
2. Introduction............................................................ 5
3. LED Display........................................................... 6
4. How to Scan Your Fingerprint ............................... 7
5. Setting Sensitivity (Security) Level........................ 8
6. Registering Fingerprints ........................................ 9
7. Registering additional fingerprints.........................11
8. Deleting Fingerprints .............................................13
9. Door Entry / Exit Operations .................................14
10. Emergency Access .............................................15
11. Specifications.......................................................16
12. Troubleshooting...................................................17
13. Warranty Policy....................................................19
14. Warranty Card .....................................................21
15. User ID List..........................................................23
Your Guardian 210A is a product of superior design and craftsmanship from the
Technology Makers of Index security Inc. Proper placement and care should be
given to insure the use of this product for many years. This is not an outdoor
device; it is not water proof and should be installed in a protected area from the
elements.
As part of our commitment to excellence, the design and specifications of Index
Security® are subject to change without prior notice and may not be reflected in
this manual.
"All trademarks are the property of their respective owners”.

FGR-ST-DL210A Fingerprint Door Lock
Deadbolt User Manual V4.0
Congratulations! You are the owner of a state-of-the-art biometric door lock featuring:
• Fingerprint identification for keyless access
• Storage of fingerprints for up to 50 users
• Attractive, self-contained unit; no external wiring
• Programmable at the door with no computer or external devices
• Manual mode for no-lock access when desired
• Key override to conform to regulations
• Powered by 6 AA batteries (typically lasting two years)
• Interchangeable with Schlage/Kwikset cylindrical plus deadbolt lock sets
Before Starting:
1. Have 6 AA Batteries ready to install into unit.
2. Confirm door hole cut outs fit your Guardian and unit handle either
left or right handed is correct.
3. Read "How to Install the Unit manual" if needed.
4. Determine who the administrator is for the lock.
The first two people Registered will be automatically assigned Administrator IDs
5. Outline all Users on the Fingerprint Template ID form for tracking user
ID number positions.
Install Batteries:
1. Six (6) alkaline AA batteries are needed. To change batteries, remove
the battery cover by pulling it straight out from both sides. Insert
batteries in proper position of positive (+) and negative (-) poles.
2. Six (6) alkaline AA batteries will operate the door for approximately
two (2) years under normal use.
3. A Low Battery Alert is indicated by four extra beeps after the Lock or
Unlock buttons are pushed, or after unlocking by fingerprint ID. After
the low battery alert, there will be approximately 50 more door
openings or equivalent operations left. Change the batteries as soon
as possible.
Guardian DL210A Operation Manual V4.0 © Copyright 2004 Index Security Inc.
3
Index
Access

FGR-ST-DL210A Fingerprint Door Lock
Deadbolt User Manual V4.0
Guardian DL210A Operation Manual V4.0 © Copyright 2004 Index Security Inc.
4
Index
Access
Start Power On
Button
Emergency Key for Deadbolt
Protective Cover (slides upward)
Deadbolt Lock Button
Emergency Key For
Lower Cylindrical Lock
(Under Cap)
Optical Fingerprint Scanner
LED Display
Deadbolt Unlock
Deadbolt Lock
Emergency Deadbolt
Key
STOR
DELETE
Battery Compartment
(6 AA alkaline batteries)
SELECT
1. Specification Callout's
Exterior portion
Interior portions
Power
Button

FGR-ST-DL210A Fingerprint Door Lock
Deadbolt User Manual V4.0
Guardian DL210A Operation Manual V4.0 © Copyright 2004 Index Security Inc.
5
Index
Access
2. Introduction - General Information
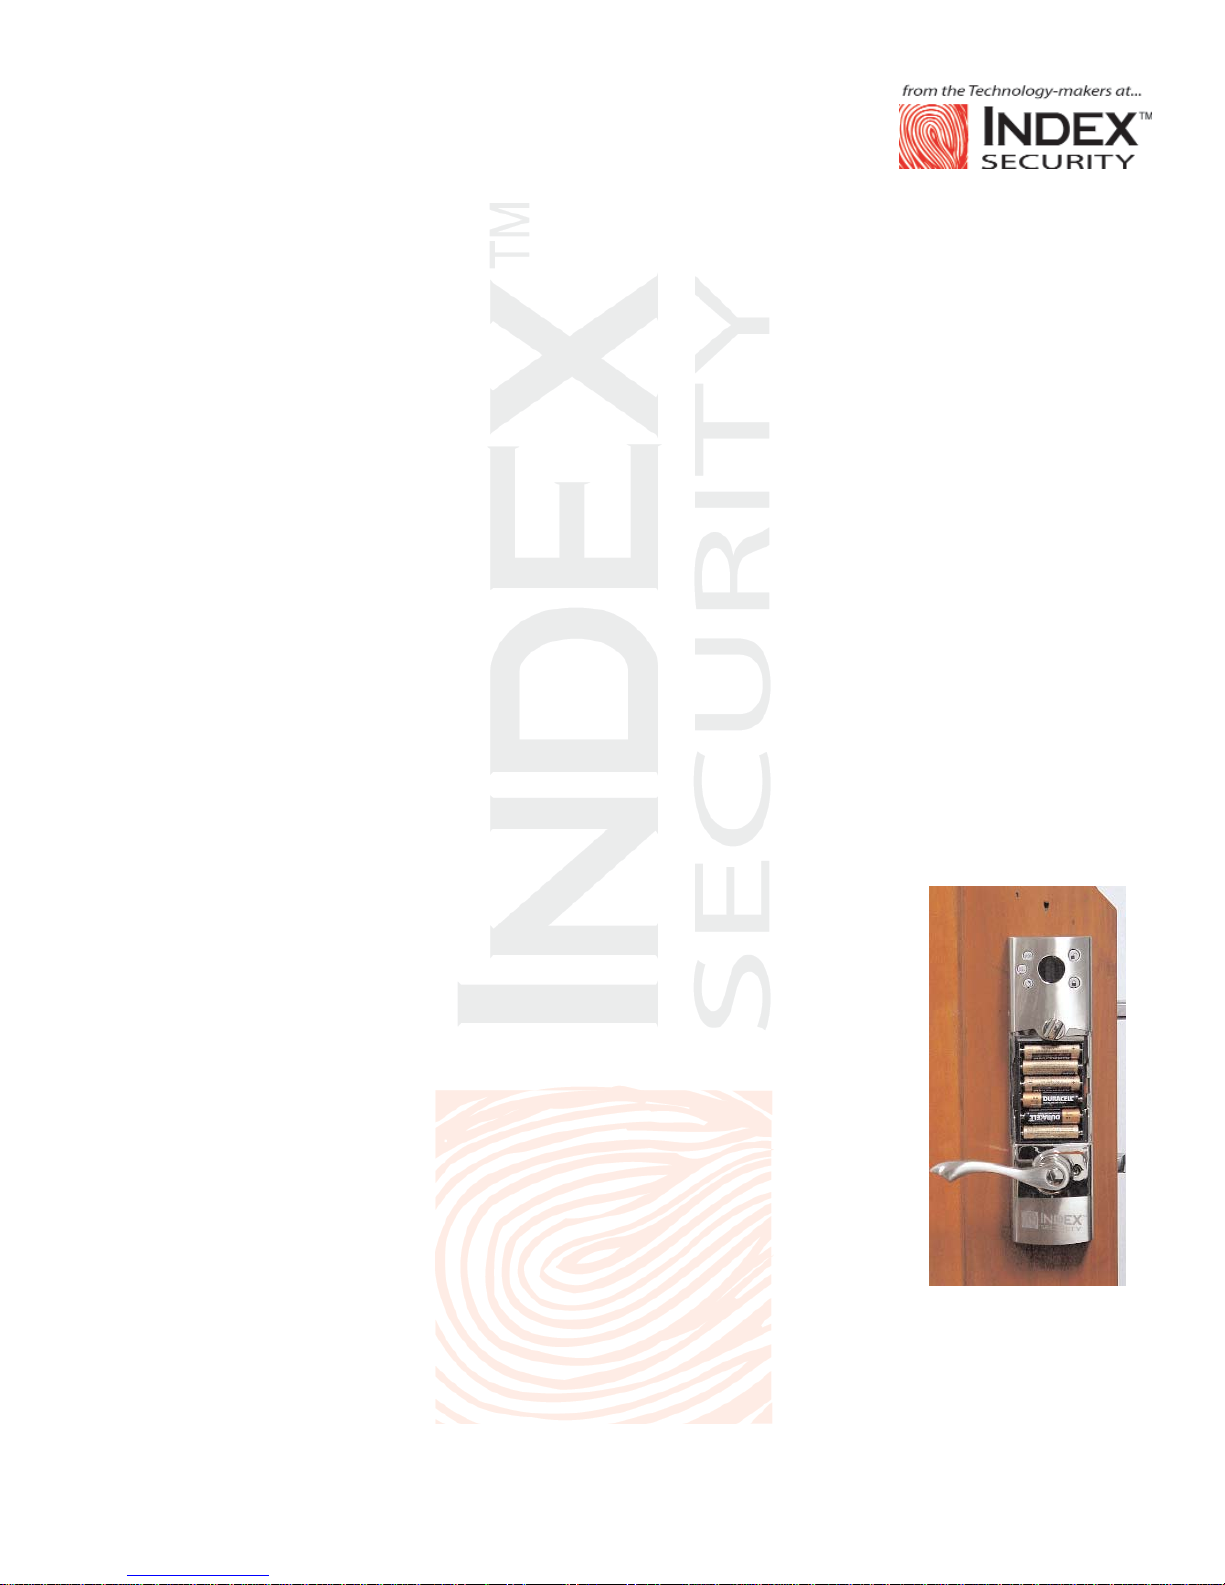
A. There are two sides of the Guardian 210A, the Exterior and Interior lock portions. When you
slide the dust cover up on the Exterior you will uncover the Power On button. Both Interior
and Exterior parts of the lock have Lock buttons that extend the deadbolt, although the
Exterior one (oval shape) is unmarked. The Interior part also has an Unlock button to
retract the deadbolt. There are also three programming buttons (STORE, DELETE, and
SELECT) on Interior of lock.
B. Registering or enrollment of Fingerprints - This is the process of acquiring the image of
fingerprints of authorized persons and storing them into the lock's memory. The image is
converted to an algorithm or a sequence of numbers that can only be recognized by this unit.
Two images of each finger are scanned in the process, with the same finger being placed two
separate times on the window.
C. Power Off/Time Out - The lock maximizes both security and battery life by automatically
powering off the unit if no action is taken for 5 to 10 seconds (depending on function), which
the user will hear as a motor noise inside the lock. During the fingerprint registration and
other programming functions, the time out function requires you to move right along in the
programming sequence. The program is set for a 5-10 second time out so, taking too long
will mean you must start over in the mode your in.
D. Manual / Unlocked Operation - The Guardian 210A can be set to an unlocked state so
users can open the door without engaging the fingerprint identification system.
E. Sensitivity Levels - Five sensitivity settings are available to optimize scan sensitivity in
matching fingerprint images. The lower levels, the easier it is for acceptance and the higher
captures more of the fingerprint to verify and is more secure.
F. Management Levels - The Guardian 210A has three authorization category levels:
Administrator, Supervisor and User. They are designated and identified by template
ID numbers for storage positions that correspond to their stored fingerprints as follows:
1.6.1 Administrators: Template ID numbers 1 through 5 - authorized to by-pass supervisors
and user levels and authorized for entry and exit. Note: First 2 users registered on to
device are automatically the administrators.
G. Administrators: Template ID numbers 1 through 5 - authorized to by-pass supervisors and
user levels and authorized for entry and exit. Note: First 2 users registered on to device
are automatically the administrators.
G1. Supervisors: Template ID numbers 6 through 10 - authorized to by-pass all user levels
except not administrators and . authorized for entry and exit.
G2. Users: Template ID numbers 11 through 50 - authorized for entry and exit.
G3. In general, the first two levels administrators and supervisors can add/delete
fingerprints
on levels below theirs. The Administrators can, in addition, add/delete their own level plus
mass-erase all stored fingerprints.
G4. The first two (2) people Registered will be automatically assigned Administrator IDs.
Thereafter, either of the first two Administrators can designate the level for each new
registrant. If no designations are made, the new registrants will be assigned template
ID numbers as Users, i.e. IDs 11 through 50. (This is because for most applications,
only two management levels are needed: Administrator and User.)

FGR-ST-DL210A Fingerprint Door Lock
Deadbolt User Manual V4.0
Guardian DL210A Operation Manual V4.0 © Copyright 2004 Index Security Inc.
6
Index
Access
Action
Mass erase
Add same level
Delete same level
Add below level
Delete below level
Open door
Check current ID
Administrator
IDs: 1 - 5
X
X
X
X
X
X
X
Supervisor
IDs: 6 - 10
X
X
X
X
User
IDs: 11 - 50
X
X
CHART: Management Levels
3. LED Display
The display shows three types of information:
• Memory status: UU = memory is empty; FU = memory is full (has all 50 users registered)
• Sensitivity (Security) level: S0 through S4
• Template IDs assigned positions
Display Template ID Position
A. The LED displays different information
depending on if you are in a pure display mode or if you have just finished a programming
function such as registering fingerprints.
B. When in the Programming Mode, immediately after registering fingerprints, you can press the
Select button and see the NEXT AVAILABLE ID or template position of the three categories of
user rights: Administrator, Supervisor or User. For example, if you have two (2) Administrators
and three (3) Users already registered and you just finished adding a fourth (4) User, pressing
the Select button will show: 15 - 3 - 5
C. In the normal Display mode, you can verify the ID of the person who just unlocked the lock.
Immediately after fingerprint verification, press the Select button. The Display will then show
the entering ID, alternating with the remaining number of available spaces in the lock
memory. For example, if there are two (2) Administrators and the last of four (4) Users just
entered, the display would show: 04 - 44
D. Memory status: UU = memory is empty; FU = memory is full (has all 50 users registered)

FGR-ST-DL210A Fingerprint Door Lock
Deadbolt User Manual V4.0
Guardian DL210A Operation Manual V4.0 © Copyright 2004 Index Security Inc.
7
Index
Access
4. How to Scan Your Fingerprint

FGR-ST-DL210A Fingerprint Door Lock
Deadbolt User Manual V4.0
Start programming:
(We suggest you read this first, then try programming.)
5. Setting “Sensitivity” (Security) Level
What are Sensitivity Levels? When you place your fingerprint on the Guardian, it doesn't
capture your actual fingerprint image, rather the fingerprint scan converts it into an algorithm
which matches a certain number of fingerprint characteristics; how many should it read is up
to you and what you set the Sensitivity Levels at. There are five triggering Sensitivity
Levels that are available for you to choose: S0 through S4. Lowest level is S0, which is
recommended for TRAINING. We recommend increasing sensitivity after you are familiar
using the Guardian 210 lock. As you raise the sensitivity level up in numerical value; the more
stringent the scanner reads your fingerprint and the higher the security level increases.
A. If no fingerprints have been registered, press Power button on Exterior portion (hear 2 beeps)
B. Press STOR, DEL and (Select) buttons on interior display panel simultaneously until the
display shows 00 or S0,S1,S2,S3 or S4 (Highest level)
C. Release the three buttons; then press the Select button to cycle through S0- S1- S2- S3-S4, etc.
D. Training: Set at S0 to start training, which will ease the learning process. (After you can
activate the lock almost every time, you can upgrade the sensitivity (security) to a higher level
for your purposes.)
E. Press STOR button again to set the chosen sensitivity level.
F. If fingerprints are already registered and stored, it is necessary for an Administrator to first
access the lock with his/her fingerprint, then proceed with the three buttons Sensitivity mode.
G. Only one sensitivity level can be set for the lock. Different sensitivity levels cannot be set for
different individuals. One setting for all!
Guardian DL210A Operation Manual V4.0 © Copyright 2004 Index Security Inc.
8
Index
Access
Set Sensitivity

FGR-ST-DL210A Fingerprint Door Lock
Deadbolt User Manual V4.0
6. Registering or Enrolling Fingerprints
Access to Exterior and Interior lock portion are needed
Exterior Side - slide up the dust cover and push the “Power On” button and to scan your fingerprints.
Interior Side - you will be using the STOR, DEL and (Select) buttons.
A. In order to register or enroll a user fingerprints, you will be operating buttons on the interior
portion and using the scanning window on the Exterior portion, thus both sides of the lock will
be used. Please familiarize yourself with the location of buttons as shown in these pictures,
as well as the sequence of operations, in order for you to more easily accomplish the
registration without being "timed out".
B. For the first two registrations, there is no need to assign management levels as they
will be Administrators automatically, but on subsequent registrations, have in mind what
authorization level you wish to assign and the range of template ID numbers defining the
levels. Make sure your selection is correct using the form provided.
Guardian DL210A Operation Manual V4.0 © Copyright 2004 Index Security Inc.
9
Index
Access
Exterior portion Interior portion
Power
Button

FGR-ST-DL210A Fingerprint Door Lock
Deadbolt User Manual V4.0
Training to Scan Your Fingerprint:
Before starting the procedure for registration, decide on what finger you wish to use and
practice placing the finger onto window in the same way you intend to open the door later.
Practicing will give you a feel for the window and how to put the center of your core onto the
center of the window. To start, you can set at S0 to start training, which will ease the learning
process. (After you can activate the lock almost every time, you can upgrade the sensitivity
(security) to a higher level for your purposes.)
Registering First Administrators:
A. Slide open dust cover
B. Press Power-On button (Exterior) (one long beep will sound)
C. Press and hold STOR (Interior) for about 3 seconds until you hear one long beep
D. Press your designated finger very firmly onto the fingerprint scanner window, stay motionless,
and press and hold STOR button again with your other hand until a long beep sounds again
and scanner starts scanning your finger
E. When scanner goes off and a short beep sounds, pick up and replace the same finger firmly
for a second scan, which starts automatically.
F. When TWO short beeps sound, congratulations! Your fingerprint was successfully
registered.
G. If you hear THREE beeps, the fingerprint was NOT registered, due to a poor image,
movement or other reasons. Start again if you heard a motor noise and the power has timed
out. If power is still on, start over.
H. After registration, test to see that you can activate the lock by unlocking the door with
your fingerprint before you shut the door and maybe lock yourself out!
I. Multi enrollment of same person is a good thing. You can register yourself or any other
person, such as a young girl, several times with a new template ID position as if she were a
different person, using the same finger. This way she will have a higher probability of
activating the lock even if she varies her finger position at entry.
J. Test your fingerprint by Unlocking the door with your fingerprint.
Guardian DL210A Operation Manual V4.0 © Copyright 2004 Index Security Inc.
10
Index
Access
Power
Button

FGR-ST-DL210A Fingerprint Door Lock
Deadbolt User Manual V4.0
Unlocking the door with your fingerprint
Normal Operation From Outside - Using fingerprint to gain access
The cylindrical (lower) lock is automatically locked for people on the outside until it is unlocked by
fingerprint but it is not locked for people exiting from the inside.
A. Press Power On button (Outside)
B. Immediate place your chosen finger firmly on the window exactly as you did during
registration
C. If successful, the green light flashes, there is a beep and the deadbolt will retract
automatically. You will have 5 seconds to push down on the door handle. (If the deadbolt
was not extended, you can see the green light flash and hear a noise indicating the door
mechanism is being activated after accepting a proper fingerprint.)
D. If there are three beeps, the fingerprint was rejected. This means the finger was positioned
and/or pressed in a way that did not match the registration. Simply press the Power On
button again and place your finger again. With a little practice, you will unlock the door every
time. (Note: how to set the sensitivity level might make it easier or harder and how to trade-off
ease of acceptance with tight security.)
E. Helpful Hint!:
If you have difficulty activating the lock and your rejection rate is more than half the time,
consider re-registering of your fingerprint with a different finger, more pressure, different
position, etc. If you had successfully registered your fingerprint, but cannot open the lock, you
may want to reregister your fingerprint with a better image. To start over with an empty lock,
you can perform a mass delete per Section.
Suggested Training: Lower the sensitivity and train before enrolling again. Once you see how
to Unlocking the door with your fingerprint, you should add your users.
7. Registering of additional fingerprints -
Right after admin registration; the first two (2) fingerprints are registered as Administrators, additional
fingerprints can be registered by any Administrator (or Supervisor.)
A. The Administrator should advise the new registrant on the proper method of placing the finger
in the scanning window and the sequence of opening and locking the door.
B. The Administrator should know what level of authority he/she wants to assign to the new
registrant.
Guardian DL210A Operation Manual V4.0 © Copyright 2004 Index Security Inc.
11
Index
Access

FGR-ST-DL210A Fingerprint Door Lock
Deadbolt User Manual V4.0
C. The Administrator first gains access to the system.
D. Immediately after successfully unlocking the door (before the time out of the power); press
and hold the STOR button for 3 seconds (long beep will sound)
E. Press the Select button repeatedly to select the desired template ID number for the new
person. The display will show the next available IDs in each of the three groups. Remember
that Template IDs 1 thru 5 are Administrators, Template IDs 6 thru 10 are Supervisors and
Template IDs 11 thru 50 are Users.
For example, if only two Administrators have been registered, they will have used up template
positions 01 and 02. Upon registering a third person, pressing repeatedly on the Select button will
display: 11 - 06 - 03. These are the next available IDs in the all three categories.
If you wish this person to be at the Supervisor level, for example, you would cycle the three
available choices to 06, the next available ID number in the Supervisor category.
Note: The template ID number must be selected at this time. A fingerprint image cannot have its
management level changed after registering.
F. As you register each person keep record of their assigned #'s this way if you wish to delete
an individual at a later time-it will be by template ID number. A user Template ID list from is
provided at the end of this manual for your convenience.
G. Press STOR for about 3 seconds again, and have new registrant place finger firmly and
properly in scanning window. You will hear a long beep and see the scanning of the finger. At
the short beep, remove and replace finger onto window for a second scan.
H. When 2 beeps sound, that person's fingerprint was successfully registered.
The display should show 03 - 11 - 07. (The next available Supervisor ID is now 07, since you just
used up 06)
Guardian DL210A Operation Manual V4.0 © Copyright 2004 Index Security Inc.
12
Index
Access
ADMIN 1-5
SUPERVISOR 6-10
USER 11-50

FGR-ST-DL210A Fingerprint Door Lock
Deadbolt User Manual V4.0
I. If 3 beeps sound, the registration was not successful. You can immediately press STOR until
a long beep (about 3 seconds) and try again to scan your fingerprint. However, if the power
has “Timed Out” and you hear the motor sound; then you must start over.
J. After a successful registration, you can immediately register another person by pressing
STOR for about 3 seconds again , or if Timed Out, start over.
K. After registrations, wait about 10 seconds for the lock to Time Out before trying to test the
fingerprint access system.
8. Deleting Fingerprints
Mass Delete with only two Administrators registered
A. While holding the DEL button, press the Power button and hold
B. Listen for long beep followed by two beeps. Display will show UU.
Mass Delete with more than two fingerprints registered
A. One of the Administrators must first perform an unlocking procedure
B. Immediately after the Administrator is successfully verified, press the Select button once and
release, then press both DEL and STOR buttons simultaneously for about 3 seconds. Display
will show UU.
Deleting individual fingerprints
A. Administrators can delete anyone. Supervisors can delete IDs on the User level. Users
cannot delete.
B. The Administrator or Supervisor must know the template ID number of the person being
deleted.
C. The Administrator or Supervisor first verifies his/her fingerprint and unlocks the lock.
D. Quickly (before time out) press DEL button for about 3 seconds until you hear a long beep.
E. Press the Select button repeatedly until the template ID of the person being deleted is
displayed.
F. Press the DEL button again for about 3 seconds until the long beep.
G. That individual has been deleted.
Guardian DL210A Operation Manual V4.0 © Copyright 2004 Index Security Inc.
13
Index
Access
Power
Button

FGR-ST-DL210A Fingerprint Door Lock
Deadbolt User Manual V4.0
9. Door Entry/Exit Operations:
Exterior Locking:
A. Closed the door. The cylindrical (lower) lock is automatically locked for people on the outside
until it is unlocked by a fingerprint but it is not locked for people exiting from the inside. The
cylindrical (lower) lock is always engaged.
B. Dead bolt locking must be activated
by pressing the DeaDBolt Lock Button
and is not automatic, from the Exterior
body or when outside.
Inside Door Operation
There re two (2) locking points: The Lower Cylindrical Lock and Dead Bolt.
For your understanding: The cylindrical (lower) lock is unlocked by pulling down on the handle when
exiting from the inside.
Interior Dead Bolt Locking:
There are Lock and Unlock buttons
clearly marked on the inside of the
lock, which apply only to the deadbolt.
Pressing the Lock button will extend
the deadbolt. Pressing the Unlock
button will retract it.
Guardian DL210A Operation Manual V4.0 © Copyright 2004 Index Security Inc.
14
Index
Access
Dead
Bolt
Lock

FGR-ST-DL210A Fingerprint Door Lock
Deadbolt User Manual V4.0
Guardian DL210A Operation Manual V4.0 © Copyright 2004 Index Security Inc.
15
Index
Access
Emergency Key Holes
Open both Locks
10. Emergency Access
Emergency Unlocking From the Outside - Using Emergency Key
A. Possible reasons for use of emergency procedures:
1. Registered fingerprint is injured and door cannot be opened.
2. Low battery indicator was ignored and batteries are dead. (Note: Batteries are replaced
from the Inside.)
3. Fingerprint ID system is not functioning.
B. The same Emergency key is used for the Deadbolt and the Lower Cylindrical lock. Both
keyholes are normally hidden from view, and are accessed only from the Outside.
C. For the Dead Bolt, slide up dust cover, and then remove it completely to expose the keyhole.
(Cover pops off by pulling upwards.)
D. For the lower cylindrical lock, use a pocket knife or tiny screw driver to pry off the round metal
cap on Exterior door handle to expose the keyhole.
Emergency Retracting of Deadbolt From the Inside
A. Only the deadbolt requires an emergency procedure,
as the lower cylindrical lock is not locked and
unlocked from the Inside.
B. Turn the deadbolt opener to manually retract the
deadbolt.
Turn Clockwise

FGR-ST-DL210A Fingerprint Door Lock
Deadbolt User Manual V4.0
To Keep Door Always Unlocked
(Deactivate the fingerprint scanner)
A. After the lock is unlocked and while power is still on, press the Select button TWICE then
press the Unlock button. A long "beep" will sound and the lock will remain unlocked.
B. To return to normal operation, press Lock button (inside or outside).
11. Specifications
Guardian DL210A Operation Manual V4.0 © Copyright 2004 Index Security Inc.
16
Index
Access

FGR-ST-DL210A Fingerprint Door Lock
Deadbolt User Manual V4.0
12. Troubleshooting
A. Problem: 3 beeps and 3 flashes of the red LED show failure when
registering fingerprint or when attempting to unlock door
B. Problem: System does not turn on when Power on button is pushed
C. Problem: The system does not respond to buttons
Guardian DL210A Operation Manual V4.0 © Copyright 2004 Index Security Inc.
17
Index
Access
Possible Cause
The finger was not pressed
on window in time - the lock
had timed out.
The finger was not positioned
as previously registered
The finger is dirty, calloused
or otherwise not giving a good
image
The batteries are depleted;
low voltage signal sounds
Solution
Repeat the procedure, but
put finger on more quickly
Repeat the procedure and vary
the positioning of the finger
If registering, try a different
finger. If unlocking, clean finger
Change batteries
Possible Cause
The batteries are depleted; low
voltage signal sounds
The batteries were not installed
correctly
Solution
Change batteries
Check that all batteries are in
equally good condition and have
polarities correct
Possible Cause
The batteries are depleted; low
voltage signal sounds
You are changing tasks too fast
and need to allow power to time
out between certain tasks
The system is confused by
wrong sequences of buttons
Solution
Change batteries
Let lock time out between tasks
Allow lock to time out and try again

FGR-ST-DL210A Fingerprint Door Lock
Deadbolt User Manual V4.0
D. Problem: The management level designations are incorrect
Guardian DL210A Operation Manual V4.0 © Copyright 2004 Index Security Inc.
18
Index
Access
Possible Cause
Levels were not set up before
registration
Solution
Delete and Re-register incorrect
fingerprints with proper
management levels selected
prior to scanning of fingers, or
Delete all fingerprints and
re-register everyone.
500 Parker Avenue , Suite "G"
Deal, New Jersey 07723-1435
Phone: 732- 531-9209 Fax: 732-531-2307
Toll Free 866-INDEX89 (866-463-3989)
www.index-security.com
info@index-security.com

FGR-ST-DL210A Fingerprint Door Lock
Deadbolt User Manual V4.0
13. Warranty Policy:
We at Index Security Inc. want to thank you for purchasing our product. We are
confident that we are bringing you the highest quality products and that you will be
extremely pleased by its superb workmanship and we offer a Six (6) month Warranty.
Index Security responsibility with regard to this limited warranty shall be limited solely
to repair or replacement, at its option, of any product that fails during normal
consumer use. This warranty does not extend to damage or failure that results from
misuse, neglect, accident, alteration, abuse, improper installation or maintenance, or
loss of data. Never try to open this device or tamper with the casing as it will
automatically void the warranty.
Please visit www.index-security.com for warranty registration or fax warranty to 732-
531-2307. Make sure to put the Serial number on the form. You must register to
validate this warranty within 30 days of purchase. If, during the warranty period the
product fails due to defects in materials or workmanship, you may request an RMA #
via the web site, phone or by fax and after receiving an RMA#, you can return the
defective product freight pre-paid to:
Guardian c/o Index Security Inc, 500 Parker Avenue, Suite G, NJ 07723-1435,
USA and we will exchanged or repair it at our option. Please make sure to include
the invoice or receipt from the original sale, your S/N , RMA # and reason for your
return.
Please include a Money Order or Bank Check (certified check) to Index Security for
$25.00 for shipping and handling charges.
We at Index Security stand behind our products. If you have any questions or
concerns, feel free to contact us at: info@Index-security.com.
Product Registration, Downloads, manuals, Drivers and Updates go to:
www.index-security.com
Product made in China 91202
Guardian DL210A Operation Manual V4.0 © Copyright 2004 Index Security Inc.
19
Index
Access

FGR-ST-DL210A Fingerprint Door Lock
Deadbolt User Manual V4.0
Notes:
Guardian DL210A Operation Manual V4.0 © Copyright 2004 Index Security Inc.
20
Index
Access
Table of contents
Popular Door Lock manuals by other brands

Kaba
Kaba Ilco 790/79 Series Rework Installation Sheet

Simons Voss Technologies
Simons Voss Technologies WaveNet Lock-Node SH 3062 quick guide

Ammo doors
Ammo doors B&D TRI-TRAN Coding Instructions

Glutz
Glutz PIATTO Fixing instructions

PDQ
PDQ KMS pdqSMART Installation instruction

Hyundai Telecom
Hyundai Telecom HDL-7300SK user manual