Infantino Jumbo Activity Gym & Ball Pit User manual

IMPORTANT! KEEP INSTRUCTIONS FOR
FUTURE USE.
Thank you for choosing this product. Read all instructions before assembling and using this product.
CAUTION! This product is under strong tension. Keep it away from children and your face while opening.
¡IMPORTANTE! GUARDE LAS
INSTRUCCIONES PARA SU USO FUTURO.
Gracias por escoger este producto. Lea todas las instrucciones antes de armar y usar este producto.
¡PRECAUCIÓN! Este producto se encuentra bajo fuerte tensión. Manténgalo alejado de los niños y de su cara al abrirlo.
4-in-1 Jumbo
Activity Gym & Ball Pit™
Instructions
Instrucciones

2.
Gym Contents: Refer to these parts when reading the instructions.
Contenido del Gimnasio: Refiérase a estas partes cuando lea las instrucciones.
1
2
3
4
5
6
7
Gym Contents: Refer to
these parts when reading the
instructions.
1Play Mat
24 Linkable Toys
3Toy Arches
4Large Storage Bag
5Mirror
4 Foam Supports
40 Multi-colored Balls
Tummy Time Pillow (Bolster)
6
7
8
8
Contenido del gimnasio:
Refiérase a estas partes cuando
lea las instrucciones.
1Tapete de Juegos
24 Juguetes Enlazables
3Arcos de Juguete
4Bolsa grande de almacenamiento
5Espejo
4 Soportes de Espuma
40 Pelotas Multicolores
Almohada para jugar boca abajo (apoyo)
6
7
8

Assembly for Overhead Discovery & Prop-Up Pillow Tummy Time Modes:
Ensamblaje los Modos de Descubrimiento Aéreo y Almohada de Apoyo para
Jugar Boca Abajo:
1-1. 1-3.
1-2.
1
1-4.
Assembly for Sit and Play Ball Pit Mode:
Ensamblaje para el Modo Siéntate y
Juega enla Piscina de Bolas:
22-1. 2-2.
2-3.
2-7.
2-5.
2-9.
2-6.
2-4.
1-5.a
1-6.
1-5.b
3.
Gym Contents: Refer to these parts when reading the instructions.
Contenido del Gimnasio: Refiérase a estas partes cuando lea las instrucciones.
1-7.
2-8.

3
WARNING:
Please retain this
information for future reference. Inspect toy before each
use. Remove all plastic, thread, and/or packaging fasteners
before giving any toy to a child. CAUTION: Toy arch is under
tension. Grasp rmly on both ends and use care to avoid injury.
Never use toy arch as a handle to carry or lift a baby. Possible
entanglement or strangulation hazard - Do not use in cribs,
playpens, etc. Do not add additional strings, cords, or straps.
This product is not intended to keep a child contained like a
play pen. Fall Hazard - Do not use on an elevated surface or near
stairs. Use product only on oor. Never allow babies to sleep
on this product. Warning! Keep away from re. Adult assembly
required. Adult supervision required at all times. Do not leave
child unattended. Intended for single child use only. Keep all
components not in use out of the reach of children. Discontinue
use if mesh is ripped or torn. In an eort to continually improve
our product, the item inside this package may vary slightly from
the photographs. Conforms to safety requirements of ASTM
F963. Storage bag is optional to attach on the toy arches.
Care Instructions:
Play Mat, Support Poles, Balls, Toys, Bolster, Ball Bag:
Surface clean only. Teether: Clean teether before
each use with a damp sponge or cloth. Keep mirror
out of direct sunlight.
En
4.
Assembly for Toddler Ball Pit Mode:
Ensamblaje para el Modo Alberca de Pelotas para Niños Pequeños:
3-1. 3-2. 3-3.
3-5. 3-6. 3-7.
Assembly for Overhead Discovery &
Prop-Up Pillow Tummy Time Modes:
1-1. In this mode the toy arches will be assembled
and the mesh sides will be down.
1-2. Pick up the toy arches. Attach the gray C-Ring
located at the end of a toy arch to the fabric loop
located on the play mat.
1-3. Repeat step (1-2.) with the remaining 3 C-Ring’s
and fabric loops.
1-4. Attach the 4 linkable toys to the fabric loops
located on the toy arches.
1-5a. Attach the mirror anywhere along gym arches.
To attach locate hook and loop straps on mirror,
wrap around arch and secure.
1-5b. For overhead mobile play attach mirror where
arches cross by wrapping hook and loop attachment
straps around arches. Add provided toys to toy loops
on mirror for additional play.
1-6. To keep ball storage bag attached to gym locate
strap on the back of the watermelon character and slip
it through the loop on the toy arch to keep in place.
1-7. To attach the other end of bag, locate the hook
and loop square on the back of the watermelon
character and connect it to the matching square on
the gym arch.
1
Instructions:
3-4.

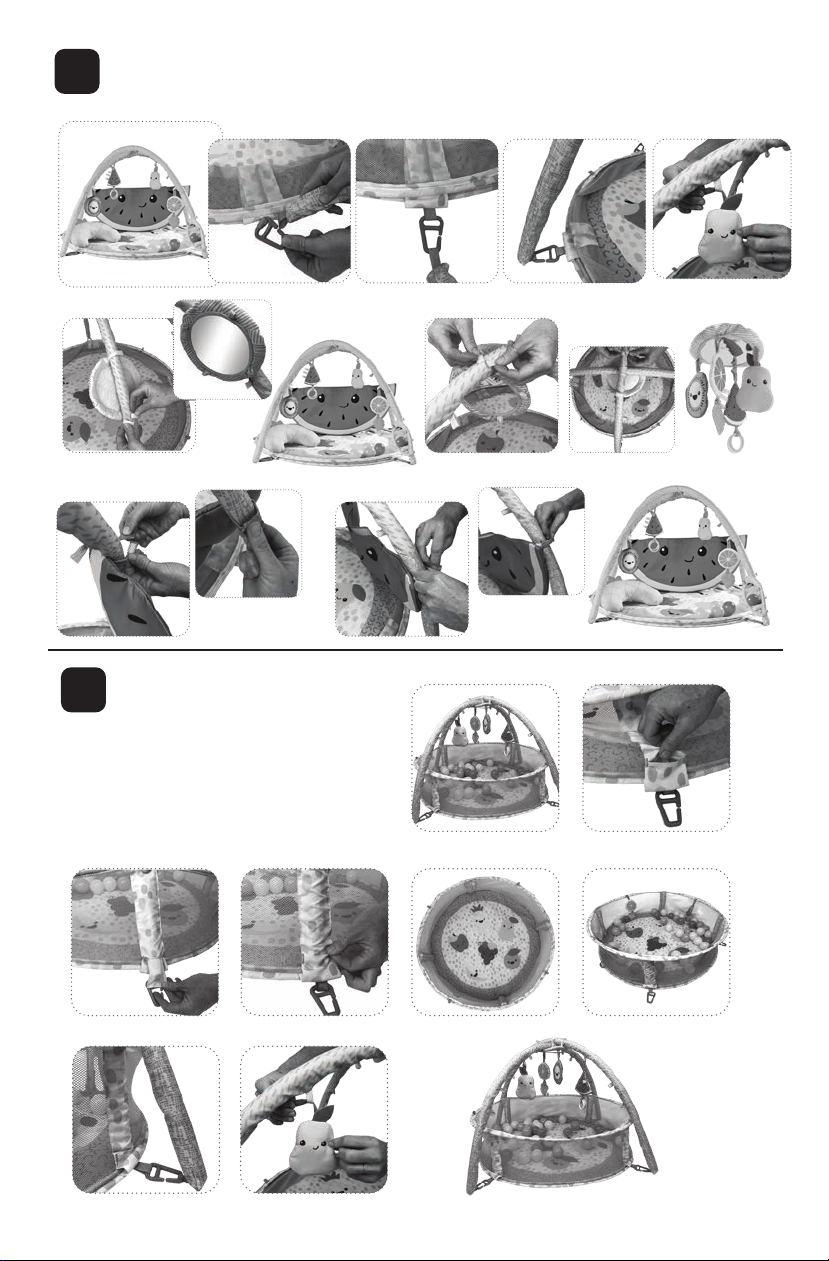
2Assembly for Sit and Play Ball Pit
Mode:
2-1. In this position the toy arches will be
assembled and the mesh sides will be up. This
is great to keep infants surrounded with fun.
2-2. Insert a foam support into a fabric sleeve,
located on the mesh.
2-3. Push the foam support upward to clear the
bottom of the fabric sleeve – it should pop
into place inside the sleeve.
2-4. Secure the fabric sleeve.
2-5. Repeat steps (2-2.), (2-3.) and (2-4.) with the
remaining 3 foam supports and the remaining
3 fabric sleeves.
2-6. The pop-up mesh sides should now be fully
upright.
2-7. Pick up the toy arches. Attach the gray C-Ring
located at the end of the toy arch to the fabric
loop located on the play mat.
2-8. Repeat step (2-7.) with the remaining 3
C-Ring’s and fabric loops.
2-9. Attach the linkable toys to the fabric loops
located on the toy arches or the 4 loops
located around the upper top of the mesh
sides.
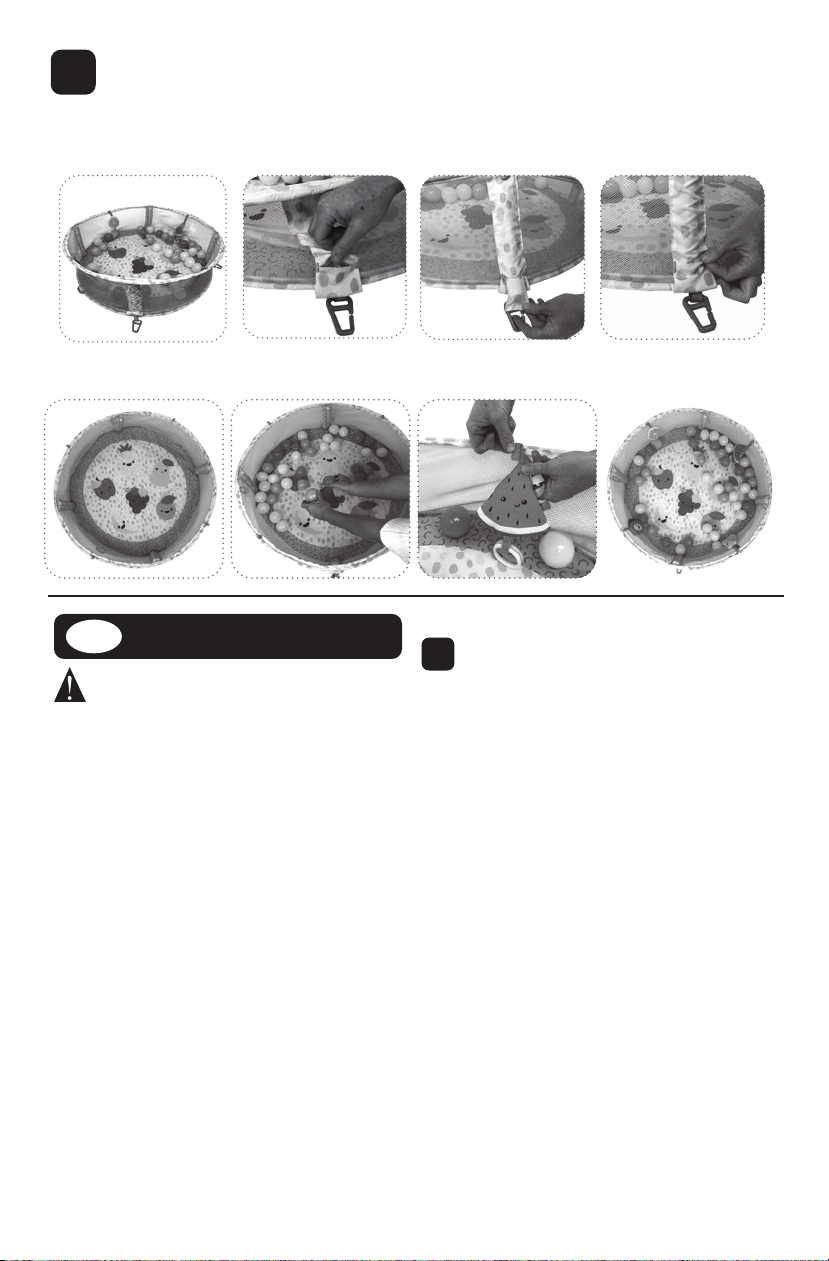
3Assembly for Toddler Ball Pit
Mode:
3-1. In this position the gym toy arches will be
removed and the mesh sides will be up. This
mode is designed for older babies who are
able to sit up unassisted and toddlers.
3-2. Insert a foam support into a fabric sleeve,
located on the mesh.
3-3. Push the foam support upward to clear the
bottom wall of the fabric sleeve – it should
pop into place inside the sleeve.
3-4. Secure the fabric sleeve.
3-5. Repeat steps (3-2.), (3-3.) and (3-4.) with the
remaining 3 foam supports and the remaining
3 fabric sleeves.
3-6. Fill the ball pit with balls.
3-7. You may also attach the 4 linkable toys to the
4 loops located around the upper top of the
mesh sides.
5.
FrEs
ADVERTENCIAS:
Por
favor conserve esta información para su referencia futura.
Revise el juguete antes de cada uso. Quite todas las sujeciones
de empacado de plástico, hilo y/o sujetadores antes de darle
cualquier juguete a un niño. PRECAUCIÓN: El arco del juguete
está bajo tensión. Agárrelo rmemente por ambos extremos
y tenga cuidado para evitar lesiones. Nunca use el arco del
juguete como asa para cargar o levantar a la criatura. Peligro
de posible enredo o estrangulamiento. No lo utilice en cunas,
corrales, etc. No le añada cadenas, cuerdas o correas adicionales.
Este producto no tiene la intención de contener a un niño como
si fuera corral de juego. Hay riesgo de caerse - No lo use en una
supercie elevada o cerca de las escaleras. Use el producto
sobre el piso solamente. No deje dormir a los bebes sobre este
producto. ¡Advertencia! Manténgalo lejos del fuego. Requiere
ser ensamblado por un adulto. Requiere de la supervisión
de un adulto en todo momento. Nunca deje a un bebé
desatendido. Diseñado para el uso de un solo niño solamente.
Mantenga todos los componentes que no estén en uso fuera
del alcance de los niños. Suspenda su uso si la malla está rota
o desgarrada. En un esfuerzo por mejorar nuestro producto de
forma continua, el artículo adentro de este empaque podría
ser ligeramente distinto al de las fotografías. De conformidad
con los requerimientos de seguridad ASTM F963. La bolsa de
almacenamiento es opcional para colocar en los arcos de jugete.
Instrucciones de Cuidados:
Tapete de juego, patas de soporte, balones, juguetes,
cojín, bolsa para balones: Únicamente limpie la
supercie. La mordedera: Limpie la mordedora antes de
cada uso con un paño o esponja húmedos. No exponer
el espejo a la luz solar directa.
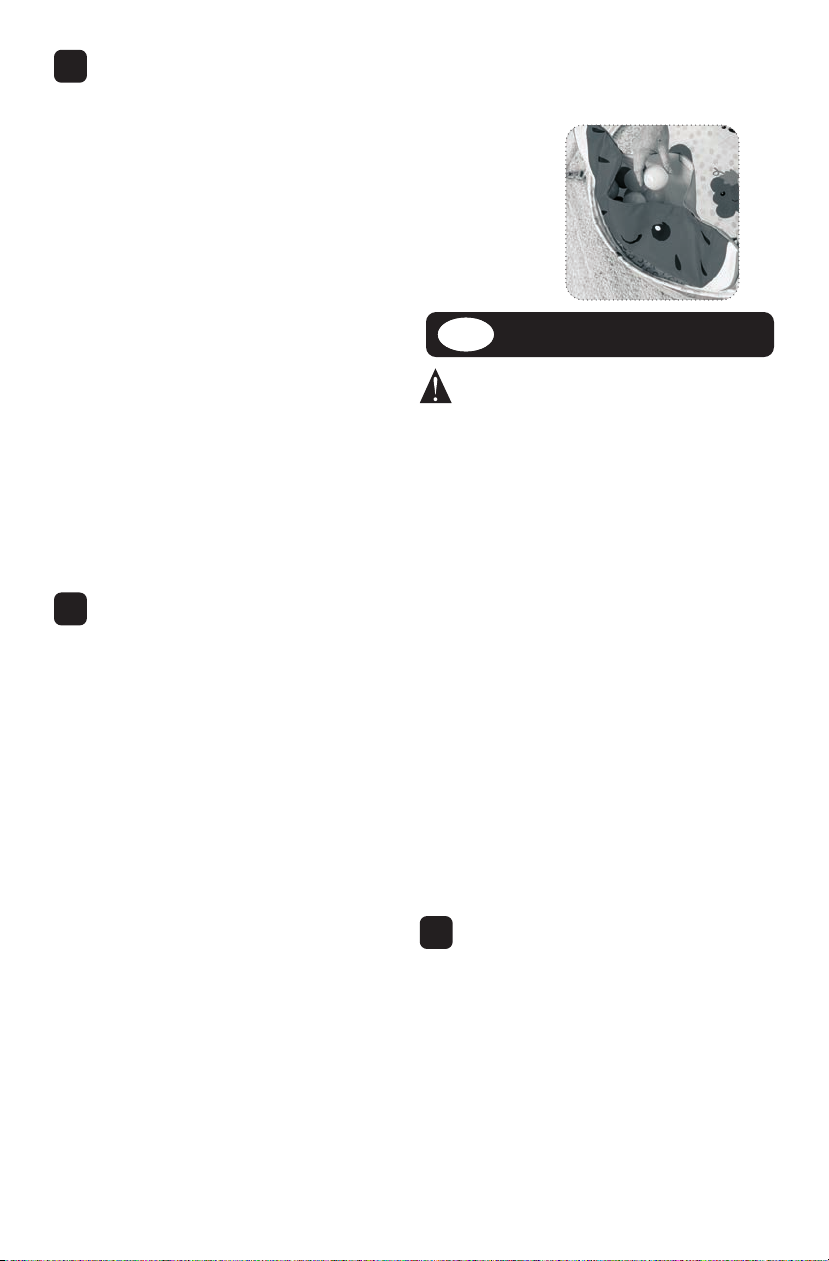
Ball Storage:
When not in use store balls in watermelon storage
bag. Open by pulling hook and loop tab apart, insert
balls and close.
Instrucciones:
1
Ensamblaje los Modos de
Descubrimiento Aéreo y Almohada
de Apoyo para Jugar Boca abajo:
1-1. En este modo los arcos de juguete serán
ensamblados y los lados de la malla quedarán
hacia abajo. Esto es perfecto para niños pequeños.
1-2. Tome los arcos de juguete. Coloque el anillo en
C gris situado en el extremo de un arco de juguete
en el bucle de tela situado en la alfombra de
juego.
1-3. Repita el paso (1-2.) con las otras 3 hebillas y clips.
1-4. Una los 4 juguetes vinculables a los lazos de tela
ubicados en los arcos de juguete.

6.
1-5a. Sujete el espejo en cualquier lugar a lo largo de
los arcos del gimnasio. Para sujetarlo, busque
l as tiras de gancho y bucle en el espejo,
envuélvalas alrededor del arco y asegúrelas.
1-5b. Para utilizarlo como móvil superior, sujete
el espejo donde los arcos se cruzan al
envolver las tiras de sujeción de gancho y
bucle alrededor de los arcos. Agregue los
demás juguetes proporcionados en las
presillas del espejo para brindar más
opciones de juego.
1-6. Para mantener la bolsa de almacenamiento
de pelotas unida al gimnasio, localice la
correa en la parte posterior del personaje de
la sandía y deslícela a través del bucle del
arco del juguete para mantenerla en su sitio.
1-7. Para jar el otro extremo de la bolsa, localice
el cuadrado de gancho y bucle en la parte
posterior del personaje de la sandía y
conéctelo al cuadrado correspondiente del
arco del gimnasio.
2Ensamblaje para el Modo Siéntate y
Juega enla Piscina de Bolas:
2-1. En este modo los arcos de juguete serán
ensamblados y los lados de la malla quedarán
hacia arriba. Esto es excelente para mantener
a los niños pequeños rodeados de diversión.
2-2. Inserte un soporte de espuma en una manga de
tela, situada en la malla.
2-3. Empuje el soporte de espuma hacia arriba para
despejar la parte inferior de la manga de tela –
que debe saltar en su lugar dentro de la manga.
2-4. Asegure la manga de tela.
2-5. Repita las acciones (2-2.), (2-3.) y (2-4.) con los 3
soportes de espuma restantes y las 3 mangas de
tela restantes.
2-6. Los lados de la malla que saltan en su lugar ahora
deben estar totalmente levantados.
2-7. Tome los arcos de juguete. Coloque el anillo en C
gris situado en el extremo del arco de juguete en
el bucle de tela situado en la alfombra de juego.
2-8. Repita el paso (2-7.) con los 3 anillos en C
restantes y los bucles de tela.
2-9. Una los 4 juguetes vinculables a los lazos de
tela ubicados en los arcos de juguete o los lazos
ubicados alrededor de la parte superior de los
lados de la malla.
3Ensamblaje para el Modo Alberca
de Pelotas para Niños Pequeños:
3-1.
En esta posición los arcos del gimnasio serán
removidos y la malla quedarán hacia arriba.
Este modo está diseñado para los bebés más
grandes que son capaces de sentarse sin
ayuda y los niños pequeños.
3-2. Inserte un soporte de espuma en una manga de
tela, situada en la malla.
3-3. Empuje el soporte de espuma hacia arriba para
despejar la pared inferior de la manga de tela –
que debe saltar en su lugar dentro de la manga.
3-4. Asegure la manga de tela.
3-5. Repita las acciones (3-2.), (3-3.) y (3-4.) con los 3
soportes restantes verticales y las 3 mangas de
tela restantes.
3-6. Llene la alberca de pelotas con pelotas.
3-7. También puede colocar los 4 juguetes de peluche
en los 4 lazos de tela en la parte superior de los
lados de la malla.
Almacenamiento de las Pelotas:
Cuando no estén en uso, guarde las pelotas en la bolsa
del sandía. Separe la lengüeta de gancho y bucle,
guarde las pelotas y cierre.

BEFORE USING THIS PRODUCT: Review and save the Instructions for future reference. Please call Infantino at 1-800-840-4916
(for US or Canada) with any questions or visit our website www.infantino.com. Made in China.
ANTES DE USAR ESTE PRODUCTO: Revise y guarde las instrucciones para su referencia futura. Llame a Infantino al 1-800-840-
4916 (para los EE.UU. o Canadá) si tiene alguna pregunta o visite nuestro sitio Web www.infantino.com. Hecho en China.
© 2021, 2022 BLUE BOX.
ALL RIGHTS RESERVED.
#213058
INFANTINO
SAN DIEGO, CA 92121 USA
www.infantino.com
? 1-800-840-4916
Table of contents
Other Infantino Baby Gym manuals