InfiRay AFFO Series User manual

AFFO Series
Operating Manual
V1.0
InfiRay Technologies Co., Ltd.

Specifications
Model
AP13
Detector Specifications
Type
Uncooled Vox
Resolution
256×192
Pixel size, μm
12
NETD, mk
≤ 40
Frame Rate, Hz
25
Optical Specifications
Objective Lens, mm
13
FOV
13.5°×10.1°
Optical Magnification, ×
1.2-2.4
Digital Zoom, ×
1×, 2×
Diopter
-3~+1
Detection Range, m
(Target size: 1.7m×0.5m, P(n)=99%)
670
Display Specifications
Type
LCOS
Resolution
720×540
Battery Power Supply
Battery type/Capacity/Output voltage
Built-in lithium ion battery/4.4Ah/3.6V
Operating time (22 ºC), h*
≤ 5h
External Power Supply
5V (Type C)
Physical Specifications
Ingress Protection Rating
IP67
Memory Capacity, GB
32
APP
Support
Operating Temperature, °C
-10~+50
Weight (g)
<340
Dimension, mm
165×60×60
*Actual operation time depends on the density of Wi-Fi use and the built-in video recorder;
*Improvements may be made to the design and software of this product to enhance its features
without prior notice to the customer;

I. Package Contents
⚫AFFO Handheld Thermal Imager
⚫Neck strap
⚫Portable bag
⚫Type-C data cable
⚫Micro HDMI video output data cable
⚫Power adapter
⚫Lens cleaning cloth
⚫User manual
II. Description:
The AFFO series infrared thermal imager is for outdoor use. It can be used in the day or night,
or in harsh weather (such as rain, snow, fog, and haze) without being affected by strong light. It
requires no external light source. Even targets hidden behind obstacles (such as branches, grass,
and shrubs) can be observed. TheAFFO series thermal imager is light and easy to carry, small in
size, suitable for single-hand operations, comfortable in use, and rich in functions. It can be widely
used for hunting, searching, and locating in various outdoor conditions.
III. Distinguishing Features
⚫12μm self-developed detector;
⚫High image quality;
⚫Lightweight and compact;
⚫Stadiametric rangefinding;
⚫Long detection distance;
⚫Built-in memory card, supporting photo taking and video recording
⚫Built-in Wi-Fi module, supporting app connection
⚫Defective pixel calibration;

IV. Units and Controls
1. Lens cover, 2. Front cover, 3. Power button, 4. Up button, 5. M button (menu button), 6. Down
button, 7. Bottom casing, 8. Eye cup, 9. Focusing knob, 10. Type-C interface rubber cap
V. Button Operations
The following table lists buttons from top to bottom:
Button
Device Status/
Current Operating
Mode
Press
Press and Hold
Power button
Powered off
——
Power on the device
Home screen
Enter the standby mode (the
display is powered off, and
the main chip enters the
standby mode)
Shut down the device
Standby
Wake up the device
——
Menu screen
Return to the home screen
——
Defective pixel
calibration screen
Add/delete defective pixels
↑button
Home screen
Switch image modes
Turn on/off the laser

pointer
Menu screen
Scroll up the menu
——
Powered off
——
Press and hold this button
to turn on the LED
indicator;
Release the button to turn
off the LED indicator
Menu button (M
button)
Home screen
Enable digital zoom
Enter the menu
Menu screen
Switch on and off/Enter the
next-level options/Select a
function parameter in
sequence
Confirm the option/Save
and go back to the
previous level
↓button
Home screen
Take a photo
Turn on the video
recording
Menu screen
Scroll down the menu
——
Recording screen
Take a photo
End the recording and save
the video
↑button + M
button
Home screen
——
Turn on/off stadiametric
rangefinding
↑button + ↓
button
Home screen
——
Turn on/off hotspot
tracking
M button + ↓
button
Home screen
——
Calibration
↑button + M
button + ↓
button
Home screen
——
Switching the status of
the laser pointer function
VI. Powering On
When the thermal imager is turned off, press and hold the Power button for 2s to turn on the

thermal imager. When an infrared image is displayed in the eyepiece, the thermal imager enters
the operating status, and the indicator is on.
WARNING! The lens of the device must not be pointed at any sources of intense
radiation energy, such as laser-emitting devices or the sun. This may damage the electronic
components in the device. Damage caused by failure to comply with the operating guidelines
is not covered under warranty.
VII. Powering Off
Press and hold the Power button. The shutdown countdown screen will appear. When the
countdown counts from 3 to 0, the device shuts down. Then, you can release the Power button.
The current status will be automatically saved after shutdown. When the device is powering off
and saving data, do not disconnect it from the power source. Otherwise, the data cannot be
saved.
VIII. Standby
When the device is powered on, press the Power button to enter the standby status. Press the
Power button again to wake up the device. Then the thermal imager enters the operating status.
IX. Turning On/Off the LED Indicator
The AFFO series is equipped with the LED indicator. You can quickly turn on the LED
indicator. When the device is powered off, press the ↑button to turn on the LED indicator, and
release the ↑button to turn off the LED indicator (the LED indicator cannot be turned on when the
device is turned on).
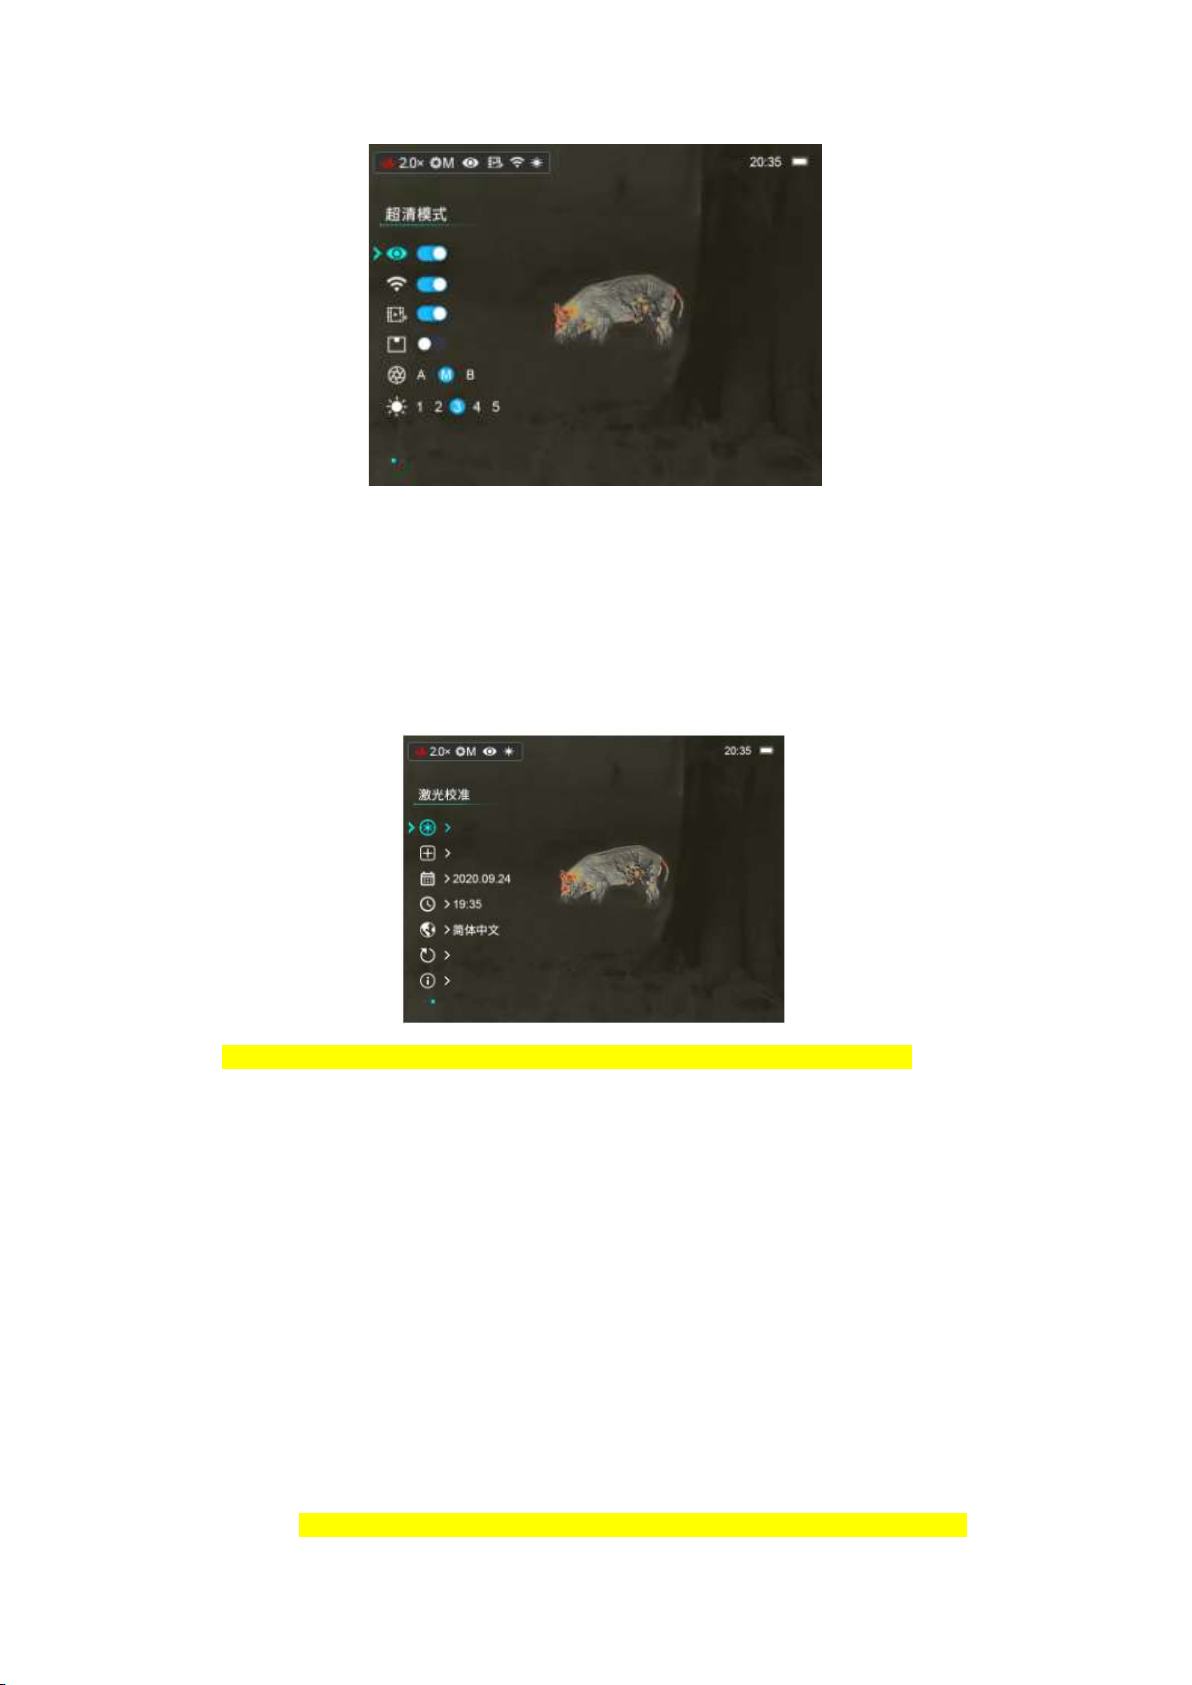
X. Switching the Image Mode
Setting the image mode: Press the ↑button to open the image palette mode, which is
white-hot, black-hot, palette, red-hot, and sky bird in sequence. The icon on the top status bar is
updated in real-time.
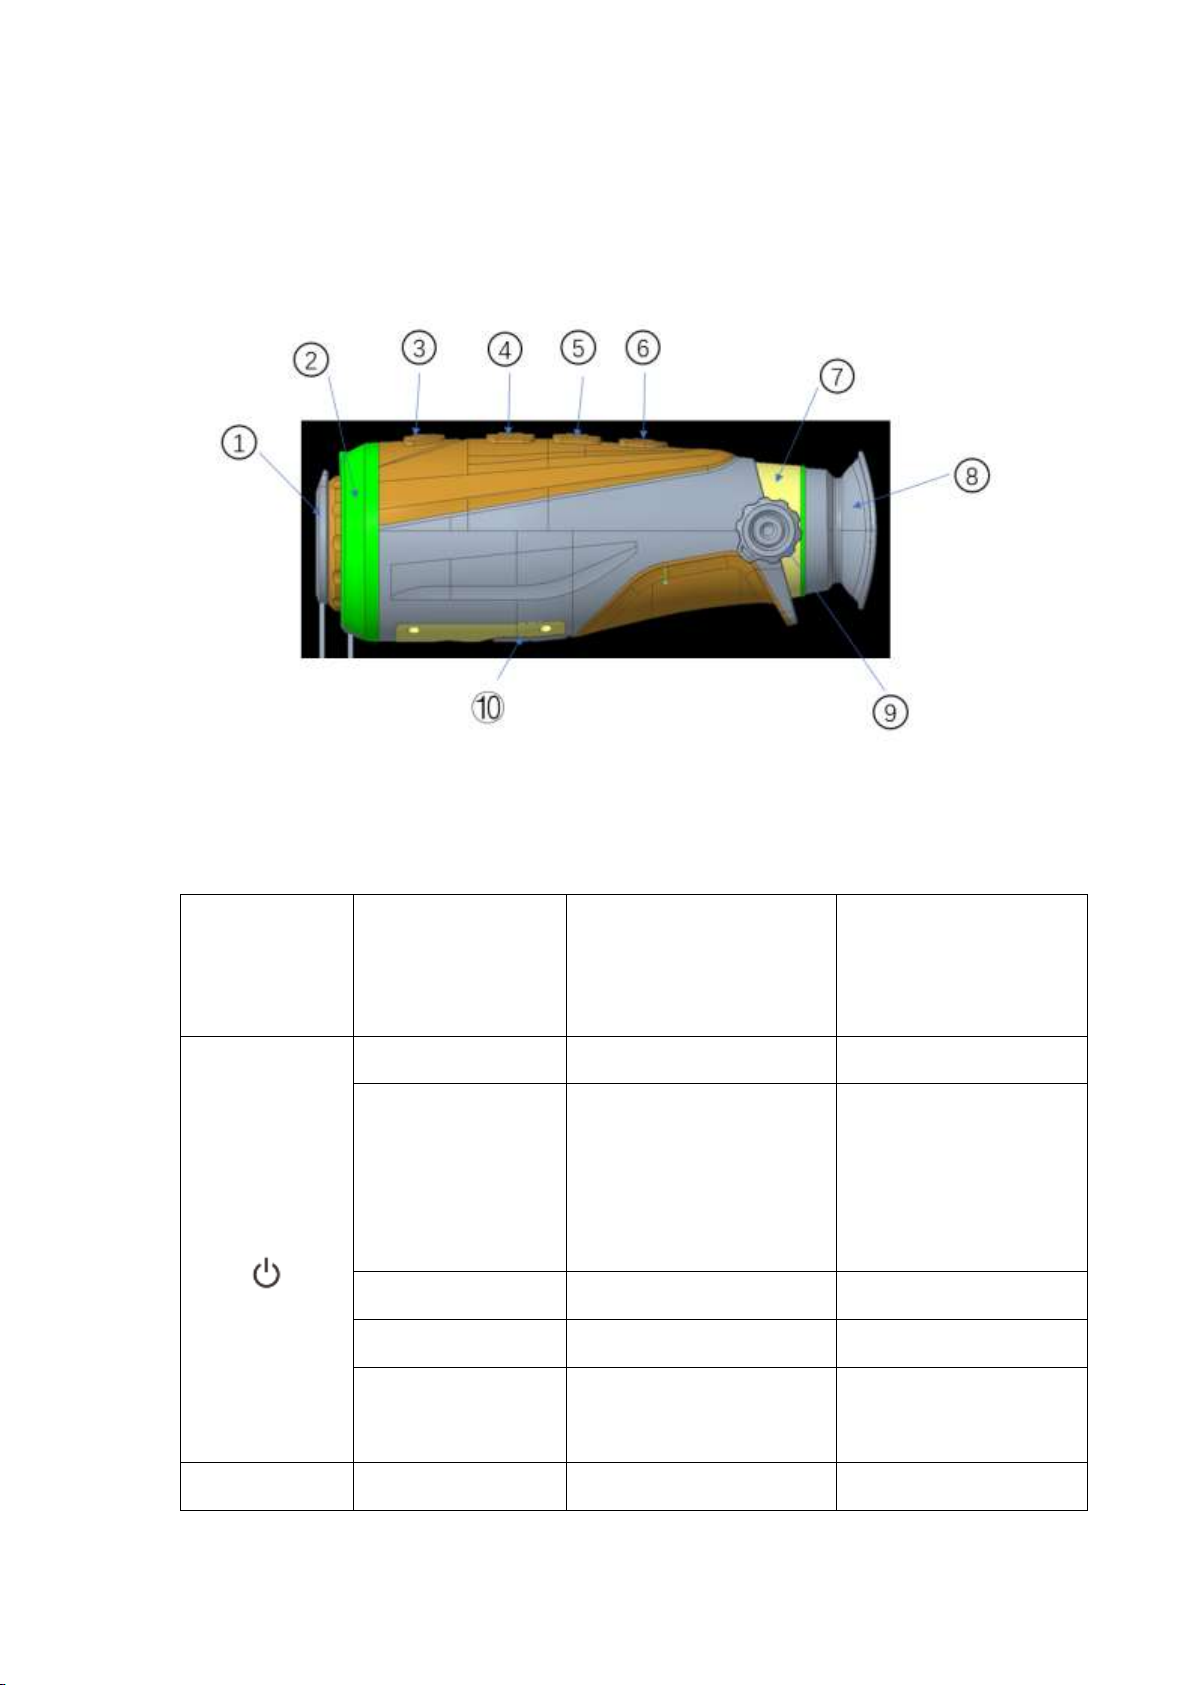
XI. DiopterAdjustment
The diopter adjustment knob is used to adjust the eyepiece diopter for users with different
degrees of myopia.
XII. Laser Locating

On the home screen, press and hold the ↑ button to turn on the laser pointer. After the laser
pointer is turned on, a laser pointer icon is displayed. Press and hold the ↑ button again to disable
the laser locating function.
XIII. Digital Zoom
On the home screen, press the Mbutton to cyclically enable the digital zoom of 1×and 2×.
The zoom status is updated in the status bar on the top in real time.
XIV. Photo Taking/Recording
Photo taking: On the home screen, press the ↓button to take a photo. When the photo taking
icon flashes for one time, the photo is taken. (When the memory is about to full, ! will be
displayed)
Recording: On the home screen, press and hold the ↓button to start recording. The recording
time is displayed. Press and hold the ↓button again to exit and save the video. (When the device is
recording videos, press the ↓button to take a photo)
XV. Stadiametric Rangefinding

On the home screen, press and hold the ↑button + Mbutton simultaneously to enter the
stadiametric rangefinding mode;
Target box-selecting range adjustment: Press the ↑/↓button to enlarge/shrink the range of the
cursor for 2px. The upper and lower cursors each move for 1px. Press and hold the ↑/↓button to
enlarge/shrink the range of the cursor for 10px. The upper and lower cursors each move for 5px.
The three reference distance values on the right change with the range of the cursor.
XVI. Hotspot Tracking
On the home screen, press and hold the ↑button + ↓button simultaneously to enter the
hotspot tracking mode.Aprompt box is displayed on the screen, to track the target with the
highest temperature on the screen.
XVII. Calibration Mode
On the home screen, press and hold the Mbutton + ↓button for calibration (the calibration
mode is consistent with that selected in the menu:Afor automatic shutter, M for manual shutter,
and B for background calibration). If you select the background calibration mode, a text prompt is

displayed in the central area of the screen. (cover lens during calibration)
XVIII. Video Output
On the main menu, turn on the video output function. The video output icon is displayed on
the always-visible status bar on the top. Use a Micro HDMI video output data cable so that the
video can be played on an external display.
XIX. Menu Settings
Press and hold the Mbutton to enter the menu screen (disabled by default). The options from top
to bottom are as follows:
1. Ultra-clear: On/Off
2. Wi-Fi: On/Off
3. Video output: On/Off
4. PIP: On/Off (this function is unavailable on theAP13)
5. Shutter correction:A for automatic shutter/ M for manual shutter/B for background calibration
(A by default)
6. Screen brightness: 1 to 5 (3 by default)

Use the ↑button and ↓button to switch up and down among functions. Functions 1 to 4 are
options where you can press the Mbutton to turn on/off the corresponding function and save the
settings instantly; For functions 5 to 6, you can press the M button to cyclically select a specific
option under the function and press and hold the Mbutton to save and confirm the settings. Then
you can continue using the ↑button and ↓button to switch up and down among functions.
The functions on the second page of the menu from top to bottom are as follows:
1. Laser calibration
2. Defective pixel calibration
3. Date setup
4. Time setup
5. Language
6. Factory reset
7. Device information
Use the ↑button and ↓button to switch up and down among functions and press the Mbutton
to enter the next level. Use the ↑button and ↓button to select an option and press the Mbutton for
confirmation. The up and right directions indicate positivity, and the down and left directions

indicate negativity.
XX. Laser Calibration
Laser cross calibration: Point the cursor to the laser calibration function on the second page
of the menu, and press the Mbutton to enter the laser calibration page: the X axis and Y axis are
displayed, the center cursor returns to the central area of the screen, and the default cursor returns
to that of factory settings. (If the laser pointer is hidden, this function is also hidden. By default,
this function is hidden)
⚫Use the ↑button and ↓button to switch among the four options, and press the Mbutton to
select an option. When the device is in the calibration mode, press the ↑button and ↓button
to move 1px a time, and press and hold the ↑button and ↓button to move 10px at a time.
⚫If the X axis or Y axis is selected for calibration, the selected icon flashes continuously. Then:
use the ↑button to move the cursor to the right direction, and use the ↓button to move the
cursor to the left direction (X axis); Use the ↑button to move the cursor to the up direction,
and use the ↓button to move the cursor to the down direction (Y axis). Then press the M
button again to stop the flashing.
⚫When the arrow points to centre/default, press the Mbutton. The cursor returns to the original
position of centre/default.

(The Default position is configured upon delivery, and the arrow points to the Default
position. Press and hold the ↑button + ↓button for activation to adjust the Default position:
Adjust the position in the X axis and Y axis.After determining the small cross position, press
the M button to save the settings.)
XXI. Defective Pixel Calibration
Point the cursor to the defective pixel calibration function on the second page of the menu,
and press the Mbutton to enter the page for defective pixel calibration (as shown in the following
figure): In the mean time, PIP is enabled on the lower-left corner of the image, and the displayed
area of the PIP image changes with the cursor position (this function is unavailable on the AP13).
Press the ↑/↓button to switch between the X axis/Y axis, and press the M button to select an
option. The icon continuously flashes. Press the ↑/↓ button to move the cursor displayed on the
screen. Use the ↑/↓button to move the cursor to left/right (X axis), or up/down (Y axis).
Press the Mbutton again to stop the flashing and switch between the X axis/Y axis for
adjustment.
On the lower area, the number of defective pixels is displayed. Point the cursor to the

position requiring defective pixel calibration, and press the button to add a defective pixel.
In the PIP image, Add is displayed (this function is unavailable in the AP13); In the same position,
press the button again to delete the defective pixel. In the PIP image, Del is displayed.
Hover the point near the PIPimage. The X axis and Y axis and the number of defective pixels of
the PIP image are moved to the upper-left corner (this function is unavailable in theAP13).
Press and hold the Mbutton.A prompt is displayed for you to save this operation. Factory
resetting can delete all added defective pixels.
XXII. Date Setup
Point the cursor to the date setup function on the second page of the menu, and press the M
button to enter the configuration page. The arrow indicates that the current option is configurable.
Use the ↑button and ↓button to configure the correct date, press the M button to switch among
year/month/day, and press and hold the Mbutton to save and exit from the date setup.

XXIII. Time Setup
Point the cursor to the time setup function on the second page of the menu. The 24-hour
system is used, and the time is displayed in the format of hour/minute. Press the Mbutton to
configure the time, use the ↑button and↓button to configure the correct hour/minute, press the M
button to switch between hour/minute, and press and hold the Mbutton to save and exit from the
time configuration. (The time on the home screen changes accordingly.)
XXIV. Language Selection
Point the cursor to the language selection function on the second page of the menu, press the
Mbutton to enter the configuration page. Use the ↑button and ↓button to switch between
languages, and press the M button for confirmation. After the selected option flashes for one time,
the option is saved and the screen goes back to the previous level.

XXV. Factory Reset
Point the cursor to the factory reset function on the second page of the menu, and press the M
button to enter the configuration page. Use the ↑button and ↓button to select between yes and no,
and press the Mbutton for confirmation.
XXVI. Device Information
Point the cursor to the device information function on the second page of the menu. The
device name, hardware version number, software version number, SN, PN, and so on are
displayed.
XXVII. Charging
When the device is charging, the LED indicator is red if the device is not fully charged yet;
the LED indicator turns green when the device is fully charged; (the LED indicator is covered by
the Type-C interface rubber cap, and is on only in the charging status. When the power level is low,

a battery icon will show the low-battery status on the display.)
Note: The battery should be fully charged before first use.
XXVIII. Precautions
1. The rated voltage of the product is 5V. Please charge the device promptly when the battery is
low so that the service life of the thermal imager will not reduce due to battery over-discharge;
2. Using this product in a high-temperature environment for a long time is not recommended.A
too high temperature will cause the thermal imager to enter the high-temperature protection
status and shut down automatically;
3. The recommended temperature for using this product is -10°to +50°.A temperature
exceeding this range will affect the service life of the product;
4. Before using this product in an environment with water, ensure that the Type-C interface
rubber cap on the bottom of the thermal imager is tightly covered;
5. Do not aim the thermal imager at radiation sources such as the sunlight and laser in any
circumstance, to avoid irreversible damage to the thermal imager;
6. In the calibration mode, the thermal imager will reduce the automatic shutter correction
frequency. If the image is degraded, cover the lens cover for manual background calibration;
7. If the thermal imager is not used for a long time, recharge the device every 2 months at least,
and store the device in a dry and ventilated environment.
8. When you configure the thermal imager with a laser pointer, do not aim the laser pointer at
human eyes.
9. The laser and cursor functions are subject to the laws in different countries or regions;
10. Do not charge the device in an environment with a temperature over 40°C.
Other manuals for AFFO Series
1
This manual suits for next models
1
Table of contents
Other InfiRay Laboratory Equipment manuals
Popular Laboratory Equipment manuals by other brands

FSA
FSA GT7-2K System manual

Linkam Scientific Instruments
Linkam Scientific Instruments LTS420 user guide

Drucker
Drucker 614B Operator's manual

Scientifica
Scientifica IVM Setup and operation manual

Bruker BioSpin
Bruker BioSpin CryoProbe RF CRP RF UNIT Technical manual

IET Labs
IET Labs HRRS SERIES User and service manual