Ink Bird PLUS User manual

U S E R M A N U A L
INKBIRDPLUS BLUETOOTH
SMART DOOR LOCK

CONTENTS
01 Product Introduction 1
02 Package Introduction & Screws 2-3
06 Technical Parameters 33
07 FCC Requirement 34
05 Device Operation
How to Finish the Settings without APP
1. How to Add Fingerprints, Passwords, and IC Cards
2. Optional Functions
32
32
32
03 Installation Manual
1. Check Door Dimensions
2. Installation Steps
4
4
4-8
04 APP Operation
1. Download and Install the INKBIRD App
2. How to Connect to INKBIRD App
3. How to Add Fingerprints, Passwords, and IC Cards
4. Optional functions
8
9-10
8-9
11-19
20-31
01
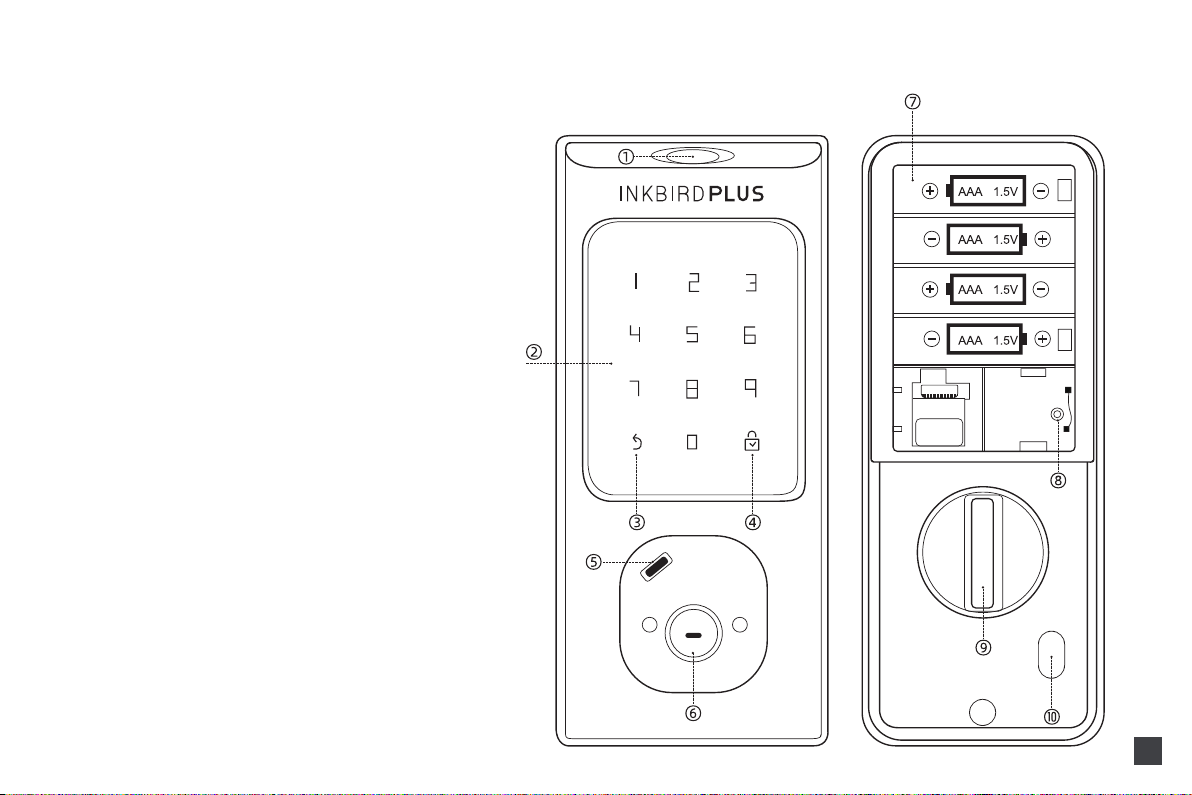
Front Panel Back Panel
Product Introduction
①Fingerprint Sensor
②Keyboard/Card Sensor
③Close/Return/Doorbell
④Confirm
⑤Type-C USB Port
⑥Keyhole
⑦Battery Groove
⑧Reset Button
⑨Thumb Turn:Manually ON/OFF
⑩Quick Open/Close
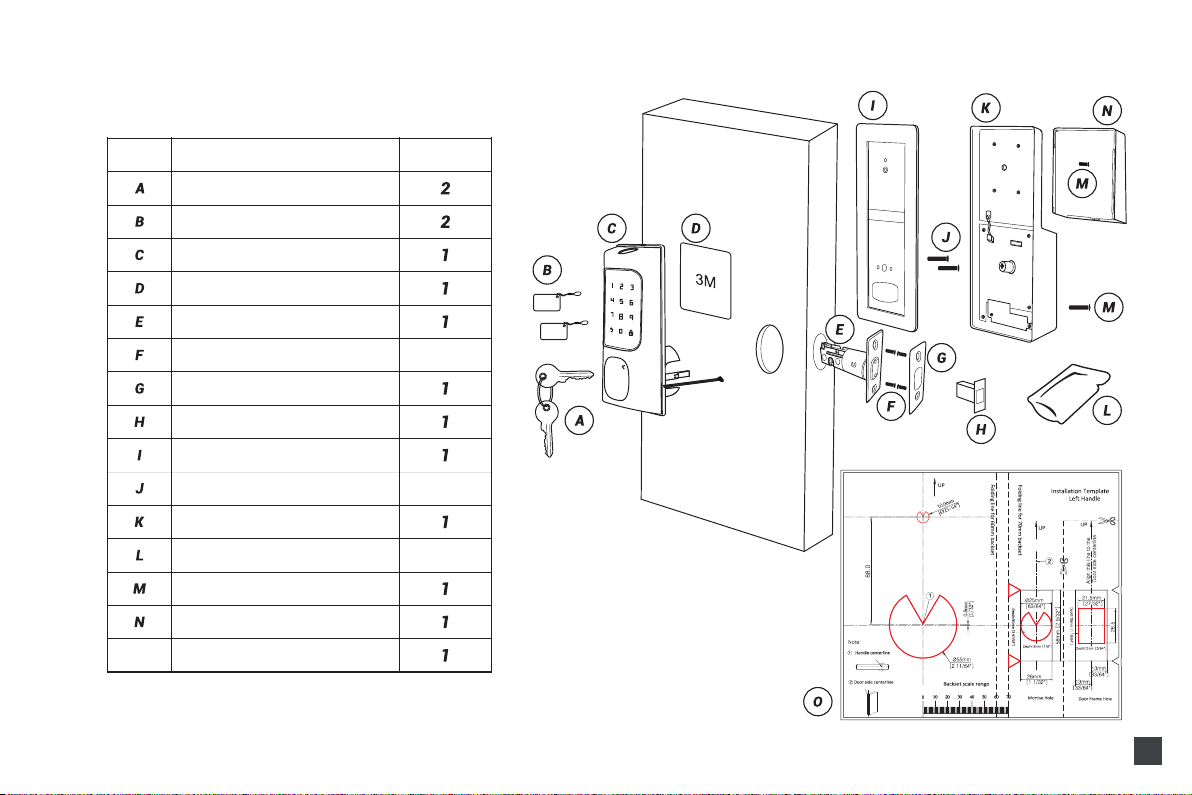
Package Introduction
Part Description Quantity
Key
IC Card
Front Panel
3M Sticker
Latch
Wood Screw Set
Strike Plate
Plastic Lock Groove
Mounting Plate
Back Panel
O
Spare Screw Set
Long & Short Screw Set
Battery Cover
1
1
1
Long Screw Set
Size Reference
02
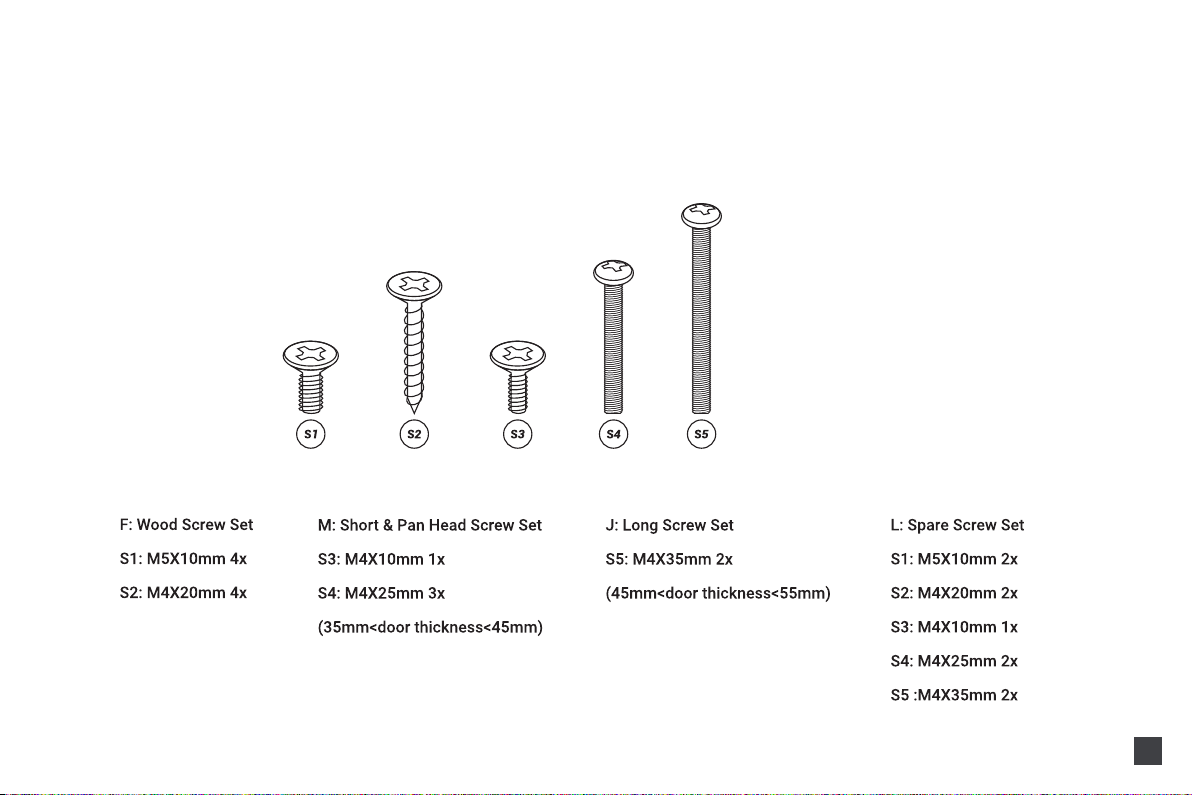
Screws
03
Installation Manual
Smart Door Lock
Door Thickness
Hole : Φ2-1/8"(54mm)
04
Note: Install and test the lock with the door open
to avoid being locked out.
Scan to Download the Manual
Tools Needed
Screwdriver; Tape Measure; Pencil; Other Chiseling Tools; Size
Reference Card.
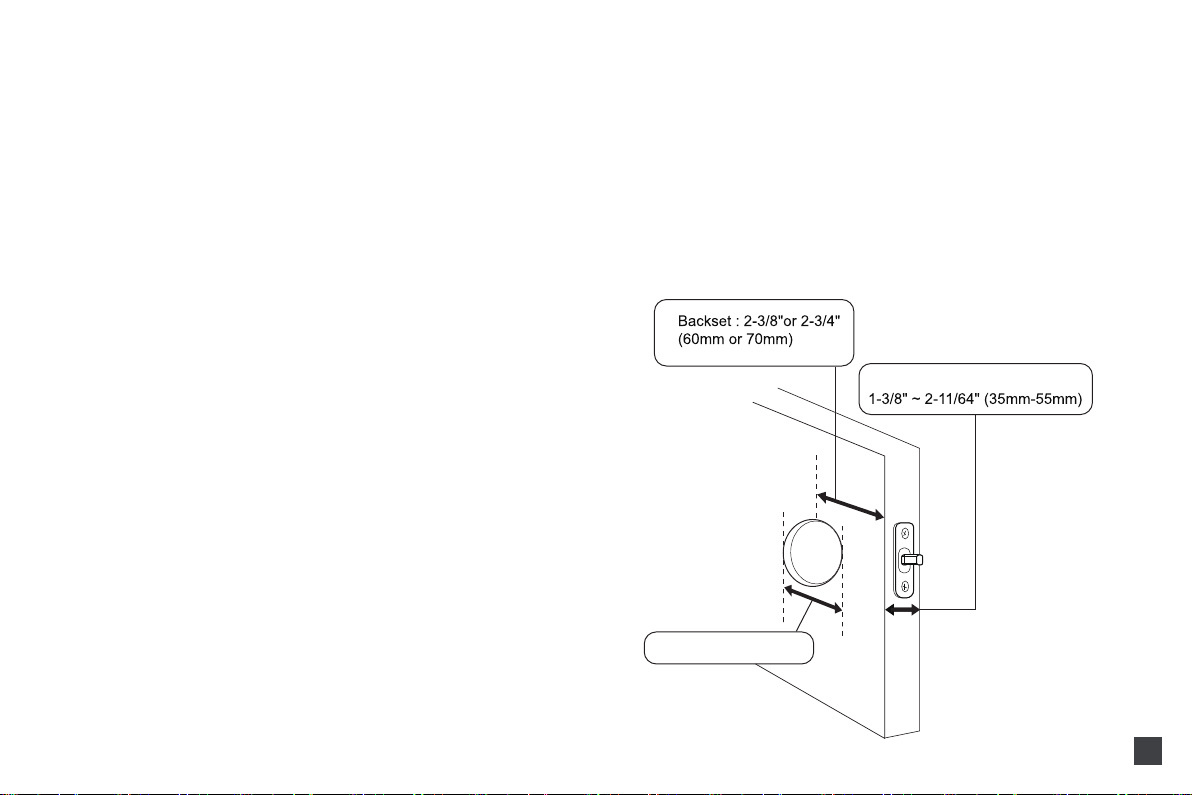
1. Check Door Dimensions
1) Backset Determination
Backset is a distance from door edge to center of hole on door face.
Backset can be 2-3/8"or 2-3/4"(60mm or 70mm).
2. Installation Steps
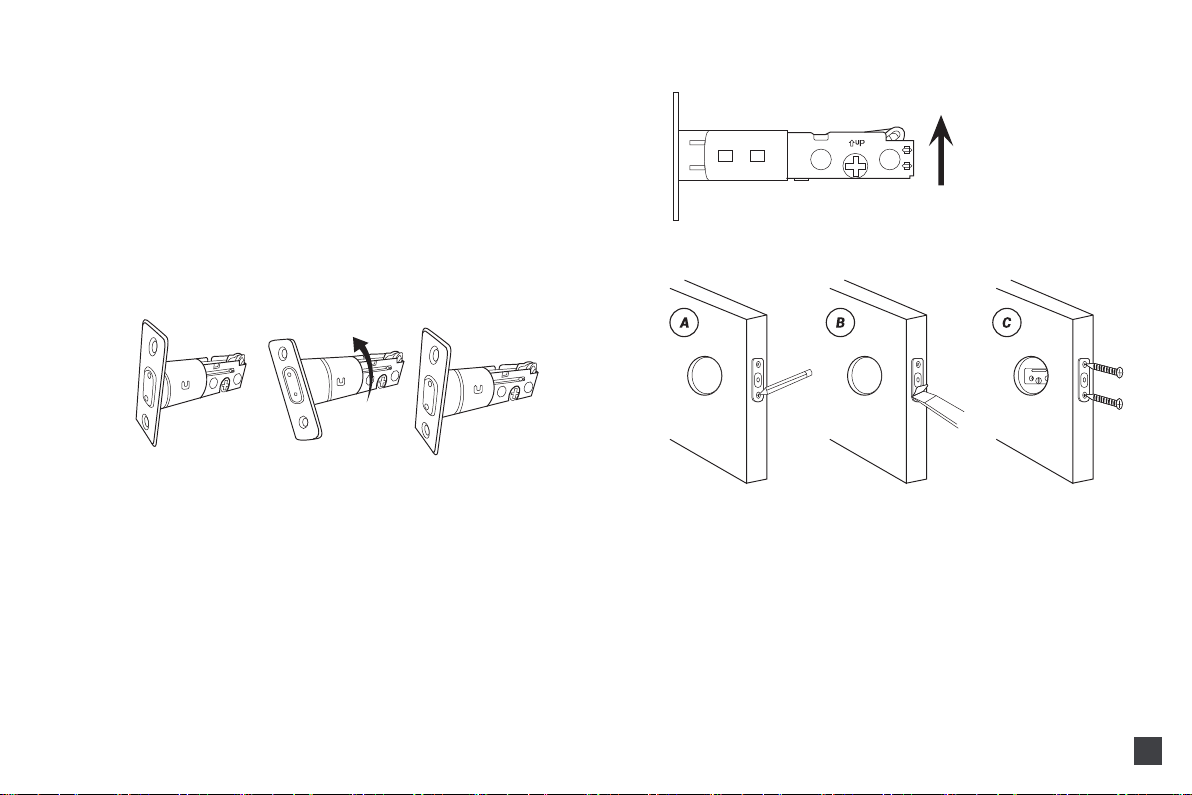
1) Adjust Latch Length
Insert the latch and ensure it is parallel to the door face.
05
2) Hole Diameter
Using the marks as guide to drill holes
Φ3/8"(10mm) Fasten Smart door lock(Optional)
Hole : Φ2-1/8"(54mm)
3) Door Thickness
The door thickness between 1-3/8" and 2- 11/64" (35mm-55mm) are
all suitable for the keypad deadbolt handle set.
Note: When performing this operation, please take protective
measures and be careful of the metal edge not to injure yourself.
Hold the right part of the lock tongue with your right hand and turn
the left iron piece counterclockwise (about 15 degrees) with your left
hand.
When the rectangular position of the 2-3/8” (60mm) tick mark
changes from convex to concave (as shown), slowly extend the
locking latch, and then turn clockwise the inside of the locking latch
back to the rectangular
position of2-3/4” (70mm) scale.
2) Install Latch
Note: Need to keep this way up when inserting the latch.
A.Mark the outline of the plate, then take out the latch.
B.Chisel 1mm-2mm deep along the outline to allow the plate to
be aligned with the door edge.
C.Insert the latch into the door, use 2 F :Wood Screw Set to
secure latch.
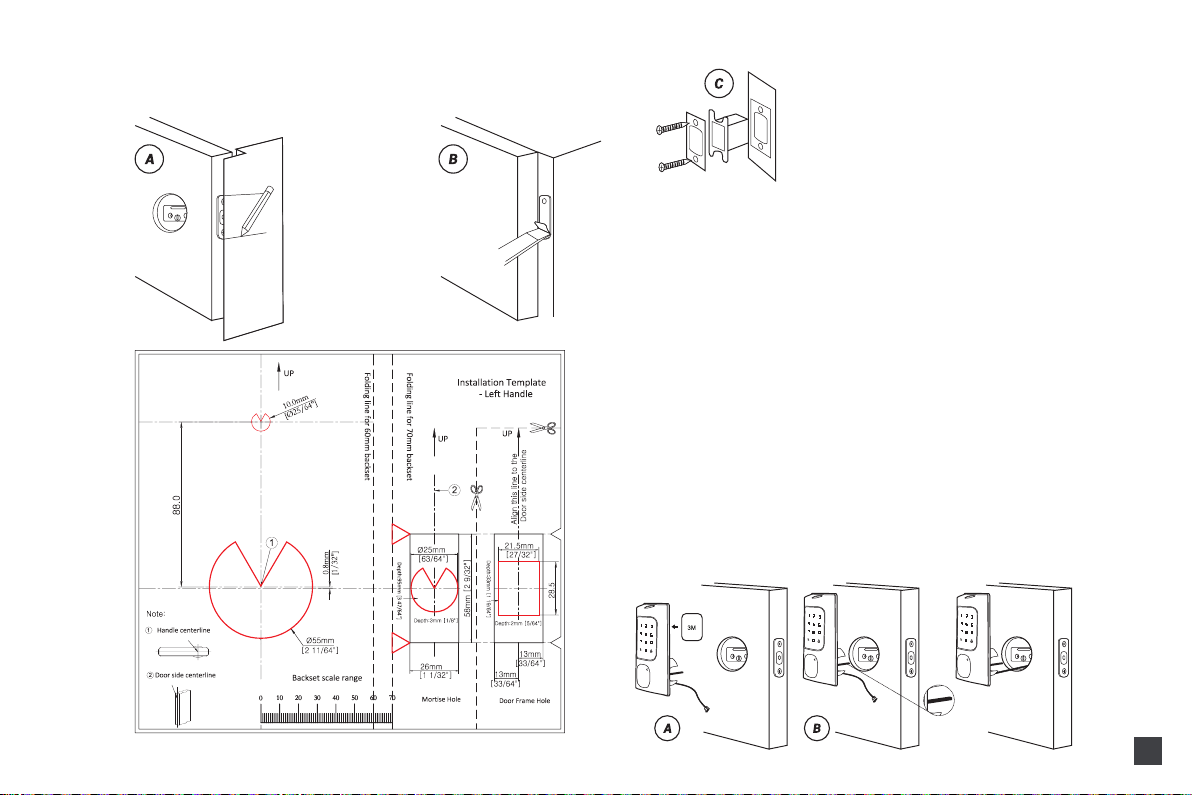
3) Install Strike Plate
Torque blade
Optional
06
A.Identify the center of the plate: Close the door to lay the latch bolt
against the door frame. Mark the outline of the plate onto the
doorjamb.
B.Drill 25mm deep at the intersection of the horizontal and vertical
lines of the plate. Chisel 1mm-2mm deep along the strike plate
outline to allow the strike plate to be aligned with the door frame.
C.Insert the plastic lock groove and the strike plate into the
doorjamb and tighten with F :Wood Screw Set.
4) Install Front Panel
A.If you want to secure the door lock, please stick the 3M stickers on
the front panel. (Optional)
B.Let the cable and the [torque blade] go through the holes on the
latch, as in the picture.
C.IMPORTANT: Latch must be in unlock position, and place the
cable under the latch.Make sure the [torque blade] is in horizontal
state.
45mm
55mm
07
D.Pass the Cable and the [torque blade] to mounting plate as in
the picture.
E.Use the 2 long screws to attach the mounting plate to the front
panel.
Notes:
The long screw set has two sizes of screws, one for door
thickness 1-3/4" (45mm) M Long & Short Screw Set and the
longest screws fit for2. 17" (55mm) JLong Screw Set .
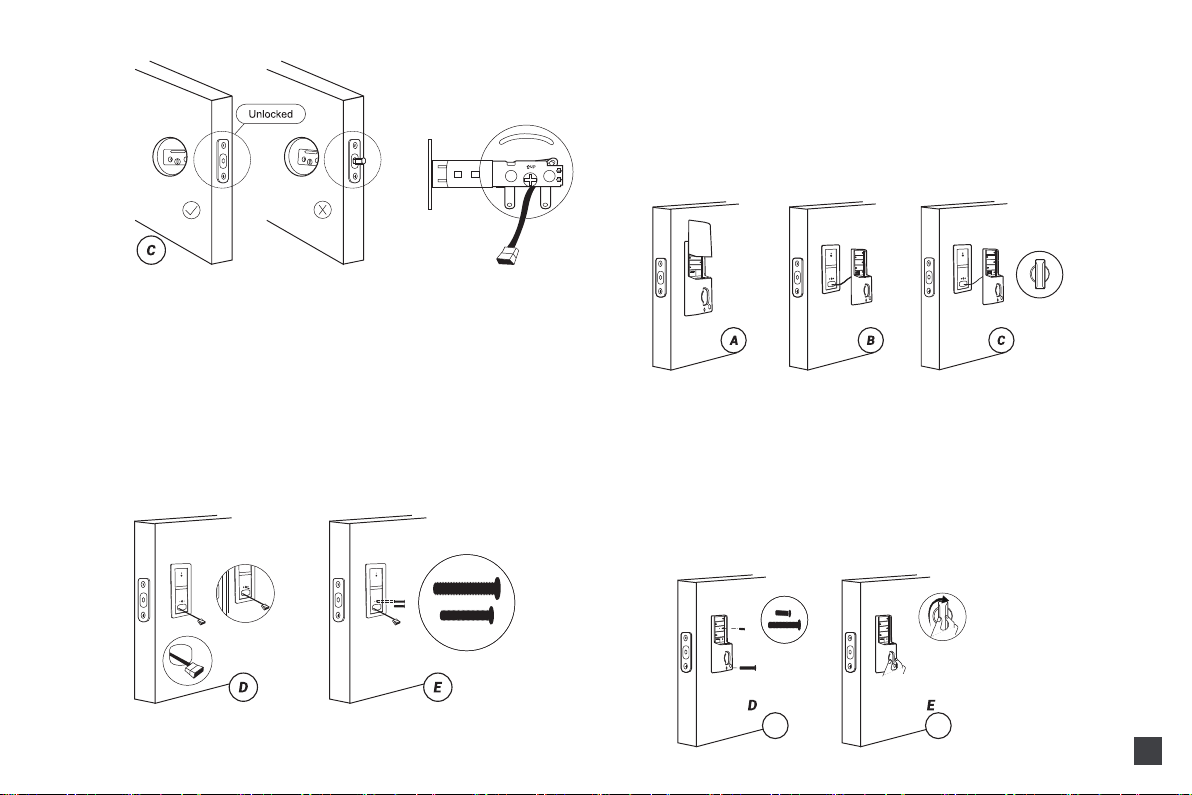
5) Install Back Panel
A.Remove the battery cover and back cover (use the sharp object
to push the back cover up first)
B.Connect the cable and ensure a tight cable connection.
C.Rotate the Thumb turn in a vertical position and insert the [torque
blade] into the interior assembly lock switch.
D.Use a short screw to tighten the inner battery groove on the back
panel, then use a long screw to attach the back panel to the door
M: Long & Short Screw Set.
E.After installing the back panel, rotate the thumb turn to test if it
works with the latch.
If that doesn't work, take out the back panel and make sure the
[torque blade] is in horizontal state and try to install it again until it
works with the latch.
APP Operation
08
6) Insert Battery and Install Back Battery Cover
A.While the door is open and unlocked, insert 4 (AA) 1.5V Alkaline
batteries into the back panel.
B.Press and hold the reset button on the back panel.
C.Keep holding the reset button until you hear “Factory reset
successfully ”.
The lock will automatically go into the locked position. This is to let
the smart lock memorize the orientation of the door.
D. If the door ca
Note:
1. Your iOS devices must be running iOS 11 or above to download
the app smoothly.
2. Your Android devices must be running Android 7.1 or above to
download the app smoothly.
Preparations
1) Complete the hardware installation.
2) Install 4 AAA batteries.
(After the first hardware installation, be sure to restore the factory
settings) Press and hold the reset button in the lower right corner
of the battery compartment for 5 seconds.
Note:
Wave up the keyboard, please touch and hold the keyboard for2
seconds.
If the unlock fails 10 times, the system will automatically lock for3
minutes.
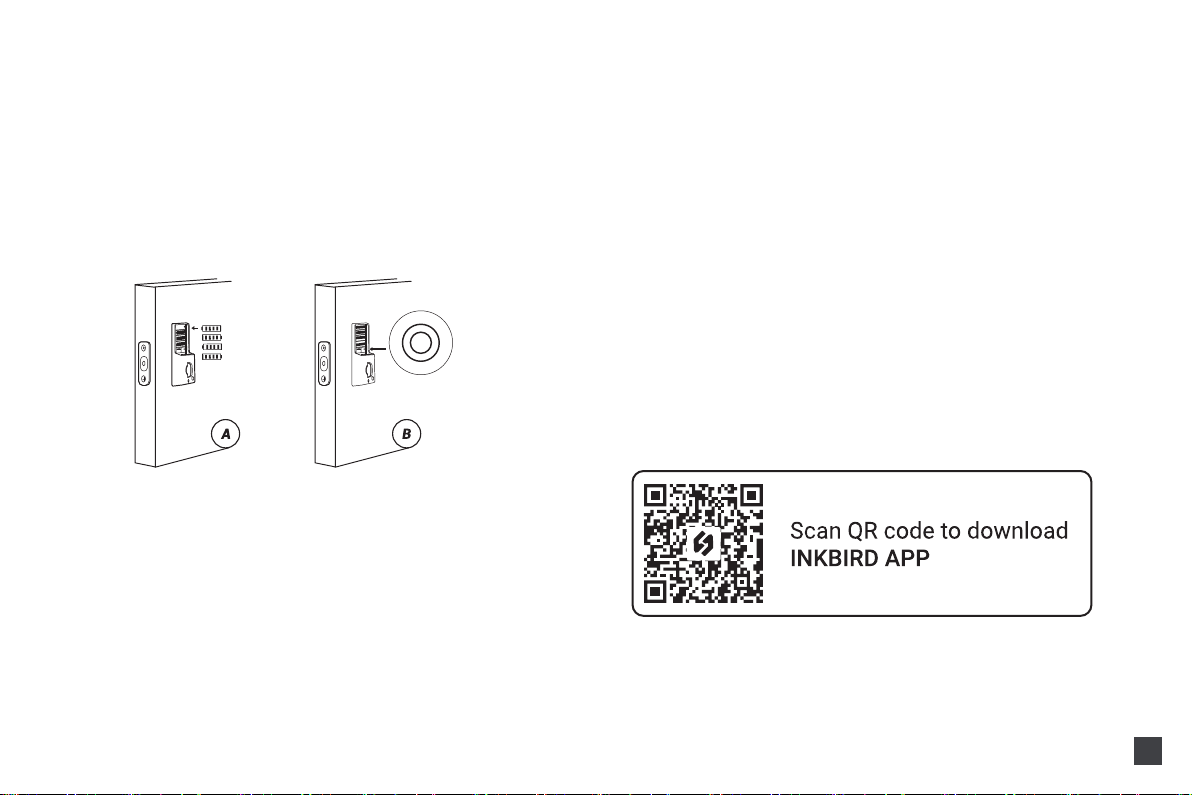
1. Download and Install the INKBIRD App
1) Search "INKBIRD" in App store or Google Play, or scan the
following QR code to download and install the APP, or update it to
the latest version.
Notes:
A.Alkaline batteries are recommended to stabilize the power
supply. If you don't use alkaline, battery performance will be
reduced greatly.
B.All settings will be saved even if all batteries are completely
discharged. Having a Type-C USB port can power the lock and
activate the keyboard.

09
2) Registration
a. Open the app, select your Country/Region, enter your email
address, and a verification code will be sent to you.
b. Enter the verification code to confirm your identity, and the
registration is complete.
c. Registering an account is necessary before using the INKBIRD
app for the first time.
2.How to Connect to INKBIRD App
Step1: Turn on the Bluetooth and location on your smartphone.
Step2: Open the app and click the "+" in the upper right corner to
add
the device.
Step3: Wake the lock, press "1" and then " " to enter Bluetooth
pairing. (Operation timeout: 60 seconds)

10

11
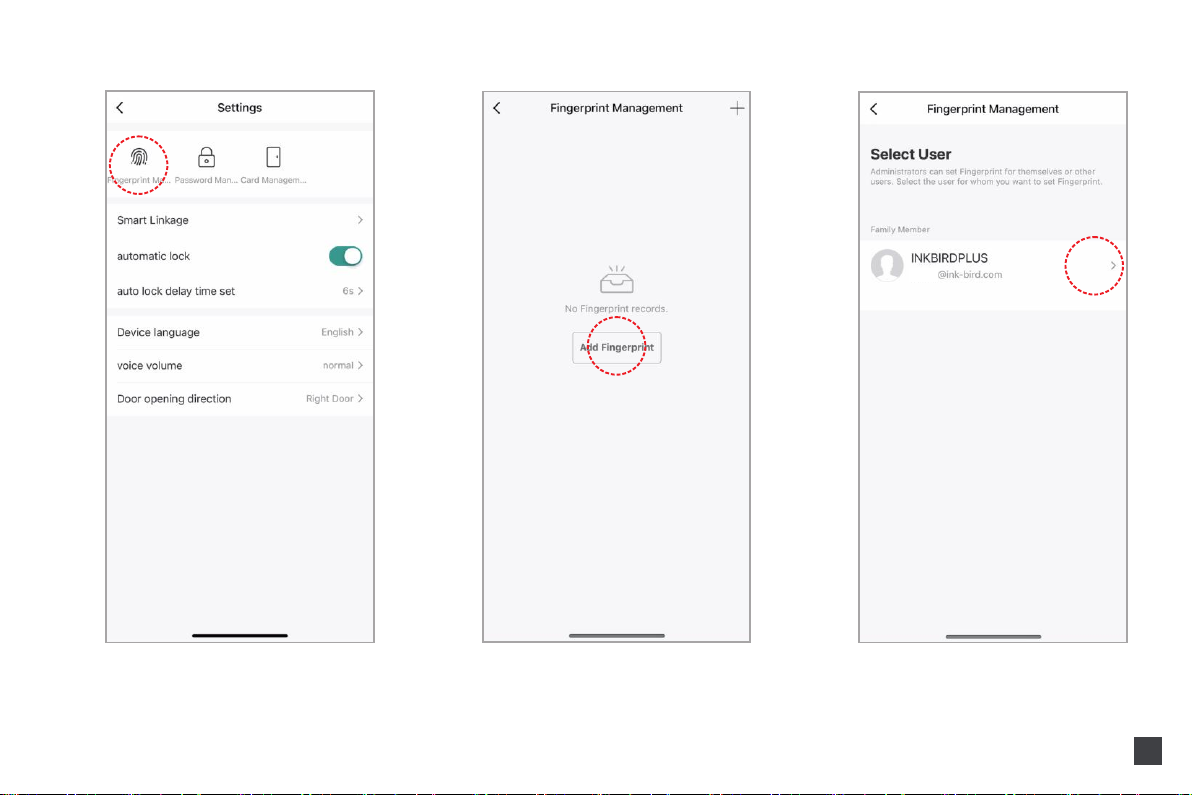
3.How to Add Fingerprints, Passwords, and IC Cards
Notes:
a) Fingerprint, passwords, and IC cards can all be administrators.
b) When entering a password or card in the app, if there is no
fingerprint, password, or card at the lock end, the password or card
must be under administration authority.
1) How to Add Fingerprints
Step1: Go to settings to enter fingerprint management, then click
"Add Fingerprints" to choose a member to capture his fingerprint.
Step2: Click "Start Capturing" and put your finger on the fingerprint
recognition area of the lock and hold for more than 5 seconds as
prompted by the app. Each fingerprint needs to be collected three
times. For the integrity of the fingerprint, a different part of the
fingerprint should be captured each time.
Note that the first fingerprint of the administrator cannot be
deleted.
All fingerprints under administrator authority can be used to verify
administrator identity.
xxx
12

13

14
2) How to Add Passwords
Step1: Go to settings to enter password management, then click
"Add Password" to choose a member.
Step2: Enter a 6-digit password or generate a random password,
then enter the password name and save.

xxx
15
16
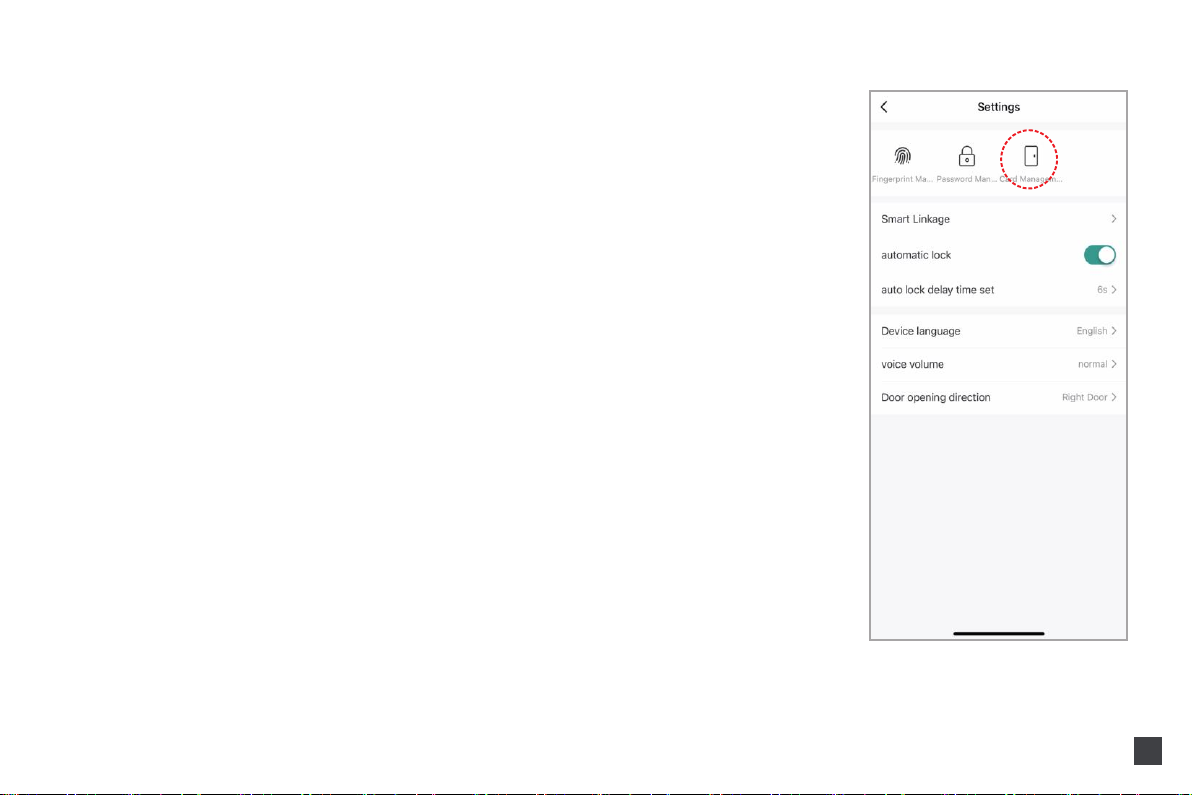
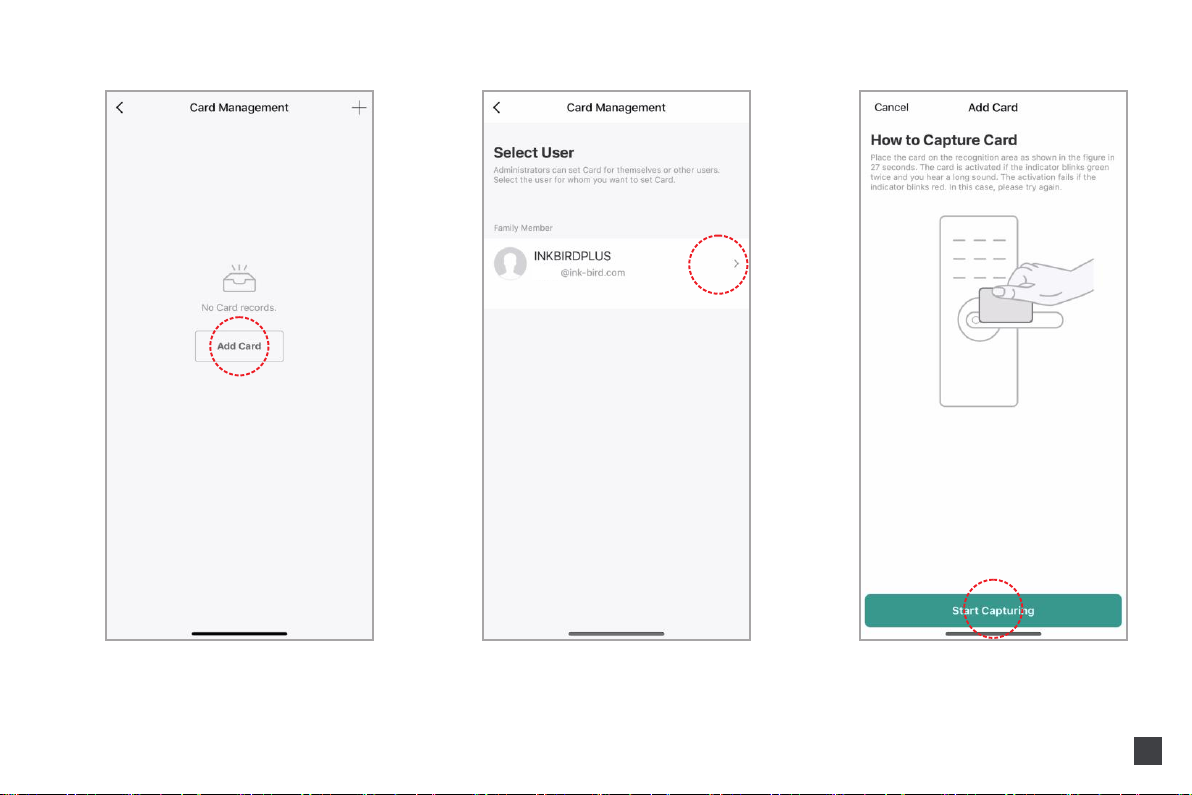
3) How to Add IC Cards
Step1: Go to settings to enter card management, then click "Add
Card" to choose a member.
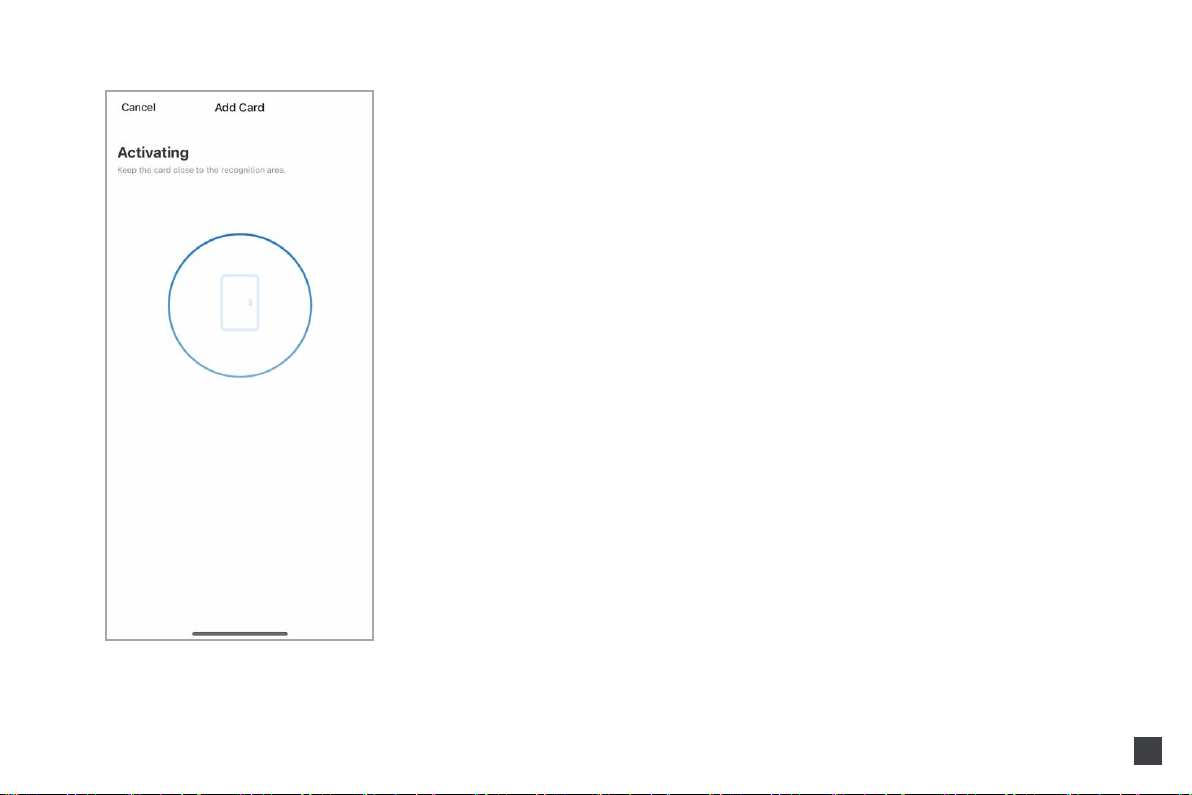
Step2: Click "Start Capturing" and put the card on the card-sensing
area of the lock until you hear a sound indicating success.
Step3: Enter a card name and complete the input.
xxx
17
18
4) How to Obtain Dynamic Password
Swipe left on the main interface and click "Obtain Dynamic
Password" to generate a password. (Dynamic Password Validity
Period: 5 minutes)
Table of contents
Popular Door Lock manuals by other brands


LockNet
LockNet Sur-Lock I/O 2000L Series Appendix to the Installation Instructions

SECO-LARM
SECO-LARM SLI SD-997B-1SQ manual

GATEMAN
GATEMAN V100 Series user guide

Assa Abloy
Assa Abloy Pyramid owner's manual

Hafele
Hafele DT 700 Mounting and Maintenance Instructions

SAFETRON
SAFETRON 600 Series installation manual


