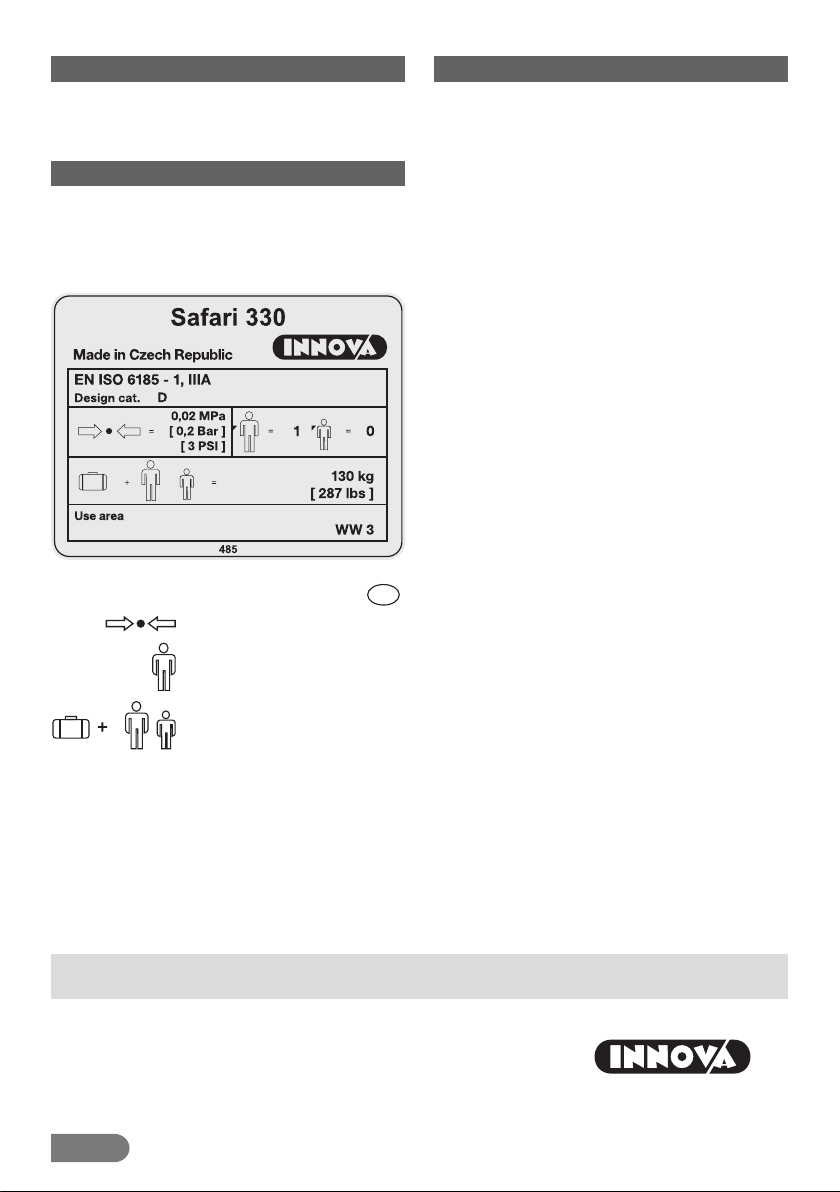
2
2. Technical description - see Figure No. 1
1. side tube
2. bottom
3. PUSH/PUSH valve – enables infl ation/defl ation, pressure
control and pressure measurement using a manometer
4. overpressure valve
5. manufacturer label
6. yellow “WARNING” label
7. infl atable seat
8. infl atable backrest
9. footrest
10. holder to attach the footrest
11. fastening strap
12. fastening strap holder
13. backrest holder
14. srew valve for small chambers (seats, footrests etc.)
15. handle
16. fl exible rope net
17. tracking fi n holder
18. rope to attach the backrest and fastening strap
ACCESSORY SUPPLIED WITH THE KAYAK:
Transport bag, trackin g fi n with user manual, belt for strapping
the folded kayak, user‘s manual with the warranty certifi cate,
sponge in a netting bag, repair kit containing glue, patches
and valve adaptors.
3. Inflation Instructions
Unfold the kayak. If you intend to use a tracking fi n, slide it
in the attachment in the bottom (17). Before you start infl ating,
unfold the kayak and install the seat and backrest, fastening
straps and footrest. Insert the backrest (8) into the kayak be-
tween both backrest holders (13). Tie a simple knot on one end
of the provided cord. Thread the other end from behind through
the lower backrest holder opening (13), lower backrest opening
(8), eyelet at the end of fastening strap (11) and back through
the upper backrest opening and holder opening. Tie a knot to
fasten it. See detail A. Repeat the steps on the opposite side
of the backrest. Thread the narrow end of the fastening strap
through the fastening strap holder (12) situated in the front secti-
on of the kayak. Adjust the footrest (9) position according to your
stature. The individual positions are marked with numbers on
the foot rest attachment (10). Position No. 1 corresponds to the
height of (150-160) cm, position No. 2 (160-170) cm, position
No. 3 (170-180) cm, position No. 4 over 180 cm.
Run the foot rest strap through holes in the foot rest atta-
chment (10) on the bottom.
Proceed through all holes from the selected position up to the
plastic buckle at the end of the attachment; run the end throu-
gh it and tighten it. See detail B.
Inflate air chambers in the following sequence: seat (7),
backrest (8), footrest (9), side tubes (1), bottom (2). Use a
foot-pump or piston pump with valve adaptor for infl ating - see
Figure 2b (the adaptor is included in the glue set). Check the
condition of the valves before infl ating. Set the valves to the
OFF position. For valve operation see Figure 2.
Infl ate the air chambers until they are fi rm but not completely
stiff . The air chambers should provide a feeling comparable to
squeezing a ripe orange. You can check the exact operating pre-
ssure by using a suitable pressure gauge (optional accessory)
– see Figure 2a. Tool for valve installation - see Fig. 2c; optional
equipment.
Sit inside the kayak after infl ating and check the position
of the foot rest. If you wish to correct the position of the foot
rest, release pressure in the bottom, release the foot rest strap
and infl ate again after correcting the position.
Then adjust the correct length of fi xation straps (11). Sit down
in the kayak again, prop your feet against the foot rest. Pull the
fi xation straps over your knees and fasten them tightly.
ATTENTION
The maximum operational pressure in air chambers
is 0.02 MPa. If the ambient temperature increases
(e.g. owing to sunlight), the pressure in the air chambers
of the canoe can rise rapidly. We recommend releasing
some air from all air chambers of the canoe after pulling
it out of the water. This will prevent possible destruction
of the air chambers. However, do not forget to continu-
ously check air pressure in the chambers afterwards,
too. A corresponding reduction in operating pressure is
up to 20% within 24 hours.
ATTENTION
When using the boat, always seal the valves with their
valve caps. This will keep dirt out of the valves. Dirt can-
cause leaky valve seals.
4. Using the kayak
The Safari 330 single-seat infl atable kayak with self-draining
fl oor is designed for recreational use and water tourism.
Whenever the kayak is used on waterways, Waterway Traffi c
Rules have to be observed. Operation of the Safari 330 in-
fl atable kayak does not require any licence provided that the
people who operate the kayak know the techniques of small
boat operation within the scope necessary for its operation,
as well as the valid navigation rules of the particular country.
The Safari 330 kayak can be used on rivers up to Diffi culty
Grade WW 3. Use double-bladed kayak paddle with a length
of (202–210) cm.
The person travelling in the kayak has to sit in their seat and
wear a fl otation life-jacket.
A good contact of the paddling person with the boat in
a sports-style kayaking, especially when performing eskimo
rescue, is provided by fi xation straps and the foot rest. The
centre of gravity can be lowered by releasing pressure from
the seat cushion, thus increasing the stability of the kayak and
a confi dence in performing the roll.
ATTENTION
Prior to using the kayak, check whether it is necessary
to observe any special regulations, restrictions or rules
connected with the river, surface of water or area in
which you intend to use it.
The boat is not designed to be towed behind motorboats,
nor may it be towed otherwise, dragged or in any way
subjected to unusual stress. Sharp edged or pointed
items carried in the kayak should be safely wrapped.
Place all valuables into a waterproof container and fas-
ten it to the kayak. Over time, sunlight adversely aff ects
the rubber coating of the boat; therefore, it is advisable
to store the boat in shade each time after use.