3
10
4
3
15
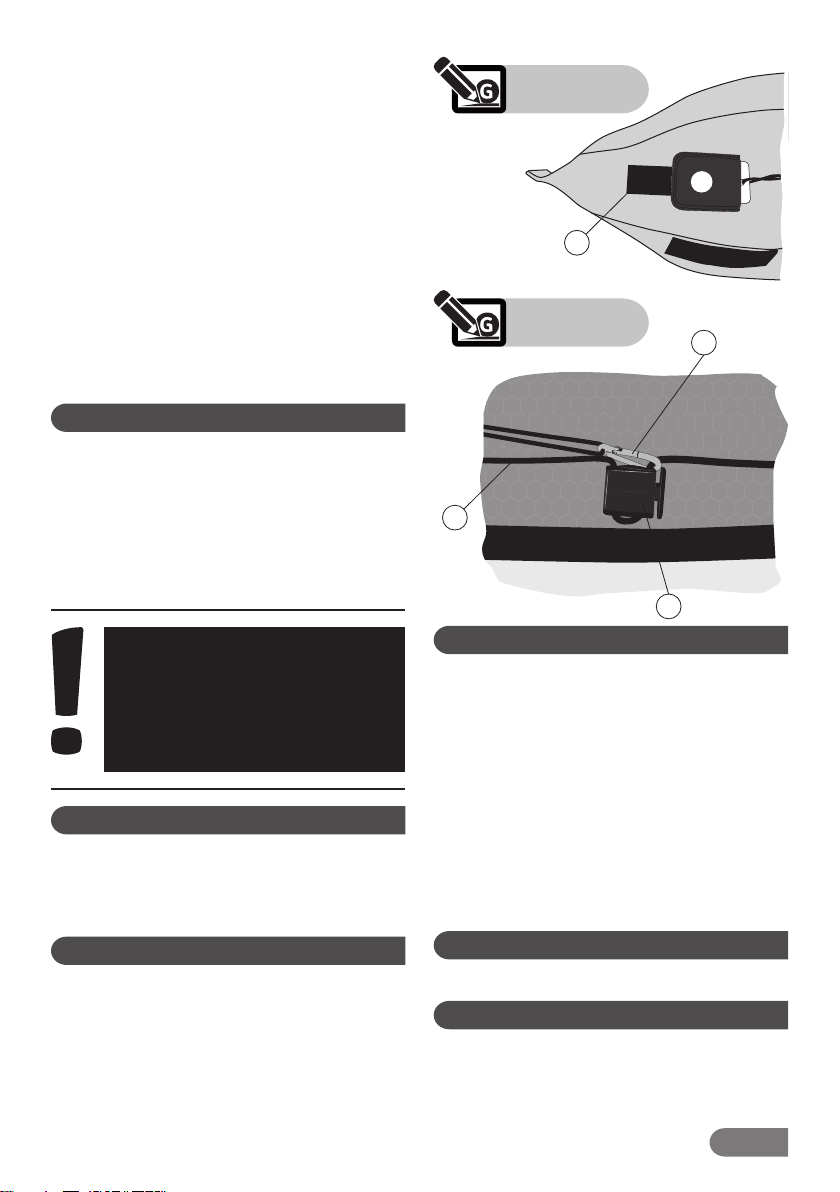
Attaching the rudder on the boat
Before the fi rst use of the rudder, a strip of Velcro
(10) must be glued to the rear deck - see Fig. 3. For a
perfect joint, the glued surface must be dry, clean and
degreased with acetone.
Insert base (11) under the rear deck of the boat, and
slide the hexagon through the discharge hole. From the
outside, attach the bracket (11) and washer (12), and
tighten with the locking screw (13). Pull the locking ring
(14) out of the rudder pin. Insert the pin into the hole
and secure with retaining ring. Control cables (6) of the
pedals are now guided through the D-rings inside the
boat and through the holes in the aft deck, and then into
the snap hooks (4); set the length using the adjusting
piece (if installed on the two-seat version, make a knot
to shorten the cords so that the adjusting pieces are ac-
cessible from the seats). Now guide the lifting cable (3)
through the brake (15) of the lifting mechanism - see Fig.
4. The mechanism needs to be fastened between the
D-rings on the boat cockpit. Attach the snap hook of the
lifting cable to the lifting mechanism, see Fig. No. 4, and
set the required cable length using the adjusting piece.
The rudder facilitates control of the kayak especially
in the wind or waves. In a tandem kayak the person in
the back steers. Operate the rudder by pressing with
one foot against the pedal and releasing the other foot.
Power is transmitted by the cables to the rudder rocker
arm to rotate the rudder. The rudder blade can be raised
by pressing the brake of the lifting mechanism and
pulling forward. When pressing the brake of the lifting
mechanism and pulling back, the rudder is lowered to its
working position.
3. Operating the rudder
Before collapsing the kayak, it is necessary to remove
the rudder. Unhook the control cables off the snap
hooks. Unclip the snap hook from the lifting mechanism.
The control cables and pedals can be left in the kayak.
Remove the rudder mounting system.
The rudder has no special maintenance requirements.
When contaminated, after contact with salt water and
before storing, wash the rudder in lukewarm water with
a spot of soap or detergent. Use grease to protect the
metal parts. Worn out or damaged parts, especially the
cable, should be replaced. Rudder should always be
transported and stored separately from the kayak. When
assembling the rudder in the kayak, always check if the
screws are securely tightened.
The warranty period is 24 months starting from the
date of sale.
The manufacturer provides free repair or replacement
for material defects.
Guarantee repairs and post-guarantee repairs are
provided by the manufacturer:
GUMOTEX, a. s.
Mládežnická 3062/3a
690 75 Břeclav, Czech Republic
Or in North America by INNOVA:
Innova Kayaks by Gumotex
11781A Watertank Road
Burlington WA 98233, USA
Tel.: (360) 707-2855, e-mail: info@innovakayak.com
Cardboard - recycle in accordance with the symbols on
the packaging.
PE-LD foil (low-density branched polyethylene) - recy-
cle in accordance with the symbols on the packaging.
The product can be disposed of as communal waste.
4. Disassembly of the rudder
5. Maintenance and storage
6. Warranty conditions
8. Disposal of the packaging
7. Disposal of the product
WARNING
The rudder blade can be damaged
in shallow water or when launch-
ing the boat or approaching the
shore.
Always lift the rudder blade to the
top position in these situations.
Fig. No. 4
Fig. No. 3