inosmart BT 600 User manual

OPERATION MANUAL
Bluetooth
Revision 25, 11.10.2023
min. reader firmware 1.6.184
min. control unit firmware 1.0.42
min. application version v3.1.54

Dear User,
Thank you for choosing to purchase a fingerprint reader that
will allow you to enter your home or business quickly and
easily. Your reader can be used to open the door using a
fingerprint, smartphone or numeric code (keyboard reader
model).
Although our readers are easy to use, please take a few minutes
to read the instructions below. We have prepared all the information you need to pay attention to both for the first
time and for subsequent use. For easier understanding, you can also visit our website www.inosmart.info/bt and
watch the attached video content about the operation and use of the fingerprint reader.
The instructions are uniform for all modules: BT 600, BT 610, BT 620, BT 630, BT 640, BT 660 and BT 670.
We wish you pleasant and simple use.

TABLE OF CONTENTS
GLOSSARY ........................................................................................................................1
INOSMART BIOMETRIC MODULES (READERS) - FUNCTIONS ..............................................2
FIRST USE .........................................................................................................................4
READER –CONTROL..........................................................................................................5
CONTROL VIA THE CONTROL UNIT ....................................................................................5
ADD FINGERPRINT OF ANEW USER ....................................................................................................5
............................................................................................................................................................6
ADD NEW CODE NUMBERS (MODULES BT 600, BT 610, BT630, BT660 AND BT 670)..............................6
RESET TO FACTORY DEFAULTS ..........................................................................................7
READER –SECURITY LOCK.................................................................................................7
CONTROL VIA A SMARTPHONE ..............................................................................8
ESTABLISH FIRST CONNECTION BETWEEN READER AND SMARTPHONE.............................8
MAIN MENUS................................................................................................................. 12
USER..................................................................................................................................................13
ADD NEW FINGERPRINT...............................................................................................................16
ADD NEW CODE NUMBERS (modules BT 600, BT 610, BT630, BT660 and BT 670) .....................18
TIMER................................................................................................................................................19
FREE ACCESS.................................................................................................................................20
SETTINGS...........................................................................................................................................21
EVENT HISTORY.................................................................................................................................22
THE MOST COMMON REASONS FOR POOR FINGERPRINT RECOGNITION........................................23
DOOR OPENING VIA BLUETOOTH CONNECTION.............................................................. 25
SECOND RELAY............................................................................................................... 28
CONECTION WITH AN ADDITIONAL TELEPHONE.............................................................. 29
PAIR READER WITH RADIO BELL...................................................................................... 30
CARE AND MAINTENANCE .............................................................................................. 31
ERROR MESSAGES .......................................................................................................... 31
RESET TO FACTORY SETTINGS ......................................................................................... 32
INOSMART READER SPECIFICATIONS .............................................................................. 34

WIRING DIAGRAM.......................................................................................................... 36
USER INSTRUCTIONS ...................................................................................................... 37
MANUFACTURER WARRANTY......................................................................................... 37

1
GLOSSARY
•BT module –Inosmart biometric module, a reader built into the outside of the sash or door
handle. Allows you to open the door using your fingerprint, smartphone or keyboard.
•Fingerprint sensor - enables identification of your fingerprint. It is built into the reader.
•Control unit - enables el. communication between the sash, the door frame and the
Inosmart reader. It is built into the side part of the door leaf.
•WiFi –wireless communication - Allows you to connect your smartphone and the Inosmart
reader.
•LED –light emitting diode. An electronic component that emits light.
•Administrator fingerprint –one of the 3 fingerprints you entered when using the reader for
the first time.
•Placing a finger - the user places his finger on the fingerprint sensor built into the reader.
•Relay - is an electromagnetic switch that you turn on with the control voltage

2
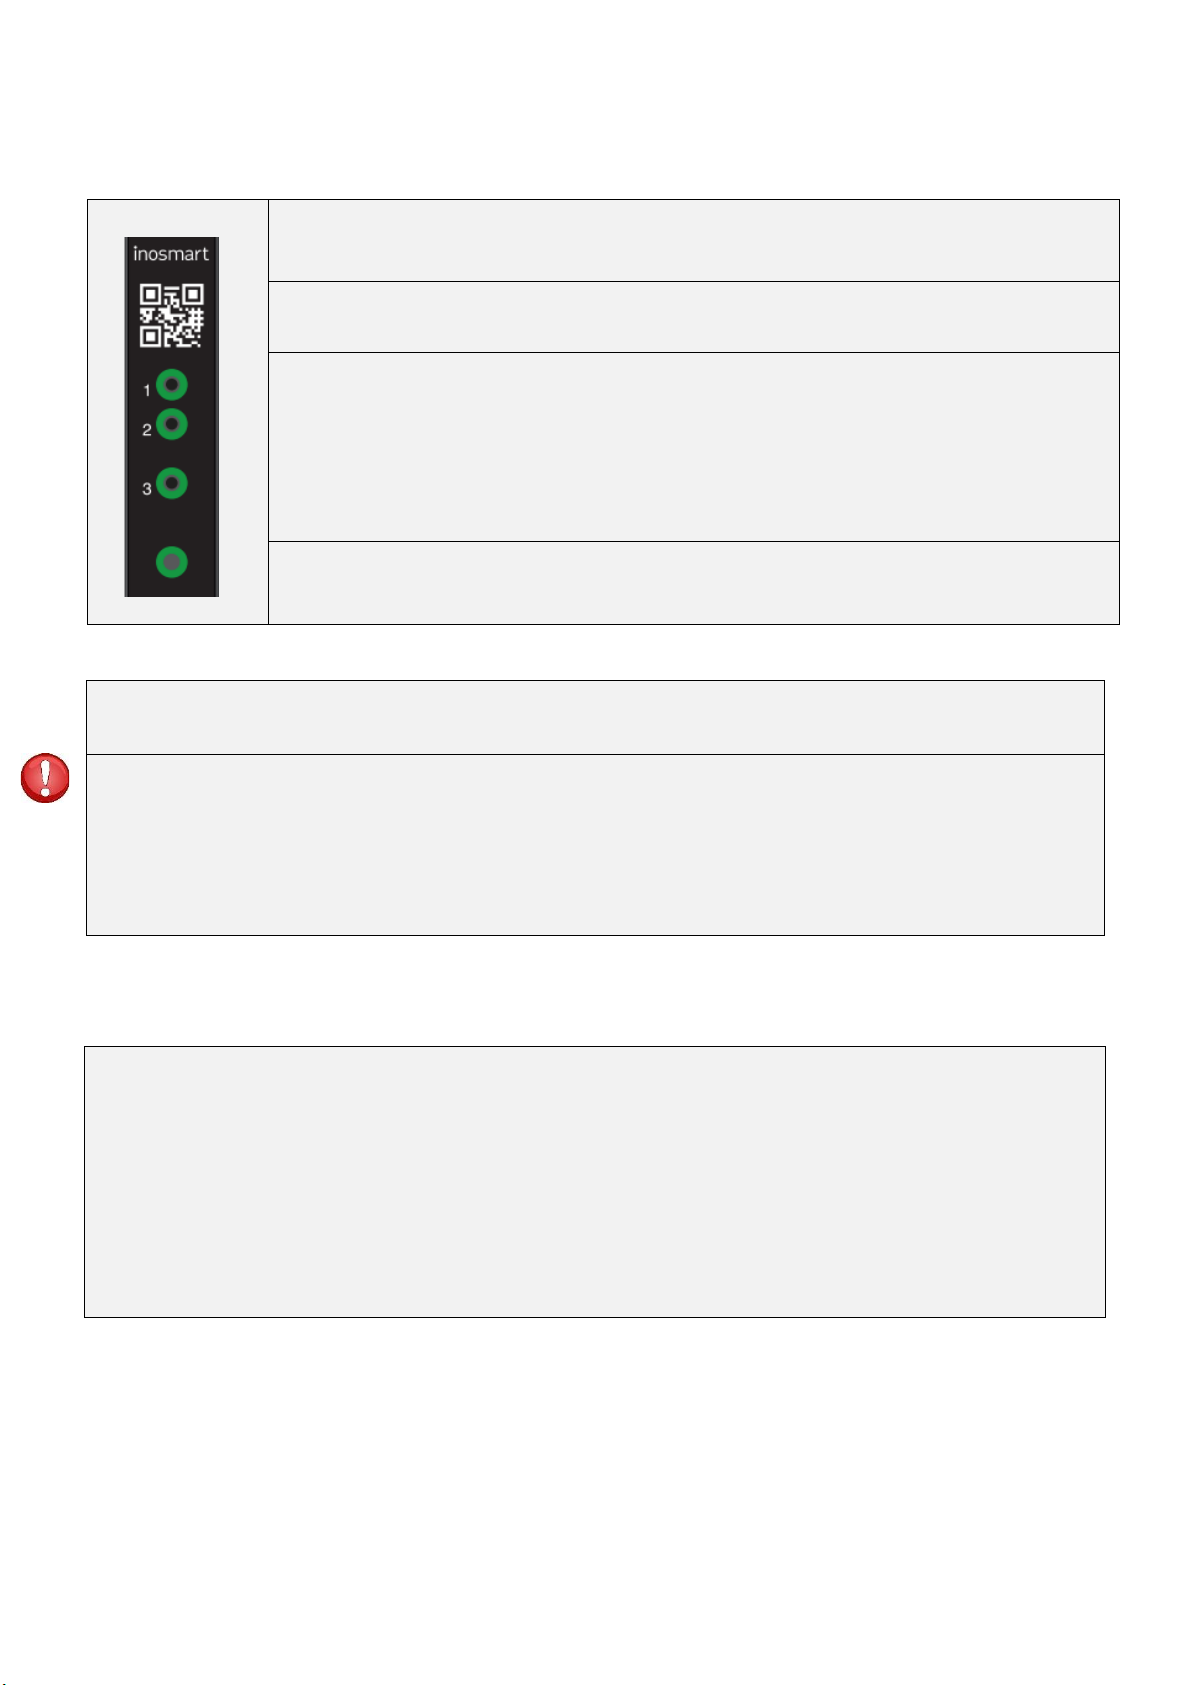
INOSMART BIOMETRIC MODULES (READERS) - FUNCTIONS
BT 600, BT 630
BT 610, BT660 and BT670
BT 620
•Fingerprint sensor
•Keyboard
•Bluetooth
•Bell
•Signal lights
•Buzzer
•Fingerprint sensor
•Keyboard
•Bluetooth
•Signal lights
•Buzzer
Fingerprint sensor
Bluetooth
Signal lights
Buzzer
NFC
CODE KEYBOARD
FOR ENTERING
CODE NUMBERS
BELL
FINGERPRINT SENSOR
MULTICOLOR
SIGNAL LEDs
3
CONTROL UNIT –FUNCTIONS
The fingerprint reader can be controlled using the buttons on the control unit installed in
the door leaf.
KEY 1
Adding a new fingerprint, smartphone or code number.
KEY 2
Removing a fingerprint, smartphones or code numbers.
KEYS 2 + 3
Registration of three administrator fingerprints. Without three registered administrator fingerprints,
the unit cannot be put into operation. To enroll the three administrator fingerprints, press buttons 2
and 3 simultaneously.
If administrator fingerprints are already registered, pressing this key combination deletes them and
registers the new fingerprints.
KEY 3
Activation of the Bluetooth connection.
KEYS 1 + 2 + 3 (10 seconds)
The control unit is reset to the factory settings. All data will be deleted!
KEYS 2+3 (5 SECONDS)
By pressing the 2+3 keys, you initiate the deletion of already entered administrator fingerprints that you release with the
existing administrator fingerprint.
The reader immediately requires the entry of 3 new administrator fingerprints, these are registered in the application
under an undefined user.
The ADMINISTRATOR is responsible for managing the fingerprint reader. Up to three different fingerprints / persons can be
determined on first use - e.g. B. a person with three fingerprints or three different people with one fingerprint each. At least
two people are recommended for practicality and safety.
Unlike the other users, an administrator has full access to the reader and the control unit and can add new users, fingerprints,
smartphones or code numbers and also remove them.
As long as the reader's memory is empty, anyone can register as an administrator with their fingerprints. An administrator
should therefore be appointed immediately when the device is commissioned to prevent any misuse.

4
FIRST USE
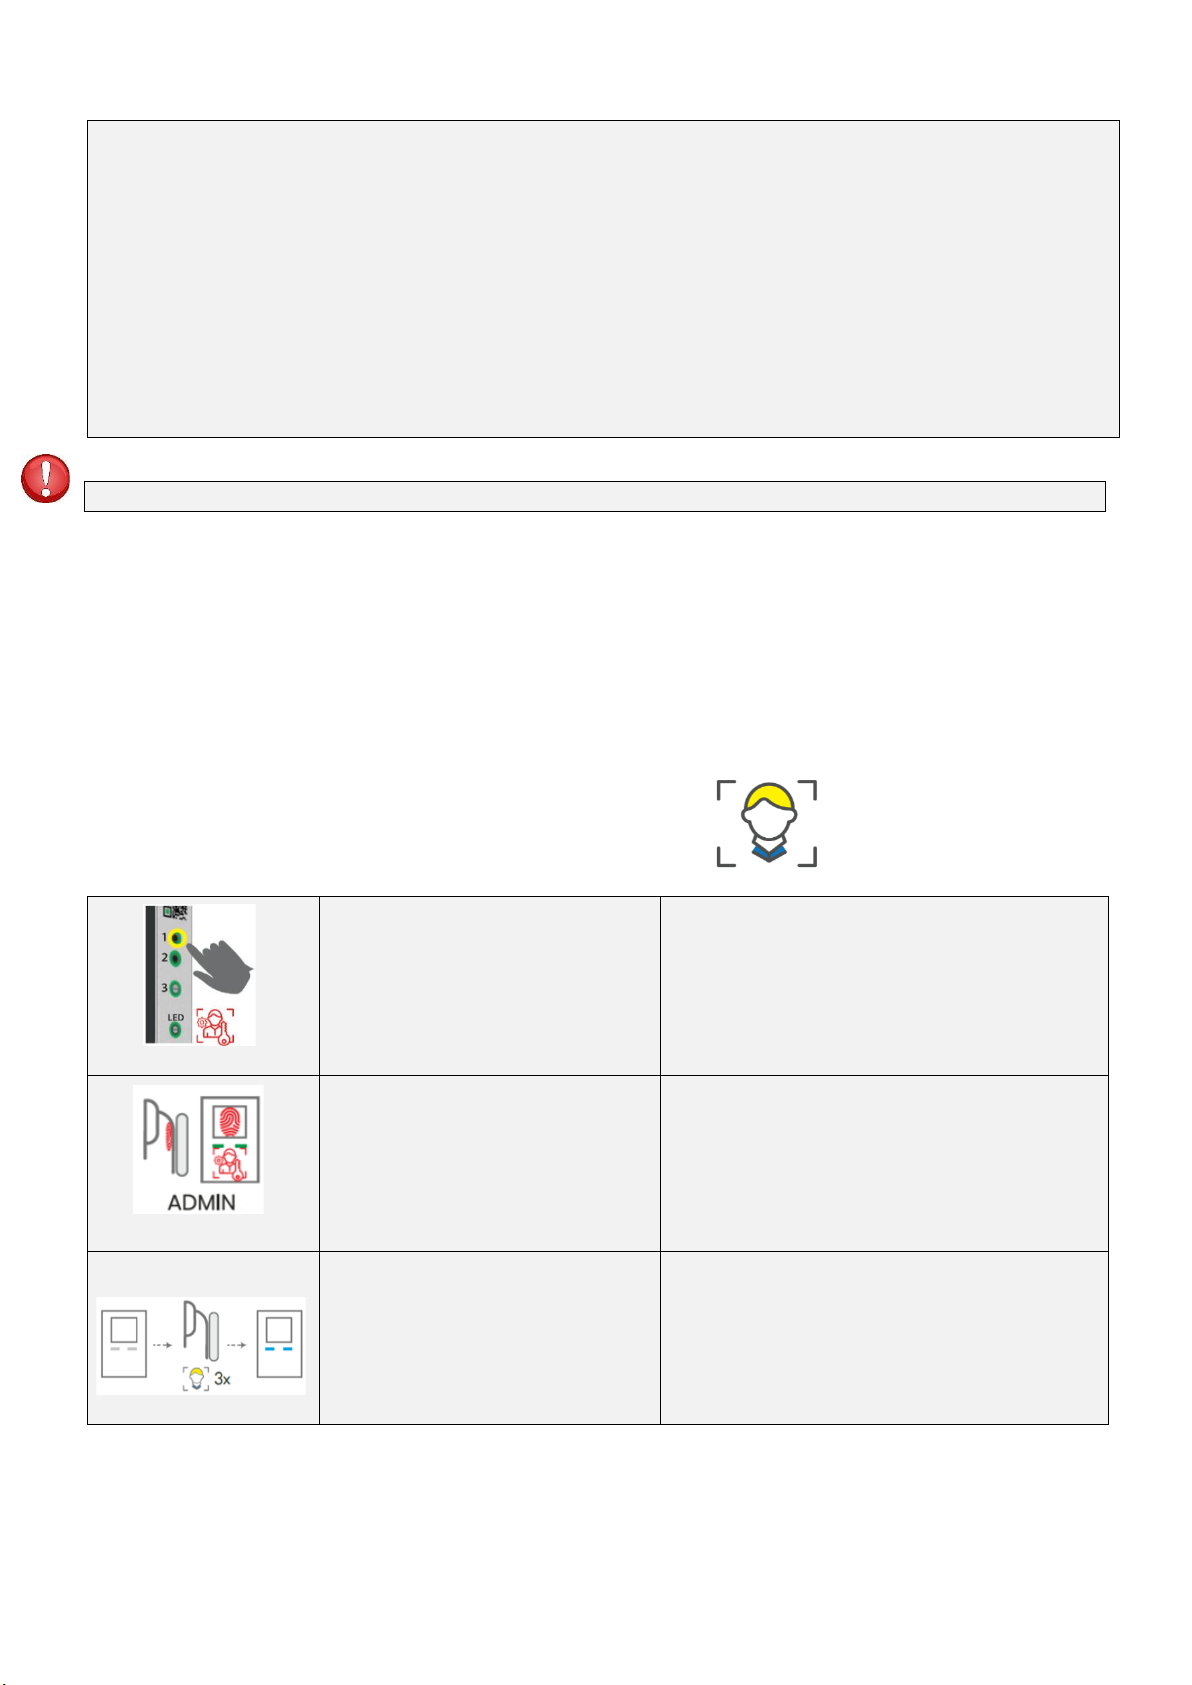
ADMINISTRATOR FINGERPRINT
Before using the Inosmart BT module (reader) for the first time, one or more
administrators must be specified. All subsequent changes, entries etc. require
confirmation by the administrator.
Before using the reader, three administrator fingerprints must be stored.
This step is essential before the first use.
Make sure the fingerprints are read correctly; the fingertip should cover at least
70% of the sensor.
The administrator has access to all security-related functions with his fingerprint. For this reason, at least two
administrators are recommended.
To add an administrator, proceed as follows:
PRESS BUTTONS 2 AND 3 ON THE CONTROL
UNIT AT THE SAME TIME.
The reader's two LEDs light up white.
READ THE FINDERPRINT OF THE RESPECTIVE
ADMINISTRATOR THREE TIMES.
Administrator 1: read in the fingerprint
three times
Administrator 2: read in the fingerprint
three times
Administrator 3: read the fingerprint
three times
Make sure that the entire fingertip
rests on the reader. The fingertip
should cover at least 70% of the
sensor.
After the administrator fingerprints have been
successfully stored, the two LEDs light up blue.
THE READER IS READY TO OPERATE.
You can also find a corresponding tutorial on our homepage www.inosmart.info/bt.
5
READER –CONTROL
The fingerprint reader can be controlled via the control unit or via the Inosmart app (smartphone).
Users, smartphones or code numbers can be added and deleted via the buttons on the control unit.
The Inosmart app enables central management of the device and all registered users - adding and removing
users, smartphones or code numbers, creating timers and detailed management of other access authorizations.
CONTROL VIA THE CONTROL UNIT
The three buttons on the control unit can be used to control the following main functions of the reader:
adding or removing fingerprints, NFC smartphones and code numbers (on models with a code pad).
ADD FINGERPRINT OF A NEW USER
PRESS BUTTON 1 ON THE CONTROL
UNIT.
The reader beeps briefly and both LEDs flash
green.
Put administrator's fingerprint on
the sensor to authorize adding a new
user's fingerprint.
A new fingerprint is approved.
The LEDs light up white.
Read the new user's fingerprint three
times via the sensor.
If this was successful, the LEDs light
up green, otherwise red.
The reader beeps briefly and both LEDs light up
green.
A NEW USER HAS BEEN ADDED SUCCESSFULLY.
The reader is ready for operation and both LEDs
light up blue.
The control unit does not allow controlling the lights, creating timers, naming users or managing access rights.

6
Each time it is used, the reader compares the fingerprint with the one stored and also saves any new properties that have
been identified. This means that individual fingerprint recognition is constantly improving over time. The system is able to
store and automatically update up to 20 fingerprint variations for each individual user.
ADD NEW CODE NUMBERS (modules BT 600, BT 610, BT630, BT660 and BT 670)
The BT 600, BT 610, BT630, BT660 and BT 670 modules have a code keypad that can be used to
open the door with a code number. The length of the code is pre-programmed at the factory to 4 digits. To
add a new code number, please proceed as follows:
PRESS BUTTON 1 ON THE CONTROL
UNIT.
The reader beeps briefly and both LEDs flash green.
Place the administrator's fingerprint on
the sensor to authorize the addition of
a new numeric code.
A new code number is approved.
The LEDs light up white.
Enter the four-digit code number.
The reader beeps briefly and both LEDs light up green.
A NEW CODE NUMBER WAS SUCCESSFULLY ADDED.
The reader is ready for operation and both LEDs light up
blue.
The skin, and thus also the fingertips, is subject to constant changes (different moisture content of the skin
at different times of the year, injuries to the skin, etc.) and at the same time no two sensor operations are
the same. For this reason, advanced sensors with 360° recognition are built into our fingerprint readers,
which counteract these problems and correctly recognize every fingerprint at any angle.
The length of the code number - from 4 to 10 digits - can be set via the Inosmart app.
If no code number was entered, the code keyboard is not functional, which is indicated by the LEDs and a beep. After
entering the first code number, the keyboard is ready for use.

7
REMOVE USER, SMARTPHONE OR CODE NUMBERS
Removing a user, smartphone, or code numbers requires the appropriate user, smartphone, and code, and an
administrator.
To remove, do the following:
PRESS BUTTON 2 ON THE
CONTROL UNIT.
The reader beeps briefly and both LEDs flash green.
Read the administrator's
fingerprint via the sensor.
The deletion is approved.
Do one of the following:
read the user's fingerprint
via the sensor,
Hold the smartphone to
the NFC interface or
Enter code numbers.
The reader beeps briefly and both LEDs light up green.
THE USER / SMARTPHONE / CODE NUMBERS HAVE
BEEN DELETED SUCCESSFULLY.
The reader is ready for operation and both LEDs light up
blue.
RESET TO FACTORY DEFAULTS
On the control unit, press and hold all three buttons (1 + 2 + 3) for 10 seconds until you hear a beep. All users, fingerprints,
NFC smartphones and timers have been wiped and the reader has been factory reset.
READER –SECURITY LOCK
If a person has not been granted access seven times in a row with their fingerprint, NFC device (smartphone) or code
numbers, the reader switches off automatically for 30 seconds. After this time, the reader is ready for operation again
and switches off again for an additional 30 seconds - 1 minute - in the event of further unsuccessful access attempts. After
each series of unsuccessful access attempts, the reader will turn itself off for an additional 30 seconds, up to a maximum
of 5 minutes. With each successful access, the corresponding counter is reset to zero.
During this security lock, the reader is completely locked, which is indicated by the LEDs on the reader flashing alternately
red and blue.

8
CONTROL VIA A SMARTPHONE
Android
iOS
The fingerprint reader can be controlled via a Bluetooth connection with the free Inosmart app. You can download the app
for Android devices in the Google Play app store https://play.google.com/store/apps/details?id=com.ismart.XF_InoSmart or
for Apple devices in the App Store (iOS) https: http://apps.apple.com/us/app/inosmart/id1513984907.
In order to successfully connect a smartphone to the reader, location and Bluetooth connectivity must be enabled (via your
smartphone's settings).
If the smartphone is connected to the reader via the Bluetooth connection, it can be managed centrally via the app:
Adding / removing users, code numbers or NFC smartphones;
Overview of all active users and their access rights;
User management (rename, add/remove fingerprints, code numbers or NFC smartphones);
allocation of access rights to specific users;
Creating timers and
Management of additional functions (e.g. lighting, assignment of the secondary relay).
The range of the Bluetooth signal is limited for security reasons. For this reason, the smartphone should not be more than 1
m away from the control unit in the door and should be free of obstacles when performing administrator activities.
Android version 8.1 or later is required to manage the device. On iPhone devices, the inoSmart application works from iOS
version 14. You can check the version in your phone settings. Get the latest version of the app by turning on automatic app
updates on your phone. Door unlocking via iPhone is possible from iOS 14.
ESTABLISH FIRST CONNECTION BETWEEN READER AND SMARTPHONE
To activate the Bluetooth connection on the control unit, proceed as follows:

9
PRESS BUTTON 3 ON THE CONTROL UNIT.
The Bluetooth connection on the control unit is
activated.
The two LEDs on the control unit light up green.
Read the administrator's fingerprint via
the sensor.
The LEDs on the reader and the LED on the control
unit light up blue.
BLUETOOTH MODEM IS ON.
Download and install the free Inosmart app from the Google Play app store for Android devices or the App Store
for iOS users and iPhone users.
Enable location detection and Bluetooth connectivity on your smartphone.
Install the free Inosmart app.
Once the installation is complete, the app is
ready to use.
For security reasons, the range of the Bluetooth connection is limited, which is why the distance between the
smartphone and the control unit should be as small as possible.
Welcome to your new app that allows
you to centrally manage your reader.
Select "Reader settings and administration" in
the app.
CHOOSE YOUR DESIRED READER.
When logging in for the first time, select
"ADD NEW READER".
The app connects to the fingerprint reader.
When using it for the first time, name it and
enter an 8-10 digit password. The reader is now
added to the list and can be connected to the
smartphone.
PAIRING THE READER WITH THE
SMARTPHONE
CONFIRM the 6-digit random code.
For a secure coupling (Bluetooth connection)
between the smartphone and fingerprint
reader, it is necessary to establish a connection
on the first attempt and to confirm the 6-digit
random code. ATTENTION! For some Android
devices, the desired pairing must first be
approved before the random code can be
confirmed. In this case, please pay attention to
the corresponding notification at the top of the
screen.
If the device is renamed, this is automatically saved and automatically displayed each time the app is started.
MAIN MENU.
The reader can be easily managed via the four
submenus.

10
The Bluetooth connection of the control unit switches off automatically after 10 minutes of inactivity.
The name and password of a reader that has already been saved can be changed at any time.
TRANSITION TO MAIN MENU
11
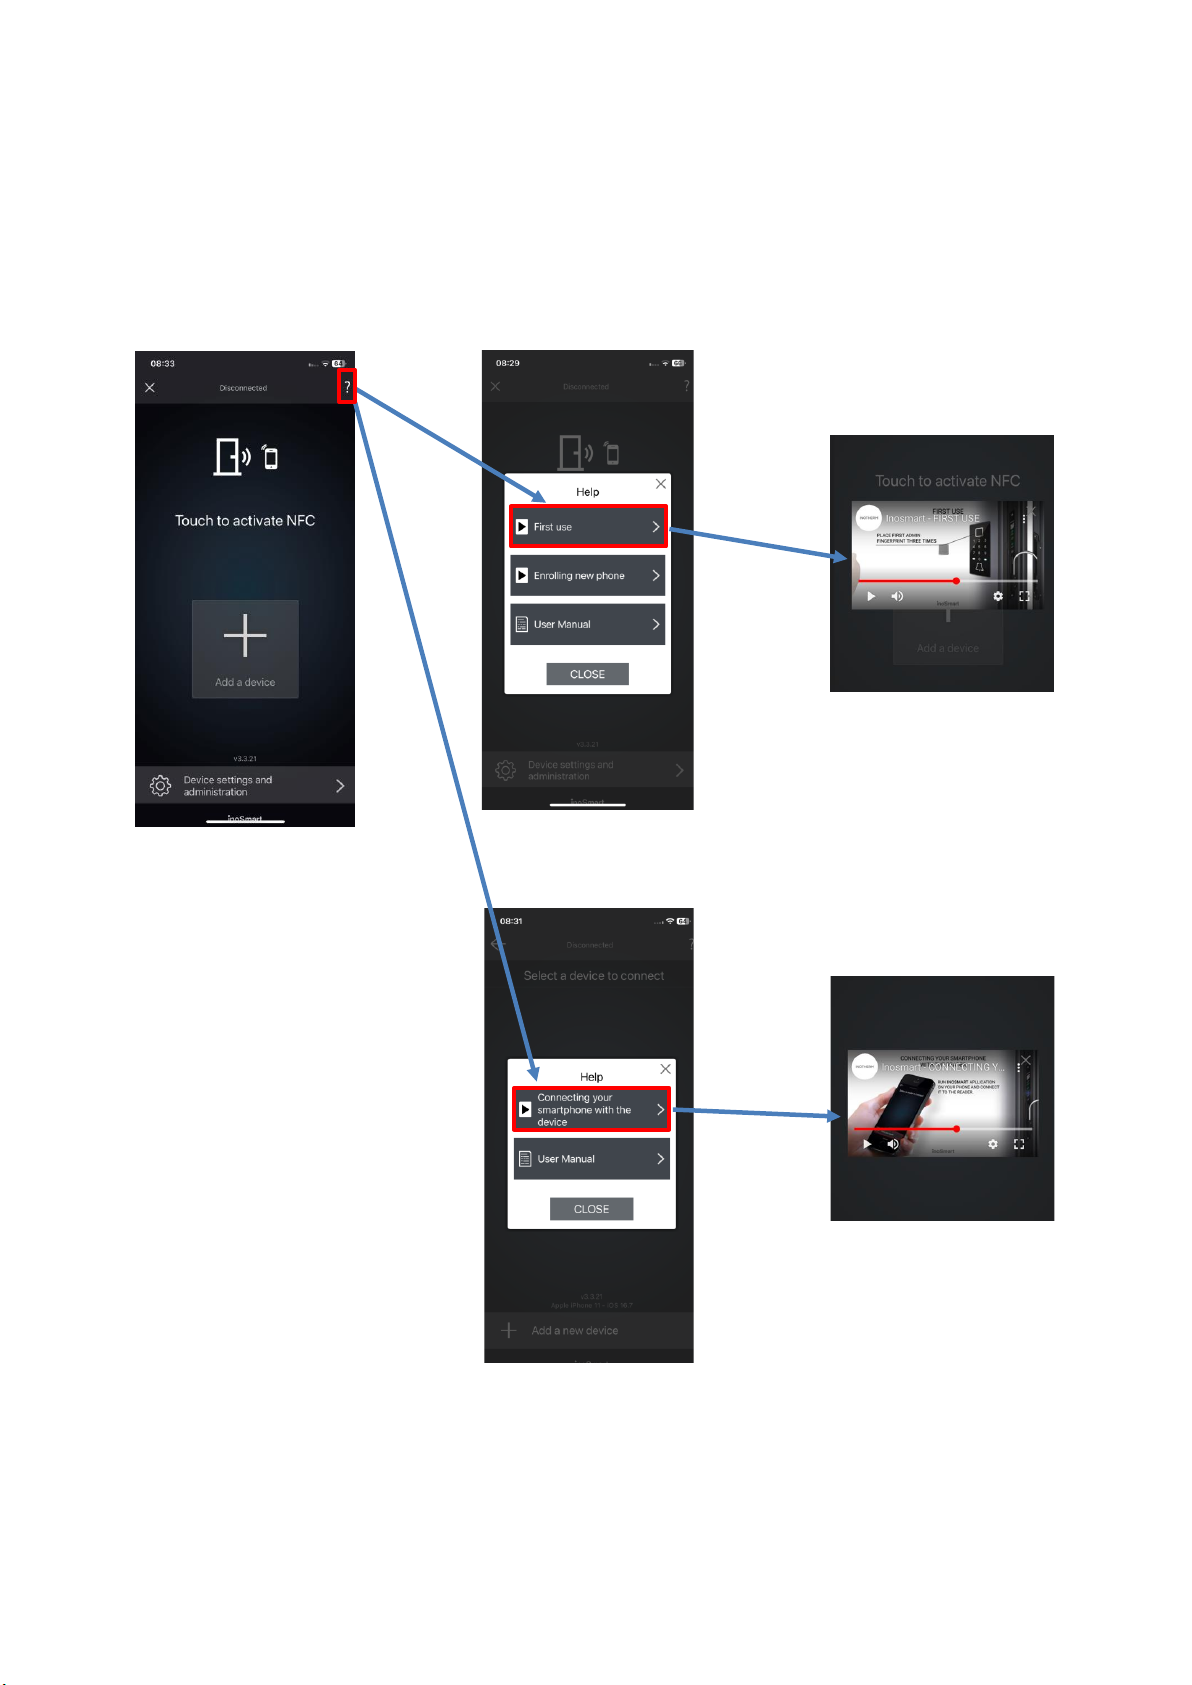
HELP WITH THE FIRST TIME CONNECTION OF READER AND SMARTPHONE
In case of connection problems will help you the ?-symbol at top right. A click on the symbol opens a help
window. For short video demonstrations or full instructions click here.
You can find more video content on our website: https://www.inosmart.info/bt/en/

12
MAIN MENUS
Inosmart app: MAIN MENU
USER
TIMER
YOUR CONTROLL UNIT
EVENT HISTORY
SETTINGS
TEST user fingerprint
13
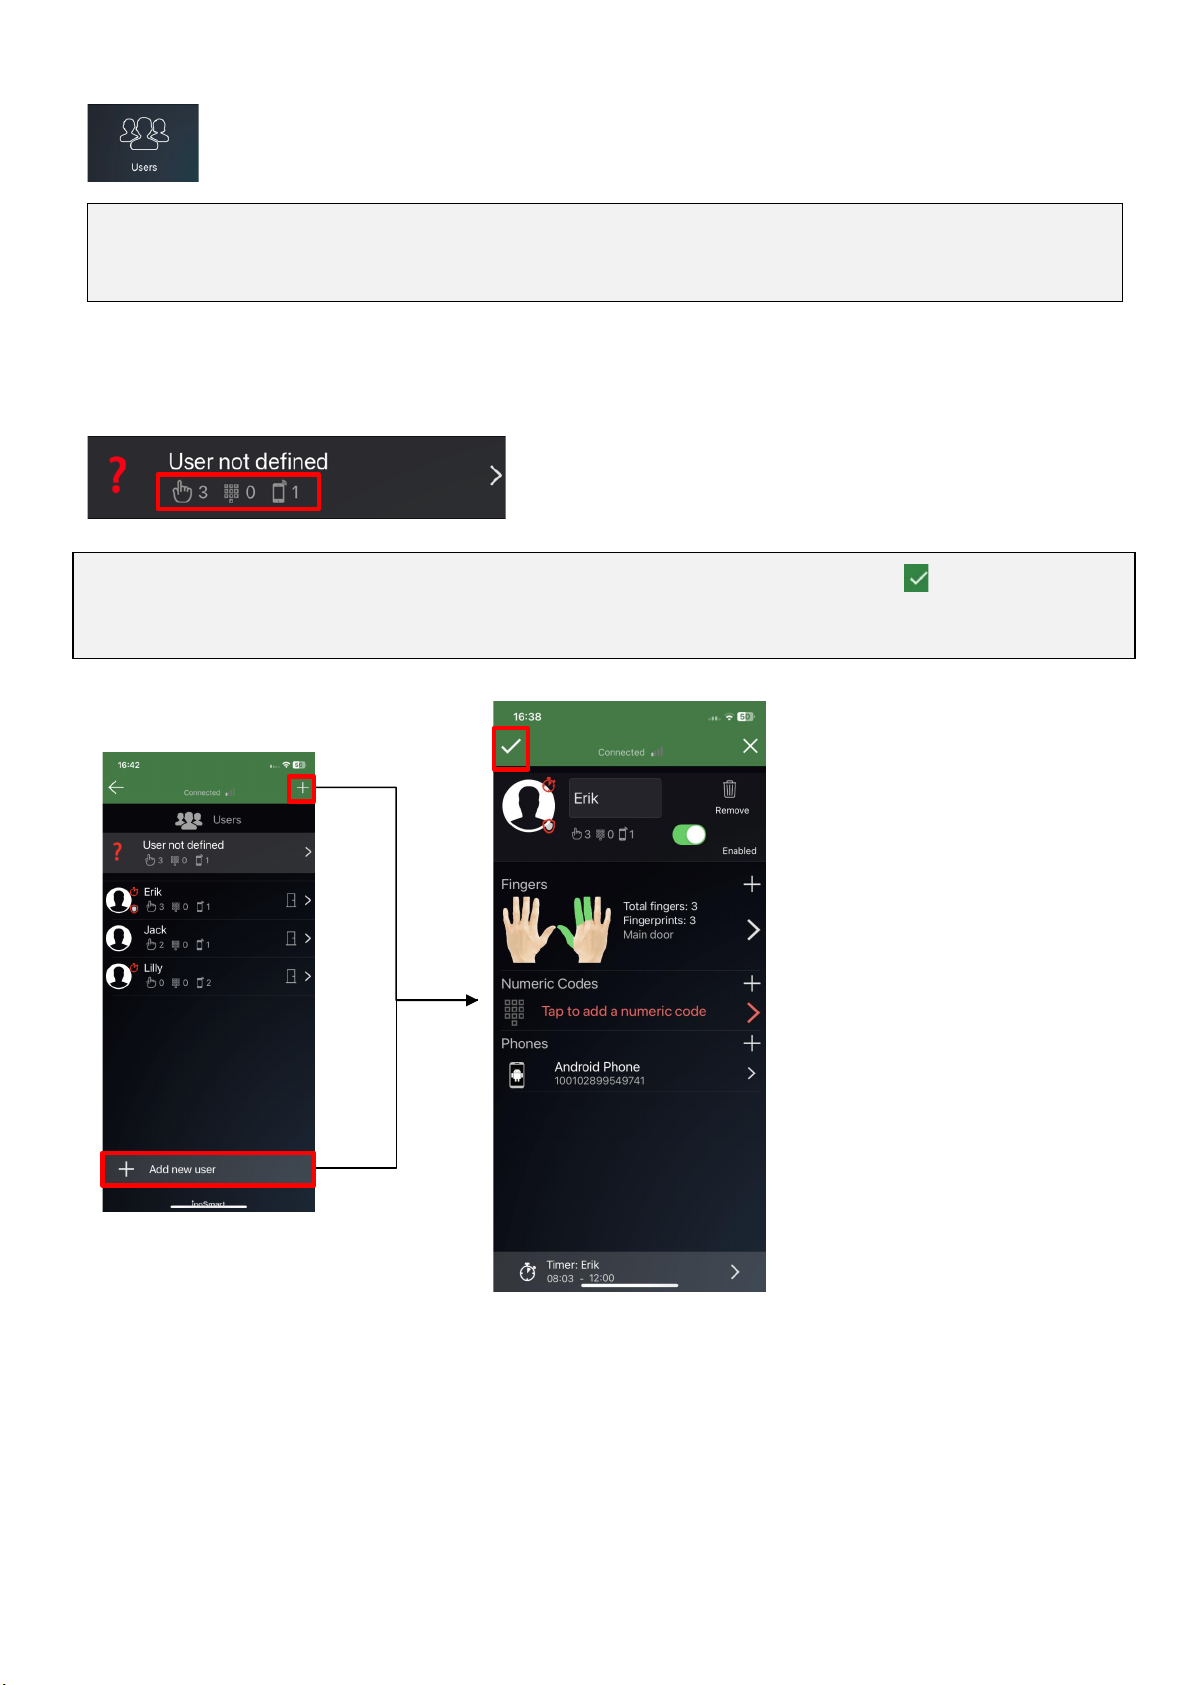
USER
This sub-menu allows you to easily manage all users, their fingerprints, smartphones and code numbers. The
directory shows all users with their permissions, with users who have access via the control unit appearing as
unidentified users in the directory at the top.
When logging in for the first time, all accesses that were added via the buttons of the control unit and for
which no user is specified are recorded in the >>User not specified<< area.
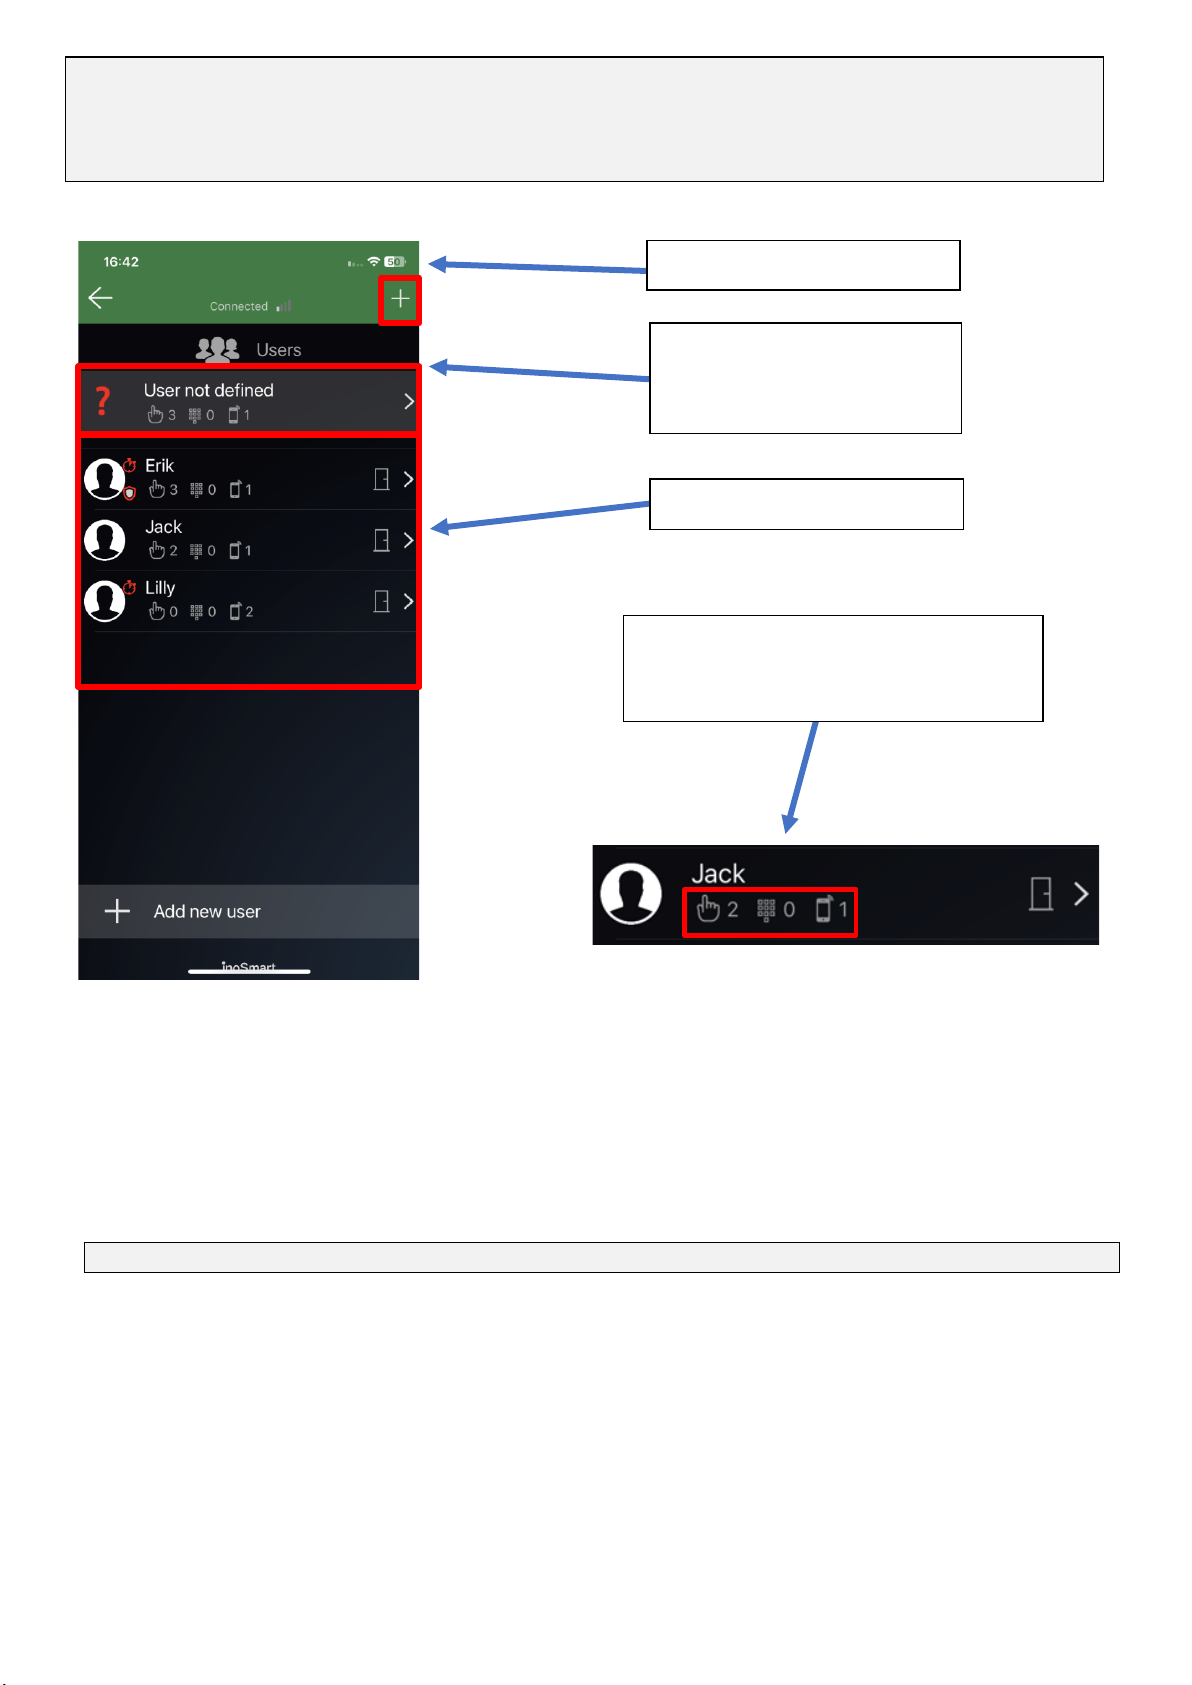
You ADD new users by clicking the + icon during registration. Confirm your selection with . You can then assign
any already logged unassigned authentications to the added users.
14
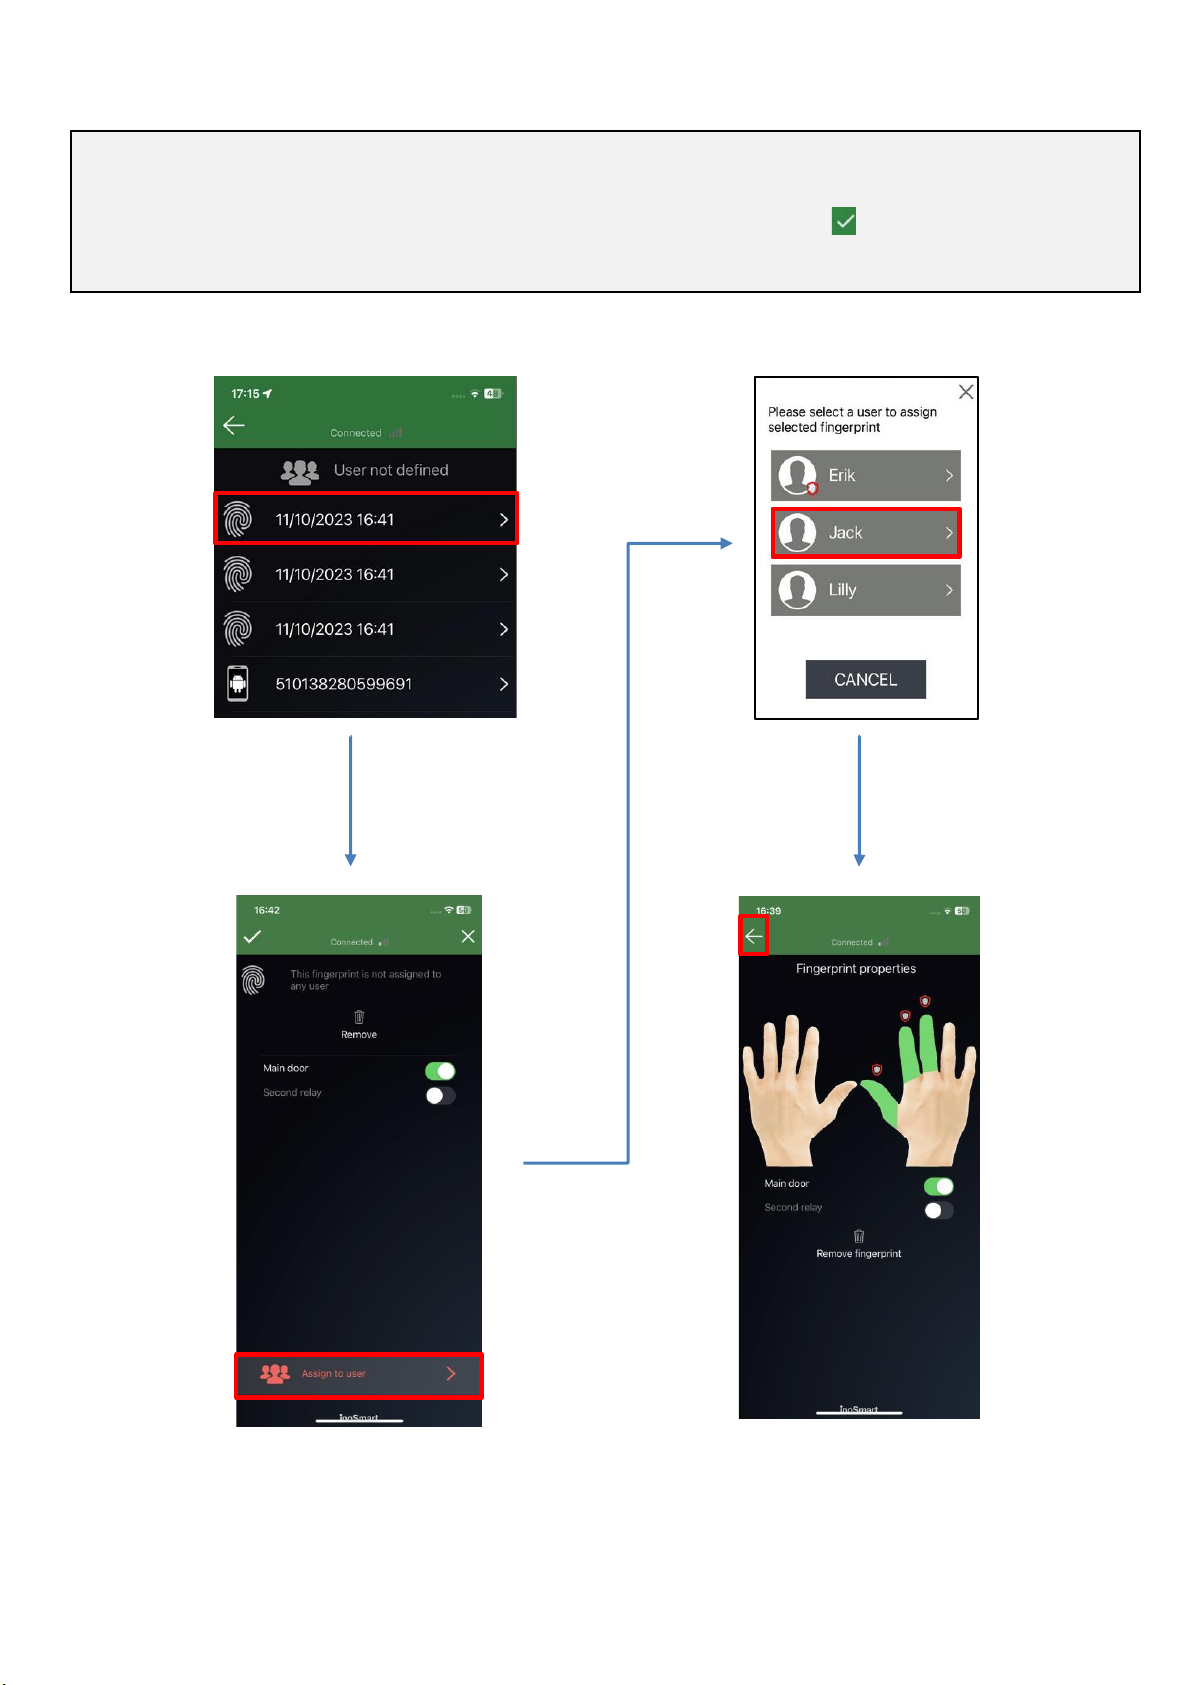
When you click ASSIGN TO USER, the application will offer you all the added users from the list. Select the person you
want. When a fingerprint is assigned, the application gives you the option to select a fingerprint. So when you verify
the user, you know which finger you've already added. Confirm your selection with .
15
REMOVE USER
Individual users can be deleted from the user directory at any time. When a user is removed, all their access
authorizations (fingerprints, NFC smartphones, code numbers) are also deleted.
To remove a user, tap the trash can in the top right corner of the user detail view.
USERS WITH ACCESS
AUTHORIZATION VIA THE
CONTROL UNIT
USER DIRECTORY
ADD NEW USER
Below each user, icons provide information
about their access rights and the number
of accesses.
In the user list, enabled features are marked with an icon under each user. If you have enabled control unit button
access, they will appear at the top of the list under Undefined User. On the right side each user is shown what
opens the assigned authentication (door, second relay).

16
TEMPORARILY DISABLE / ENABLE USER
You can use the button in the user detail view to deactivate or activate the user in question.
The individual user's button takes you to their DETAIL VIEW, where all their active access permissions - FINGERPRINTS, NFC
SMARTPHONES and CODE NUMBERS - are displayed as sections. By pressing the „+“-Buttons in the respective section allow
you to grant the user the appropriate access authorization.
FINGERS Section
REMOVE USER by tapping the Trash icon
"CODE NUMBERS" Section
NFC SMARTPHONES section
USER SCHEDULES
ADD NEW FINGERPRINT by tapping the "+"
button
ENABLE or DISABLE USER
This manual suits for next models
6
Table of contents


