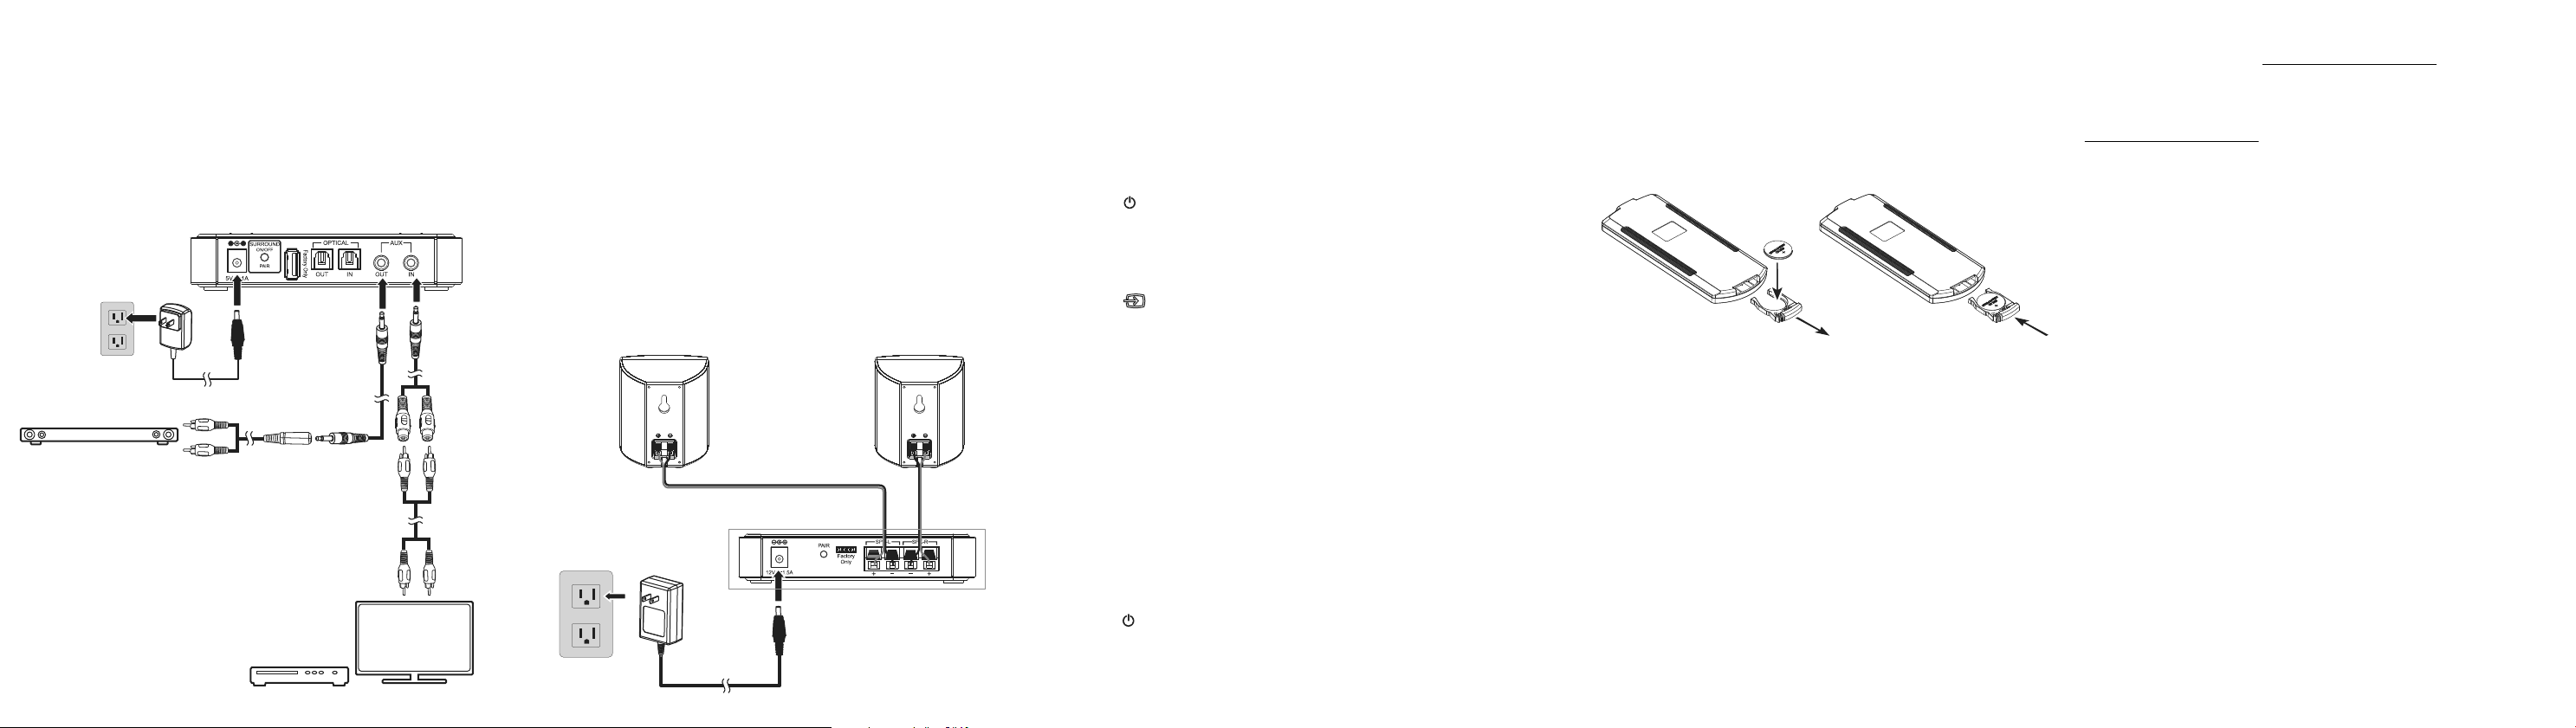
OPTION 2 - AUX connection (good), RCA
1Connect one end of an RCA cable (not included) to your audio source
device.
2Connect the other ends of the RCA cable to the 3.5mm male to RCA
female adapter (included), then connect the other end to the AUX In jack
on the transmitter.
3Connect one end of the 3.5 mm audio cable (included) to the AUX Out
jack on the transmitter.
4Connect the other end of the 3.5 mm audio cable to the 3.5 mm female
to RCA male adapter (included), then connect the other end to the
soundbar.
V1 ENGLISH 17-0288
Connecting the receiver to the transmitter
1Turn on the transmitter and receiver.
2Press and hold the sound and pairing button on the back of the
transmitter for three seconds (the receiver blinks blue when it is in
pairing mode. It lights solid blue when the receiver is on and paired with
the transmitter).
3Press and hold the sound and pairing button on the back of the receiver.
CONNECTING THE SPEAKERS TO THE RECEIVER
1Connect one end of the speaker wires (included) to the jacks on the back
of the speakers.
2 Connect the other end of the speaker wires to the SPK-L (left speaker)
and SPK-R (right speaker) jacks on the back of the receiver, black/red for
right channel and grey/red for left channel speakers.
3 Connect the 12V/1.5A AC adapter to the DC IN jack on the back of the
receiver. Plug the other end into a power outlet.
USING THE REMOTE CONTROL
Note: See the User Guide for instructions on programming a universal remote.
1Remove the plastic tab from the battery compartment.
2Point the remote control directly at the IR sensor on the front of the
transmitter. You must be within approximately 23 ft. (7 m) of the
transmitter.
USING YOUR SPEAKERS
1 Press the (Power) button on the transmitter or the remote control to
turn on your speaker system. The power indicator on the transmitter turns
o.
2Turn on the audio source device connected to your speakers and begin
playback.
3Press the (source) button on the transmitter to select the
audio source or press the selected source button on the remote control
until you hear sound from your speakers.
Note: If you use the OPTICAL connection, you must change your device’s audio
output setting to“PCM” or“Dolby 5.1” format. Refer to the manual you received with
the output device for additional information.
4Press and release the sound and pairing button on the transmitter, or the
sound button on the remote control, to switch between stereo and
surround sound modes.
5Adjust the volume (Master volume and rear speaker volume) on the
transmitter, or with the remote control, or on the audio source device to a
comfortable level.
Notes:
When you adjust the master volume, the rear/surround speaker volume will be
adjusted at the same time.
When you adjust the surround volume, the master/front speaker volume will not be
impacted.
6Press the (Power) button again to turn o your speaker system. The
power indicator on the transmitter lights red.
7 Adjust the sound delay on the remote control to synchronize the
soundbar and rear surround speakers.
Left speaker Right speaker
AC Adapter
12V/1.5A
Speaker wires
REPLACING THE REMOTE CONTROL BATTERY
1 Squeeze the battery tray’s sides together and slide it out of the remote
control.
2Remove the old battery and insert the new 3V lithium battery (CR2025)
with the + side up.
3Slide the battery tray back into the battery compartment until it clicks into
place.
ONEYEAR LIMITED WARRANTY
For complete warranty, visit www.insigniaproducts.com.
CONTACT INSIGNIA
1-877-467-4289 (U.S. and Canada) or 01-800-926-3000 (Mexico)
www.insigniaproducts.com
Dolby, Dolby Audio, and the double-D symbol are trademarks of Dolby Laboratories.
The above contents shall be added in this le per Dolby request.
INSIGNIA is a trademark of Best Buy and its aliated companies
Distributed by Best Buy Purchasing, LLC
7601 Penn Ave South, Richeld, MN 55423 U.S.A.
©2017 Best Buy. All rights reserved.
Made in China
5V/1A
AC adapter
Back of the
transmitter
Soundbar
Audio source
(TV, Blu-ray, or cable box)
3.5 mm to RCA
adapter (included)
If required.
3.5 mm cable
(included)
RCA to
3.5 mm
adapter
(included)
RCA cable
(not included)
NS-HURSK18_17-0288_QSG_V1.ai 2 7/6/2017 10:01:29 AMNS-HURSK18_17-0288_QSG_V1.ai 2 7/6/2017 10:01:29 AM


