Instant Shade Umbrella Aurora User manual
CANTILEVER UMBRELLA
OWNER MANUAL

CANTILEVER UMBRELLA
2
Congratulations on purchasing your Aurora cantilever umbrella. The Aurora is
manufactured using the best materials and fabrics and is designed to give you many
years of trouble free use and enjoyment. The following information is to inform you
how to operate your Aurora umbrella to ensure trouble free use and ease of operation.
Please follow these instructions as they are designed to assist operation and prolong
the life of your umbrella.
General Information
Your Aurora umbrella is principally intended for use in low to moderate wind conditions
and in the weather conditions for which it was designed.
· Do not leave umbrella open when unattended, particularly in windy cond.itions.
· Umbrella should be closed and securely strapped in strong winds and adverse
weather conditions.
· Always secure your umbrella to an appropriate base.
· Anymodicationstoyourumbrella,exceptthosemadebyanauthorisedInstant
Shade Umbrellas agent, may invalidate the warranty.
· Makesureumbrellacanopyisdryandcleanpriortostoringawayforextended
periods of time to prevent mould from developing.
· Be careful when closing the umbrella to ensure that the canopy does not get caught
or “pinched” by the umbrella arms. This is particularly important before storing
theumbrellaawayforextendedperiodsoftimeoriftheumbrellaistobelaid
horizontally for storage. Damage to the fabric caused by “pinching” is not covered
by warranty.
· Inspecttheinstallationtting/baseonaregularbasisandtightenasnecessary.
· Periodincally clean the umbrella frame, removing cobwebs, insects, dirt and other
foreign objects that can interfere with the mechanical operation of the umbrella.
AURORA CANTILEVER UMBRELLA

3
Simple maintenance procedures:
(1) Incoastalormetropolitanenvironmentsfrequentwashing(withahose)ofthe
completeunitisverybenecial.Payparticularlyattentiontotheslidercar,slidercar
guide tracks and rotating mechanism.
(2) Shouldthe16rotatingmechanismstoppinholesbecomelledwithsandordust
etc. then by lifting the umbrella up the spigot say 20cm you will allow the dust
cover to be lifted and the 16 holes can be cleaned. This will certainly be a two man
operation.
(3) Periodic cleaning of the slider car tracks with mineral turpentine is recommended.
(4) Always fold the canopy as described in section “TO CLOSE AURORA UMBRELLA” step
(4). This will prolong the new look of the canvas and prevent marking and holes
(5) Ifyouhaveacoverbagitisadvisabletotitiftheumbrellaisnottobeusedfor
some time.
(6) All parts are virtually maintenance free eg aluminium, stainless steel, Nylon etc
however it is recommended that if the umbrella is not to be used for a period, say
winter months, then it is a good policy to put the umbrella in storage. You may even
remove the spigot as it is unsightly if not in use and also dangerous should children
fall on it.
(7) Thecanvascanopymaybecleanedormouldremovedbyusingamildmixtureofan
approvedmouldremoverandorwarmsoapywaterusingasoftbrush.Testrston
the strap to ensure no damage will be caused to the umbrella canopy fabric.
(8) Do not used bleach based detergents to clean the canopy.
AURORA CANTILEVER UMBRELLA
4
CANTILEVER UMBRELLA
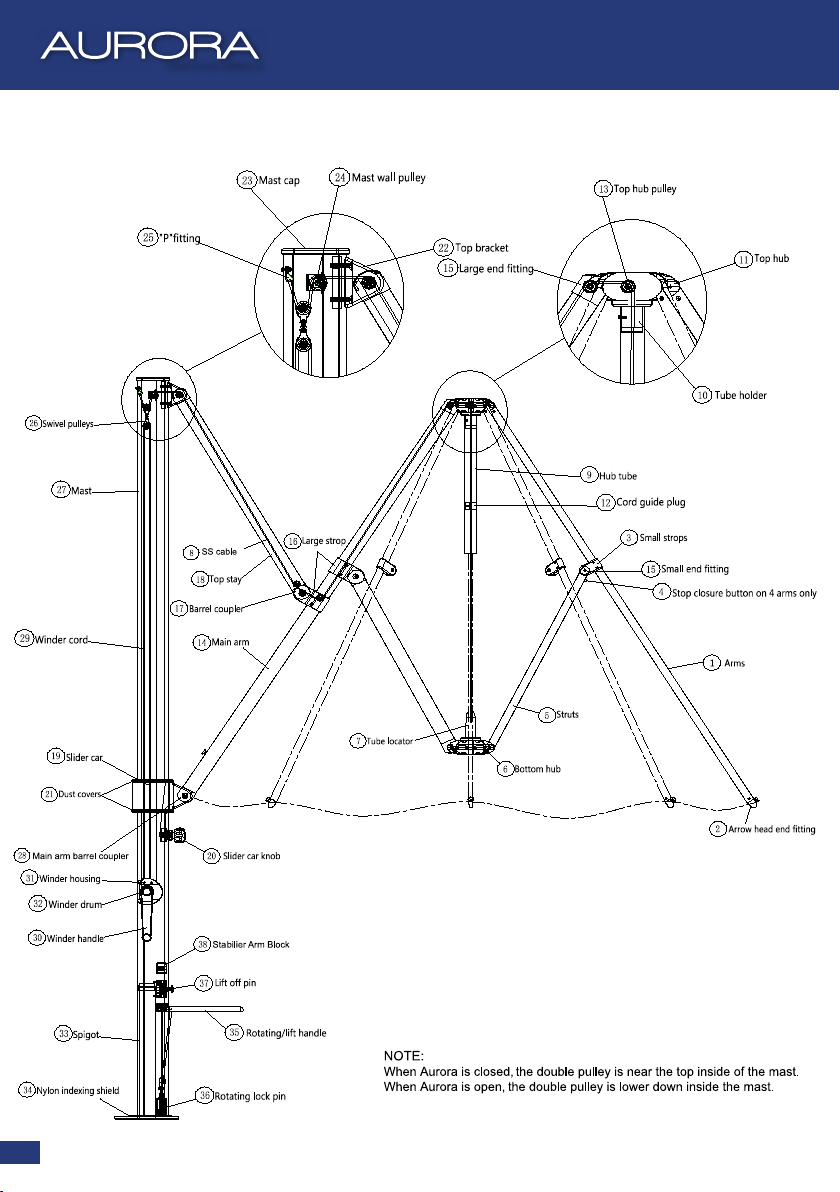
AURORA PARTS IDENTIFICATION
AURORA PARTS IDENTIFICATION
ECLIPSE PARTS IDENTIFICATION

5
AURORA PARTS IDENTIFICATION
AURORA PARTS IDENTIFICATION
ECLIPSE PARTS IDENTIFICATION
1 Arms
2 Arrowheadendtting
3 Small strop
4 Stop closure button on 4 arms only.
5 Struts
6 Bottom hub
7 Tube locator
8 Stainless steel cable
9 Hub tube
10 Tube holder
11 Top hub
12 Cord guide plug
13 Top hub pulley
14 Main arm
15 Smallendtting
16 Large strop
17 Barrel coupler
18 Top stay
19 Slider car
20 Slider car Knob
21 Dust covers
22 Top bracket
23 Mast cap
24 Mast wall pulley
25 “P”tting
26 Swivel pulleys
27 Mast
28 Main arm barrel coupler
29 Winder cord
30 Winder handle
31 Winder housing
32 Winder drum
33 Spigot
34 Nylonindexingshield
35 Rotating/lifthandle
36 Rotating lock pin
37 Liftopin
38 Stabiliser Arm Block
6
CANTILEVER UMBRELLA
6
TO OPEN THE AURORA UMBRELLA
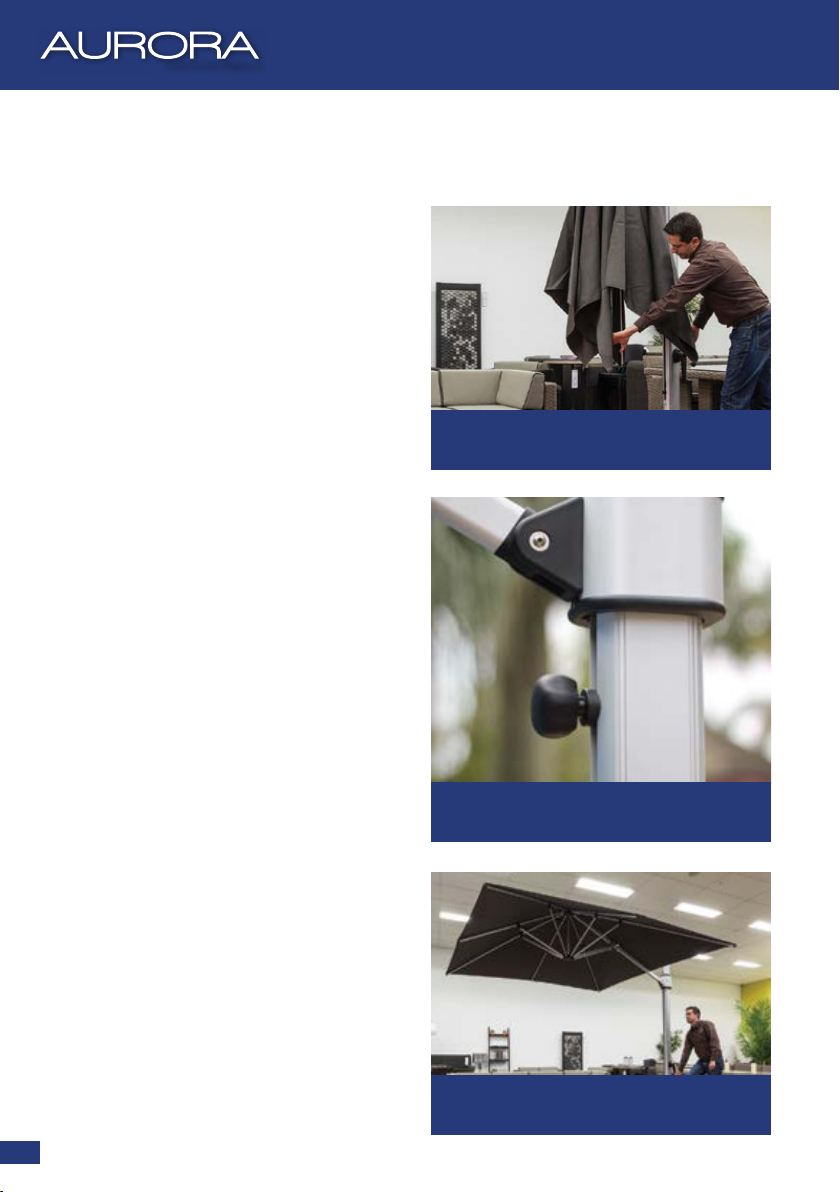
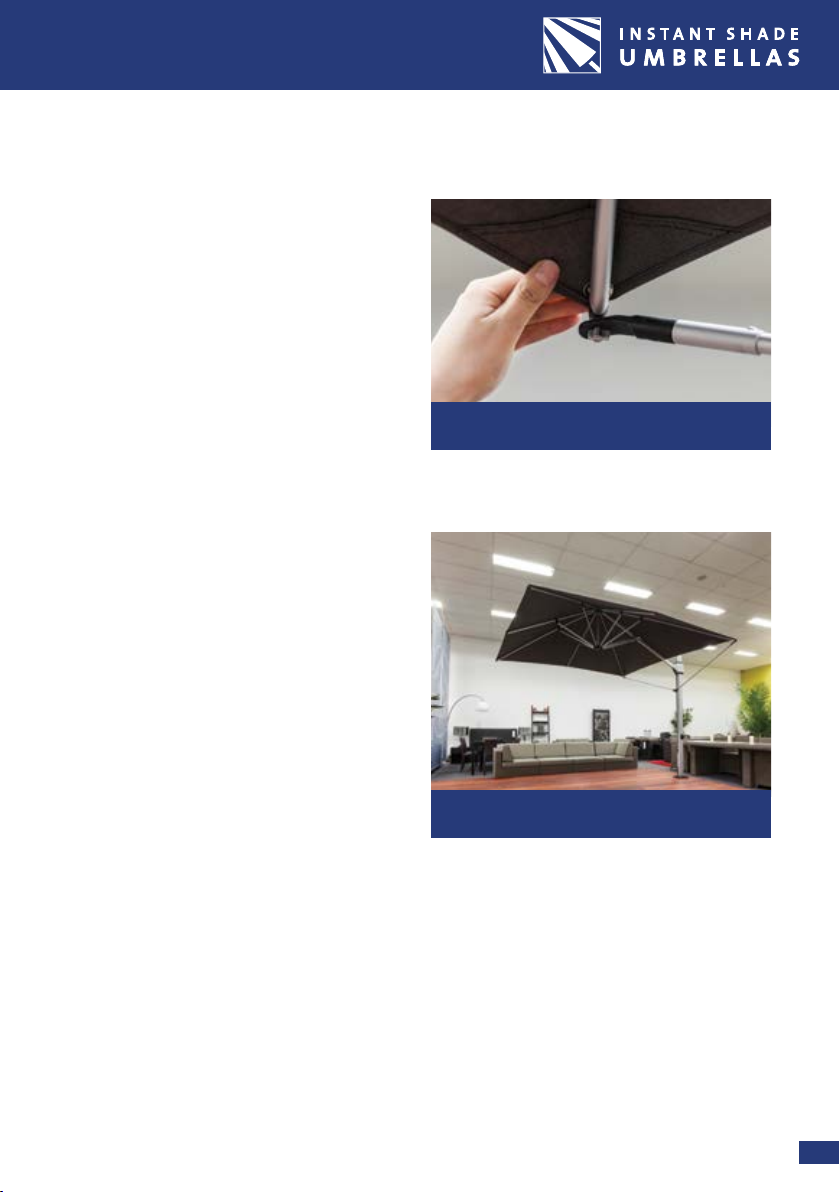
1Remove the strap from the canopy.
2Gently spread the canopy arms open
with your hands (refer Figure A).
3 Ensure the slider car knob is loose
and slider car can move freely (refer
Figure B).Insertthewinderhandle
(30) into the winder housing (31) on
the mast and rotate in a clockwise
direction.
4Continue winding until the canopy is
fully open. The bottom hub (6) will be
seated into the hub tube (9) and the
edge of the canopy should be tight
(refer Figure C).
Note: The winder handle will become a
little harder to wind as the umbrella
nears fully open. This is normal
particularly when the canopy is new.
5Once the canopy is fully opened hold
the slider car knob (20) and push the
slider car up until the canopy is
horizontal and slider car is at its
highest position. Tighten slider car
knob (20) clockwise to secure the
umbrella.
6The winder handle may be removed if
desiredasachildproongmeasure.
Figure A
Gently spread the canopy arms open.
Figure B
Ensure tilt knob is loose (turn anti-clockwise)
when opening and closing umbrella.
Figure C
Edge of canopy should be tight.
7
TO CLOSE AURORA UMBRELLA
1Turn the sider car tilt knob (20) anti-
clockwise until loose.
2Rotate the winder handle (30) in an
anti-clockwise direction. The canopy will
begin to collapse. Continue winding in an
anti-clockwise direction until the canopy
is mostly closed and the canopy arms are
pointing almost vertically down to the
ground.
3Hold the slider car tilt knob and pull the
slider car down the mast towards the
ground. The canopy should now be fully
closed. Reach around with one arm and
pull the canopy back towards the mast to
complete closing.
4 IMPORTANT:Foldthecanopyneatlyto
prevent any “pinching” of the canvas by
the umbrella frame. To do this stand in
frontofthecanopyandndthefront
four panels of fabric. Pull these together
towards your body and then roll all
four panels together back towards the
umbrella frame. Hold the rolled panels
withonehand,whilegrabbingthefth
panel folding it over the roll to hold it in
place. Alternate folding over remaining
panelsfromlefttorightwiththesixth,
seventh and eighth panel.
5Secure folded panels in place with the
canopy strap, wrapping it around the
mast and canopy. Gently push the folded
canopy back against the mast so that it is
compact.
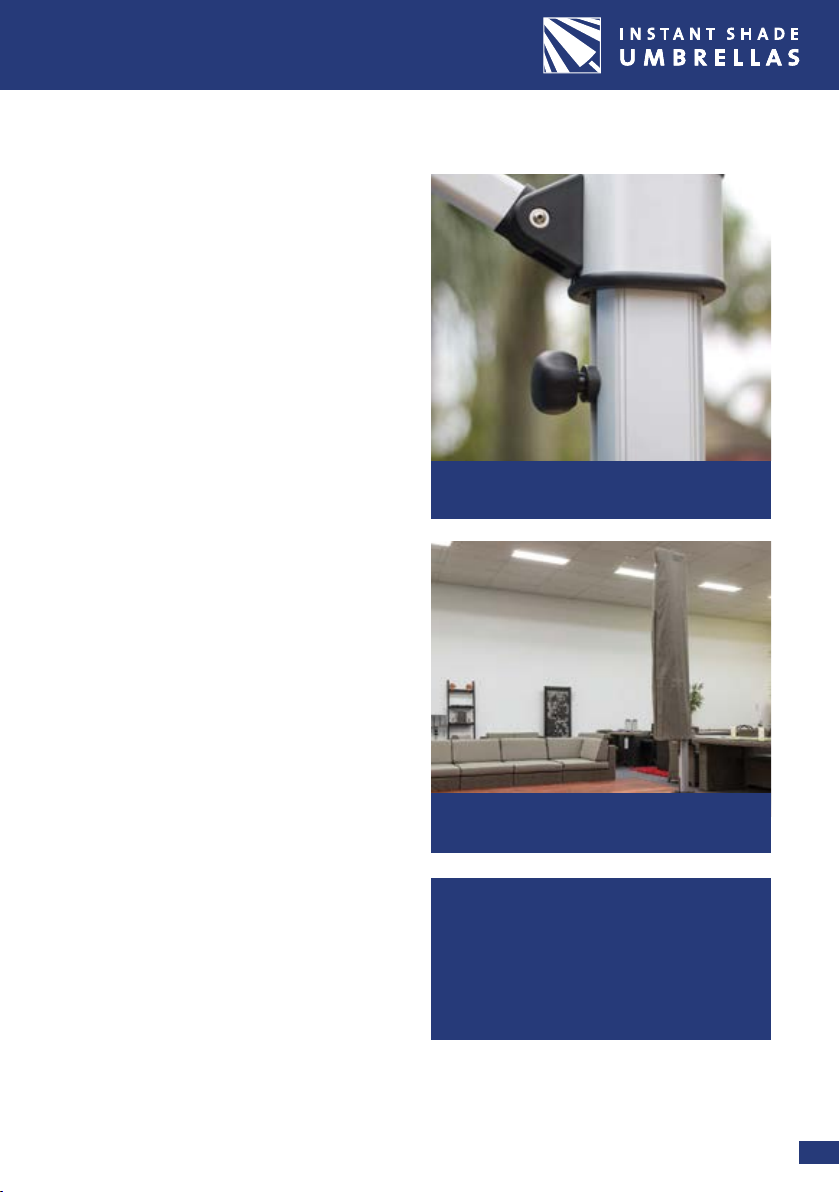
6 FITTINGTHEOPTIONALCOVERBAG:Stand
in front of the folded canopy and open the coverbag zip completely. Use the handle rod
to lift the coverbag behind the mast and up as high as possible to clear the top of the
umbrella. Pull the coverbag down over the top of the mast and canopy. Zip the coverbag
closed. The zip should be on the front side of the canopy, not at the back of the mast.
A video showing
correct operation of the umbrella can
be found on our website at
www.instantshadeumbrellas.com.au
Figure A
Ensure tilt knob is loose (turn anticlockwise)
when closing umbrella.
Figure B
Fit the cover bag over mast and frame and zip up.

8
CANTILEVER UMBRELLA
8
TO TILT THE CANOPY
1 Gently spread the canopy arms
open with your hands. Make sure
the slider car knob (2) is loose (turn
anticlockwise to loosen). Open the
canopy by inserting the handle (30)
into the winder housing (31) on
the mast and rotate in a clockwise
direction.
2Wind the handle (30) until the canopy
is fully open and the bottom hub (6) is
fully in the hub tube (9) and the edge
of the canopy is tight.
3 Hold the slider car knob (20) and raise
the slider car (19) up the mast. (refer
Figure B.)
4 Once you have moved the slider car to
therequiredposition,tightenthetilt
knobbyturningclockwisermly.
5 The tilt angle of the canopy can be
adjusted at any time by loosening the
slider car knob (20) and sliding the
slider car up and down the mast
6 When closing the umbrella always
start by loosening the slider car knob
(20) anticlockwise. Refer instructions
“TO CLOSE AURORA UMBRELLA”.
NOTE: The optimum strength of the
umbrella is reached only when the
slidercarisatitsmaximumheightand
the umbrella canopy edge is horizontal
to the ground. The strength of the
umbrella is lessened when the canopy
is in an angled position. Figure D
Tilt position 2 (approx. 60 degrees)
Figure C
Tilt position 1 (approx. 30 degrees)
Figure B
Tilt knob loose to open
Figure A
Start with the umbrella almost completely closed

9
TO ROTATE THE AURORA UMBRELLA
There are 16 pre-determined location holes
in the spigot. These location holes are
found at every 22.5 degrees interval around
the spigot base. They are located where
indicated on the spigot base and are under
the nylon indexing shield (34) which acts as
a dust cover for the holes not in use.
1Pull the rotation lift handle (35) out from
the mast cavity (refer Figure A).
2Lift up on the handle and feel the
resistance from the spring that houses the
rotating lock pin (36)).
WARNING:Inliftingthishandleyouare
not attempting to lift the whole umbrella,
rather just the spring on the rotating lock
pin that locates the rotation lock pin.
3 By using the rotating lift handle (35) as a
lever you may rotate the umbrella on the
base(referFibureB)untilyouarriveatthe
newrequiredposition.
NOTE: There is some resistance to
rotation as the weight of the umbrella
when opened and friction need to be
overcome.Foreasierrotationclose
theumbrellacanopyrst.
4 Each position is marked by a notch on
the spigot base. Align the indicator arrow
withanotch(referFigureC).Once
aligned with a notch, lower the rotating
handle down to locate the rotating lock
pin. WARNING: Do not force the rotating
handle down if the indicator arrow is
between notch positions. The rotating
handleshouldclosedowneasily.Ifany
resistance is encountered do not force
it, rotate the umbrella further slightly
to locate the correct hole position.
Figure A
Lift rotation handle
Figure B
Rotate the umbrella by using the handle
Figure C
Align the indicator arrow with a notch

10
CANTILEVER UMBRELLA
10
TO USE YOUR (OPTIONAL) STABILISER BARS (STAY KIT)
Your Aurora cantilever umbrella can
performance in a wider range of wind
conditions. This “stay kit” consists of two
(joined) stabiliser bars. It is an optional
extra and is available from your Aurora
dealer.
Note: The Aurora umbrella does not
need to be tted with the stay kit for
normal operation in calm to moderate
wind conditions. However for higher wind
strengths or for commercial applications it
is advised to t the stay kit to add stability
to the umbrella.
To install stay kit:
1 Slide the stay block (38) up the internal
mast housing to a height roughly the
same as the height of the stabiliser
bars when standing vertical (refer
Figure A).
2 Attach the threaded stainless screw
with the two aluminum stays attached
to the stay block and tighten the screw
sucientlyforthestayblocktoremain
in position without sliding down the
mast (refer Figure B).
3 Swingeitheraluminumstayarmo
the ground and attach to the umbrella
arm using the “T-lock”. Position the
T-lock to vertical and slide the hole
intheplasticttingattheendofthe
stabiliser bar over (refer Figure C). Set
the T-lock to horizontal to lock the bar
in place (refer Figure D).
Figure B
Screw stays into stay block
Figure C
Slide end of stay arm over T-lock
Figure A
Slide stay block up mast
11
CONTINUED - STABILISER BARS
4 Attach the remaining arm to the other
side. Note: There is adjustment to the
outer end of the stays so as to align
the knob/screw connection with the
umbrella arm ends.
5 You may need to loosen the central
threaded stainless screw and adjust
up or down the mast until you have
applied a little upward tension on the
umbrella arms. Tighten this screw in
position (refer Figure E for umbrella
with stay kit correctly tted).
CAUTION:Donotovertensionasthis
may distort the umbrella arms.
Reverse the process to remove the
stay kit. The stay kit must be removed
to close the umbrella or tilt the canopy.
Important:
Your Aurora umbrella, even when
ttedwiththestaykit,isnota
permanent, all-weather structure. The
umbrella should be closed and folded
when not in use and never left open
when unattended or in strong winds.
Figure E
Umbrella with stays attached
Figure D
Set T-lock to horizontal
12
CANTILEVER UMBRELLA
12
MOBILE CROSS BASE INSTALLATION PROCEDURE
Use the Cross Base with your umbrella
ifyoudonotwishtocarryoutxeda
installation. The Cross Base allows you
theexibilitytomovetheumbrella
around. However it should only be used
in light wind conditions.
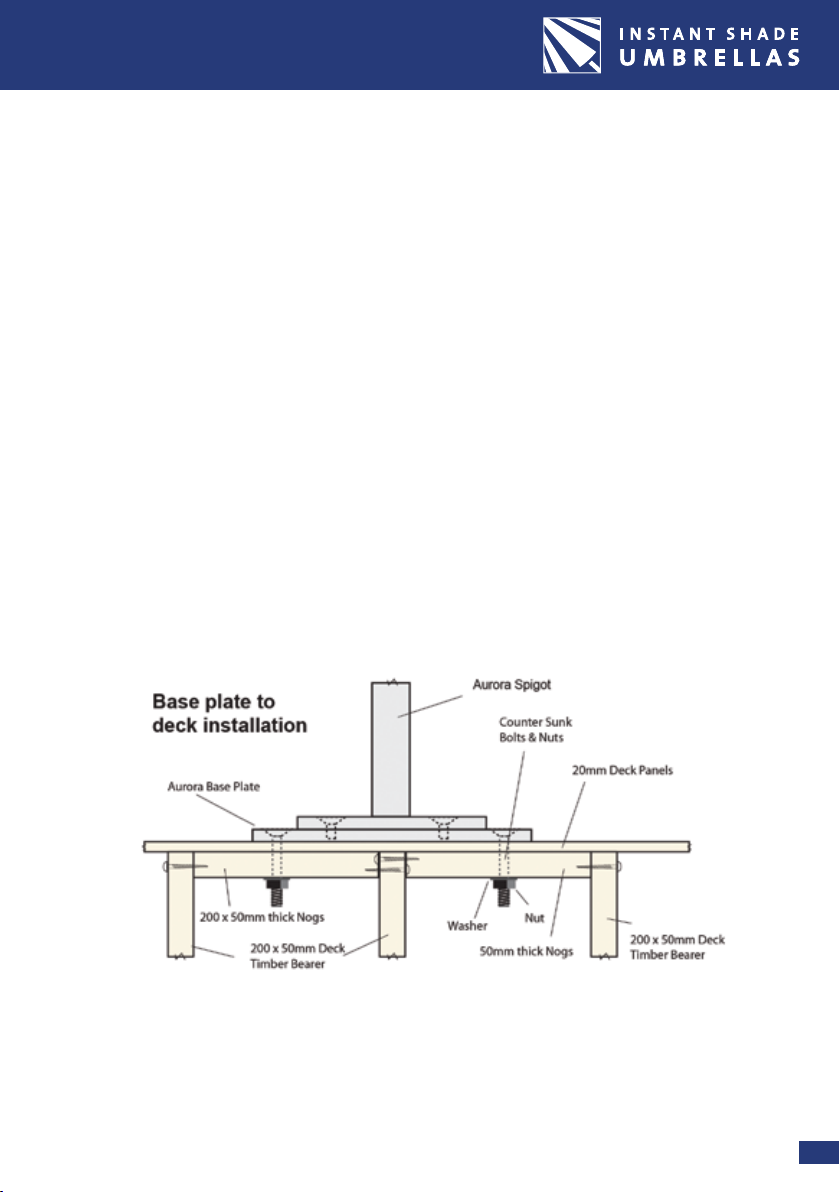
1Unpack the two cross base sections
and install the 4 end plates with the
screws provided. (refer Figure A)
2Lay the top section (cut out facing
down) over the bottom section (cut out
facing up). (refer Figure B)
3Place the umbrella spigot onto the
cross base, lining up the four holes in
the spigot plate with the four holes on
the cross base. (refer Figure C)
Figure A
Figure B
Figure C

13
4Secure the spigot plate to the cross
baseusingthe4x30mmscrews
provided.
5The Aurora cross base is designed to
acceptfour(4)50cmx50cmx5cm
concrete pavers. (refer Figure E).For
greater stability in the wind, more
weight may be added.
6Once the Aurora corss base is
assembled, the Aurora umbrella can be
installed on the spigot.
NOTE: The stability of the Aurora
umbrella is at its maximum strength
when the spigot plate is secured to an
Aurora base plate or In-ground tting as
seen on pages 15, 16, 17 and 18. The
mobile cross base is to be used in light
wind only.
Figure D
Figure E
Figure F

14
CANTILEVER UMBRELLA
14
Permanent Installation Procedure
YourAuroraumbrellacomesfullyassembledintheboxthatitisdeliveredin.Once
youhavexedthespigotcorrectlyyoumaylifttheAuroraumbrellaontothespigot.
This is recommended as a two man operation.
Prior to xing the spigot in place please read this important
information.
Rotation of the spigot
YourAuroraumbrellacanrotate360degreesandbelockedin16dierentlocations.This
meansthatevery22.5degreesofrotationthereisprovisiontolocktheumbrella.Inmost
situations there will be a table and chairs, sun-lounger, play area etc. over which you usually
want shade without rotating the umbrella. To ensure you retain the ability to shade your
preferred position you must have one of the 22.5 degree rotation locking holes in line with
this position. There is a locking hole in line with each of the 4 screw holes in the spigot base.
There are three intermediate holes between each of the screw holes and these are marked
with an indicator mark in the spigot base. To retain a symmetrical installation it is best to aim
a screw hole in your usual preferred direction.
Removing Packaging
Iftheumbrellaisbeinginstalledforthersttime,ensureallpackagingandwrapping
material has been removed. There may be some wrapping material on the canopy arms
underneath the fabric canopy - partially open the umbrella and get in underneath the
fabric canopy to remove all of this wrapping before fully opening the umbrella.
Stand the Aurora umbrella vertical
Recommendedasatwopersonoperation.Onceyourxingiscompletetheumbrellacanbe
placedoverthespigotandloweredintoposition.Inthetopofthespigotthereisagroove
into which a spring loaded pin will position itself just before the umbrella seats on the nylon
indexingshield.Youshouldnothavetoassistthispinintopositionbutbeawareofitshould
theumbrellanotseattotally.Thispinistoensurethattheumbrellacannotliftoduring
high winds. Whenever you remove the umbrella from the spigot you will have to pull this pin
outtoextractthepinfromthegroovesothatyoucanlifttheumbrellao.
There are three installation alternatives described in the following pages, select
which suits your situation
Permanent Installation Procedure
15
(1) Fixing the Aurora base plate to a timber deck:
IfyouwishtolocateyourAuroraumbrellaontoatimberdeckthenthefollowing
installation method should be adhered to. Your Aurora base plate must be bolted
to the frame of the deck and not only to the deck planking. You need to fasten to
1 or 2 “nogs” or “dwangs” or “braces” between the deck joists or bearers that form
thestructuralframeofthedeck.Itissuggestedthat2nogsof20cmby5cmtimber
braces be secured hard up under the deck planking and between the deck bearers
and fasten these braces to the deck frame with suitable fastenings. These may be
large galvanised coach screws. Z nails, builders brackets or similar. The base plate
shouldnowbesetintherequiredpositionandboltedthroughthedeckplanking
andthexedbracesbyusing10mmx100mmstainlessboltsandnutswithalarge
washer on the underside. (See base plate to deck installation below.)
16
CANTILEVER UMBRELLA
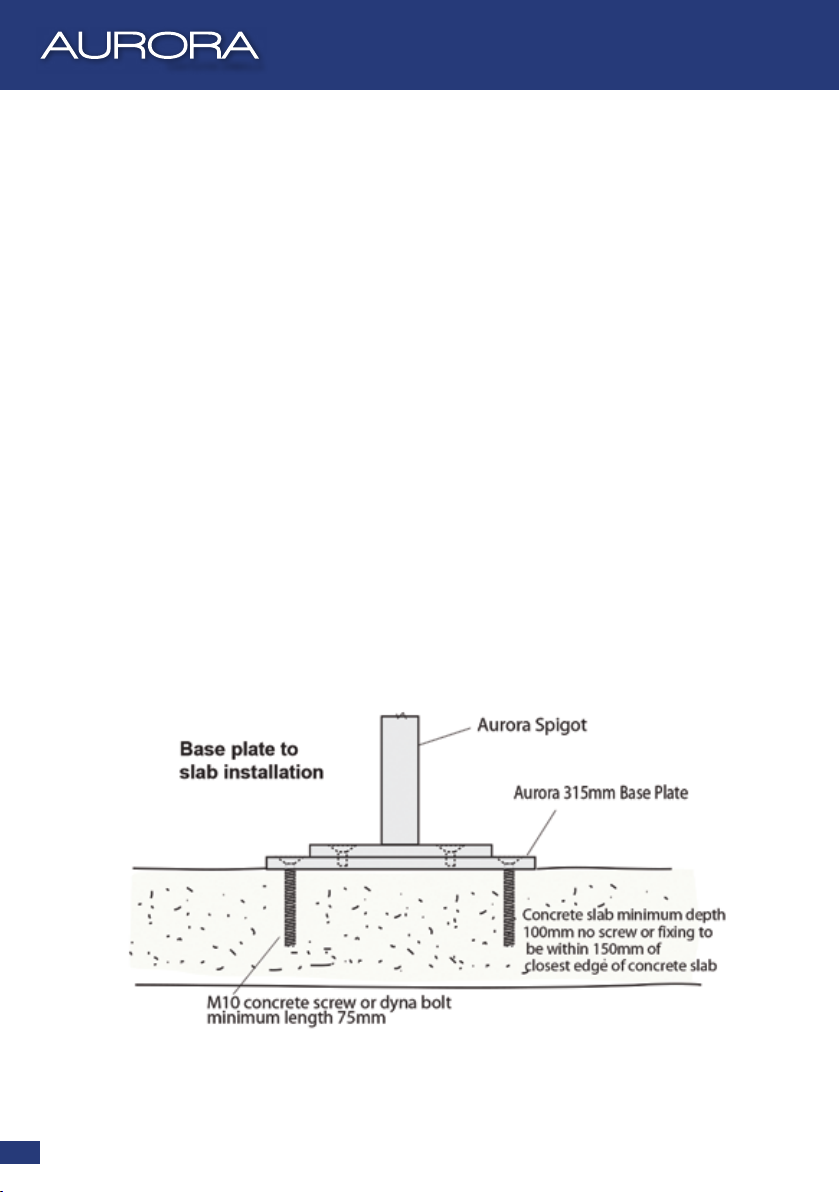
(2) Fixing the Aurora base plate to a concrete slab:
Wheninstallingyourumbrellaonaconcretesurfaceyoumayxthebaseplateto
the concrete using 4 concrete screws or fastenings. (See earlier paragraph “Rotation
of the spigot”). Once you have installed your base plate to the concrete use the 4
stainless steel screws provided to attach the spigot to the base plate. The reason
for this is that should your wish to remove the umbrella and spigot for any reason,
say season or security reasons, you can remove the spigot easily and leave only the
deckplatexedtothewhichisapermanentxing.
Important: Wheninstallingabaseplaterstandthenthespigotscrewedontopyou
stillneedtodirectoneofthespigotscrewholesinyourpreferreddirection.Inthiscase
the deck plate is installed under the spigot in a rotational position to suit.

17
(3) Fixing in lawn, soil or patio:
Wheninstallationisrequiredinsoilorsand,anIn-groundttingmustbeused.
Thisisagalvanisedsteelttingwhichmustbeconcretedintoposition.Because
terraindiersfromthickclaytosandornesoilthenadierentsizedholemust
bepreparedandadierentvolumeofconcreteused.Asaguideonlyahole45cm
by45cmby60cmdeepisaminimumrequirementforheavyclayterrain.Eventhen
a post hole borer can be used to deepen the centre of the footing. When pouring
the concrete it is advisable to drop a few lengths of re-inforcing steel bar into the
hole to prevent the concrete from cracking. Rember that depth of hole is better than
width and it is much easier to make the hole over size than to try to re-stabilise the
in-groundttingshoulditstarttomoveovertime.Ifapplicablepatiotileshaveto
beremovedtofacilitatethisIn-groundttingandthencuttosuitwhenreplaced.
Important: Please read “Rotation of the spigot” before commencing installation.
BecausethescrewholesinthespigotandtheIn-groundttingareidenticalyoushould
aimoneofthescrewholesinyourpreferredposition.AlsoensuretheIn-groundtting
plate is level in the concrete. Allow adequate time for the concrete to cure before
using.
Tip:Toensurethatconcreteslurrydoesnotcomeupthe4threadedholesintheIn-
groundttingitisadvisabletoinsertthe4screwsintotheIn-groundttingand
stick some tape over the underside of the holes.

18
CANTILEVER UMBRELLA
Thank you for your purchase from Instant Shade Umbrellas.
Thebenetsgivenbythiswarrantyareinadditiontoallotherrightsandremediesinrespect
of the product which the purchaser has under the Trade Practices Act and similar state and
TerritoryLaws.Nothinginthiswarrantywillexclude,restrictormodifyanyconditions,warranty
rights or liability implied in this purchase or protected by law where to do so would render this
warranty void.
Warranty – PLEASE READ CAREFULLY
NOTE:Warrantyonumbrellaframe,andonpolyesterfabricistwo(2)years,andonolenfabric
is three years (3). Warranty on printing is one year (1). The warranty covers manufacturer’s
faults and defects only.
1. This warranty applies to the original purchaser only.
2. This warranty does not cover damage caused by wind or adverse weather conditions, fair
wearandtear,accidents,misuse,re,ood,hail,earthquakesorothernaturaldisasters,or
alterationsorrepairsbyanyotherthananauthorisedagentofInstantShadeUmbrellasPty
Ltd
3. The umbrella must be used with a suitable base with a reasonable amount of weight
applied,orbecorrectlyinstalledwithanappropriateIn-groundtting.Ifinstalled,this
warrantyisvalidonlyforinstallationsmadebyInstantShadeUmbrellasPtyLtd,an
authorisedagentorifinstalledbythecustomer,theinstallationmustbecarriedoutexactly
asrequiredintheinstructionsthataresuppliedwiththeumbrellaoravailableonour
website.
4. Inthecaseofinstallations,theowneristoascertainpositionofallundergroundpipesand
electrical wires and notify installer of any obstacles. Although all care will be taken, no
responsibility can be accepted for any damage during installation.
5. The canopy fabric warranty is a Limited Manufacturers Warranty, which is passed on by
InstantShadeUmbrellasPtyLtd.
6. The warranty is valid only if the umbrella is opened and collapsed as instructed by an
authorisedInstantShadeUmbrellasPtyLtdDealerand/oraspertheinstructionsin
theumbrellamanualassupplied.Itishighlyrecommendedthatyoucloseandtieyour
umbrellawhenstrongwindsareexpected.Ifstrongwindsareexpectedforalongperiod
of time it is recommended that the umbrella be removed from its base and stored. When
closingtheumbrellaforextendedperiodsoftime,thecanopymustbefoldedinsucha
wayastoavoid“pinching”ofthefabricintheumbrellaribs/arms.Wearandtearcausedby
“pinching” of the fabric by the umbrella framework is not covered under this warranty.
7. Iftheumbrellaistobetransported,itmustbedismantledandadequatelypackaged
(preferablywithcanopyandframewrappedseparately)toavoiddamageduringtransit.If
damage is incurred as a result of insecure packing, this is outside our warranty provision.
WARRANTY

19
8. Inthecaseofrepairstotheumbrellabeingrequired(regardlessofwhethertherepairsare
coveredunderwarranty)thecostoftransportationto/fromInstantShadeUmbrellasPtyLtd
for any repairs is to be paid by the claimant.
9. ThiswarrantyistheonlyexpresswarrantygivenbyInstantShadeUmbrellasPtyLtd.No
person has the authority to change or add to these obligations and liabilities without
InstantShadeUmbrellasPtyLtdapprovalinwriting.
10.InstantShadeUmbrellasPtyLtdreservestherighttodeterminewhetherornotfault
is caused by faulty workmanship or material or that any part is defective. Where fault
is determined, we reserve the right to repair or replace products at our discretion 11.
InstantShadeUmbrellasPtyLtdoritsauthorisedagentmayoeradvice,butacceptsno
responsibility as to the ultimate positioning of the umbrella.
Our premium Olen fabrics are guaranteed to:
· Protectagainstrot,mildewanddiscolorationtypicalinnormalconditions.Itdoesnotapply
against any deterioration of any kind due to wind or weather related damage, misuse,
burns, negligence, vandalism, perforations or stains due to environmental pollution, and
fair wear and tear.
· Retain a light-fastness rating of 6-8 on a 1-8 scale (minimum fading) for a period of 3 years.
Ourpremiumolenfabricsareverytightlywoven,withminimallighttransmission,resultingin
excellentUVprotectionofUPF50+andSPF100.Shouldthefabricfail,themanufacturerofthe
olenfabricwilloertoreplacethefabricfreeofcharge,subjecttothefollowing:
1. Proof of date of purchase is provided by the customer.
2. The fabric is maintained correctly.
3. Thisfabricguaranteeextendsspecicallytothereplacementoffabriconlyandexcludes
theworkandinstallationofothersandalsoexcludesotherttingsandhardware.Other
costs such as re-making a canopy, dismantling, transport, re-erection, travelling costs and
consequentiallossarealsoexcludedfromthisguarantee.
CARE & CLEANING
· Propercareandcleaningshouldbetakentoensurethelifeofoutdoorfabrics.Forregular
careandmaintenance,excessivedirtshouldbebrushedfromthefabricusingasoftbrush;
thefabricshouldthenbesprayedwithwarmwater(notexceeding100°F/40°C)and
airdried. Periodically the fabric should undergo a more thorough cleaning. Again brush
fabric with a soft bristled brush, spray with warm water then apply a gentle natural soap,
rinse thoroughly and air-dry.
· Fabricshouldneverbestoredwhilewet,alwaysensurefabricisthoroughlydriedbefore
storingforextendedperiods.
· Any early signs of mould and mildew must be removed immediately.

20
CANTILEVER UMBRELLA
Instant Shade Pty Ltd
51CapellaCrescent,MorrabbinVIC3189
Ph(03)95559535Freecall1800083300
Email info@instantshade.com.au
www.instantshadeumbrellas.com.au
EXCLUSIVELY IMPORTED &
DISTRIBUTED BY:
Other manuals for Aurora
1
Table of contents
Other Instant Shade Umbrella Patio Furniture manuals


Popular Patio Furniture manuals by other brands

Umbrosa
Umbrosa PARAFLEX CLASSIC manual

Schneider Schirme
Schneider Schirme Rhodos Assembly and operating instructions

All Things Cedar
All Things Cedar 10' Teak Market Umbrella Assembly instructions

MDT-tex
MDT-tex SAH user guide

Essential Garden
Essential Garden USD-047S owner's manual

Forever Redwood
Forever Redwood WOOD PATIO BENCH Assembly instructions


Thomasville
Thomasville Messina 523117 Assembly instructions

Stone
Stone garden lifestyle 441554 quick start guide

shelta
shelta AD45 quick start guide

Axley
Axley 014270 operating instructions

Patioflare
Patioflare Costa Rica Assembly instructions

kingsley-bate
kingsley-bate Nantucket NT70 Assembly instructions