INTEGRA Biosciences VIAFLO 96 User manual

125955_V02_QSG_VIAFLO_96_384_EN.docx 1/4
Quick Start Guide VIAFLO 96/384 −24/96/384 Channel Pipette
This quick start guide is intended to provide a quick overview of your
VIAFLO 96/384’s key features and to offer basic inst
ructions for getting started. For
detailed information, please refer to the operating instructions (OI)
that can be found
at www.integra-biosciences.com in different languages.
Intended use
This is a general-purpose laboratory instrument. Any use of this instrument in a medical or IVD
setting is the sole responsibility of the user. VIAFLO 96 and VIAFLO 384 are electronic hand held
pipettes that can be used with 24-, 96- and 384-channel (VIAFLO 384 only) pipetting heads for
aspirating and dispensing aqueous solutions in the volume range of 0.5 μl to 1250 μl using GripTip™
pipette tips only, see www.integra-biosciences.com.
Safety information
Regardless of the listed safety notes, all locally applicable regulations must be observed.
1) The pipette may only be used by properly trained personnel in a manner specified by INTEGRA
Biosciences.
2) Do not use the instrument near flammable material or in an atmosphere with danger of
explosion.
3) Do not immerse the pipetting head in liquid. Avoid pipetting of liquids emitting corrosive vapors.
4) Servicing work and repairs may only be performed by INTEGRA Biosciences or an authorized
after-sales service member.
Getting started
Set up the instrument on a perfectly horizontal surface according to the IQ/OQ document
(PN 125953). Supply voltage: 100 zH06 – 05,CAV042 – .
Insert a 3 core power cable in the socket on the rear side and connect it to the electricity mains.
a. Carrying handle of base unit
b. Pipetting unit, to move up and down (Z-axis)
c. Knob of Side cover, covers pipetting head
d. Base unit, to move left and right (X-axis)
e. Main switch and power socket
f. Plate slider
g. Plate holders on position A and B
h. Instrument deck
i. Control unit
j. Tip load button
Switch on/off:
Press the main switch (e).
VIAFLO 96/384 control unit
k. Display
l. Touch wheel, spin to scroll the cursor
m. OK button, to make a selection
n. Run key, to start operations
o. Tip ejector
p. Purge button, to empty tips
q. Arrow buttons, for selections
r. Back button, to navigate backward
b
d
A
h
e
g
j
a
c
i
f
B
k
l
m
o
q
r
p
n

2/4 125955_V02_QSG_VIAFLO_96_384_EN.docx
Change Head
To install a pipetting head, select the Toolbox option “Change Head”. Remove pipetting head from
case and pull Piston plate (1) up.
•Loosen the knob (c) and remove the Side cover.
•Remove the existing head, if installed.
•Push the appropriate pipetting head into the slide block and make sure the
Piston plate (1) slides onto the brazen rails.
•Mount the Side cover, screw the knob tightly and press OK to continue.
Check whether the Pipet factor on the display corresponds to the Pipet factor indicated in the latest
calibration certificate. Press OK if the factor coincides. If it doesn’t, click Edit.
Loading GripTips
•Put a tip box on the Plate holder.
•Hold the Control unit and lower the pipetting head down onto the tip box
until the Tip load button flashes.
•When prompted, push the Tip load button and at the same time push down
the Control unit. The Tip load button lights after loading.
•Move the Pipetting unit up until the light of the Tip load button turns off.
If less than the full tip rack needs to be loaded, first press OK before pressing
the Tip load button to switch to the low power loading mode. Enter the number
of columns to be loaded.
Selecting a pipetting mode
With your electronic pipette, you have the choice of building protocols by selecting from a menu of
predefined programming modes, or you can create custom multi-stepped protocols. A description of
the most commonly used Pipetting Modes:
Pipetting mode
Description
Pipet
Liquid transfers when aspirate and dispense volumes are equal.
Repeat Dispense
Dispense multiple aliquots of the same volume.
Sample Dilute
Aspirate two liquids divided by an air gap, followed by dispense.
Pipet/Mix
Multiple mixing by aspiration and dispensing of defined volume.
Manual Pipet
Control the aspiration and dispensing up to the set volume.
Reverse Pipet
Liquid transfers of viscous or high vapor pressure liquids.
Variable Dispense
Dispense multiple aliquots of different volumes.
Multi Aspirate
Aspirate multiple aliquots of different volumes.
Sample Dilute/Mix
Aspirate two liquids divided by an air gap, followed by dispense and mix.
Serial Dilution
Aspirate a transfer volume followed by dispense and mix sequences.
Custom
Allows to create and store up to 40 multi-stepped pipetting protocols.
From the Main Menu, use the Touch Wheel to scroll to your desired function-
based programming mode. Press OK to enter the mode and to start defining
parameters.
1
125955_V02_QSG_VIAFLO_96_384_EN.docx 3/4
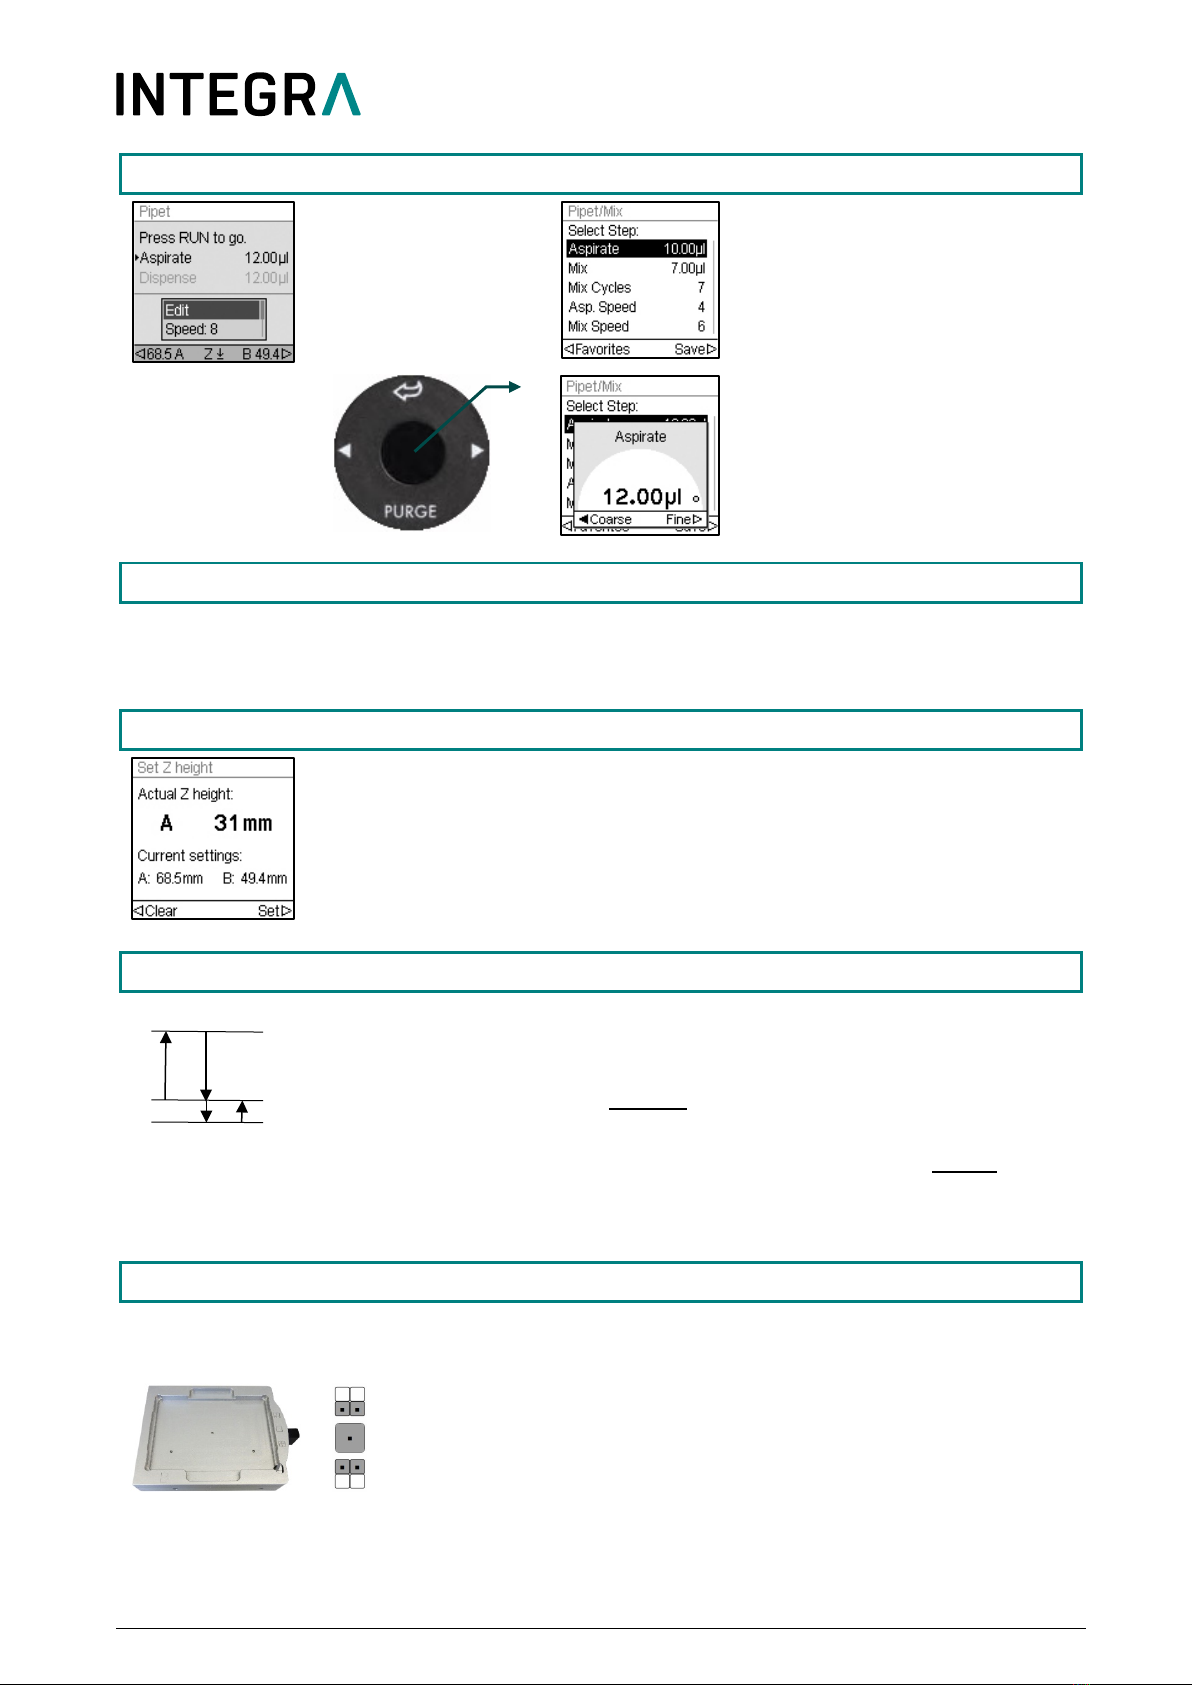
Setting/changing parameters
Scroll to Edit and
press OK.
A list of editable steps is
displayed.
Select a step and press OK.
Use the Touch Wheel to set the
value and press OK.
Press to save your settings.
Running a program
Insert the GripTips into the liquid to be transferred. Press and release the Run key to aspirate the
volume selected in the first step (marked with a triangle on the Run screen).
Your pipette will prompt you to press the Run key at each successive step.
Set Z-Position
•To define the optimal tip immersion depth, press
or
to access the Z-
position screen.
•Move the pipetting unit to the target position (A or B) until the actual Z-
height is displayed.
•Finally, move the unit down to the desired dispensing height and select Set
to save your setting.
Two Step Blowout
During aspiration, the piston of your electronic pipette moves up (1).
During dispensing, the piston returns to the initial position (0). During the last
dispense of a program, it automatically moves further down (2) and blows the
remaining liquid from the tip (Blowout).
When the piston returns to the initial position (0), a small amount of air is
aspirated, provided the tip is no longer immersed in the liquid (Blowin).
Note: Manually delay the blowin by holding the Run Key pressed during the last dispense. Remove
the tips from the vessel and release the Run Key to start blowin.
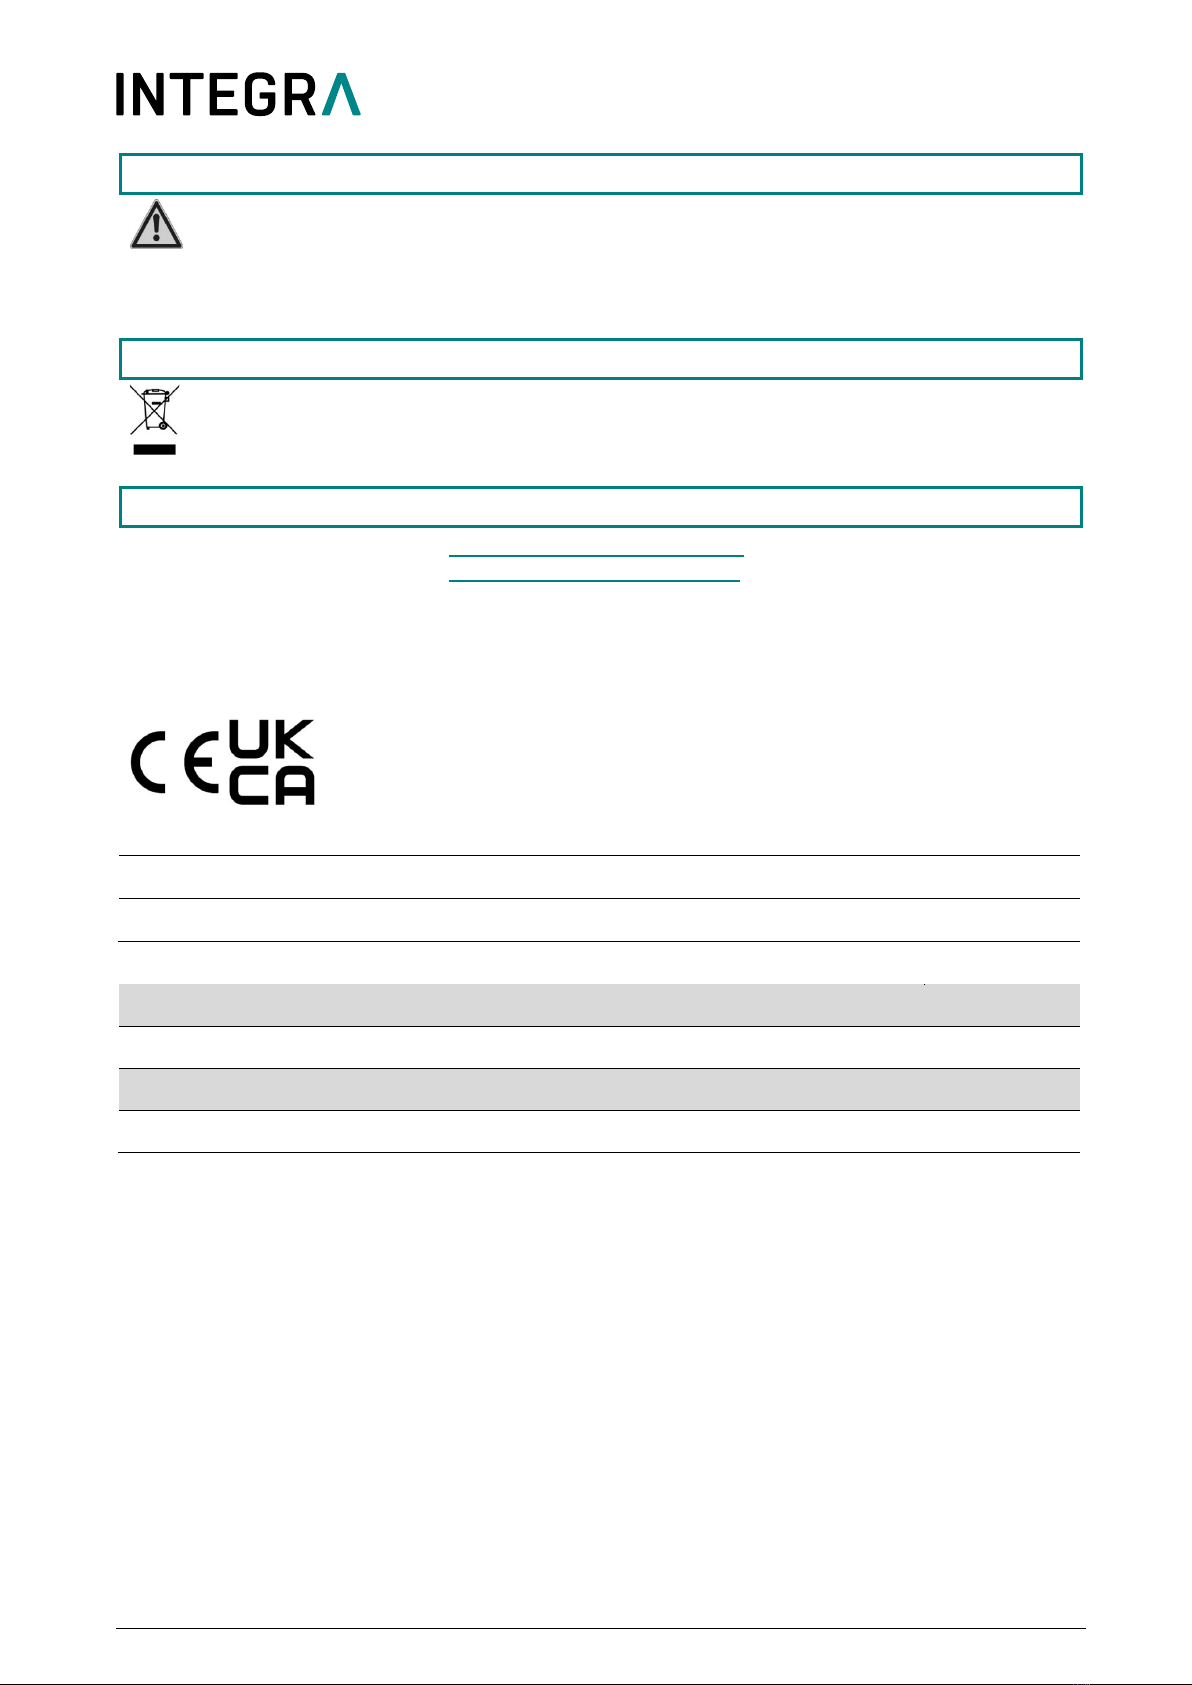
Using the Plate slider, e.g. for reformatting
To access a plate that has 4x more wells than the head channels, the plate must be shifted beneath
the pipetting head. To accommodate the front or rear positions, set the plate slider. To accommodate
the left and then the right positions, move the pipetting head one well to the right.
•Plate slider at the back: pipette into the front wells.
•Plate slider in the middle: pipette into plates that have as many
wells as the head has channels.
•
Plate slider at the front: pipette into the rear wells.
2
0
1
4/4 125955_V02_QSG_VIAFLO_96_384_EN.docx
Maintenance
Always switch off the device and disconnect from the electricity supply when carrying out
maintenance work.
Clean the VIAFLO 96/384 housing a lint-free cloth lightly soaked with mild soap solution in distilled
water or with a 70 % solution of isopropanol or ethanol.
Equipment disposal
VIAFLO 96/384 must not be disposed of with unsorted municipal waste.
Dispose of VIAFLO 96/384 in accordance with the regulations in your area governing
disposal of devices.
Manufacturer
INTEGRA Biosciences AG
CH-7205 Zizers, Switzerland
T +41 81 286 95 30
F +41 81 286 95 33
info@integra-biosciences.com
www.integra-biosciences.com
INTEGRA Biosciences Corp.
Hudson, NH 03051, USA
T +1 603 578 5800
F +1 603 577 5529
Declaration of conformity
INTEGRA Biosciences AG – 7205 Zizers, Switzerland
declares on its own responsibility that the devices
Description
Models
VIAFLO 96
6000, 6001
VIAFLO 384
6030, 6031
comply with:
EU Directives and Regulations
2014/35/EU, 2014/30/EU, 2012/19/EC, 2011/65/EC, 1907/2006
GBR Regulations
S.I. 2016/1101, S.I. 2016/1091, S.I. 2013/3113, S.I. 2012/3032
For detailed, signed CE declaration and regulations of other countries, please refer to the operating
instructions supplied with the device.
This manual suits for next models
5
Table of contents
Other INTEGRA Biosciences Laboratory Equipment manuals


Popular Laboratory Equipment manuals by other brands


Belden
Belden HIRSCHMANN RPI-P1-4PoE installation manual

Koehler
Koehler K1223 Series Operation and instruction manual

Globe Scientific
Globe Scientific GCM-12 quick start guide

Getinge
Getinge 86 SERIES Technical manual

CORNING
CORNING Everon 6000 user manual

Biocomp
Biocomp GRADIENT MASTER 108 operating manual


