INTERSON Simpli Series User manual

Instructions For Use
Simpli Series
Ultrasound Imaging System
Equipment Manufacturer M
EC Representative P
Interson Corporation
7150 Koll Center Parkway
Pleasanton, CA 94566 USA
Phone: 925.462.4948
Fax: 925.462.4833
Email: support@interson.com
Website: www.interson.com
MedNet GmbH
Borkstraße 10
48163 Münster
Germany
Phone: +49 251 32266-61
Fax: +49 251 32266-22
2797
Information in this document is subject to change without notice.
These Instructions For Use are applicable to the following SimpliTM Series probes:
GP-C01
SP-L01
© Copyright Interson Corporation. All rights reserved. No part of this manual or software may be
reproduced in any form or by any means, electronic or mechanical, including but not limited to
photocopying, recording, or by any information storage and retrieval systems, without the express
written consent of Interson Corporation.
Windows is a trademark of Microsoft Corporation
Interson, SimpliVue and Simpli Series are trademarks of Interson Corporation

Simpli Series System Instructions for Use 2 01-5034-00 R1
Contents
Overview.......................................................................................................................................................5
Introduction ..............................................................................................................................................5
Warnings and Safety Information.............................................................................................................5
Meaning of Signal Words and Symbols.................................................................................................5
General Cautions and Warnings ...........................................................................................................5
Symbology.................................................................................................................................................7
Ultrasound Probes ........................................................................................................................................8
Device Description ....................................................................................................................................8
Indications for Use....................................................................................................................................8
Contraindications......................................................................................................................................8
Acoustic Energy and Surface Temperatures.............................................................................................8
Electromagnetic Compatibility (EMC).......................................................................................................9
Care and Handling of Probes ....................................................................................................................9
DO NOT OPEN ANY PROBE....................................................................................................................9
DO NOT DISCONNECT OR REMOVE USB CABLE FROM THE PROBE......................................................9
Maintenance.............................................................................................................................................9
Cleaning and Disinfection .......................................................................................................................10
Probe Cleaning....................................................................................................................................10
Probe Disinfecting...............................................................................................................................10
Training ...................................................................................................................................................11
Storage....................................................................................................................................................11
Transportation ........................................................................................................................................12
Disposal...................................................................................................................................................12
Troubleshooting......................................................................................................................................12
Customer Service ....................................................................................................................................13
Prepare to call customer service:........................................................................................................13
Taking the probe to a service partner:................................................................................................13
Probe Preparation...................................................................................................................................13
General Use.............................................................................................................................................13
Invasive or Surgical Use ..........................................................................................................................13
Installing Sheaths ................................................................................................................................13
Getting Started............................................................................................................................................15

Simpli Series System Instructions for Use 3 01-5034-00 R1
Minimum System Requirements ............................................................................................................15
System Components ...............................................................................................................................15
Installing SimpliVue.................................................................................................................................15
Imaging Display.......................................................................................................................................16
Using SimpliVue ..........................................................................................................................................17
Starting a New Exam...............................................................................................................................17
Changing Presets.....................................................................................................................................17
Editing Patient Information ....................................................................................................................17
Optimizing the Image..............................................................................................................................18
Imaging Modes........................................................................................................................................20
Using B-Mode......................................................................................................................................20
Using CFM Mode.................................................................................................................................20
Saving Images..........................................................................................................................................20
Saving Cines ............................................................................................................................................20
Imaging Tools..........................................................................................................................................20
Annotation ..........................................................................................................................................21
Adding pointers...................................................................................................................................21
Measurements and Calculations.........................................................................................................21
Statement of Accuracy............................................................................................................................23
General Settings..........................................................................................................................................24
Configuring Export Destination...............................................................................................................24
Editing Clinician and Facility Information ...............................................................................................24
Changing Left-Right Orientation of Image..............................................................................................24
Inverting Image.......................................................................................................................................24
Displaying a Centerline ...........................................................................................................................24
Grid..........................................................................................................................................................24
Configuring Cine Duration.......................................................................................................................24
Configuring Cine Compression Setting ...................................................................................................24
Review.........................................................................................................................................................25
Reviewing Images ...................................................................................................................................25
Reviewing Cines ......................................................................................................................................25
Generating Reports.................................................................................................................................25
Deleting Images, Cines, and Reports ......................................................................................................26

Simpli Series System Instructions for Use 4 01-5034-00 R1
Exporting Images, Cines, and Reports ....................................................................................................26
Remote Viewing with VSee.........................................................................................................................27
Creating a VSee Messenger Account......................................................................................................27
Configuring VSee Messenger for Remote Viewing of Ultrasound Imaging............................................27
Add Contacts in VSee Messenger ...........................................................................................................28
Initiating a Call Session............................................................................................................................28
Appendix A –SimpliVue Software Installation ...........................................................................................29
Software Installation:..............................................................................................................................29
Appendix B –Interson Probe System Specifications ..................................................................................30
Appendix C –Computer System Specifications ..........................................................................................31
Appendix D –Interson Probes and Their Applications ...............................................................................32
Transducer Model GP-C01......................................................................................................................32
Transducer Model SP-L01 .......................................................................................................................32
Appendix E –Summary of the Acoustic Quantities ....................................................................................33
Appendix F –Achieving ALARA ...................................................................................................................37
ALARA Guidelines....................................................................................................................................37
Applying the ALARA Principle .................................................................................................................37
Display of Indices ....................................................................................................................................38
Thermal Index Display.............................................................................................................................38
Adjusting Image Controls to Minimize the Indices.................................................................................38
ALARA Resources ....................................................................................................................................38
Appendix G –Interson Ultrasound Probes –Indications for Use ...............................................................39
Appendix H –EMC Information ..................................................................................................................41
Appendix I –Maximum Probe Temperature ..............................................................................................43
Appendix J –Patient Privacy and Confidentiality .......................................................................................44
Appendix K –Calculations...........................................................................................................................45
Available Calculations: ............................................................................................................................45
Appendix L –Interson Customer Warranty ................................................................................................46
Appendix L –Warranty and Extended Warranty Registration ...................................................................47

Simpli Series System Instructions for Use 5 01-5034-00 R1
Overview
Introduction
Congratulations on your purchase of the Interson Simpli SeriesTM Ultrasound Probe System. Please
review this user manual before you begin imaging. Contact Interson or your sales representative if you
have any question.
Note: The sale of this item is subjected to regulation by the U.S. Food and Drug Administration (FDA)
and state and local regulatory agencies.
YCAUTION
U.S. federal law restricts this device to sale by or on the order of a physician.
Warnings and Safety Information
Meaning of Signal Words and Symbols
In this user manual, the signal words such as WARNING and CAUTION are used regarding safety and
important instructions. All users of the Interson Ultrasound Probe System must understand the meaning
of these signal words. These signal words and symbols and their meaning are as follows.
Signal Word
Meaning
YWARNING
Indicates a potentially hazardous situation which, if not avoided, could cause
injury or harm to the operator or patient.
YCAUTION
Indicates a potentially hazardous situation which, if not avoided, may result in
minor injury or harm to the equipment.
Type BF Equipment (B = body, F = floating applied part).
Follow operating instructions
Y
ATTENTION, refer to user manual
General Cautions and Warnings
YCAUTION
Probes must be cleaned after each use. Cleaning the probe is an essential step prior to effective
disinfection. Follow the manufacturer’s instructions when using disinfectants.
YWARNING
Do not allow sharp objects, such as scalpels or cauterizing knives, to touch probes or cable.

Simpli Series System Instructions for Use 6 01-5034-00 R1
YWARNING
Interson probes will not exhibit excessive surface temperatures under normal use. Disconnect the
equipment if unsafe temperatures are observed. Refer to Appendix I for temperature safety information.
YWARNING
If the probe is used with other devices, current leakage may increase, and electric shock may be caused.
It is the user’s responsibility to ensure safety in such cases.
YWARNING
Do not insert the probe connector into any USB ports other than those on your computer or tablet.
YWARNING
The use of AC adapters which have not been tested for electrical safety could potentially cause harm to
the system, the probe, the operator and/or the patient. Interson recommends that you use only the AC
adaptor supplied by the manufacturer of your computer or tablet. Such adaptors should display
certification of electrical safety testing. If you are using a battery-operated system, you can disconnect
the AC adapter to obviate this warning.
YWARNING
Do not touch the USB probe System’s USB cable connector and the patient simultaneously.
YWARNING
USB Probe System is not to be used with HF (high frequency) surgical equipment.
YWARNING
The use of non-ISO 10993-compliant Ultrasound Transmission Gel could potentially cause harm to the
probe, operator and/or the patient.
YWARNING
Do not submerse the USB probe in water.
YWARNING
No modification of this equipment is allowed. Attempting to modify or service the equipment may result
in safety hazards and performance degradation and/or failure.
YWARNING
Health care providers who maintain or transmit health information are required by the Health Insurance
Portability and Accountability Act (HIPAA) of 1996 and the European Union Data Protection Directive
(95/46/EC) to implement appropriate procedures: to ensure the integrity and confidentiality of

Simpli Series System Instructions for Use 7 01-5034-00 R1
information; to protect against any reasonably anticipated threats or hazards to the security or integrity
of the information or unauthorized uses or disclosures of the information.
Symbology
The following symbols may be used on Interson labeling:
Symbol for “Serial Number”
REF
Symbol for “Part Number”
Symbol indicating the “date of manufacture”
Indicates conformance with European Council Directive 93/42/EEC
M
Equipment manufacturer
P
EC representative
TUV Rheinland of North America, Inc, cTUVus Certification

Simpli Series System Instructions for Use 8 01-5034-00 R1
Ultrasound Probes
Device Description
The Interson USB Ultrasound Probe System is a self-contained, portable, multiple-mode, and multiple-
application diagnostic ultrasound system. The system contains an ultrasound generator/receiver, analog
to digital converter, microcontroller, control logic, USB 2.0 interface and control offering a full
complement of conventional operating modes, software-based parameter controls, and recording. The
selection of probes offered with the system permits a wide range of clinical applications including fetal
heart, abdomen, OB/GYN, vascular, extremity, pediatric, cardiac, neonatal cephalic, urology, and
ophthalmology. With these general areas of intended use, the various probes adapt the system for the
specific imaging tasks.
Different models of the USB Ultrasound Probe System are available. The initial operational settings for
each USB Ultrasound Probe System are preprogrammed in the system. User-customized parameter
settings for each USB Ultrasound Probe System may be inserted by the operator and stored for recall as
needed via the system control panel. Customization includes transmit power, images controls selection,
and Time Gain Compensation (TGC). Controls are also provided to select display format and to utilize the
Cine function.
The Interson USB Ultrasound Probe System supports B-Mode mode scanning, providing high resolution
and high penetration performance. The probes can be used in applications such as fetal heart,
abdomen, OB/GYN, vascular, extremity, pediatric, neonatal cephalic, cardiac, and urology. The Interson
USB Ultrasound Probe System can measure distances and calculate areas, circumferences and volumes.
A Color Flow Mapping (CFM) mode provides a qualitative indication of fluid flow and direction. The
Interson USB Ultrasound Probe System supports the Cine function (capable of storing up to 32 to 1024
sequential images). Management of patient history is possible by image-storage function.
The expected service life of Interson probes is at least five (5) years.
Refer to Appendix B for more information on Interson Probe System. Refer to Appendix D for more
information on Interson probes.
Indications for Use
Please refer to Appendix G.
The system is intended for use by healthcare professionals.
Contraindications
The Interson Simpli Series GP-C01 and SP-L01 ultrasound probes are not indicated for ophthalmic use or
any application that causes the acoustic beam to pass through the eye.
Acoustic Energy and Surface Temperatures
The effects of acoustic energy on human tissue are currently under investigation. Therefore, it is
recommended that diagnostic ultrasound output power be set to the lowest possible levels in
accordance with the principle of ALARA (As Low As Reasonably Achievable).
See Appendix E of this manual for Acoustic measurements and Appendix F for guidance on how to best
implement ALARA.

Simpli Series System Instructions for Use 9 01-5034-00 R1
Electromagnetic Compatibility (EMC)
The Interson USB powered ultrasound probes have completed and passed EN 60601-1-2 testing.
Like other medical equipment, Interson USB Ultrasound Probes require special precautions to ensure
electromagnetic compatibility with other electrical medical devices. To ensure electromagnetic
compatibility (EMC), Interson USB Ultrasound Probes must be installed and operated according to the
EMC information provided in this manual.
The Interson USB Ultrasound Probes have been designed and tested to comply with IEC 60601-1-2
requirements for EMC with other devices.
See Appendix H of this manual for EMC test details.
YCAUTION
Portable and mobile RF communications equipment may affect the normal function of the Interson USB
Ultrasound Probes.
YCAUTION
Do not use cables or accessories other than those provided with the Interson USB Ultrasound Probe, as
this may result in increased electromagnetic emissions or decrease immunity to such emissions.
Care and Handling of Probes
Although Interson probes are very durable, reasonable care must be taken to avoid damaging them.
Handle the membrane on the tip of the probe and the cable attachment at the other end of the probe
with care. Keep the probe membrane away from sharp objects to avoid damage. Store the probe in its
padded case. This will protect the probe and the delicate scanning membrane. Do not put stress on, or
use the cable to carry the probe, as this may damage the probe and cable. Your probe should give you
many years of reliable service if these simple precautions are followed.
DO NOT OPEN ANY PROBE
Be careful when handling the USB probe. If the USB probe is dropped on a hard surface it can be
damaged.
DO NOT DISCONNECT OR REMOVE USB CABLE FROM THE PROBE
Be sure to keep the USB probe plug dry at all times.
The probe should be cleaned after every use. Regularly check the probe housing and transducer lens for
cracks. Regularly check the cable for cuts, cracks, and kinks. This could also impair the performance of
the probe.
Maintenance
Periodic testing and maintenance of the Interson USB ultrasound probe is NOT required.
YWARNING
Users of this USB probe(s) have an obligation and responsibility to provide the highest degree of infection

Simpli Series System Instructions for Use 10 01-5034-00 R1
control possible to patients, co-workers and themselves. To avoid cross contamination, follow all
infection control policies established for the office, department, or hospital as they apply to personnel
and equipment.
Cleaning and Disinfection
YWARNING
Always disconnect the ultrasound probe system from the host computer before performing maintenance
or cleaning.
YWARNING
Always follow the manufacturer’s instructions when cleaning and disinfecting probes and biopsy guide
adapters.
YWARNING
Do not use a surgeon’s brush when cleaning probes. Even the use of soft brushes can damage the probe.
Probe Cleaning
The USB Ultrasound Probe System is capable of withstanding, without damage or deterioration of the
safety provisions, the cleaning and/or disinfecting process specified in this manual.
1. Wear protective gloves when performing the cleaning process.
2. Disconnect the probe from the system.
3. Remove any sheaths, biopsy guide adapters, and biopsy needle guides.
4. Discard sheaths (sheaths are a single-use item) in a biohazard container.
5. Use a soft cloth lightly dampened in a mild soap or compatible cleaning solution to remove any
particulate matter or body fluids that remain on the probe or cable.
6. To remove remaining particulates, rinse with water up to probe’s USB cable connection.
7. Wipe with a dry cloth; or wipe with a water-dampened cloth to remove soap residue, and then
wipe with a dry cloth.
Probe Disinfecting
A 106reduction in pathogens should be reached following the disinfecting procedures in this manual and
using the following recommended solutions. The following disinfectants are recommended because of
both biological effectiveness (as qualified though the FDA 510(k) process) and their compatibility with
Interson ultrasound product materials.
Solutions
Country
Type
Active Ingredient
FDA 510(k)
Cidex®
USA
Liquid
Gluteraldehyde
K924434
Cidex Plus®
USA
Liquid
Gluteraldehyde
K923744
Sporicidin®
USA
Liquid
Phenol
K904581
Revital- OxTM
Resert® HLD
USA
Liquid
Hydrogen
Peroxide
K080420
1. Wear protective gloves when performing the disinfecting procedure.

Simpli Series System Instructions for Use 11 01-5034-00 R1
2. Check the expiration date on the solution that is being used.
3. Use only solutions that are within the expiration date.
YWARNING
The level of disinfection required for a device is dictated by the type of tissue it will contact during use. To
avoid infection, ensure the disinfectant type is appropriate for the equipment. For information, see the
disinfectant label instructions and the recommendations of the Association of Professional in Infection
Control and Epidemiology (APIC) and the U.S. Food and Drug Administration (FDA).
YWARNING
Using a non-recommended disinfection solution, incorrect solution strength, or immersing a probe deeper
or for a period longer than recommended by disinfectant manufacturer can damage or discolor the probe
and will void the probe warranty.
For more information on probe warranty please refer to Appendix L.
YWARNING
Disinfect probes using only liquid solutions. Using autoclave, gas (EtO), heat or radiation to sterilize or
other non-Interson-approved methods will permanently damage the probe and void the warranty.
1. Examine the probe for damage such as cracks, splitting, sharp edges or projections. If damage is
evident, abandon disinfection, discontinue use of the probe, and contact a customer service
representative.
2. Mix the disinfecting solution that is compatible with the probe according to label instructions for
solution strength. A disinfectant qualified by the FDA 510(k) process is recommended.
3. Immerse the probe up to the cable in the disinfecting solution for the recommended length of
time per the manufacturer. Do not immerse any part of the probe’s cable or cable connector.
4. Using the instructions on the disinfectant or sterilization label, rinse the probe up to the strain
relief, and then air dry or towel dry with a clean cloth.
Training
This USB probe system is intended to be used by trained medical professionals only.
The specific probe functions are described in this manual and are also available through the SimpliVue
system software Help Menu.
Storage
When the probe is not being used, it should be stored in a clean, dry area.
YCAUTION
Disinfect the probe before use to avoid it becoming a source of infection.
To prevent damage to the probe, do not store in areas where it might be exposed to:
•Excessive vibration
•Excessive dust and dirt

Simpli Series System Instructions for Use 12 01-5034-00 R1
Store the probe under the following ambient conditions:
•Temperature: -10°C to 50°C (14°F to 122°F)
•Relative humidity: 20% to 80% (no condensation)
•Atmospheric pressure: 700 hPa to 1060 hPa
Transportation
•Never carry the probe by the cable. The cable could disconnect from the probe allowing it to
drop and possibly damaging the probe.
•Never bend the USB cable in a tight radius. This could result in damage to the cable.
•Transport the probe under the following ambient conditions:
oTemperature: -10°C to 50°C (14°F to 122°F)
oRelative humidity: 20% to 80% (no condensation)
oAtmospheric pressure: 700 hPa to 1060 hPa
•When transporting the probe to a different field location, use the carrying case or enclosure that
the probe was originally packaged in.
•Call Interson for a Return Material Authorization (RMA) number before returning a probe for
evaluation and possible repair.
•When returning for repair, return probe in original package. If the original package is not
available, contact Interson for the best packaging method prior to sending a probe in for
evaluation and possible repair.
Disposal
1. Contact Interson Corporation before disposing of the probe(s).
2. Concerning the WEEE label:
The following information is for EU member states:
The use of this symbol indicates that this product should not be treated as household waste. By
ensuring that this product is disposed of correctly, you will help prevent potential negative
consequences for the environment and human health, which could otherwise be caused by
inappropriate waste-handling of this product. For more information concerning the return and
recycling of this product, please consult Interson Corporation.
Troubleshooting
If a problem is experienced with the USB probe, try the suggestions as listed below:
No image:
1. Disconnect the probe, exit the program and turn off the computer.
2. Turn on the computer, reconnect the probe and restart the program.
Image not clear:
1. Adjust the image controls in the system controls area of the imaging display by changing gain
and/or contrast.
Error messages:
1. Repeast all steps listed in “No image.”

Simpli Series System Instructions for Use 13 01-5034-00 R1
Customer Service
If you are not able to find the solution by using this manual, contact Interson customer service or local
Interson distributor.
Prepare to call customer service:
To receive the fastest possible resolution of a problem, have the following information available when
calling (925) 462-4948 or emailing support@interson.com:
•Serial number, product name and model.
•Purchase date on the invoice.
•Conditions under which the problem occurred.
•Error messages that have been displayed.
•Operating system version number.
Taking the probe to a service partner:
If advised to take the USB probe to your service partner, be sure to provide the service partner with the
information listed in “Prepare to call customer service.”
Probe Preparation
YWARNING
Some transducer sheaths contain natural rubber and talc, which can cause allergic reactions in some
individuals. For more information, see the FDA’s March 29, 1991, Medical Alert on latex products.
Acoustic coupling gel must be used during exams.
General Use
Apply a liberal amount of gel between the transducer and the body.
Invasive or Surgical Use
YWARNING
To prevent contamination, the use of sterile transducer sheaths and sterile coupling gel is recommended
for clinical applications of an invasive or surgical nature. Do not apply the transducer sheath and gel until
you are ready to perform the procedure.
Installing Sheaths
Interson recommends the use of market-cleared, transducer sheaths for intracavity or surgical
applications. To lessen the risk of contamination, install the sheath only when you are ready to perform
the procedure.
1. Place gel inside the sheath.
2. Insert the transducer into the sheath.
3. Pull the sheath over the transducer and cable until the sheath is fully extended.
4. Secure the sheath using the bands supplied with the sheath.

Simpli Series System Instructions for Use 14 01-5034-00 R1
5. Check for and eliminate bubbles between the face of the transducer and the sheath. If any
bubbles are present between the face of the transducer and the sheath, the ultrasound image
may be affected.
6. Inspect the sheath to ensure there are no holes or tears.

Simpli Series System Instructions for Use 15 01-5034-00 R1
Getting Started
Minimum System Requirements
Interson cannot guarantee that SimpliVue will work on your device without issue, but your device must
meet or exceed the following specifications:
•Operating System: Windows 7 & 10
•Processor: 2.5 GHz
•Memory: 4 GB
•Storage: 75 MB
•USB 2.0 port
System Components
The system consists of the following:
•A commercial off-the-shelf (COTS) Windows tablet, laptop, or PC
•SimpliVue running as a software on the COTS device
•The SP-L01 linear array probe and/or the GP-C01 curved array probe
•USB cable
Installing SimpliVue
Please refer to Appendix A.

Simpli Series System Instructions for Use 16 01-5034-00 R1
Imaging Display
The imaging display contains an ultrasound image, exam and image information, depth and frequency
indicators, and system controls.
Imaging Display
1
Navigation menu (new exam, enter patient information, review exam, settings, help)
2
Image area
3
Image information
4
Probe selection
5
System controls area
6
Depth selection
7
Frequency selection
8
Imaging controls area (CFM, save image, save cine, measurement & annotation)
1
3
4
5
6
7
8
2
Simpli Series System Instructions for Use 17 01-5034-00 R1
Using SimpliVue
This section describes the common procedures that may be used in performing patient exams with the
system.
Note: The software is intended to be used in landscape orientation only.
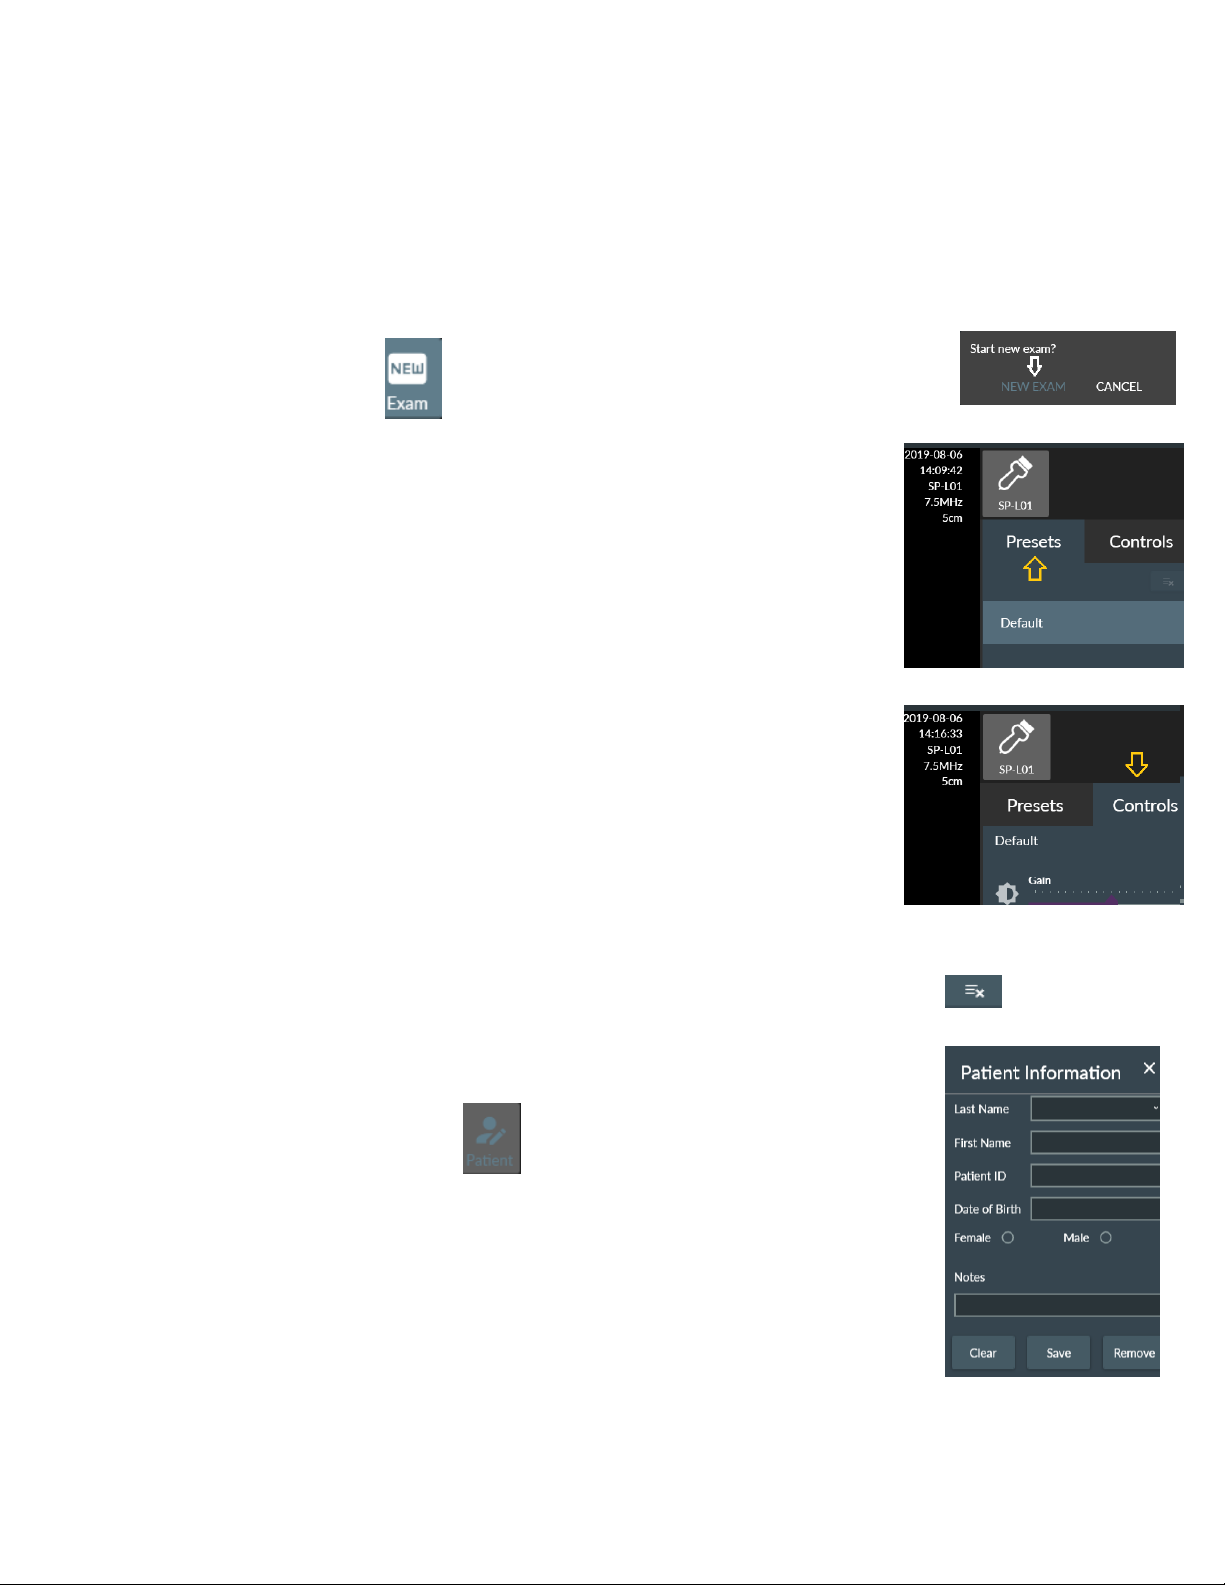
Starting a New Exam
1. Touch New Exam . On the New Exam dialogue box, touch New Exam.
Changing Presets
1. Touch Presets in the system controls area.
2. Touch a preset.
3. To edit a preset, select the preset you want to
edit and touch Controls. Adjust the controls as
desired and save the changes.
Refer to Optimizing the Image.
Note: You can adjust the controls for the
“Default” preset, but you cannot save the changes.
4. To delete a preset, select the preset you want to delete and touch Delete Preset .
Note: You cannot delete the “Default” preset.
Editing Patient Information
1. Touch Patient Information .
2. The Patient Information Window will appear.
Touch the field you want to edit
and use the keyboard to replace, insert, or delete text. Touch Save.
3. To close the Patient Information window, touch the Xat the top right corner of the open
window.

Simpli Series System Instructions for Use 18 01-5034-00 R1
4. The Last Name, First Name, Patient ID, Date of Birth, and Sex fields must be completed to save a
new patient profile.
5. To select an existing patient profile, expand the drop-down arrow in the Last Name field and
touch a patient name.
6. To delete an existing patient profile, expand the drop-down arrow in the Last Name field and
touch the name of the patient. Touch Remove.
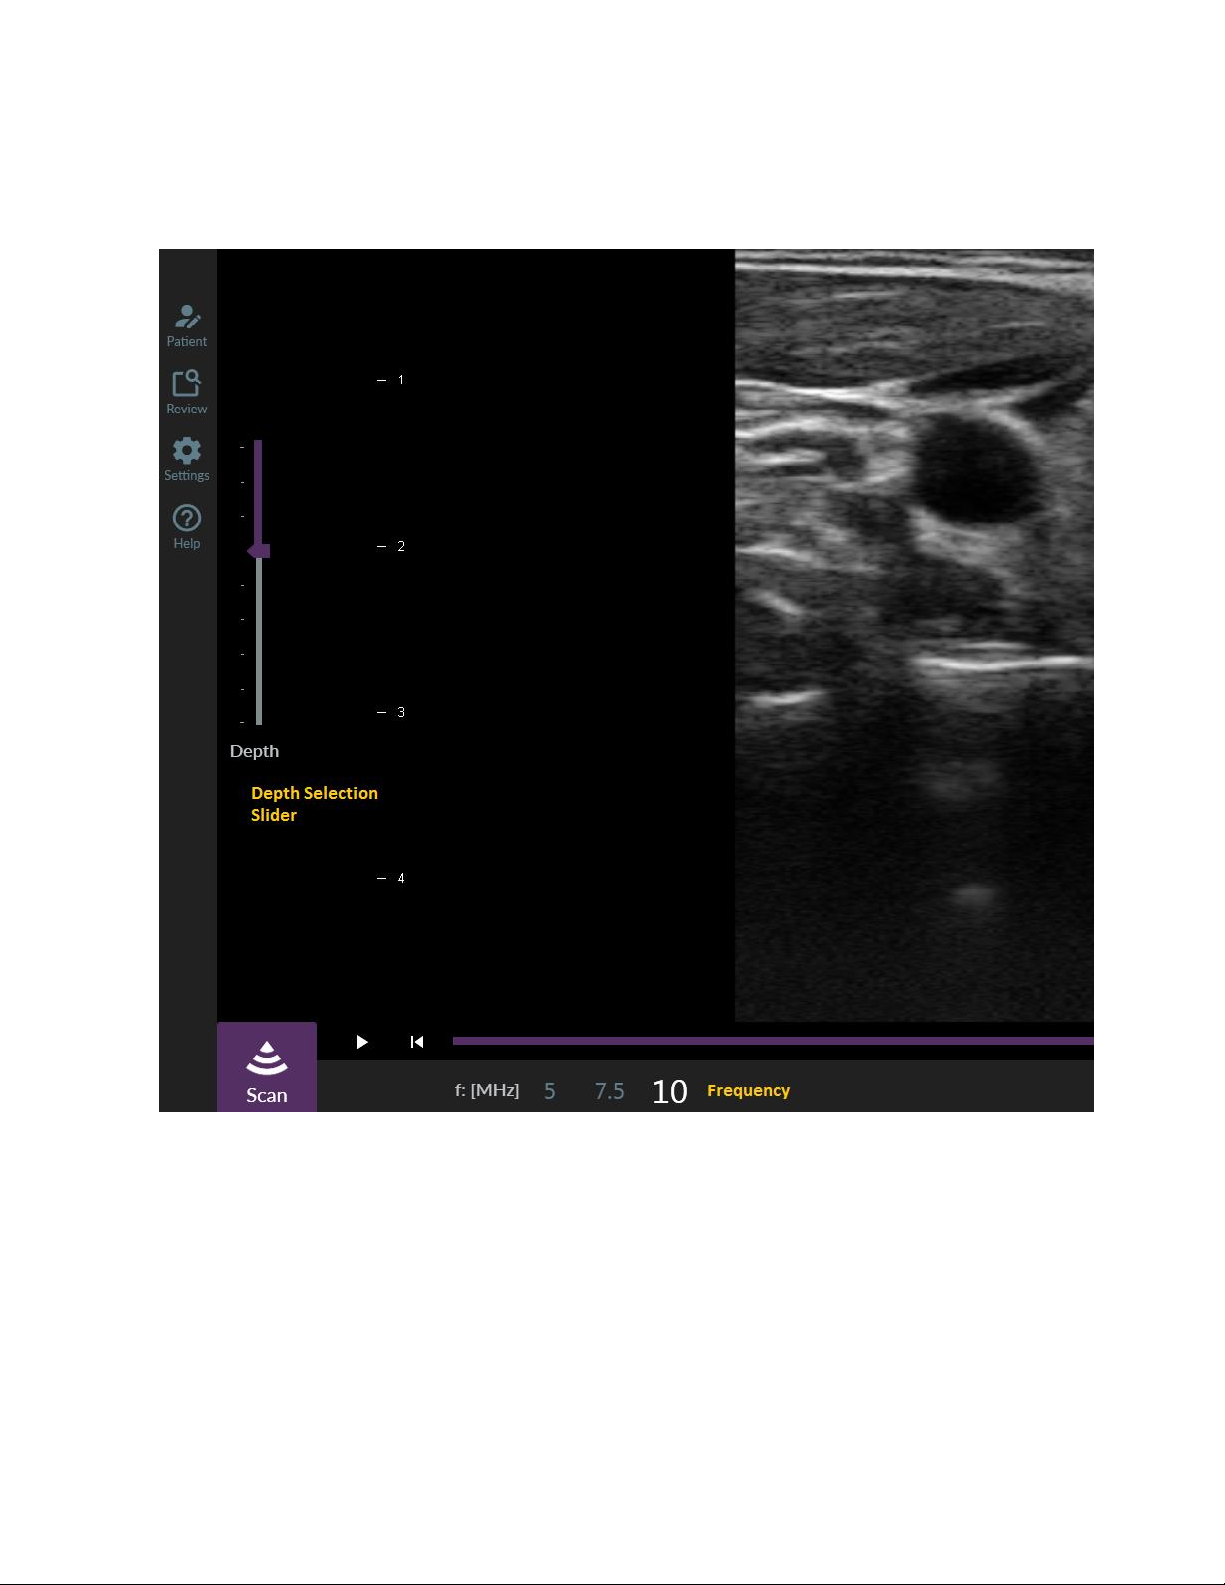
Optimizing the Image
1. Touch Controls tab in the systems control area.
Note: The controls are not all visible at the same time.
Use the scroll bar to scroll up or down to access all the controls.
a. To control the image gain, adjust the Gain slider.
b. To control the image contrast, adjust the Contrast slider.
c. To control the gain to the part of the image closest to the probe,
adjust the Near Gain slider.
d. To control the gain to the middle part of the image, adjust the
Mid Gain slider.
e. To control the gain to the part of the image farthest from the
probe, adjust the Far Gain slider.
f. To control the power output, adjust the Power slider.
g. To control the image gain during CFM mode, adjust the
CFM Gain slider. High gain suppresses color information and a low
setting highlights color information.
h. To turn soft tissue image processing filter on and off, touch
Soft Tissue.
i. To turn edge enhancement image processing filter on and off,
touch Edge Enhanced.
j. To save changes to image control adjustments, touch Save.
Enter a new name in the Save dialogue box if you wish to create
a new preset.
k. To reset any image control adjustments to the last saved settings,
touch Reset.
Simpli Series System Instructions for Use 19 01-5034-00 R1
2. To increase or decrease the image depth, adjust the Depth selection slider.
3. To increase or decrease the probe operating frequency, touch a frequency you want from the
frequency selection.

Simpli Series System Instructions for Use 20 01-5034-00 R1
Imaging Modes
This system supports two imaging modes: B-Mode and Color Flow Mapping (CFM).
Using B-Mode
1. The software initializes in B-Mode.
2. Touch a preset from the preset list displayed in the system controls area. To adjust the image,
touch Controls tab and adjust the image using the controls available. Refer to Optimizing the
Image.
3. Touch Scan or push the button located on the probe. You can now begin B-mode
imaging.
4. Touch Freeze or push the button located on the probe to pause imaging.
Using CFM Mode
1. You must start B-mode imaging before using CFM mode. Touch Scan or push the
button located on the probe. You can now begin B-mode imaging.
2. Touch CFM to start CFM mode. A color box is overlaid on the B-mode image. The
direction and velocity of flow in the color box are represented with different colors for direction
and different shades for velocity. A color key is shown to the right of the image area.
3. Touch CFM again to stop CFM mode.
Saving Images
The software automatically saves an image every time you freeze imaging. The acquired image is saved
in the _Stat Images folder by default and a thumbnail of it is available in the Review window.
To manually save an image, touch Save Image . In the Save As dialogue box, enter a name for
the image file and touch Save. If no patient profile has been selected, the saved image is saved in the
_Stat Images folder by default.
Saving Cines
Touch Save Cine . In the Save As dialogue box, enter a name for the cine file and touch Save.
If no patient profile has been selected, the acquired cine is saved in the _Stat Images folder by default.
Imaging Tools
Touch Additional Tools to display a pop-up menu of annotation, pointer, measurement,
calculation tools on the screen.
This manual suits for next models
2
Table of contents
Other INTERSON Medical Equipment manuals


Popular Medical Equipment manuals by other brands


Terumo
Terumo Azur CX 35 Instructions for use

COOK Medical
COOK Medical G22181 Instructions for use

Olympus
Olympus GIF-H190 specification

Sunrise Medical
Sunrise Medical Guardian 900-0880 Installation instructions manual

Ormed
Ormed Artromot-F operating instructions

Cogentix Medical
Cogentix Medical Urgent PC Instructions for use


