iocharger AH10R-7 User manual

ELECTRIC VEHICLE CHARGER!
"#$%&''&%"(#!)*"+,!
&-./012!3!&-./0144!
.

5(#%,#%$!
SPECIFICATIONS 2.....................................................................................
FEATURES 3......................................................................................................
PRODUCT OVERVIEW 3..................................................................................
SAFETY INSTRUCTIONS 4..............................................................................
INSTALLATION 5..................................................................................................
TOOLS REQUIRED 5........................................................................................................
OVERVIEW OF STEPS 5..................................................................................................
STEP ONE - CHECK BOX CONTENTS 5.........................................................................
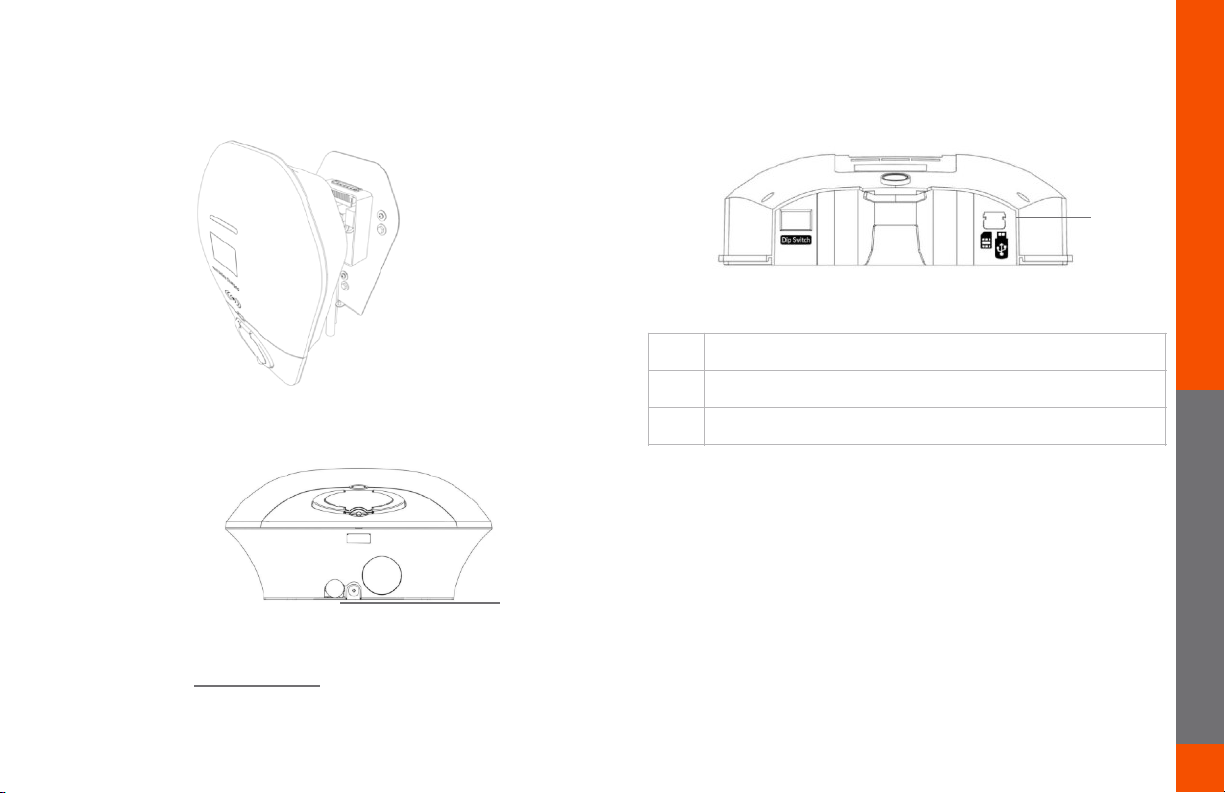
STEP TWO – CONCRETE ANCHORING 6.......................................................................
STEP THREE – POWER CABLE WIRING 7............................................................................
STEP FOUR – INTERNET CONNECTION 7-8..................................................................
STEP FIVE – VERIFY THE INSTALLATION 8...................................................................
STEP SIX - SECURE COVER 8........................................................................................
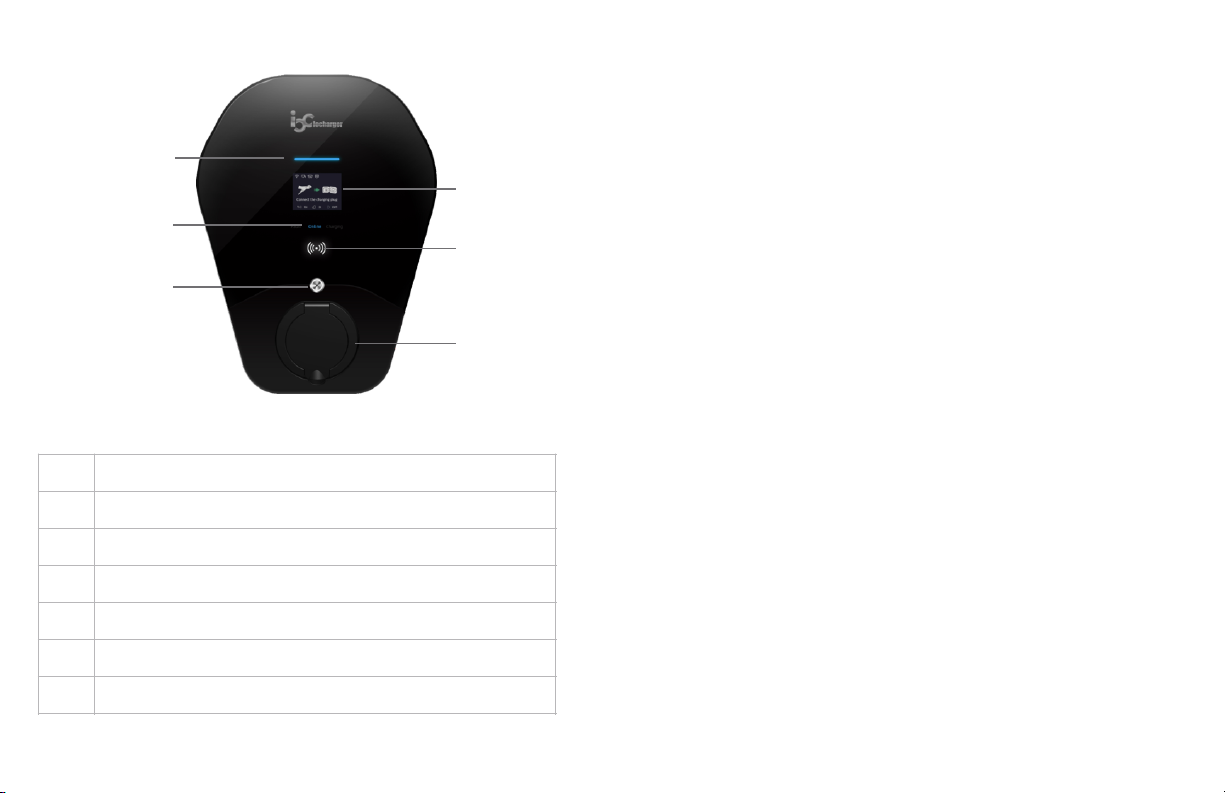
LCD DISPLAY DETAILS 9-11.......................................................................
TROUBLESHOOTING 12............................................................................
MAINTENANCE AND REPAIR 12....................................................................
For information on how to charge your electric vehicle, refer to the documentation
provided with your vehicle.
,',5%0"5!6,-"5',!5-&0),0
"78(0%&#% !
0,&+!%-"$!,#%"0,!+(5*7,#%!9,:(0,!"#$%&''"#)!(0!*$"#)!
%-,!5-&0),0;!:&"'*0,!%(!+(!$(!(0!%(!:(''(<!&#=!(:!%-,!
"#$%0*5%"(#$!&#+!<&0#"#)$!"#!%-"$!+(5*7,#%!5&#!
0,$*'%!"#!:"0,>!,',5%0"5&'!$-(5?>!$,0"(*$!"#@*0=!(0!+,&%-;!
%-,!5-&0),0!7*$%!9,!"#$%&'',+!9=!&!A*&'":",+!
,',5%0"5"&#;!
%-,!,#%"0,!"#$%&''&%"(#!7*$%!5(78'=!<"%-!%-,!'&%,$%!9$!
2B2.!0,)*'&%"(#$;!

4
$8,5":"5&%"(#$!
All specifications and descriptions contained in this document are verified to be accurate at the time of printing. However, because continuous improvement is
a goal at iocharger, we reserve the right to make product modifications at any time.
Model
&-./012
&-./0144
Voltage and Wiring
230V AC single-phase: LIVE, NEUTRAL, and EARTH.
400V AC three-phase: L1, L2, L3, NEUTRAL, and EARTH.
Current and Power
Maximum 32A and 7kW
Maximum 32A and 22kW
Frequency
50-60 Hz
Internal RCD
AC 30mA, DC 6mA
Data Protocol
OCPP 1.6J
Charging Connector
IEC62196 Type-2 socket
Buttons
1 x Physical Button
RFID
ISO 14443 A/B
Display
2.8’’ LCD
Network Connectivity
Ethernet, WLAN, Cellular
Working Temperature
-30°C to 50°C
Storage Temperature
-40°C to 70°C
Working Humidity
5% - 95% without condensation
Dimension (H x W x D)
380 x 288 x 141 mm
IP Rating
IP55
Certifications
EN 61851-1:2020, EN61851-21-2, EN 61000-3
$8,5":"5&%"(#$
,',5%0"5!6,-"5',!5-&0),0

!87,!,&0%-!:&*'%!7(#"%(0"#)!
The charger has been developed to meet and comply with wiring
regulations BS7671:2018 including amendment 1: 2020!
!
If installed on a TN-C-S (PME) system, a dedicated earth rod to the
charge point may not be required, as our hardware meets the
requirements of exception that requires the service voltage between
live and neutral to be monitored and for charging to be stopped and
the car isolated from the supply (including earth) in the event of a fault
condition appearing.
$,':17(#"%(0"#)!&#+!0,5(6,0=!
The charger will automatically resume charging after a minor fault such
as OVP, UVP, OTP or OCP, with no user intervention required.
Resetting of RCD or PME faults can be configured to manual or
automatic.
(588!.;B@!:*''!80(:"',$!3!$7&0%!5-&0)"#)!
$*88(0%!
The charger supports OCPP 1.6J full profiles, including the latest smart
charging to balance the load of charging stations with limited power
supply.!
C
<(0?8'&5,!8,+,$%&'!5-&0),0<(0?8'&5,!8,+,$%&'!5-&0),0<(0?8'&5,!8,+,$%&'!5-&0),0
,',5%0"5!6,-"5',!5-&0),0

80(+*5%!(6,06",<!
#D;
"EFG
1
LED indicator
2
2.8’’ LCD screen
3
Status indicator, Fault, Online, Charging
4
RFID card reader
5
Physical button
6
Type-2 socket for EV Charging
<(0?8'&5,!8,+,$%&'!5-&0),0
1
2
4
3
5
6
:,&%*0,$

H
$&6,!%-,$,!"78(0%&#%!$&:,%=!"#$%0*5%"(#$!
This document contains important instructions and warnings that must be
followed when installing and maintaining the workplace pedestal charger"
<&0#"#)$I!
Do not install or use the charger near flammable, explosive, harsh, or combustible
materials, chemicals, or vapors.
Turn off input power at the circuit breaker before installing or maintaining.
Do not use or stop using the charger if it is defective, appears cracked, frayed,
broken or otherwise damaged, or fails to operate.
Do not attempt to open, disassemble, repair, tamper with, or modify the charger. The
charger is not user serviceable. Contact iocharger or authorized service provider for
any repairs.
Do not touch the charger sockets with sharp metallic objects, such as wire, tools or
needles.
Do not put fingers into the charger sockets.
Do not use this charger if the EV charging cable is frayed, has broken insulation, or
displays any other indication of damage.
Do not use this charger if the enclosure or the EV charging connector is broken,
cracked, open, or show any other indication of damage.
$&:,%=!"#$%0*5%"(#$
,',5%0"5!6,-"5',!!5-&0),0
5&*%"(#$I!
The charger should be installed only by a qualified approved technician.
Make sure that the materials used and the installation procedures follow local
building codes and safety standards.
Incorrect installation and testing of the charger could potentially damage either the
vehicle’s Battery and/or the charger itself. Any resulting damage is excluded from
the warranty for both the vehicle and the charger.
Do not operate the charger in temperatures outside its operating range of -30°C to
+50°C.
Ensure that the EV charging cable is positioned properly to the charging sockets.
Do not use cleaning solvents to clean any of the charger’s components.

#(%,$!9,:(0,!"#$%&''&%"(#!
The charger should be protected by an external Residual Current Device
(RCD) to be installed in the upstream circuit which complies with the
following:!
◇Rated residual operating current not exceeding 30mA!
◇Type-A!
◇Complies with one of the following standards: IEC61008-1,
IEC61009-1, IEC60947-2 and IEC62423!
%(('$!0,A*"0,+
◇Philips #2 screwdriver
◇Electric drill
(6,06",<!(:!$%,8$!
TURN OFF THE POWER SUPPLY. Then follow these steps to install the
Charger:
1. Check box contents
2. Wall mounting & wiring
3. Install the charger
4. Internet connection
5. Verify the installation
6. Web configuration
These steps are detailed next.
J
EV Charger with back plate
Terminal crimps x 4
User Manual x 1
Terminal crimps x 3

$%,8!(#,!1!5-,5?!9(K!5(#%,#%$!
If any of these components are damaged or missing, contact iocharger.
"
,',5%0"5!6,-"5',!!5-&0),0
"#$%&''&%"(#
Expansion screws x 3

B
$%,8!%<(!L!<&''!7(*#%"#)!3!<"0"#)!
1. Remove the back plate from the charger and mount the back
plate to the wall!
!
!
Electrical Connection
There are four possible connection variants, depending on whether
three-phase is used, and whether a TN network, TT network or IT
network is used, as shown on the label on the back plate.
2. Connect the cable through the bottom of the junction box
"#$%&''&%"(#
,',5%0"5!6,-"5',!5-&0),0

$%,8!%-0,,!L!"#$%&''!%-,!5-&0),0!
1. Install the charger to the backplate
2. Fix the charger and back plate with screw and press the
button to remove the bottom case to insert the SIM card.
$%,8!:(*0!L!"#%,0#,%!5(##,5%"(#
Supporting Ethernet, Wi-Fi and Cellular connection
1. Cellular & Ethernet
!
!
2. Wi-Fi
a) Connect your device to the charger Wi-Fi SSID ‘ioc-
XXXXXX’, and enter default password ‘IOC12345’
b) Open web-based setup page by entering the default IP
Address ‘192.168.10.1:8080’, and enter Username ‘admin’
and Password ‘ioc12345’ then click ‘ok’"
"
"
#D;
"EFG
1
Insert SIM card to the card slot for cellular connection
2
Connect internet cable to backplate for Ethernet connection
2
,',5%0"5!6,-"5',!5-&0),0
"#$%&''&%"(#
SIM
Button
Screw

M
!
#D;
"EFG
1
Change the value to ‘true’ to activate the offline mode
2
Ethernet supporting DHCP or static IP
3
Scan the Wi-Fi to select the SSID to be connected
4
Ask iocharger for further details on iocharger2.0 connection
via sim card as this will be provided with the initial
subscription. Any data sim can be used if connecting to the
free iocharger2.0Lite service or other 3rd party back end.
"#$%&''&%"(#
,',5%0"5!6,-"5',!5-&0),0

$%,8!$"K!L!6,0":=!%-,!"#$%&''&%"(#!
1. Verify the power cables are wired properly
2. Close the upstream RCD to power on the charger unit, and you
should see the LED lights sequentially illuminate green.
3. If the LED red light illuminates or flashes, refer to the
Troubleshooting table on page 12.
4. Check on the screen display whether internet is available and
back office is connected, refer to page 11.
5. Test the live charging process with simulator or electric vehicle if
the installation is completely verified.

'5+!$50,,#!+"$8'&=!+,%&"'$
N
,',5%0"5!6,-"5',!5-&0),0
Welcome Screen
Scan the QR code or swipe the
RFID card to start charging
Connect the charging plug
Suspended by EV
Suspended by EVSE
Charging in process
'5+!+"$8'&=

./
'5+!+"$8'&=
,',5%0"5!6,-"5',!5-&0),0
Remove the charging plug
Automatic upgrade mode
activated
Software downloading and
upgrading automatically
Network upgrade mode
Micro SD card upgrade mode
Software update error

..
,',5%0"5!6,-"5',!5-&0),0
'5+!+"$8'&=
Factory Reset
Invalid Authorisation
Service not available
RFID Activated
Reserved Mode
Explanation of ICONS

.4
%0(*9',$-((%"#)!
7&"#%,#,!&#+!0,8&"0
Regularly inspect the Charger components for damage. If damage is found, contact iocharger.
The Electric Vehicle Charger contains no user-serviceable components. If the unit is not operating correctly, contact iocharger.
$OEPQRDST
&URDST
Status indicator is not green after
the charger is powered on
1
Make sure the AC power input is connected correctly.
2
Turn OFF the charger and then back ON using the switch.
3
If the problem persists, contact iocharger for Technical Support.
Status indicator does not flash
green when the charger is
connected to the EV
1
Unplug the charging plug and reconnect it fully to the receptacle on the EV.
2
Inspect the cable and plug for damage.
3
Inspect the EV and its receptacle for damage.
4
If the situation persists, contact iocharger for Technical Support.
Status indicator flashes red while
charging
1
There is a temporary error.
2
Wait until the temporary error is resolved and the charger returns to normal condition. It usually takes less than 10 seconds.
3
If the status indicator doesn’t return to green, turn OFF the charger and then back ON.
4
If the situation persists, contact iocharger for Technical Support.
Status indicator is solid red
1
There is a critical error.
2
Unplug the charging plug from the EV immediately.
3
Turn OFF the charger and then back ON.
4
If the situation persists, contact iocharger for Technical Support.
%0(*9',$-((%"#)
%0(*9',$-((%"#)

Wipe the outside of the Charger regularly with a clean damp cloth to remove any accumulation of dust and dirt.
,',5%0"5!6,-"5',!5-&0),0
This manual suits for next models
1
Table of contents
Other iocharger Batteries Charger manuals