IONODES ION-R100S User manual

DOCUMENT APPROVED FOR GENERAL DISTRIBUTION
ION-R100S
User Manual
Version 1.1
IONODES INC.
www.ionodes.com

ION-R100S –User manual
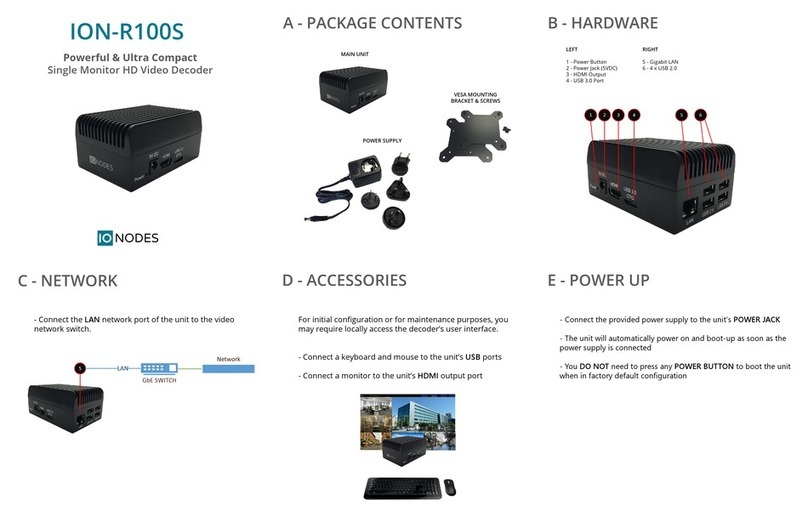
ION-R100S
User Guide
©2016-2018, IONODES INC
All Rights reserved.
No part of this documentation may be reproduced in any means, electronic or mechanical, for
any purpose, except as expressed in the Software License Agreement. IONODES shall not be
liable for technical or editorial errors or omissions contained herein. The information in this
document is subject to change without notice.
The information in this publication is provided “as is” without warranty of any kind. The entire risk
arising out of the use of this information remains with recipient. In no event shall IONODES be
liable for any direct, consequential, incidental, special, punitive, or other damages whatsoever
(including without limitation, damages for loss of business profits, business interruption or loss of
business information), even if IONODES has been advised of the possibility of such damages
and whether in an action or contract or tort, including negligence.
This software and documentation are copyrighted. All other rights, including ownership of the
software, are reserved to IONODES Inc. Windows and Windows Embedded Standard are
registered trademarks of Microsoft Corporation. All other brand and product names are
trademarks or registered trademarks of the respective owners.
The following words and symbols mark special messages throughout this guide:
Warning: Text set off in this manner indicates that failure to follow directions could result in dam-
age to persons or equipment.
Note: Text set off in this manner indicates special instructions which should be paid attention
to.

ION-R100S –User manual
Page 3 of 56
Table of Contents
1IMPORTANT SAFETY INSTRUCTIONS ..............................................................................................5
2CLEANING INSTRUCTIONS ..................................................................................................................6
3HANDLING NOTES...................................................................................................................................6
4MOISTURE AND CONDENSATION NOTES........................................................................................6
5BEFORE YOU BEGIN...............................................................................................................................7
5.1 ABOUT THE ION-R100S ........................................................................................................................7
5.2 PARTS LIST ............................................................................................................................................8
6HARDWARE INSTALLATION ...............................................................................................................9
6.1 EQUIPMENT INSTALLATION....................................................................................................................9
7CONNECTIONS .......................................................................................................................................10
8POWERING THE ION-R100S FOR THE FIRST TIME.....................................................................12
9DEVICE CONFIGURATION..................................................................................................................15
9.1 NETWORK CONFIGURATION BASICS ....................................................................................................15
9.2 SETTING UP THE INITIAL NETWORK CONFIGURATION LOCALLY .........................................................16
9.3 SETTING UP THE INITIAL NETWORK CONFIGURATION REMOTELY.......................................................19
9.4 SETTING UP THE TIME..........................................................................................................................23
9.4.1 Setting up the NTP time server........................................................................................................24
9.5 VIDEO CONFIGURATION CONCEPTS .....................................................................................................25
9.6 CONFIGURING VIDEO CONNECTIONS ...................................................................................................27
9.6.1 Video over RTSP Data Sources.......................................................................................................27
9.6.2 Video over HTTP Data Sources......................................................................................................32
9.6.3 Video over Passive RTP Data Sources ...........................................................................................33
9.6.4 Displaying a Data Source...............................................................................................................34
9.6.5 On-Screen Displays.........................................................................................................................36
9.6.6 Displaying an On-Screen Display...................................................................................................38
9.7 CONFIGURING WEB CONNECTIONS......................................................................................................40
9.8 CONFIGURING VIEWS...........................................................................................................................43
9.9 VIEW SEQUENCES ................................................................................................................................44


ION-R100S –User manual
Page 4 of 56
9.10 CONFIGURING VIDEO OUTPUT.............................................................................................................47
10 PERFORMING A FIRMWARE UPDATE........................................................................................49
10.1 BATCH FIRMWARE UPDATE .................................................................................................................50
11 DIAGNOSTICS.....................................................................................................................................53
11.1 VIEW STREAM DETAILS.......................................................................................................................53
11.2 SAFE MODE..........................................................................................................................................54
ANNEX A –STATEMENT LIMITED WARRANTY...................................................................................56

ION-R100S –User manual
Page 5 of 56
1 Important Safety Instructions
WARNING: Read and save these instructions! Follow all warnings and instructions
specified within this document and/or on the equipment.
CAUTION: The unit will be powered on upon connecting a valid power supply source.
Please make sure to properly shutdown the device’s operating system prior to removing
its power source.
The equipment shall be installed in a FIXED or DESKTOP configuration and should be installed
by qualified personnel only (person having the appropriate technical training and experience
necessary for product installation).
When installing the equipment, please make sure that cables are installed so that accidents
cannot occur. Cables connected to the equipment must not be subject to any mechanical strain.
To reduce the risk of fire, electric shock and/or injury, observe the following:
•Do not position the equipment as such that persons could walk on the connected cables.
•Do not spill any type of liquid substance on or near the equipment.
•Do not touch the equipment and its connected cables during an electrical storm; there
may be a risk of electric shock.
•Do not attempt to connect this equipment to electrical outlets controlled by switches or
automatic timers.
•Do not attempt to perform hardware service on this product yourself. Opening the
equipment casing may expose you to dangerous voltage or other risks. Refer servicing
to IONODES technical service personnel. Never open the device yourself as this will void
the warranty.
•The equipment should be situated away from heat sources such as radiators, heat regis-
ters, stoves, or other products that produce heat.
•Do not place a heavy object on or step on the product. The object may fall, causing seri-
ous personal injury and serious damage to the product.
Note: Opening the equipment case, damaging or altering the tamper proof label will void the
warranty.

ION-R100S –User manual
Page 6 of 56
2 Cleaning Instructions
•Unplug this product from the wall outlet before cleaning.
•Use a soft dry cloth for cleaning.
•For stubborn dirt, soak the cloth in a weak detergent solution, wring well and wipe. Use a
dry cloth to wipe it dry. Do not use any type of solvent, such as thinner and benzene, as
they may damage the surface of the product.
3 Handling Notes
When shipping the product, the original shipping carton and packing materials should to be
used. For maximum protection, repack the unit as it was originally packed at our factory.
Do not use volatile liquids, such as insect spray, near the unit. Do not leave rubber or plastic
products in contact with the product for long periods of time. They will leave marks on the
surface finish.
4 Moisture and Condensation Notes
Moisture condensation will damage the product. Read the following notes carefully.
Moisture condensation occurs during the following cases:
•Transferring the product directly from a cold place to a warm place.
•Using the product in a room where you just turned on the heater, or a place where the
cold wind from an air conditioning unit directly hits the unit.
•In the summer, when moving the product to a hot and humid place after leaving an air
conditioned space.
•Using the product in a humid place.
Warning: Do not use the product when moisture or condensation may occur. If the product is
used in such an environment, it may damage discs and internal parts.

ION-R100S –User manual
Page 7 of 56
5 Before you begin
5.1 About the ION-R100S
The ION-R100S decoder delivers high quality H.264 video decoding and display to the video
surveillance market. It is an embedded, high-performance digital video decoder, capable of
decoding multiple H.264 and/or MJPEG video streams and display them onto a Full HD monitor.
The high-performance decoding capabilities of the ION-R100S offer a cost-effective way to
decode and display digital camera streams while providing the benefits of video over IP.
The ION-R100S provides innovative configuration options and tools that can significantly
decrease the amount of time and effort required to deploy a unit. Using web-based configuration
tools, users can easily and remotely manage all aspects of the appliance.
To support high-performance decoding, while keeping the total cost of ownership within budget
constraints, the ION-R100S uses highly efficient hardware-based stream decompression.
The ION-R100S is fully compatible with H.264 or MJPEG video streams provided by most third-
party IP cameras and video encoders on the market. Combined with the IONODES line of IP-
based video encoders, the ION-R100S can also decode video streams provided by most third-
party analog cameras.

ION-R100S –User manual
Page 8 of 56
5.2 Parts List
Qty Description
1 ION-R100S appliance
1 5V DC power supply with country-specific power plug attachments
1 VESA mounting bracket and screws
1 Quick install guide
Below are additional items which are not included but may be required:
•USB mouse & keyboard
•Display with HDMI interface
•Internet access and/or a network switch
•Power bar with surge protection
Note: When unpacking, inspect the shipment box and appliance to identify any possible
damages due to shipping. Make sure all items have been delivered and that no
items are missing. Contact your IONODES representative should you find any dam-
ages or defects.
Note: The product serial number label helps the IONODES product support team identify
your device and its factory configuration in the event that your ION-R100S or its
components require service. The label is attached on the underside of the enclo-
sure.

ION-R100S –User manual
Page 9 of 56
6 Hardware Installation
6.1 Equipment Installation
The ION-R100S can be placed on a flat surface, such as a desktop, or mounted via the available
mounting bracket.
When installing the ION-R100S, position the unit to allow for cable clearance at the front and
rear of the unit. Make sure that minimal air flow is provided to the unit.
The ION-R100S can be mounted to various mounting structures via the available VESA
mounting assembly. Ideal to mount the ION-R100S behind a screen. Note that VESA mounting
screws are shipped with the device.
Warning: Be careful not to damage the enclosure when using mounting screws.

ION-R100S –User manual
Page 10 of 56
7 Connections
The ION-R100S offers one dedicated digital video output connection (HDMI), one LAN port as
well as several USB ports. More details can be found below.
1. 1x Power button (recessed)
The power button can be used to turn the unit on or off. It needs to be pressed with a
small sharp object like a paperclip.
2. 1x Power Input
Appliance power connector. Connect to the power adapter provided with the appliance
(5V DC, 4A, 20W max).
3. 1x HDMI Output
HDMI v1.4b connector interface for video output to a single screen with max. 1080p
resolution.
4. 1x USB 3.0 Port
General purpose USB connector interface. To be used for future expansion.

ION-R100S –User manual
Page 11 of 56
5. 1x Ethernet Port
Gigabit Ethernet (10/100/1000 Base-T) RJ-45 network port. Please use RJ45 (cat. 5e or
6) network cable. Note that the ION-R100S cannot be powered using Power-over-
Ethernet (PoE).
6. 4x USB 2.0 Ports
General purpose USB connector interface. To be used with mouse & keyboard.

ION-R100S –User manual
Page 12 of 56
8 Powering the ION-R100S for the first time
Before you can use the ION-R100S, you need to connect the following cables:
•Display: You can connect one display using the HDMI connector
•Ethernet network
•Keyboard and mouse (optional)
•Power
Connecting a keyboard and mouse to the ION-R100S allows you to configure the ION-R100S
locally and for this reason are strongly recommended. If you plan on configuring the device
remotely, then the keyboard and mouse are optional.
On first power on, once all the required cabling is connected, the appliance will boot
automatically. If the appliance was previously shut down using the power button, in order to turn
it back on, you’ll need to press the power button for a couple of seconds and then release. After
a few moments, the image below appears on the connected display:

ION-R100S –User manual
Page 13 of 56
When the device is ready to be used, the display switches to the main user interface:
The ION-R100S is now ready to be configured.
•Currently Displayed View
In the top left corner appears the view currently displayed. You can select a different
view by clicking the down arrow beside the view name. Views are configured using the
device’s web interface or by switching to configuration view (see below).
•Switch to Display/Configuration View
This button allows you to switch between displaying video and the configuration interface.
•Video Streams Details
When in display view, toggle this button to display performance details about each video
tile:
oVideo stream name and URI displayed in the video tile
oCurrent connection state
oStream Resolution
oCurrent framerate and bitrate
oNetwork packet lost count (displayed only when one or more packets are lost)

ION-R100S –User manual
Page 14 of 56
•Performance Graphs
These graphs show the device’s recent resource usage.
oCPU: shows the main processor’s activity
oGPU: shows the graphics adapter’s activity
oMem: shows the system’s RAM memory utilization
oEth: shows the traffic on the Ethernet interface

ION-R100S –User manual
Page 15 of 56
9 Device Configuration
Before the ION-R100S can be used on your video network, it must undergo an initial setup step
during which its network configuration is determined. This initial configuration setup step is
required so that the ION-R100S can communicate with computers and cameras on the network.
Once the initial network configuration step is completed, video output and connectivity settings
will need to be set-up through the device’s web interface.The device keeps this configuration
within its internal memory and acts as a fully standalone video decoding & display appliance.
The initial network configuration can be performed directly on the device by connecting a
keyboard and a mouse to the ION-R100S, or it can be performed remotely using a computer or
laptop connected to the same network.
9.1 Network Configuration Basics
By factory default, the ION-R100S is configured in DHCP mode (Dynamic Host Configuration
Protocol). In DHCP mode, when the device boots up, if it is connected to a network it scans that
network for a DHCP server. If a DHCP server is found on the network, the device requests that
the DHCP server provide a unique network address and associated settings. The device then
uses the DHCP-provided network configuration to communicate with other computers and
cameras the network.
If no DHCP server is found on the network, the device switches to APIPA mode (Automatic
Private IP Addressing). In this mode, the device automatically assigns itself a unique network
address in the range 169.254.0.1 to 169.254.255.254 with subnet mask 255.255.0.0. APIPA
mode ensures that devices in the APIPA network address range can communicate with one
another.

ION-R100S –User manual
Page 16 of 56
If computers and cameras on your network are not configured in APIPA mode, the ION-R100S
will not be able to communicate with them while in APIPA mode. In such a case, the network
configuration of the ION-R100S must be set manually.
When the network configuration is set manually, the ION-R100S skips all the steps above and
always uses the user-provided configuration. It is then the responsibility of the user to ensure
that the network configuration in the ION-R100S is compatible with the computers and cameras
on the network.
9.2 Setting Up the Initial Network Configuration Locally
The configuration of the ION-R100S can be accessed on the device itself by switching to the
configuration view.

ION-R100S –User manual
Page 17 of 56
To access the device’s configuration, you must enter a valid username and password. The
factory default user name and password are both ‘admin’. The following screen is then
displayed:
On the left side, select Configuration. The configuration interface is then displayed on the right
side. Select the Network tab to display the network configuration.

ION-R100S –User manual
Page 18 of 56
The Ethernet network configuration is shown in the first section Network Interface #1 –LAN 1.
The first information displayed is the connection status of the Ethernet cable. If the configuration
reports the network interface as not connected, check the Ethernet cable between the ION-
R100S and the network before proceeding.
By default, the ION-R100S is configured in DHCP mode. If a DHCP server is present on the
network, the network configuration provided by the DHCP server is displayed. In that case,
nothing needs to be done; the device is ready to communicate with computers and cameras on
your network.
If the IP address shown is in the range 169.254.*.*, this means that the device could not obtain
its network configuration from a DHCP server. In that case, the network configuration must be
set manually.
To set the network configuration manually, uncheck Use DHCP. You can then enter each
network setting separately. If you are unsure what values to enter, ask your network
administrator to provide configuration settings compatible with your network. At a minimum, a
valid IP address and Subnet mask must be entered. Once this is done, click on Save at the
bottom to apply the configuration changes.
The device is now ready to communicate with computers and cameras on your network.

ION-R100S –User manual
Page 19 of 56
9.3 Setting Up the Initial Network Configuration Remotely
Initial device network configuration can also be done via the ION Configuration Tool (ICT), a tool
provided by IONODES and that can be found on the IONODES web site at www.ionodes.com.
The ICT plays several roles:
1. Discovery of all ION-R100S and other IONODES devices on the network
2. Remote configuration of the IP address and subnet mask
3. Applying batch firmware upgrade of all common IONODES devices
4. Accessing a device’s web based management interface
Once your device is installed on your network and powered up, launch the ICT from any
computer located on the same network as the device.
The ICT supports 2 methods for discovering a device on the network. The first method doesn’t
require any configuration and uses the Bonjour discovery protocol. In order to be able to
discover a device via Bonjour, the network must support multicast IP.
If multicast is not supported, you can use the second method: Unicast Discovery. Unicast
Discovery can be configured by using the “Unicast Discovery” menu option under the Admin
menu list.

ION-R100S –User manual
Page 20 of 56
To configure Unicast Discovery, add one or more IP address ranges. Unicast Discovery will
attempt to reach a device at a specific IP address in the configured ranges. Discovery can be a
long process if the range of IP addresses is large. To accelerate the discovery, add several
small ranges of IP addresses.
The ping timeout option can be increased for a high latency network.
The ICT will display as many devices as it discovers on the network.
Other manuals for ION-R100S
2
Table of contents
Other IONODES Media Converter manuals

IONODES
IONODES ION-R200 User manual

IONODES
IONODES ION-R100S User manual

IONODES
IONODES ATOMAS-DUO-HDMI User manual

IONODES
IONODES ATOMAS-MINI User manual

IONODES
IONODES ION-E100-HD User manual

IONODES
IONODES ION-E100 User manual

IONODES
IONODES ION-R100 User manual

IONODES
IONODES ATOMAS-IOT-DUAL User manual

IONODES
IONODES ION-R100S User manual
Popular Media Converter manuals by other brands

exaSound
exaSound e68 owner's manual

Lika
Lika ES5812/MB Series user guide

Net Optics
Net Optics 10 GigaBit Media Converter Tap installation guide

Data Translation
Data Translation MACH Series user manual

Link
Link HD & SDI Frame Synchronizer HFS-975 Specification sheet

Televes
Televes 554912 Safety instructions