IPC Eagle S9440P Guide

1
Industrial Vacuums
3 Flow Series
Operations and Parts Manual
Models:
S9440P
S9440PL

2
IMPORTANT SAFETY INSTRUCTIONS
When using an electrical appliance, basic precaution must always be followed, including the following
READ ALL INSTRUCTIONS BEFORE USING THIS MACHINE.
This machine is for commercial use.
WARNING
DANGER:
Failure to read and observe all DANGER statements could result in severe bodily injury or death.
Read and observe all DANGER statements found in your Owner’s Manual and on your machine.
WARNING:
Failure to read and observe all WARNING statements could result in injury to you or to other
personnel; property damage could occur as well. Read and observe all WARNING statements found in your
Owner’s Manual and on your machine.
CAUTION:
Failure to read and observe all CAUTION statements could result in damage to the machine or to other
property. Read and observe all CAUTION statements found in your Owner’s Manual and your machine.
DANGER:
Failure to read the Owner’s Manual prior to operating or attempting any service or maintenance
procedure to your machine could result in injury to you or to other personnel; damage to the machine or to other
property could result as well. You must have training in the operation of this machine before using it. If you or your
operator(s) cannot read English, have this manual explained fully before attempting to operate this machine.
DANGER:
Operating a machine that is not completely or fully assembled could result in injury or property damage.
Do not operate this machine until it is completely assembled. Inspect the machine carefully before operation. Use only
as described in this manual. Use only the manufacturer’s recommended attachments.
DANGER:
Machines can cause an explosion when operated near flammable materials and vapors. Do not use this
machine with or near fuels, grain dust, solvents, thinners, or other flammable materials.
DANGER:
Do ot pick up flammable fluids, dust or vapors.
DANGER:
Do ot vacuum anything that is burning or smoking, such as cigarettes, matches, or hot ashes.
DANGER:
This machine is ot suitable for picking up health endangering dust.
DANGER:
Using a machine with a damaged power cord could result in an electrocution. Do not use the machine if
the power cord is damaged. Do not use the electrical cord to move the machine. Keep cord away from heated
surfaces. Do not unplug by pulling on the cord; grasp the plug, not the cord. Turn off all controls before unplugging.
Do not close a door on cord or pull around sharp edges or corners.
DANGER:
Electrocution could occur if maintenance and repairs are performed on a unit that is not properly
disconnected from the power source. Disconnect the power supply before attempting any maintenance or service.

3
War i g:
Operating a machine without observing all labels, decals, etc., could result in injury or damage.
Read all machine labels before attempting to operate the machine. Make sure all of the labels are attached or
fastened to the machine. Get replacement labels and decals from the manufacturer’s distributor.
War i g:
Electrical components can “short-out” if exposed to water or moisture. Keep the electrical components of
the machine dry. Always store the machine in a dry area.
War i g:
Use of this machine to move other objects or to climb on could result in injury to the operator or damage to
the machine. Do not use this machine as a step or furniture. Do not allow to be used as a toy. Close attention is
necessary when used by or near children.
War i g:
Moving parts of this machine can cause injury and/or damage. Keep hands, feet, loose clothing, hair,
fingers, and all parts of the body away from openings and moving parts.
War i g:
Electrocution could occur if you handle the plug or appliance with wet hands. Do not handle plug or
appliance with wet hands.
War i g:
The machine employs a removable float for wet pick-up operation to reduce risk of electrical shock. Always
install float before any wet pick-up operation.
War i g:
Rotating fan blades inside the cover. Before opening cover, switch off machine. Wait until the fan/brush
stops completely or dust and debris may be ejected.
War i g:
If the machine is not working properly, has been dropped, damaged, left outdoors, or dropped into water,
return it to an Authorized service center.
War i g:
Damage could occur to machine if openings are blocked. Do not put any object into openings. Do not use
any opening blocked keep free of dust, lint, hair, and anything that may reduce air flow.
War i g:
Injury could occur to the operator or the machine if used without the dust bag and/or filters in place. Do not
use the machine without the dust bag and/or filters in place.
War i g:
Injury to the operator and/or damage to the machine could occur when cleaning on stairs, unless caution is
used. Use extreme caution when cleaning on stairs.
War i g:
To reduce the risk of electrical shock, always use a 3-wire electrical system connected to the electrical
ground. Whenever possible connect the machine to an outlet protected by a ground fault interrupter (GFCI).
See “Grounding Instructions.”
SAVE THESE INSTRUCTIONS

4
120 Volt Machi e I structio s For
Co ectio To The Power Supply A d The
Electrical Grou d
This machine must be connected to the electrical ground to protect
the operator from electrical shock. The machine has an approved
power cord with three conductors and a plug with three terminals.
Connect the plug to a receptacle that has three holes and is
connected to the electrical ground. The green (or green and yellow)
conductor in the cord is the ground wire. Never connect this wire to
any terminal other than the ground terminal.
This machine uses a 120 volt AC 60 cycle electrical circuit. Make
sure you have the correct frequency and voltage before connecting
the power cord to an outlet. The machine has a plug as shown in
Figure 1. If a receptacle connected to the electrical ground as
shown in Figure 1 is not available, have one installed by an
electrical contractor. Do ot use a adapter.
War i g:
To reduce the risk of electrical shock, protect the machine from rain. Keep the machine in a dry area.
War i g:
To reduce the risk of electrical shock, always use a 3-wire electrical system connected to the electrical
ground. Whenever possible connect the machine to an outlet protected by a ground fault interrupter (GFCI).
War i g:
Do not cut, remove or break the ground pin. If the outlet does not fit the plug, consult your electrical con-
tractor.
War i g:
Have worn, cut or damaged cords and plugs replaced by an authorized service person.
War i g:
If it becomes necessary to use an extension cord to reach an electrical outlet, you must use one that is at
least one size larger in wire size. Such as a power cord that is marked 12/3 would need to use an extension cord that
is marked 10/3. Do not use an extension cord that is undersized.

5
IMPORTANT INSTRUCTIONS
•
Before use the equipment must be correctly assembled with all of its components
•
Check that the electrical outlet is correct for use with the plug on the machine
•
Before connecting, check that the specified motor voltage corresponds to the main voltage available
•
Never use the equipment near flammable, explosive or toxic substances sparks from the motor could
cause dangerous reactions.
•
Always unplug the machine from the electrical outlet when leaving machine unattended or before
attempting any repair.
•
Service and repair should be done by qualified personnel only. Use only original manufacturer’s
replacement parts.
Operatio S9440P
This machine is a commercial vacuum designed for dry pick up only. The three motors run simultaneously,
But turn themselves off one at a time cyclically to clean themselves. When emptying the machine or
servicing the filters, make sure the Cyclonic Shield is inserted into the tank opening. The Shield is
designed to improve the performance of the machine and also protect the filters from clogging up
prematurely. The vacuum can be operated with or without a disposable paper or cloth bag.
However the performance, run time, efficiency, and filter life will be greatly increased by utilizing
disposable bags.
Filtration can also be enhanced by adding HEPA filters. These optional filters can be purchased from your
Distributor, the optional filters available are listed below
S821622 Cartridge Filter, Polyester
S821622-H Cartridge Filter, HEPA

6
IMPORTANT INSTRUCTIONS
•
Before use the equipment must be correctly assembled with all of its components
•
Check that the electrical outlet is correct for use with the plug on the machine
•
Before connecting, check that the specified motor voltage corresponds to the main voltage available
•
Never use the equipment near flammable, explosive or toxic substances sparks from the motor could
cause dangerous reactions.
•
Always unplug the machine from the electrical outlet when leaving machine unattended or before
attempting any repair.
•
Service and repair should be done by qualified personnel only. Use only original manufacturer’s
replacement parts.
Servici g The Filter
The filters are accessed by lifting the head assembly off the tank. Then remove the filter retainer by turn-
ing the black knob counter-clockwise. Remove the filter retainer plate. The filters will then slide off of the
support assembly.
Note:
•
Be sure to frequently clean the filters.
•
Allow filters to thoroughly air dry after washing them before returning them to the machine.
•
Worn filters can affect vacuum performance. Replace the filters when they become worn out and nor-
mal cleaning will not restore vacuum performance.
Filter Retainer Plate
Knob
Filter Support Assembly
Filter

7
Periodic Mai te a ce
(Every six to twelve mo ths)
1. Check filter for wear, replace dirt saturated filters that do not respond
to normal cleaning.
2. Inspect gasket seals and replace those which have begun to leak.
3. Examine carbon motor brushes and commutator.
Servici g The Vac Motor
Motor Replaceme t
1. Disconnect power cord from power source.
2. To access the vac motor, remove the screws that attach the main cover to the head assembly and set
the cover to one side.
3. Disconnect the motor’s 2 red lead wires from the main wiring bridge.
4. Disconnect green/yellow wire by removing the screw from the motor core.
5. Remove the four motor mounting screws.
6. Remove motor plate and set aside.
7. Take out the motor and remove the upper and lower gaskets.
8. Inspect gaskets. If they show signs of wear replace the.
9. Install gaskets onto new motor ensuring that they are properly seated.
10. Install the new motor. Make sure foam mufflers are positioned properly.
11. Attach motor plate to motor.
12. Connect green/yellow wire to motor core.
13. Connect motor’s 2 red lead wires to main wiring bridge.
14. Re-assemble vac cover.
15. Test for proper operation.

8
Servici g The Vac Motor
Carbo Brush Replaceme t
1. Disconnect power cord from power source.
2. To access the vac motor, remove the screws that
attach the main cover to the head assembly and
set the cover to one side.
3. Remove the motor cover by removing two screws.
See Fig. 1
4. Remove the wire terminal from carbon brush
housing. See Fig. 2
5. Remove the carbon brush assembly by removing
the 2 screws that attach it to the vac motor.
See Fig.3
6. Inspect armature commutator. If it is extremely
pitted, grooved or not concentric then the motor
will need to be replaced or sent to a qualified
service center.
7. Slide the yellow brush housing from plastic holder.
See Fig. 4
8. Reverse steps 7 through 4 to install new brush and
housing (part number S8TOEG845)
9. Repeat steps 4 through 8 for the other carbon
brush.
10. Reverse steps 3 and 2 for re-assembly.
11. Test for proper operation.

9
3 Flow S9440P & S9440PL

10
3 Flow S9440P & S9440PL
Item # Part # Description Qty.
1 S80138/L Strain Relief, Cord 1
2 S80139 Clamp, Cord 1
3 S81006 Screw, 5 x 20 2
4 S82931AUG6 Block, Cord, Yellow 1
5 S81054 Screw, 5 x 50 4
6 S82930G6 Handle, Yellow 1
7 S81026 Screw, 5 x 30 1
8 S81006 Screw, 5 x 20 2
9 S81005 Screw, 5 x 14 2
10 S830015 Bridge, Junction 1
11 S81054 Screw, 5 x 50 4
12 S82932AUG6 Cover 1
13 S81006 Screw, 5 x 20 2
14 S830014 Switch, Power 1
15 S83937 Filter, Intake 3
16 S83273 Screw, 5 x 55 9
17 S86141 Grommet 1
18 S82957AUVEI Cover, Intermediate Yellow 1
19 S82627 Screw, 5 x 40 9
20 S82627 Screw, 5 x 40 3
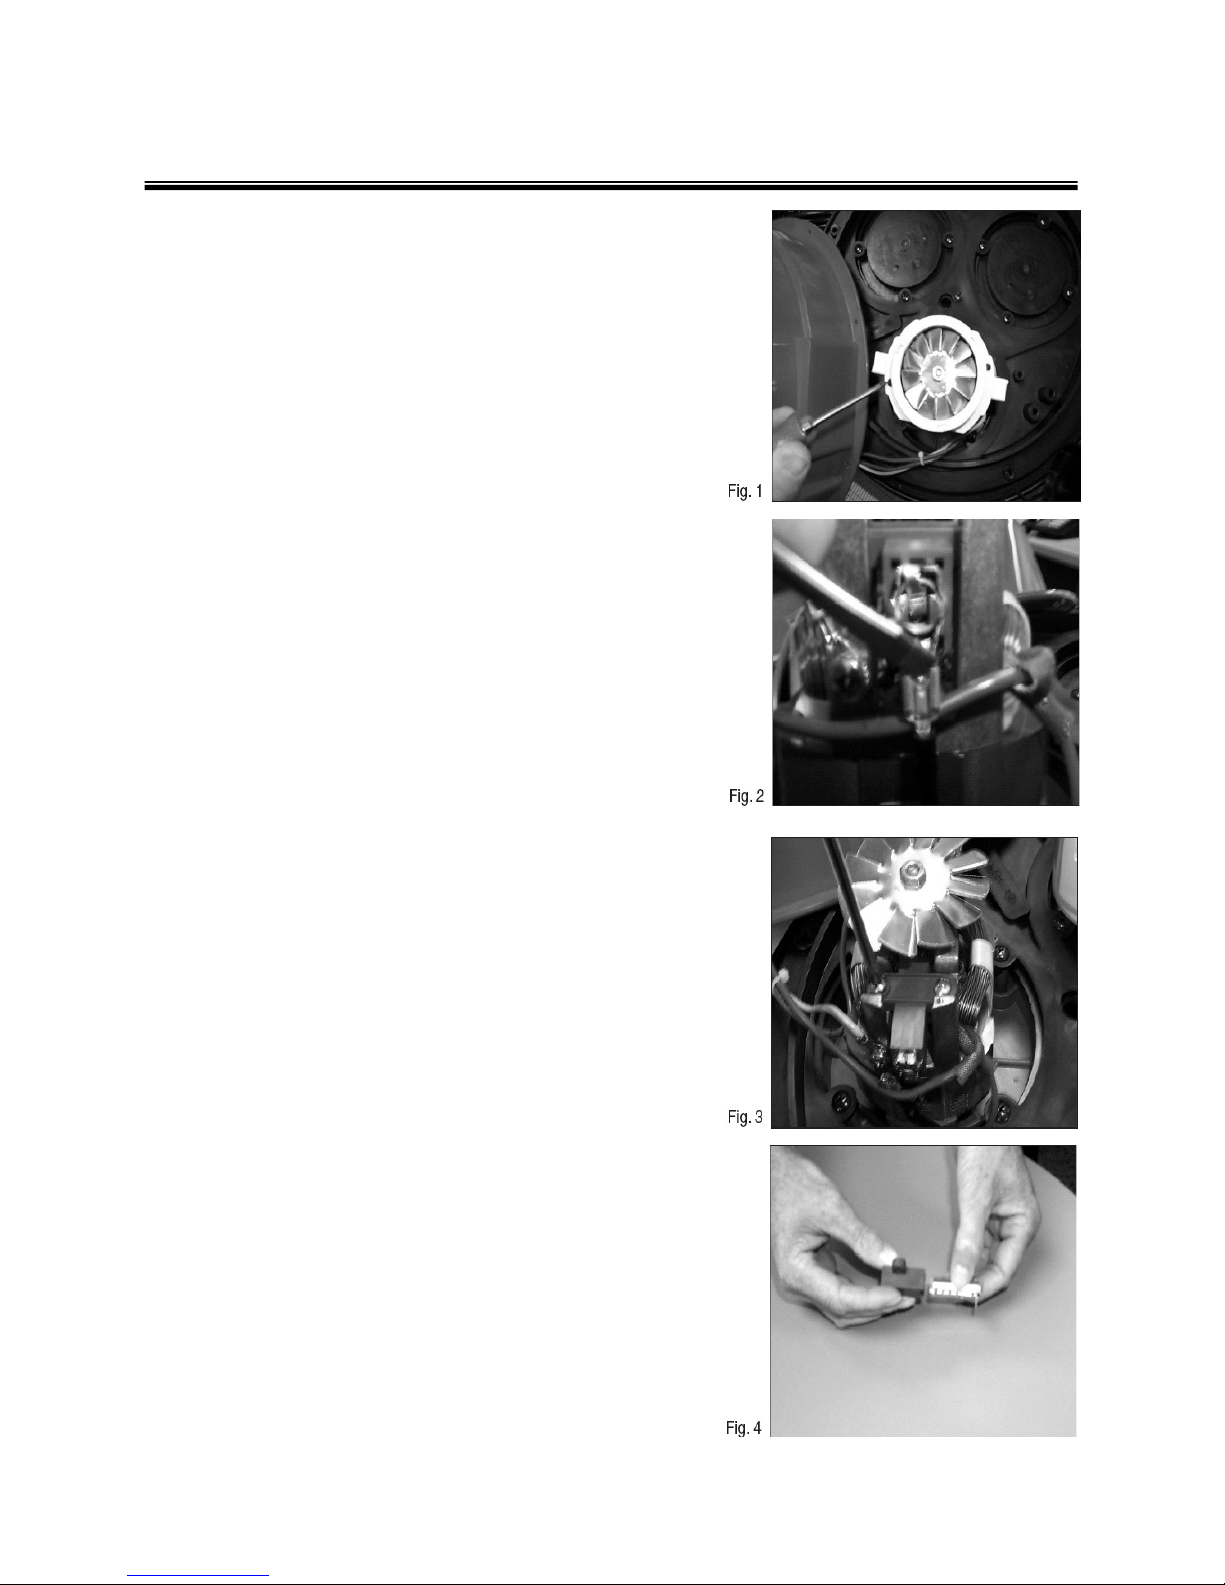
21 S81433 Screw, 5 x 45 1
22 S83189 Screw, 5 x 30 1
23 S821641AUG6 Cover, Motor 1
24 S83969 Gasket 3
25 S80310 Spacer, Motor 3
26 S821672 Cover, Motor 3
27 S83901 Gasket 3
28 S821671/120 Motor, 1250W 120V 60Hz 3
29 S87083 Gasket, Motor 3
30 S86867 Spacer, Motor 3
31 S86901 Gasket, Motor 3
32 S83454 Foam, Sound Deadening 3
33 S821037 Filter, Motor 3
34 S80468/F12 Valve 3
35 S83108GPG6 Base, Motor 1
36 S86235 Thermo Regulator 1
37 S86241 Temperature Sensor 1
38 S82958FF Clip, Ground 1
39 S81005 Screw, 5 x 14 1
40 S821649 Circuit Board 1
41 S81005 Screw, 5 x 14 2

11
3 Flow S9440P & S9440PL
Item # Part# Description Qty.
1 S820813 Cyclone, Shield `1
Item # Part # Description Qty.
1 S821625 O-Ring 3
2 S821624 Frame, Filter 1
3 S81005 Screw, 5 x 14 6
4 S821622 Filter, Cartridge 3
5 S821623 Retainer 1
6 S81732 Knob, M10 1

12
3 Flow Poly S9440P
No. Part# Descriptio Qty.
1 S82558 Handle 1
2 S82637NE Tank, Poly 24g Black 1
3 S81026 Screw 5x30 4
4 S82584G6 Retainer, Tank 1
5 S82846 Gasket 1
6 S82593 Deflector 1
6a S82767 Deflector (430P) 1
7 S82652AG6VE Inlet Cover w/button 1
7a S82762AG6VE Inlet Cover w/button (430P) 1
8 S81300 Rivet 4
9 S81847 Latch 2
10 S81050 Screw 8
11 S82974 Washer, Plastic 8
12 S81072-1NE Support, Handle Front 2
13 S81860-1NE Support, Handle Rear 2
14 S81302NE Rivet 4.8x17 2
15 S82559 Caster, Swivel 2
16 S82680 Screw 8
17 S82556 Support, Axle 2
No. Part# Descriptio Qty.
18 S80904 Wheel, Rear 2
19 S82557 Retainer, Wheel 2
20 S83835NE Cap, Wheel 2
21 S82607 Spacer, wheel 2
22 S81006 Screw 8
23 S82555 Axle 1
24 S80834 Nut, 1.25” 1
25 S80256 Gasket 1
26 S82763 Elbow, Drain 1
27 S83592 Clamp 1
28 S82765 Hose, Drain 1
29 S83156 Screw 1
30 S82788 Clamp 1
31 S82812 Retainer, Drain Plug1
32 S82764 Drain Plug 1
33 S86250 Handle Grip 2

13
3 Flow Plastic S9440PL
Item# Part# Descriptio Qty.
1. S81847/SNE Latch, Head 2
2. S81302 Rivet, 4.8 x 17 4
3. S820984 Tank 1
4. S81979 Screw, 5 x 25 4
5. S821786 Inlet, Tangential 1
6. S821647 Gasket, Inlet 1
7. S821705 Support, Cyclone 1
8. S81302NE Rivet, 4.8 x 17 2
9. S82993-1NE Handle, Tank 2
10. S83883 Washer 4
11. S81026 Screw, 5 x 30 4

14
3 Flow Plastic S9440PL
Item# Part# Descriptio Qty.
1. S80918-1V Handle, Main 1
2. S80917V Support, Handle 2
3. S80913 “T”, Handle Support 2
4. S81302NE Rivet, 4.8 x 17 2
5. S81302NE Rivet, 4.8 x 17 2
6. S80901NE-1 Base, Cart 1
7. S81005 Screw, 5 x 14 6
8. S80915 Screw, 12 x 140 2
9. S81028 Washer, M12 2
10. S83835NE Washer, Plastic 2
11. S80904 Wheel, Rear 2
12. S81401 Bushing 2
13. S82052 Spacer 2
14. S81302NE Rivet, 4.8 x 17 2
15. S820418 Caster, Swivel 2
16. S86250 Grip, Handle 2

15
Warranty Policy
Limited Warranty
IPC Eagle warrants new cleaning equipment against defects in material and
workmanship under normal use and service to the original purchaser as detailed
below
.
1 year
Subject to the conditions stated below, IPC Eagle warrants all other cleaning
equipment components to be free from defects in materials and workmanship for a
1-year period. Parts replaced or repaired are warranted for the remainder of the
original warranty period.
IPC Eagle will furnish and charge for replacement parts, including transportation, to
the original owner through an IPC Eagle authorized service center. If the part is
returned within 30 days and is found defective, the owner will be credited for the cost
of the replacement part including shipping and handling.
Labor charges are covered for one year from the date of purchase if provided by an
authorized IPC Eagle service center.
Wear items exempt from warranty include belts, carbon brushes, power cords, wheels,
brushes, pads, handle grips, filters, screens, hoses, and squeegees.
This warranty shall not apply to failures caused by misuse or abuse, improper
maintenance as stated in the operation manuals, use of unauthorized repair parts,
repairs by other than an IPC Eagle authorized service center, and damage in transit.
IPC Eagle disclaims and denies any liability for any direct, indirect, special incidental
or consequential damage which may be suffered as a result of sale, delivery,
servicing, use, loss of any product, downtime, labor, freight, or other charges not
expressly included herein.

16
This manual suits for next models
1
Table of contents
Other IPC Eagle Vacuum Cleaner manuals

IPC Eagle
IPC Eagle Planet Optimum Series Guide

IPC Eagle
IPC Eagle S9DUSTPRO Guide

IPC Eagle
IPC Eagle 14" User manual

IPC Eagle
IPC Eagle 415P-AD Guide

IPC Eagle
IPC Eagle Barrel Vac S9430BV Guide

IPC Eagle
IPC Eagle BP6 User manual

IPC Eagle
IPC Eagle 315P Guide

IPC Eagle
IPC Eagle Pulsar User manual

IPC Eagle
IPC Eagle Barrel Vac Guide

IPC Eagle
IPC Eagle GC 150 Guide