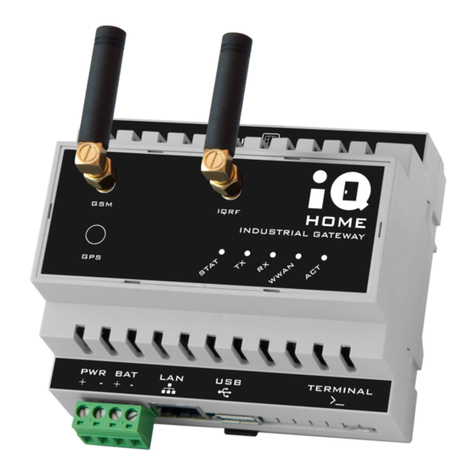
IQ Home GW-UNI-01 User manual

© 2016 IQ HOME Kft. www.iqhome.org
Quick Start Guide
Universal Gateway
Model
GW-UNI-01
Software package version
1.02
DPA version
2.23
HWPID
0x0213
DPA Custom Handler version
1.00 (HWPIDver: 0x0100)
Date
2016-02-25
Document revision
1.0

GW-UNI-01 Quick Start Guide
© 2016 IQ HOME Kft. www.iqhome.org 2/ 17
Contents
1Setup ..............................................................................................................................................3
1.1 Connecting Ethernet cable ....................................................................................................3
1.2 Connecting power supply ......................................................................................................3
2Connect to Universal gateway .......................................................................................................4
3First boot........................................................................................................................................6
3.1 IP address auto configuration................................................................................................6
3.2 Logging in to the gateway......................................................................................................6
4Setup ..............................................................................................................................................7
4.1 USB serial console..................................................................................................................7
4.2 Connecting CK-USB-04A programmer ...................................................................................7
4.3 Configuration of hardware ....................................................................................................8
4.3.1 Jumpers and connectors....................................................................................................8
4.3.2 Switching between SIM slot and soldered IQRF module...................................................8
5Demo Applications.........................................................................................................................9
5.1 Web demo..............................................................................................................................9
6MQTT............................................................................................................................................12
6.1 IQHome ................................................................................................................................12
6.2 Amazon AWS IoT..................................................................................................................14
Document revisions .............................................................................................................................17

GW-UNI-01 Quick Start Guide
© 2016 IQ HOME Kft. www.iqhome.org 3/ 17
1Setup
1.1 Connecting Ethernet cable
For network communication, use the included patch cable. Connect the gateway to 10/100Mbps
capable Ethernet switch or router.
Caution!
This guide is assumes that you can connect the gateway to the same local network your computer
which runs the IQRF IDE!
1.2 Connecting power supply
The gateway works with 5V DC power supply which is included in the package.
Connect the DC plug to the DC socket above Raspberry Pi’s micro USB power socket, than connect
the adaptor to 230V wall outlet.
The device has no power switch. It can be turned on by connecting the 5V power source to it. To turn
off the device you only have to disconnect power source.
Caution!
When using SD card in writable mode (RW mode) you should soft shutdown the Universal Gateway
operating system first! Unclean shutdown of the gateway can damage the file-system and can result
unusable state!
The boot time of the gateway is about half minute. After the gateway successfully started, acquired
an IP configuration and the blue status LED started flashing, the system is open for cooperating with
the IQRF IDE (assuming the default configuration is not modified).

GW-UNI-01 Quick Start Guide
© 2016 IQ HOME Kft. www.iqhome.org 4/ 17
2Connect to Universal gateway
Follow the few steps below to connect to the Universal Gateway on the same network.
1. Open the IQRF IDE, open a project and choose “IQRF Device Manager” from the “Tools” menu
or press F9 (Figure 1)
2. Select Add UDP device icon (or press Shift+Ctrl+D).
3. Select „Mode: User gateway”
4. Click „Search”,
5. Select your gateway from the list. If the list still empty check your network settings.
6. Click „Add”
Figure 1 IQRF Device Manager –Find and add gateway

GW-UNI-01 Quick Start Guide
© 2016 IQ HOME Kft. www.iqhome.org 5/ 17
7. Select your newly added gateway, then click “Connect”(Figure 2)
Figure 2 IQRF Device Manager –Connect to gateway
8. Now your gateway connected to IQRF IDE. A connection log shows up in the Output window
and in the left bottom corner the status indicator blinking green next to the GW-UNI-01 label
(Figure 3).
Figure 3 IQRF IDE after gateway connected successfully

GW-UNI-01 Quick Start Guide
© 2016 IQ HOME Kft. www.iqhome.org 6/ 17
3First boot
3.1 IP address auto configuration
By default, the gateway tries to get IP configuration from DHCP service. If you do not have access to
the DHCP service console you have three options to determine the Universal gateway IP address:
Connect and log in via serial console,
use IQRF IDE to search for User gateways or
use your own DHCP server on your development PC and connect the Universal gateway
directly via Ethernet cable.
Caution!
Do not start DHCP service on an Ethernet interface connected to corporate LAN! It can cause serious
network outage and can generate unnecessary incidents for your IT department. If you are unsure
please consult your IT department or Network administrator.
3.2 Logging in to the gateway
You have two choices to log in: Use SSH client to connect or you can use USB serial console. To
determine the gateway’s IP address configured by DHCP or to set up static IP address use serial
console first.
Default username: pi
Default password: raspberry
Caution!
After first login change default password!
Change password:
$ passwd
To create new user use:
$ sudo adduser <new username>
Set appropriate locales and time zone.
$ sudo dpkg-reconfigure locales
$ sudo dpkg-reconfigure tzdata

GW-UNI-01 Quick Start Guide
© 2016 IQ HOME Kft. www.iqhome.org 7/ 17
4Setup
4.1 USB serial console
Use a mini USB A male type cable to connect to the gateway’s USB serial terminal.
Your windows operating system will recognize the MCP2221 USB to Serial converter. If necessary,
please install driver for MCP2221. Can be download at:
http://www.microchip.com/wwwproducts/en/MCP2221 Documentation -> Software
After driver installed, use a Serial Terminal emulator to connect to the gateway (e.g. PuTTY)
Default settings:
Baud: 115200
Data bits: 8
Stop bit: 1
Parity: None
4.2 Connecting CK-USB-04A programmer
To directly program your DC-TR-56x/76x module you can directly connect CK-USB-04A programmer
to the board, after removing the multi-jumper from CON2.
Figure 4 CK-UB-04A connected to Universal Gateway

GW-UNI-01 Quick Start Guide
© 2016 IQ HOME Kft. www.iqhome.org 8/ 17
4.3 Configuration of hardware
4.3.1 Jumpers and connectors
Connector
Purpose
Default setting
CON1
Main connector to Raspberry Pi
User peripheral board connector
Connected to Raspberry Pi
CON2
Connects IQRF 56/76 pads to the
Raspberry Pi
CK-USB-04A programmer connector
Multi jumper inserted, IQRF pads
connected to Raspberry Pi.
CON3
IQRF programing connector
Empty
CON4
Connects the USB-Serial converter to the
Raspberry’s Serial interface.
Rx and Tx connected with jumpers
4.3.2 Switching between SIM slot and soldered IQRF module
In default configuration the gateway board has a surface mounted DCTR-76D(A) IQRF module. The
pads connected to the Raspberry Pi mainboard via CON2 with a multi-jumper plugged in.
If you want to use a SIM type IQRF module (DCTR-52/72) you should remove the multi-jumper from
CON2 and insert the IQRF module to the SIM slot. The SIM slot is connected to the Raspberry Pi by
default.
Caution!
Do not insert the IQRF module to the SIM slot when CON2 jumper is plugged in and another IQRF
module soldered to the gateway board! It can result in hardware damage.

GW-UNI-01 Quick Start Guide
© 2016 IQ HOME Kft. www.iqhome.org 9/ 17
5Demo Applications
The Universal Gateway provides some demo application with source codes to assist in the first steps.
To develop custom application see the Universal Gateway Programmer’s Manual for details.
Caution!
The described steps below is based on the DCTR-72DA modules.
5.1 Web demo
To use the Demo Web Application you can simply click on the IP address of the gateway in the IQRF
Device Manager (7) or copy the IP address of the gateway to the browser.
http://<GW-UNI-01-IP>
The default Demo Web App will great you. Please use IQRF IDE to bond IQRF nodes to the coordinator
placed on your gateway shield. For a video tutorial click on the link in the browser.
After successfully bonded the nodes, please refresh your web browser.
Figure 5 Universal Gateway Demo Web Application landing page with empty network

GW-UNI-01 Quick Start Guide
© 2016 IQ HOME Kft. www.iqhome.org 10 / 17
After page refresh you will see as much IQRF modules on your screen as much you successfully
bonded. Click on “G” or ”R” fields to activate the appropriate LED on the selected IQRF module.
Figure 6 Universal Gateway Demo Web Application landing page with two bonded node

GW-UNI-01 Quick Start Guide
© 2016 IQ HOME Kft. www.iqhome.org 11 / 17
This demo uses the FRC command to collect temperature sensor data from nodes and display in a
chart with Google Charts https://developers.google.com/chart/. The FRC command sending interval
is 5sec by default and the data collecting interval can be changed or can be stopped.
Figure 7 Universal Gateway Demo Web Application Sensor Demo with Google Charts

GW-UNI-01 Quick Start Guide
© 2016 IQ HOME Kft. www.iqhome.org 12 / 17
6MQTT
6.1 IQHome
The IQHome team provides a simple web application for testing the Universal Gateway’s basic MQTT
features. This web application can connects to the mqtt.iqhome.org MQTT broker via a websocket
and can subscribe and publish messages to any custom topic. To identify the gateway the application
uses the gateway MID (hwid) and automatically subscribe for the example topic what defined in the
gateway’s default configuration.
Caution!
The mqtt.iqhome.org broker and WEB demo can be used only for testing purposes!
The broker is open and everybody can publish/subscribe to all topics. From this reason never publish
sensitive messages! IQHome development and testing software solutions comes with ABSOLUTELY
NO WARRANTY, to the extent permitted by applicable law.
1. In the IQRF IDE press “Ctrl+M” to show module info and copy the MID or in the menu USB Device
-> Show TR Module Info (Figure 8)
Figure 8 IQRF IDE Show TR Module Info
2. Open a browser go to http://mqtt.iqhome.org/ and paste your gateway’s MID into Gateway MID
input (Figure 9)
3. Press Connect

GW-UNI-01 Quick Start Guide
© 2016 IQ HOME Kft. www.iqhome.org 13 / 17
Figure 9 mqtt.iqhome.org MQTT Web Application over websocket
The web application do automatically after click the Connect button:
1. Connect to broker via websocket at port 9001
2. Subscribe for topic iqrf/gateway/MID/network/response where MID is the gateway’s MID
(hwid)
3. Publish Get bonded nodes IQRF DPA command to topic iqrf/gateway/ MID/network/request
4. The broker forwards the message to the gateway with defined MID and it responds with a DPA
response to topic topic iqrf/gateway/MID/network/response
5. The web application builds the actual network by create nodes as much as bonded to the
coordinator
The Console shows the messages of the status between the application and the MQTT broker. The
Stream shows the transferred messages with topic name and time stamp. The sent messages
marked with red and the received ones with green color.
Clicking on the node’s LEDs the web application sends a LED set request to the node. If the node
receive the packet set the LED and after the web application receive the response update the LED
state.

GW-UNI-01 Quick Start Guide
© 2016 IQ HOME Kft. www.iqhome.org 14 / 17
The default publish message is an FRC request for temperature. The nodes temperature value is
updates when the FRC response is received.
6.2 Amazon AWS IoT
The Universal Gateway is fully compatible with AWS IoT service. This guide try to help to configure
the AWS IoT for the Universal Gateway. For more information see Amazons documentation at
http://docs.aws.amazon.com/iot/latest/developerguide/.
If you do not have an account you can sign up at https://aws.amazon.com. If you have an account
sing in and open AWS IoT on your AWS console or go to https://console.aws.amazon.com/iot.
1. Click on “Create a resource” (Figure 10)
Figure 10 Create resource
2. Click on “Create a thing” (Figure 11)
3. Set name and click to “Create”
Figure 11 Create a thing
4. Select your new thing, click on its name and Detail shows up on the right side
5. Click to “Connect device” (Figure 12)

GW-UNI-01 Quick Start Guide
© 2016 IQ HOME Kft. www.iqhome.org 15 / 17
Figure 12 Connect to device
6. Select NodeJS, Click “Generate certificate and policy” (Figure 13)
Figure 13 Generate certificate and policy
7. Download Amazon root certificate and store as rootCA.pem
If you logged in to Universal gateway via SSH or serial console you can simply download:
$ wget
https://www.symantec.com/content/en/us/enterprise/verisign/roots/
VeriSign-Class%203-Public-Primary-Certification-Authority-G5.pem
-O rootCA.pem
8. Download keys and certificates and copy files to the gateway with scp or use sshfs or copy file
contents in command line (Figure 14)
Figure 14 Download certificate and keys
9. Click to “Confirm & start connecting”
10. Open /etc/unid/unid.conf via SSH or serial console and copy host from sample code (Figure 15)
and insert into the configuration file and change mqttport to 8883.
# the hostname or IP address of the broker to connect
host = <endpoint>.iot.<region>.amazonaws.com

GW-UNI-01 Quick Start Guide
© 2016 IQ HOME Kft. www.iqhome.org 16 / 17
# the network port to connect to, default is 1883
# to disable this interface set to 0
mqttport = 8883
Figure 15 Copy host name and port number
11. Restart unid
$ sudo service unid restart
12. After successful setup you can test the communication with MQTT.fx.
Setup guide for MQTT.fx with AWS IoT at
http://docs.aws.amazon.com/iot/latest/developerguide/verify-pub-sub.html.
If the example /etc/unid/subscribe.conf file does not changed, you can test the communication:
1. Subscribe to topic: #
2. Set publish topic: iqrf/gateway/all/network/request
3. Send a DPA message i.e. Get addressing information from coordinator:
0000.00.00.FFFF
Click Publish and in the Subscribe tab the request and the response shows up

GW-UNI-01 Quick Start Guide
© 2016 IQ HOME Kft. www.iqhome.org 17 / 17
Document revisions
Revision
Date
Description
1.0
2015-02-25
Initial
Other manuals for GW-UNI-01
1
Table of contents
Other IQ Home Gateway manuals
Popular Gateway manuals by other brands

CTI Products
CTI Products RadioPro installation guide

BEGA
BEGA Gateway 70 588 Installation and start-up instructions

enphase
enphase Envoy Communications Gateway Installation and operation manual

Dinstar
Dinstar UC100-1T1S1O user manual

Sollae
Sollae SIG-5451 user manual

TRENDnet
TRENDnet TW100-BRV324 user guide