IQ IQTouch TB1000 User manual

IQTouch
Interactive Flat Panel
TB1000
——User Manual——

Content
Safety Instruction................................................................................................................................... ..
1.Installation........................................................................................................................................... 1
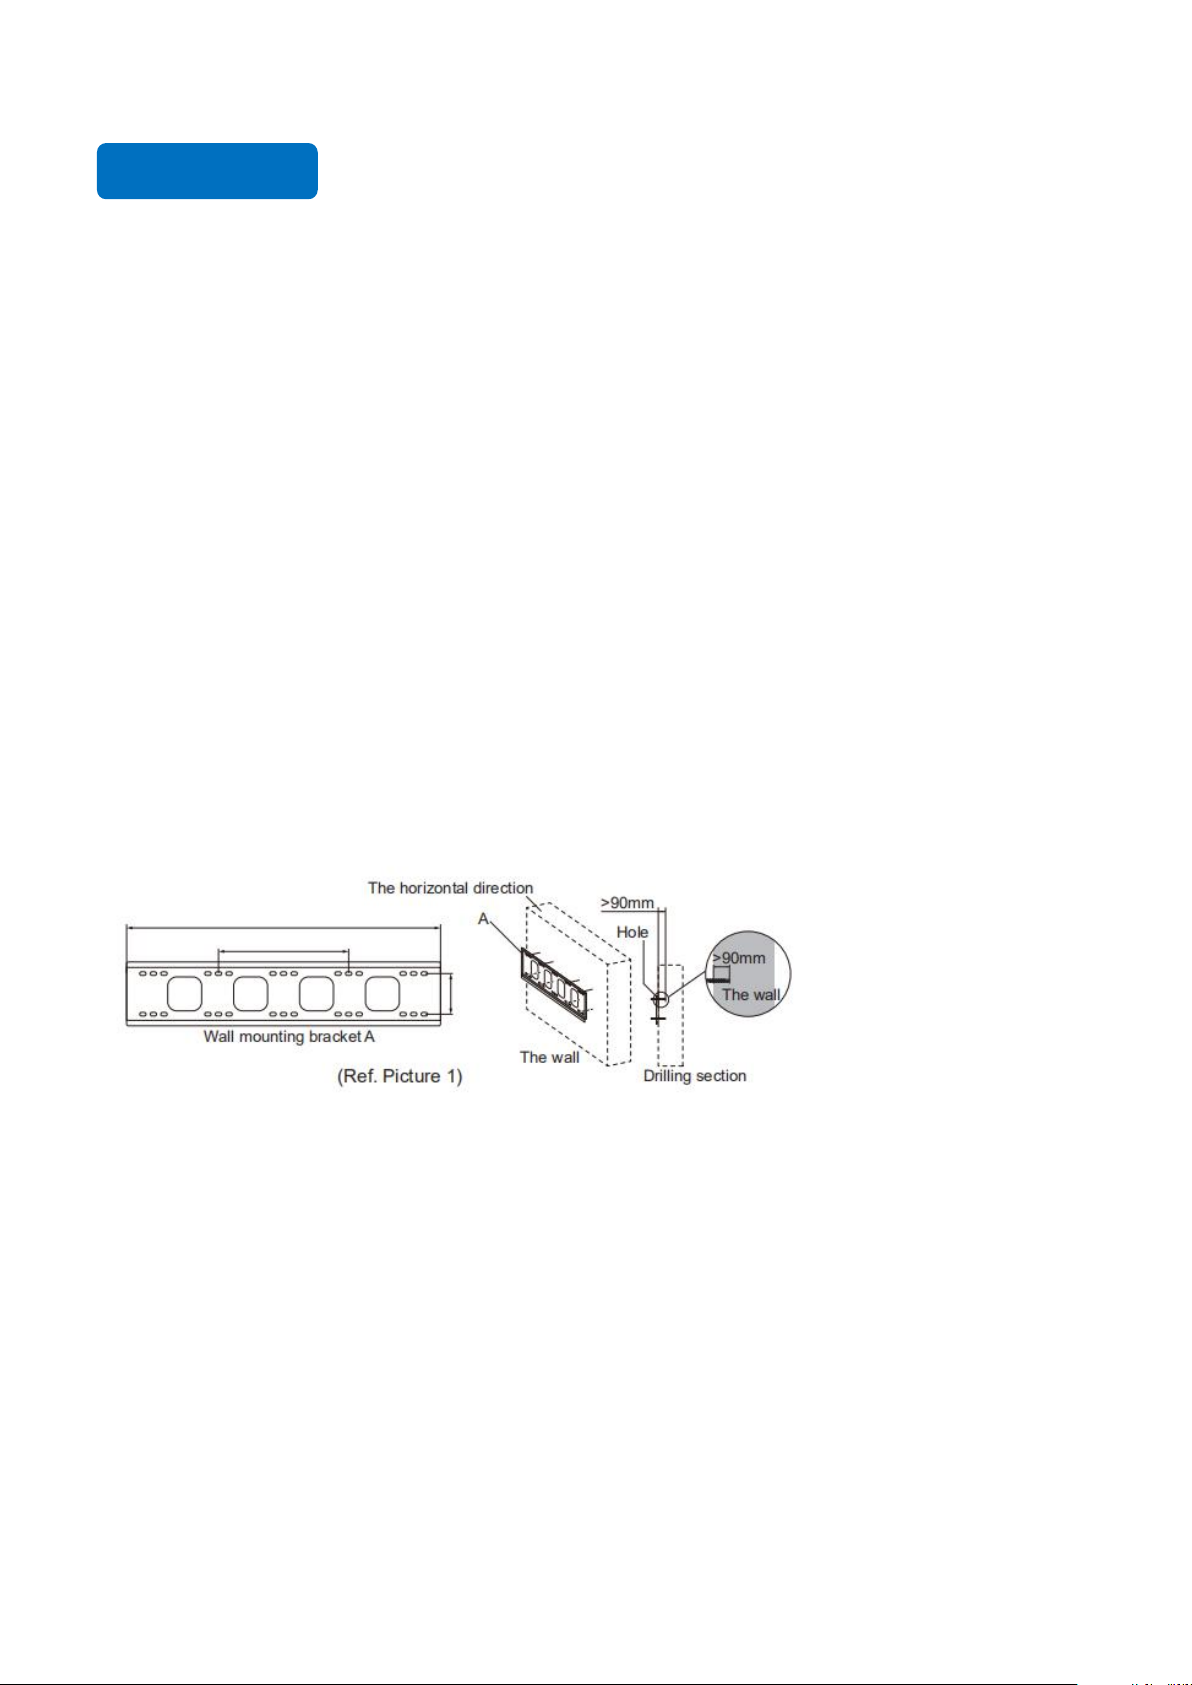
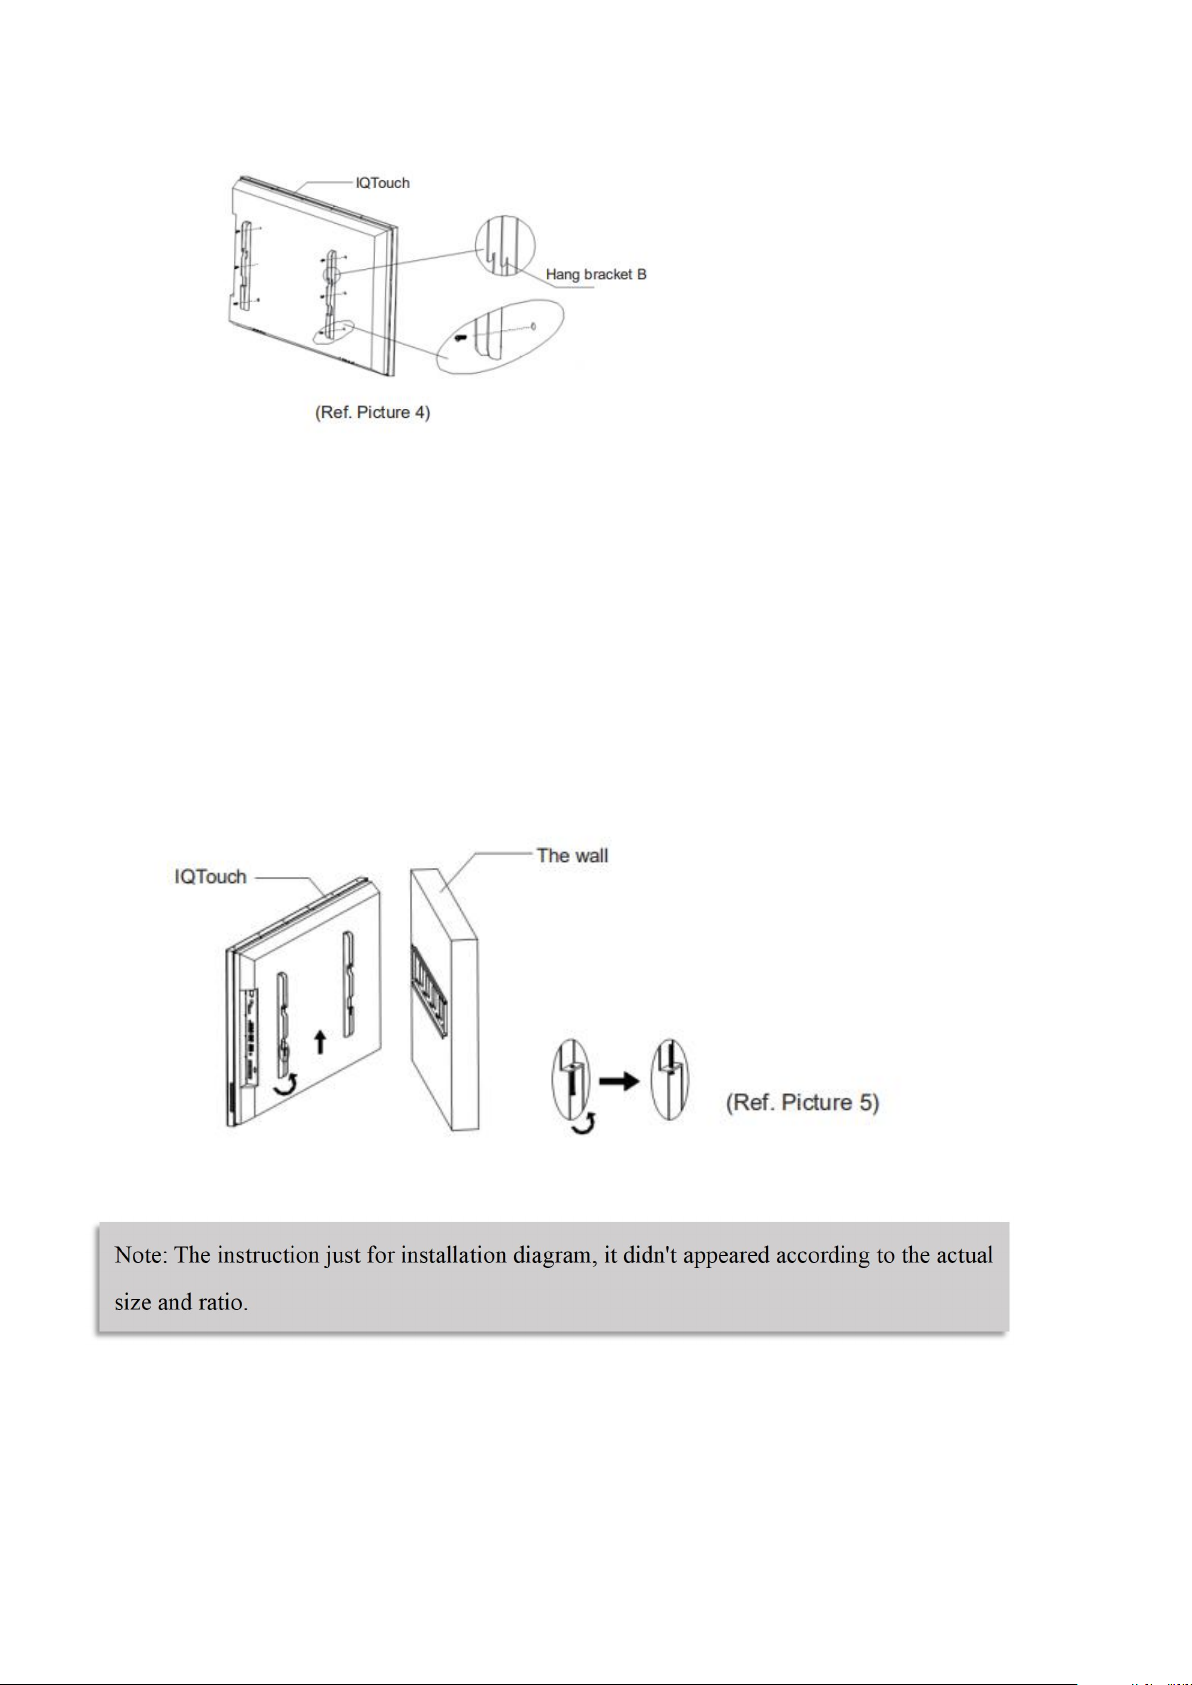
1.1 Bearing...................................................................................................................................... 1
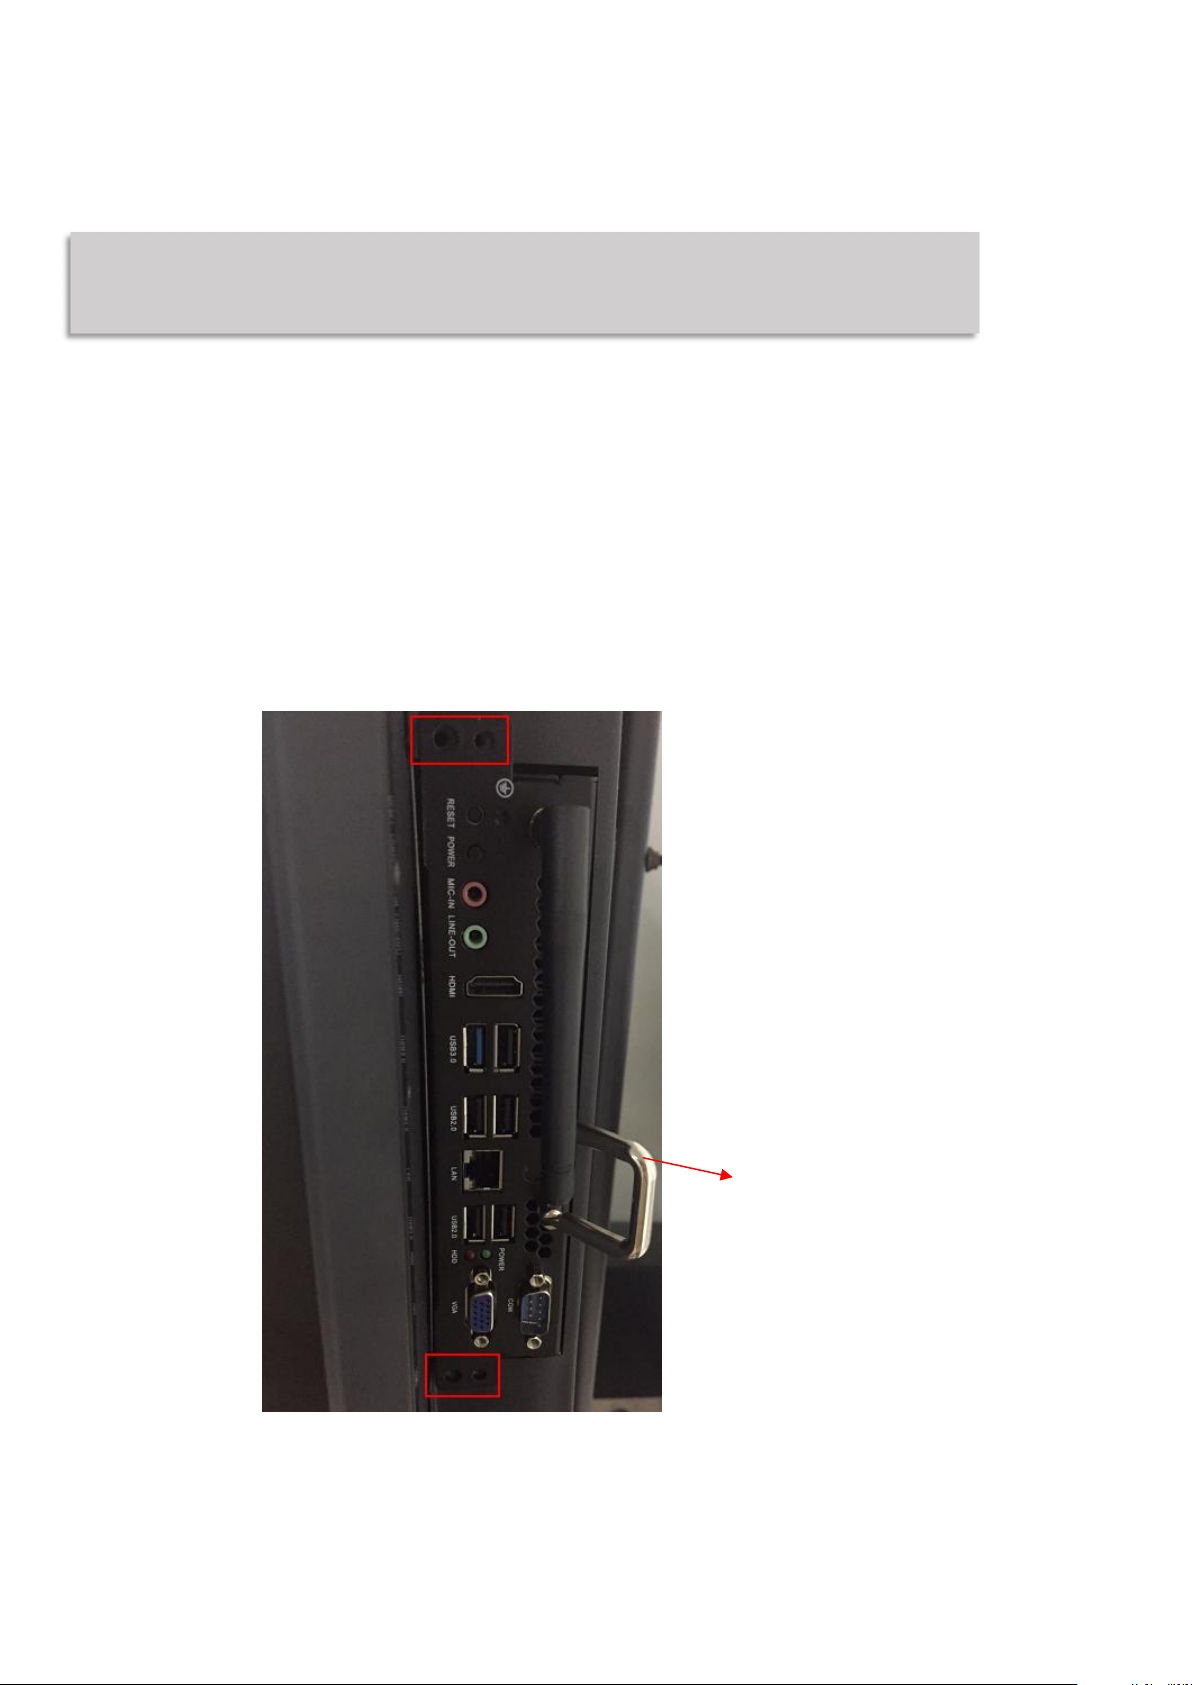
1.2 OPS Installation.........................................................................................................................4
2.Enable the Device................................................................................................................................5
3.Control Panel.......................................................................................................................................5
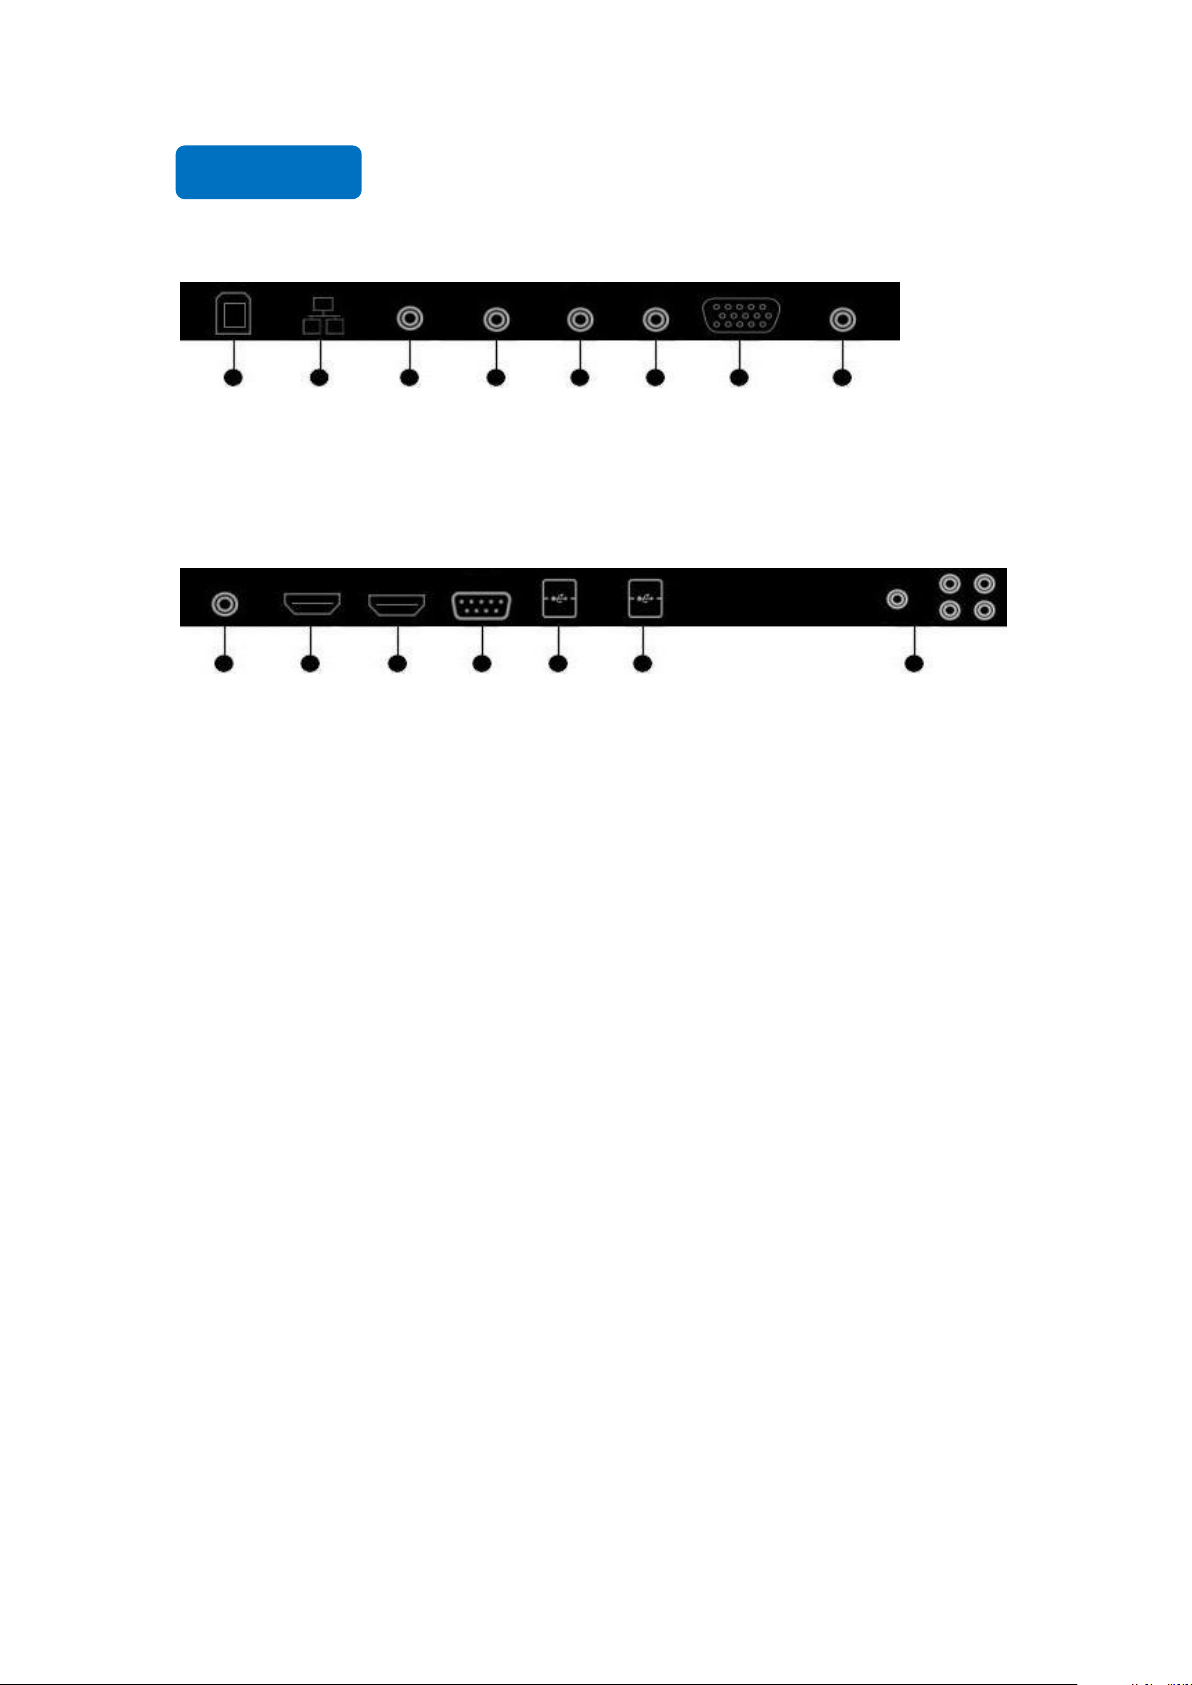
4.Interface...............................................................................................................................................6
5.Remote Control................................................................................................................................... 7
6.Remote Control Area...........................................................................................................................8
7. Connecting and Setting...................................................................................................................... 9
7.1 External Computer and Touch Connecting............................................................................... 9
7.2 AV Connecting...........................................................................................................................9
7.3 Video-OUT.............................................................................................................................. 11
7.4 RS232...................................................................................................................................... 12
8.Android Home Page.......................................................................................................................... 14
8.1 Sidebar.....................................................................................................................................14
8.2 Status bar................................................................................................................................. 21
9.Android Settings................................................................................................................................23
9.1Personalization......................................................................................................................... 23
9.2 Network................................................................................................................................... 27
9.3 Intelligence.............................................................................................................................. 29
9.4 System..................................................................................................................................... 32
10.Whiteboard App.............................................................................................................................. 36
10.1Interface display..................................................................................................................... 36
10.2 More menus...........................................................................................................................36
10.3 Code scanning and sharing....................................................................................................44
10.4 Common function..................................................................................................................45
11.Document Management...................................................................................................................52
11.1Interface introduction............................................................................................................. 52
11.2 Classification display.............................................................................................................52
11.3 Extended menu...................................................................................................................... 55
11.4 Display method......................................................................................................................57
11.5 Toolbar...................................................................................................................................58
12.Multi-screen Interaction.................................................................................................................. 60
12.1 Application note.................................................................................................................... 60
12.2 Operating instructions........................................................................................................... 60
12.3 Special instructions for multi-screen interactive interface.................................................... 61
12.4 Computer screen....................................................................................................................62
13.Built-in PC Operation......................................................................................................................64
14.Packing List.....................................................................................................................................65
15.Troubleshooting...............................................................................................................................66

Safety Instruction
For your safety, please read the following instruction before you use the product. Serious injury or
property loss may be caused by improper operations. Do not try to repair the product without
guidance.
Placement
Do not place the unit on an unstable cart, stand, tripod, racket, table, or shelf.
Do not expose the unit to direct sunlight and other sources of heat.
Do not handle liquids near or on the unit.
Never spill liquid of any kind into the unit
Do not put the unit near appliances that create magnetic fields.
Power Supply
Check that the unit’s operating voltage is identical with your local power supply.
Please unplug power supply and aerial plug when the weather is thunder-storm or lighting.
Please unplug power supply when there is nobody at home or didn’t use over a long time.
Please keep power cord from physical or mechanical damage.
Please use exclusive power cord, don't modify or lengthen it.
Please check and ensure AC source is connected with the ground.
A sudden power failure may damage the panel.
Frequent power on and off in a short time may cause faults.
LED Screen
Never use any other tough or sharp object to replace the written pen.
Unplug the power supply plug before cleaning.
Clean the screen with a soft dustless and dry cloth.
Never use water or the spray type detergent to clean the unit.
For deep clean, contact an authorized service center.
Please don’t display the high brightness image on the screen for a long time.
Sight Distance
The best distance between audience and screen is 5-7 times that of screen diagonal.

The best watching angle between audience and screen is within 176 °
Temperature
Do not place the unit near or over a radiator or a heater register.
If your unit is suddenly moved from a cold to a warm place, unplug the power cord for at least.
Two hours so that moisture that may have formed inside the unit can dry completely.
Normal operating temperature is 0 ~ 40℃.
Humidity
Do not expose machine in rain, damp or place near water.
Ensure the indoor drying, cool.
Ventilation
Keep the ventilation openings clear.
Ensure that the unit has enough space for ventilation around: left, right and back >10cm, top>
20cm.
Earphone
It will affect the hearing if you listen to noisy sound for a long time.
Before using earphone, please turn down the volume in advance.

1
1.Installation
1.1 Bearing
If the product is installed in a wall-mounted way, the bearing capacity of the surface for installation
must be at least four times of the weight of the product. If the surface for installation is a wall or the
ceiling of a building, the surface must be made of solid bricks, concrete or other materials with
equal intensity. If the product is installed on a surface made of loose material such as an old brick
wall, wood plank wall, solid brick wall, a metal or non-metal structure surface, or a surface with a
thick decoration layer, take necessary consolidating measures to ensure that the product is stably
installed.
Step1: Punching holes in the wall
Mark 8 holes location on the wall according to wall mounting bracket A and use the drill bit drilling
the 8 holes. Depth of holes not less than 90mm (Ref. Picture 1)
Step2: Expansion bolt installation
Press the expansion bolt into 8 holes. (Ref. Picture 2)

2
Step3:Wall mounting bracket A installation
Install the wall mounting bracket A with 8pcs screws and gaskets. Please ensure that the wall
mounting bracket A is installed horizontally. (Ref. Picture3)
Step4: Install the left& right hang bracket B to IQTouch.
Use screws fix the hang bracket B at the back of IQTouch. Please check the direction of hang bracket
B before installation. (Ref. Picture 4)

3
Step5: Hang IQTouch on the wall mounting bracket A
Hanging the left &right hang bracket B to the wall mounting bracket A, please ensure two hang
brackets B total hang on wall mounting bracket A, then tighten the screws of hang bracket B to
prevent it slide. (Ref. Picture5)

4
1.2 OPS Installation
Note: The OPS does not support hot-plugging. Please insert the plug of the OPS after the
interactive panel is disconnected from the power.
Install the OPS by the following steps:
1) Insert the OPS into the special slot on the rear of the interactive panel.
2) Tighten the screws.
3) Confirm that the OPS is installed correctly.
Handle facing
outward

5
2.Enable the Device
1) Connect the power cord to the port at the back of the device.
2) Plug the power cord to the electrical socket.
3) If the power LED light is not turn red please turn on the rocker switch at the back
of the device.
4) Press power button or put the battery in to remote control and use remote control
to power on the device.
3.Control Panel
Icon
Function Description
Power button: On or standby model
IR receiver:Receive infrared signals such as remote control
USB 2.0 port (Android & PC)

6
4.Interface
Terminal Interface
Side Interface
Coax out HDMI 1 HDMI 2 RS232 USB2.0 USB 2.0 WIFI: antenna port
Touch RJ45 YPBPR IN AV IN AV OUT VGA VGA EARPHONE
AUDIO IN

7
5.Remote control
Button
Function Description
Power on/off
Mute
0~9
Input digit/”space” in OPS mode
Channel DASH key
Channel BACK key
One key to power off the screen
Active writing application
Back
Return to the current page
VOL+/VOL-
Control sound volume
CH+/CH-
Select different input source
PgUp/PgDn
Next/previous page in ops mode
Up/down/left/right button
Enter
Confirm
Input
Select different input source
Menu
Open/close menu
HOME
Back to Home page
Auto
Auto correction (valid under VGA channel)
Reserved function keys
Start menu in OPS mode
Space
Function key in OPS mode
Alt +Tab
Change window in OPS mode
Alt +F4
Close window in OPS mode
Stop current operation or exit menu
F1-F12
Correspond to computer buttons F1-F12

8
6.Remote Control Area
The effective receiving area is about 3 meters with 30° angle from vertical point to the left and
right. And the effective receiving area is about 5 meters from the front of device. Note that the
remote control signal receiver locates at the position of power indicator.
5M

9
7. Connecting and Setting
For safety, please do not connect any power supply before the external devices setup.
7.1 External Computer and Touch Connecting
1) Connect a VGA cable (15 pin) between the VGA and external PC. Connect an earphone
cable between the PC and audio at the same time.
2) Connect a USB cable between the external PC and USB terminal.
3) Plug the POWER cord and switch it on from the rear panel.
4) Start up the external computer.
5) Press to turn on the panel.
6) Select Signal source to VGA source according to the one you connected.
Note: The panel can connect with the external PC via HDMI.
7.2 AV Connecting
AV IN

10
1) Connect an AV cable with the device with AV-OUT (Yellow is Video, Red is Audio-R,
White is Audio-L).
2) Plug the POWER cord and switch it on from the rear panel.
3) Press to turn on the panel.
4) Select Signal source to AV IN source.
YPbPr
1) Connect a YPbPr cable with the device with YPbPr.
2) Plug the POWER cord and switch it on from the rear panel.
3) Press to turn on the panel.
4) Select Signal source to YPbPr source.
Front HDMI/ HDMI 1/ HDMI 2

11
1) Connect a HDMI cable with the device with HDMI.
2) Plug the POWER cord and switch it on from the rear panel.
3) Press to turn on the panel.
4) Select Signal source to HDMI source according to the one you connected.
7.3 Video-OUT
HDMI-out
1) Connect a HDMI cable with the device with HDMI.
2) Plug the POWER cord and switch it on from the rear panel.
3) Press to turn on the panel.

12
7.4 RS232
1) Connect a serial port cable with the device.
2) Plug the POWER cord and switch it on from the rear panel.
3) After connecting the central control system and unit, you can use some of the function
such as power on/off or adjust the volume etc.

13
RS232 code list
RS232 Code for Android Firmware
6-byte command, baud rate 115200
Start code 99, client code 23, function ID code, device ID code (generally 01 without special
instructions), check code + function ID code = FF, end code AA
Function
Required Commands(Hex)
Power ON
99 23 01 00 FE AA
Power OFF
99 23 01 01 FE AA
HOME
99 23 00 01 FF AA
Mute
99 23 02 01 FD AA
Sound mode
99 23 03 01 FC AA
Image mode
99 23 04 01 FB AA
Analog TV
99 23 07 01 F8 AA
Video 1
99 23 08 01 F7 AA
Video 2
99 23 09 01 F6 AA
Quantity
99 23 0A 01 F5 AA
Computer 1
99 23 0B 01 F4 AA
Computer 2
99 23 0C 01 F3 AA
HDMI 1
99 23 0E 01 F1 AA
HDMI 2
99 23 0F 01 F0 AA
Front HD
99 23 10 01 EF AA
Built-in computer
99 23 11 01 EE AA
Menu
99 23 12 01 ED AA
Signal source
99 23 13 01 EC AA
Exit
99 23 14 01 EB AA
Listen alone
99 23 16 01 E9 AA
Sound (+)
99 23 17 01 E8 AA
Sound (-)
99 23 18 01 E7 AA
Up
99 23 22 01 DD AA
Down
99 23 23 01 DC AA
Left
99 23 24 01 DB AA
Right
99 23 25 01 DA AA
OK
99 23 26 01 D9 AA
Multimedia
99 23 27 01 D8 AA

14
8.Android Home Page
Enter the Android interface by default after power on.
8.1 Sidebar
The sidebars are divided into left sidebar and right sidebar. Click on the icon , floating on
the left and right side of the screen to show the sidebar. The functions are Back, Home page, Task,
Annotation, Input and Control panel. The sidebar will be hidden automatically after 5 seconds
without any operation.

15
Back
Click the icon to return or exit the current program.
Home
Click icon to enter the main interface of Android system.
Task
Click icon,to enter the task management interface, where you can select to open or close the
application.
1) In multi task state, touch the task list area and slide up and down to view the task list.
2) Touch the task thumbnail to enter the task interface.

16
Annotation
Click the icon to open the annotation.
Annotation Toolbar Instruction:
Click to open pen mode. Long press to pop up the writing menu , choose color
and size of the pen.
Click to open eraser mode.
Click to exit the mode if the current mode is annotation.
Click to open drop-down menu of the annotation.
Click to share scan QR code. You can scan code to save the files to your own mobile device.
Click to insert whiteboard.
Click to exit the annotation mode.
Table of contents
Other IQ Interactive Whiteboard manuals
Popular Interactive Whiteboard manuals by other brands

Westinghouse
Westinghouse WB55F1D1 user manual

TRIUMPH BOARD
TRIUMPH BOARD 55 inch user manual

SMART Board
SMART Board Board 600i6 Configuration and user's guide

Da-Lite
Da-Lite Large advantage electrol Instruction book

PENANDFREE
PENANDFREE uBoard installation guide

SMART Board
SMART Board Board E70 user guide