TIP Fluorescent tubes can be very fragile. Please be careful when removing the bulb from the packaging.
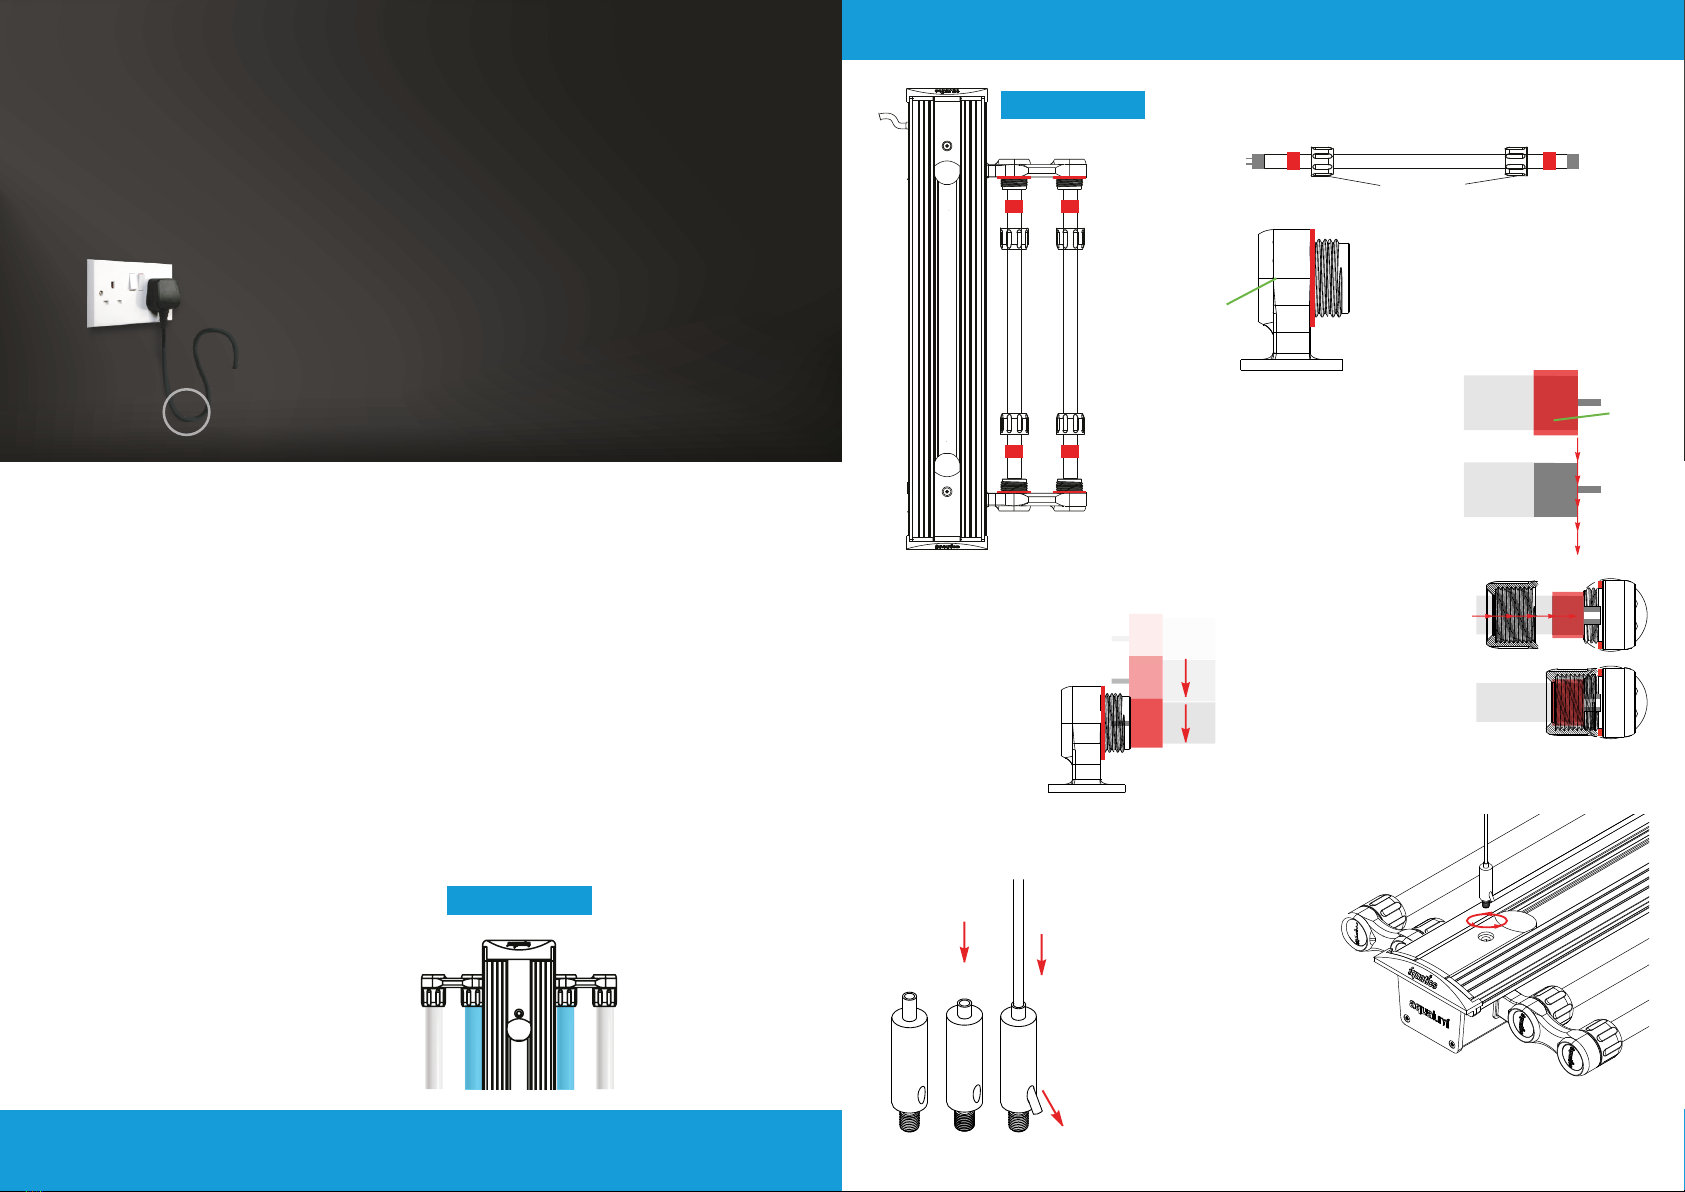
DRIP LOOP (FIG 1)
DIAGRAM 1
DIAGRAM 2
Please read the set of instructions carefully before operation.
iQuatics AquaLumi Universal lighting system has been designed and manufactured by industry veterans and we
are proud to present you with our latest high quality finished product. Always make sure the instructions are
followed precisely; do not operate your appliance if there are any signs of damage or malfunction. If damaged,
maintenance should be carried out by the manufacturer or a qualified person. This is to avoid any permanent
damage to your fixture.
IMPORTANT
1. LAMP INSTALLATION
If you ordered fluorescent tubes with your Aqualumi Universal, your bulbs were removed and
packaged safely to prevent damage in transit. Never operate your Aqualumi Universal if there is any
visible damage to the system or bulbs on arrival.
1.1 INSTALLATION LOCATION
Ideally your light unit will be located next to an adequately rated electricity supply. If you are using an
extension lead please make sure the lead is not overloaded.
1.2 WORKINGSPECIFICATION
220v-240v (Fluctuation) Ambient working temperature +65 degrees C.
Your Aqualumi Universal should be installed in dry conditions away from the outside weather and
corrosive materials. Frequently wipe down your lighting system of any residue which maybe have
built up over time.
Under no circumstances should your lighting system be submerged under the water.
Minimum distance from the water surface is 20mm.
1.2 REPLACING/INSTALLING YOUR FLUORESCENT TUBES
Make sure your light unit is unplugged from the power supply before changing any fluorescent tubes.
Your Aqualumi Universal will have either a single
power cable or a double power cable. Depending
on the model which you have purchased. The 2
tube Universal is fitted with a single power cable
which controlls both tubes at the same time. Both
tubes need to be installed for the fixture to work.
With the 4 tube Aqualumi bar there will be 2
power supplies. One will control tube 1 and 4 and
the other will control 2 and 3 giving more control
over the timing of your lights. See Diagram 1.
Please Note:
If your light system
uses different size
tubes on the front
and back, the front
2 will be controlled
seperately to the
back 2 tubes.
Suspension
Cable Grip
Seals and washer are shown in red for illustration purposes.
SCREW CAPS
STEP 2
Each Lamp receiving connector
has 2 washers/seals. Place Seal 1
into positing over the thread of the
connector making sure it is seated
against the flat surface.
STEP 3
Simultaneously carefully push
the ends of the tubes into the
receiving pins on the connectors.
These will click into place when
seated correctly.
STEP 4
Tighten the screw cap onto the
receiving thread. This will be
quite tight due to the material
and thread to allow for the
water tight seal. Do not use a
spanner on this. They should
be tightened by hand.
STEP 1
Push down on the top nipple to
release the locking latch.
STEP 2
Insert the nylon coated
suspension cable keeping the
nipple pressed down until the
cable exits the bottom side exit.
STEP 3
Adjust the lighting system height
to the desired location and
release the nipple to secure the
cables in position.
STEP 4
Screw the threaded end of the
suspension fitting onto the receiving
hole on each end of the lightng system.
STEP 1
Place two screw caps onto each tube as shown in the below
illustration.
Repeat steps 1-4 on all the tubes that you are placing into your setup.
Carefully slide seal 2 onto each
end of the fluorescent tube aligning
it up to the outer edge of the metal
end cap as shown here.
The rubber seals are important to
create a water tight seal.
Seal 1
Seal 2
TIP Change the bulbs at the time of day at which your lighting is not in use, saving you having to disturb
the timing of your aquarium lighting and ensuring the unit is fully cool.
As with all aquarium electronic equipment, make sure you have a drip loop to
prevent the socket or plug from getting wet. As shown in (fig 1), opposite, the part
of the power cable lying below the level of the socket is used to prevent the water
entering the socket
Make sure your pendant is safely out the reach of children, unless accompanied
by adult supervision, as injury may occur from hot parts, the lamp, or moving parts.
This lighting system should only be used for its intended purpose. It must be
installed indoors and not exposed to the weather, freezing temperatures or close
to other heat sources and never submerged in water.
1 12 2


