IRISBOND DUO User manual


User Manual
IRISBOND DUO
www.irisbond.com
Table of Contents
Welcome to Irisbond.................................................................................................. 2
Irisbond Duo Eyetracker........................................................................................................ 3
System Components ............................................................................................................. 3
Description of Components .................................................................................................. 4
Assembly Options.................................................................................................................. 5
How to Position Irisbond Duo When Using a Laptop............................................................ 6
How to Attach Irisbond Duo to a Desktop Computer Screen ............................................. 12
How to Attach Irisbond Duo to a Tablet ............................................................................. 14
Installing the EasyClick Software............................................................................. 18
1.1. Main Menu ................................................................................................... 22
1.1.1. Beginner Mode........................................................................................................ 23
1.1.2. Pro Mode ................................................................................................................. 28
1.1.2.1. Settings ................................................................................................................. 28
1.1.2.2. Desktop Bar .......................................................................................................... 38
Certifications ........................................................................................................... 41
Troubleshooting ...................................................................................................... 42
Open Source Library Licenses ................................................................................ 43

User Manual
Introduction
www.irisbond.com Page 2
Welcome to Irisbond
Congratulations on purchasing the Irisbond system which will allow you to use a computer simply by
moving your eyes!
The Irisbond system is based on the latest innovations in artificial vision technology, and more specifically,
on
Eye Tracking
technology, which allows the user to control a computer mouse by moving their eyes.
Those who benefit most from the system are people with severe motor impairment who cannot use
conventional mouse movement systems. Individuals with Amyotrophic Lateral Sclerosis (ALS) or Cerebral
Palsy using Irisbond can access a variety of apps installed on the computer. Irisbond gives the user a
window to the world, allowing them to communicate, share experiences and knowledge, watch movies,
read, listen to audiobooks, play...there really is no limit!
In addition, by using Augmentative and Alternative Communication (AAC) tools such as a virtual keyboard,
voice synthesizers and environmental control systems, the user can control the remote control for the TV,
or any other infrared device. For perhaps the first time ever, they will able to control devices at home around
them.
The Irisbond eyetracker is safe to use, complies with relevant European Guidelines and Directives and has
been tested by a certified laboratory in accordance with industry standards.
User Manual
IRISBOND DUO
www.irisbond.com Page 3
Irisbond Duo Eyetracker
The system is made up of one eyetracking device connected to computer via a cable
(included with the device) through a USB port (either USB 2.0 or USB 3.0). The
eyetracker emits infrared light beams which create reflections on the user’s corneas. A
camera then registers these reflections and through a series of complex computational
algorithms is able to identify the user’s pupils. The information is then processed by the
computer via the Irisbond Primma software (once installed on the computer). This
allows the user’s eye movements to be translated into onscreen positioning coordinates
for the mouse.
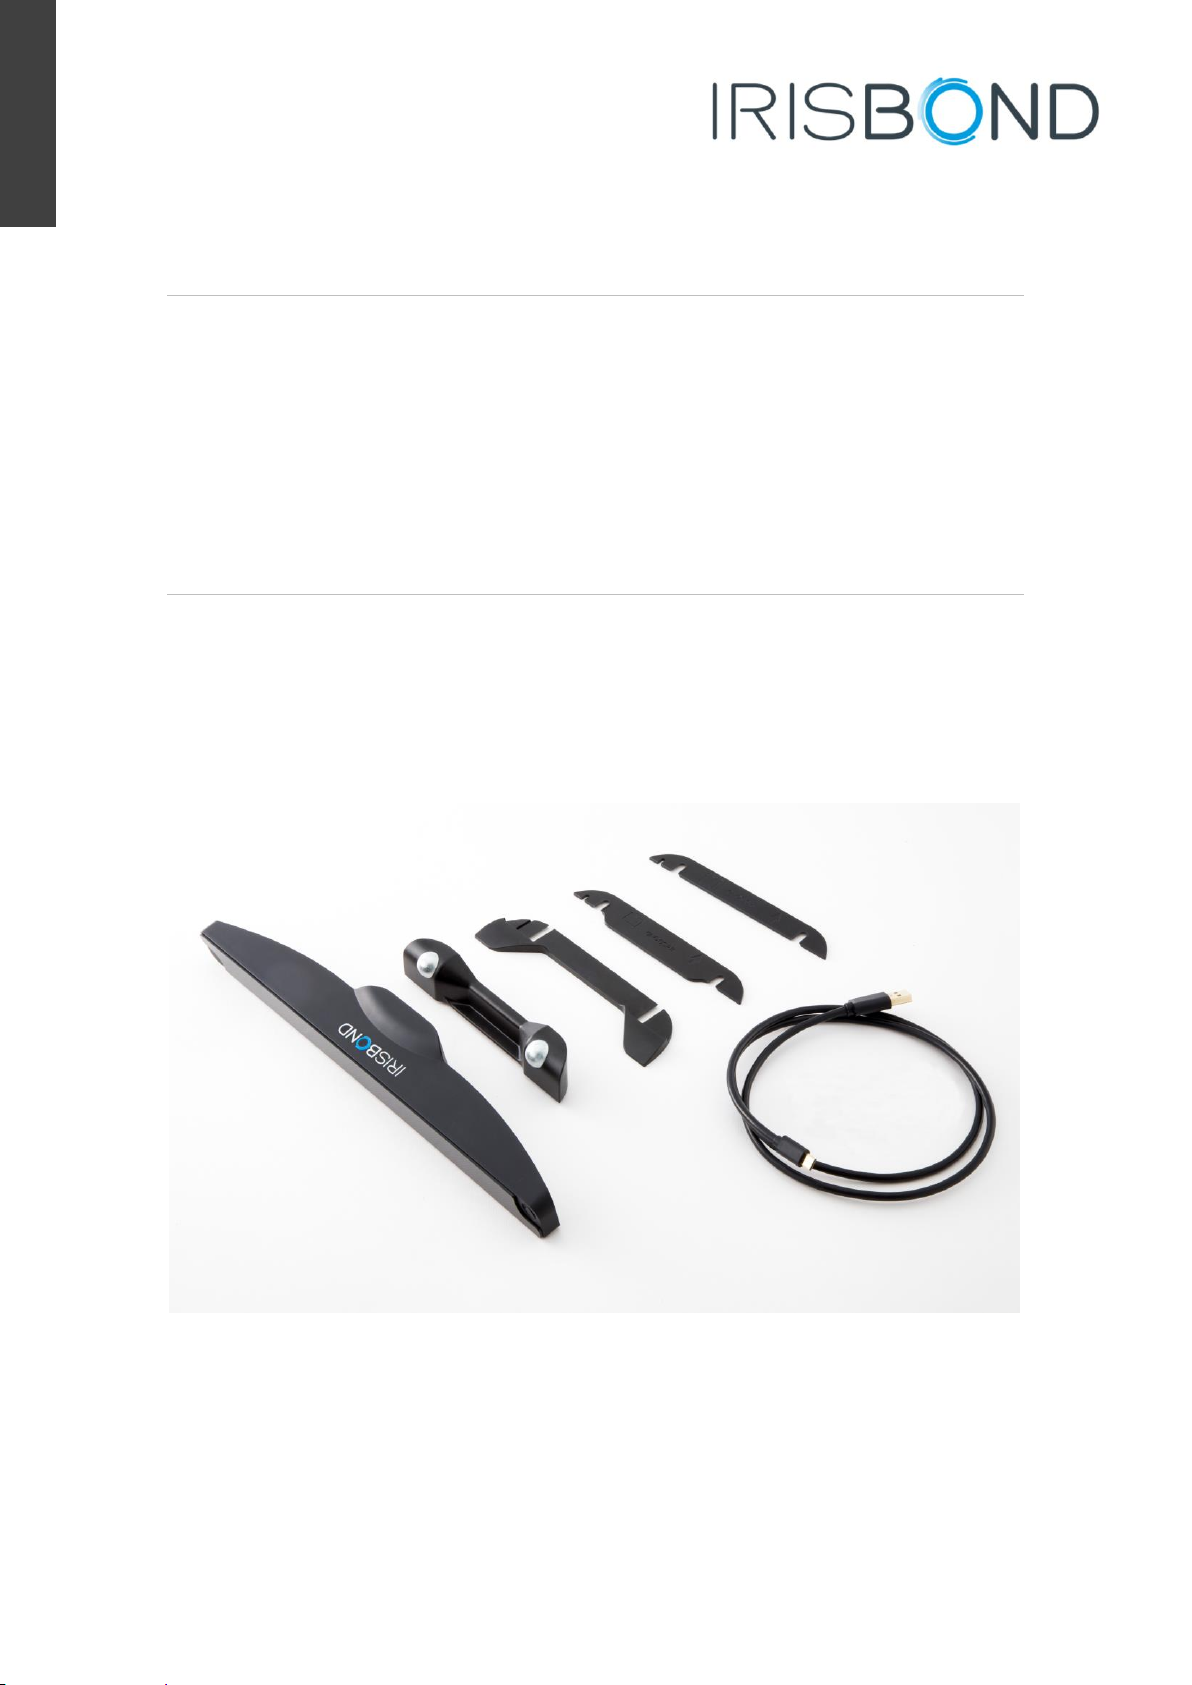
System Components
The Irisbond Duo system comes with the following components:
•1 Irisbond eyetracker.
•1 USB extension cable.
•4 mounting attachments.
User Manual
IRISBOND DUO
www.irisbond.com Page 4
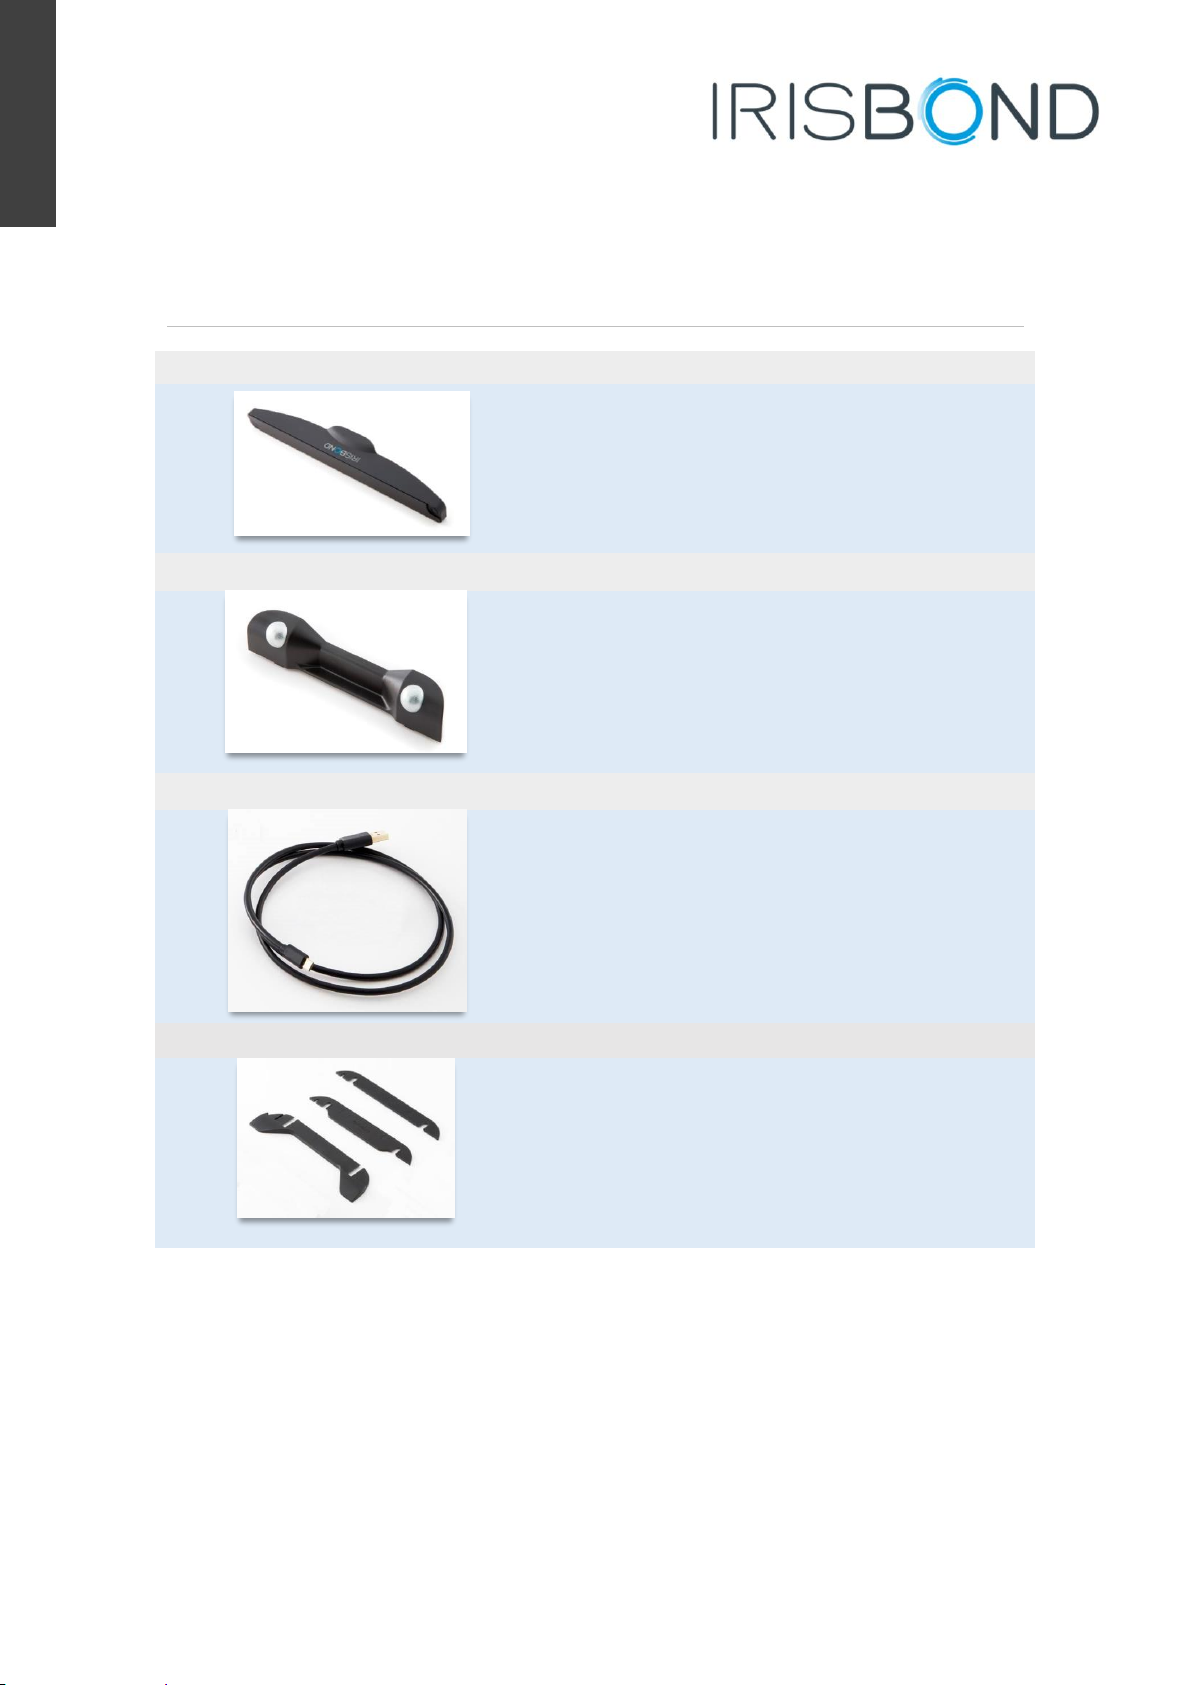
Description of Components
Irisbond Duo Eyetracker
On the back of the eyetracker there are two metallic
indentations which the eyetracker support fits into.
Support
The eyetracker support holds the device in place.
Cable
The cable enables a connection between the
computer and the eyetracker.
Mounts
The mounts allow you to use the Irisbond system on
various surfaces.
User Manual
IRISBOND DUO
Positioning
www.irisbond.com Page 5
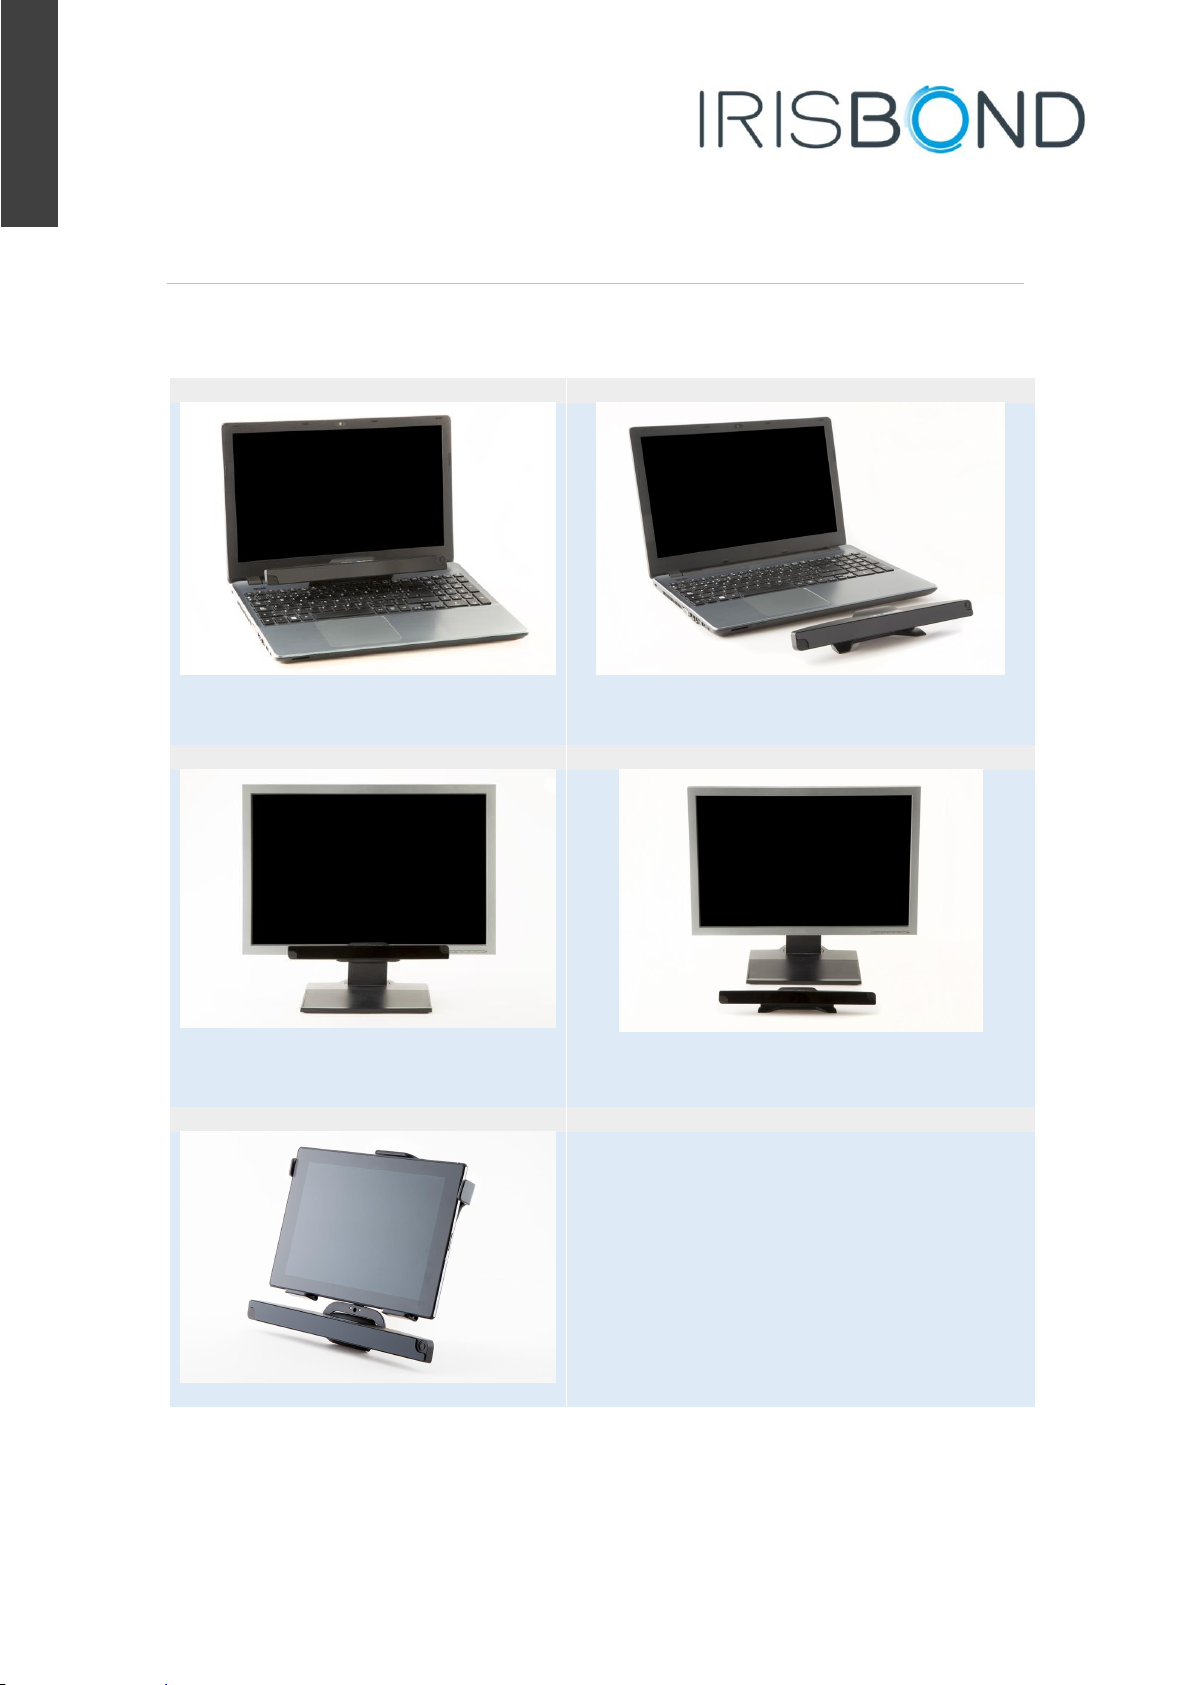
Assembly Options
The Irisbond Duo system is designed to be fully adaptable for use with laptops,
Desktop PCs and tablets:
1. Laptop
Attached to a flat surface on the laptop.
Placed in front of the laptop.
2. Desktop Computer
Attached to the lower area of the monitor.
Placed in front of the monitor.
3. Tablet
Attached to a tablet using a special adaptor.
User Manual
IRISBOND DUO
Positioning
www.irisbond.com Page 6
How to Position Irisbond Duo When Using a Laptop
When using a laptop, the Irisbond eyetracker can be positioned in three ways:
1. Attached to the laptop in the space between the screen and the keyboard
2. Attached to the bottom section of the laptop screen
3. Placed on a table in front of the laptop
How you choose to position the eyetracker will depend on the model of the laptop you are using
and the position of the user (seated in a chair, reclined in a profiling bed, lying down, using an
inclined table etc.)
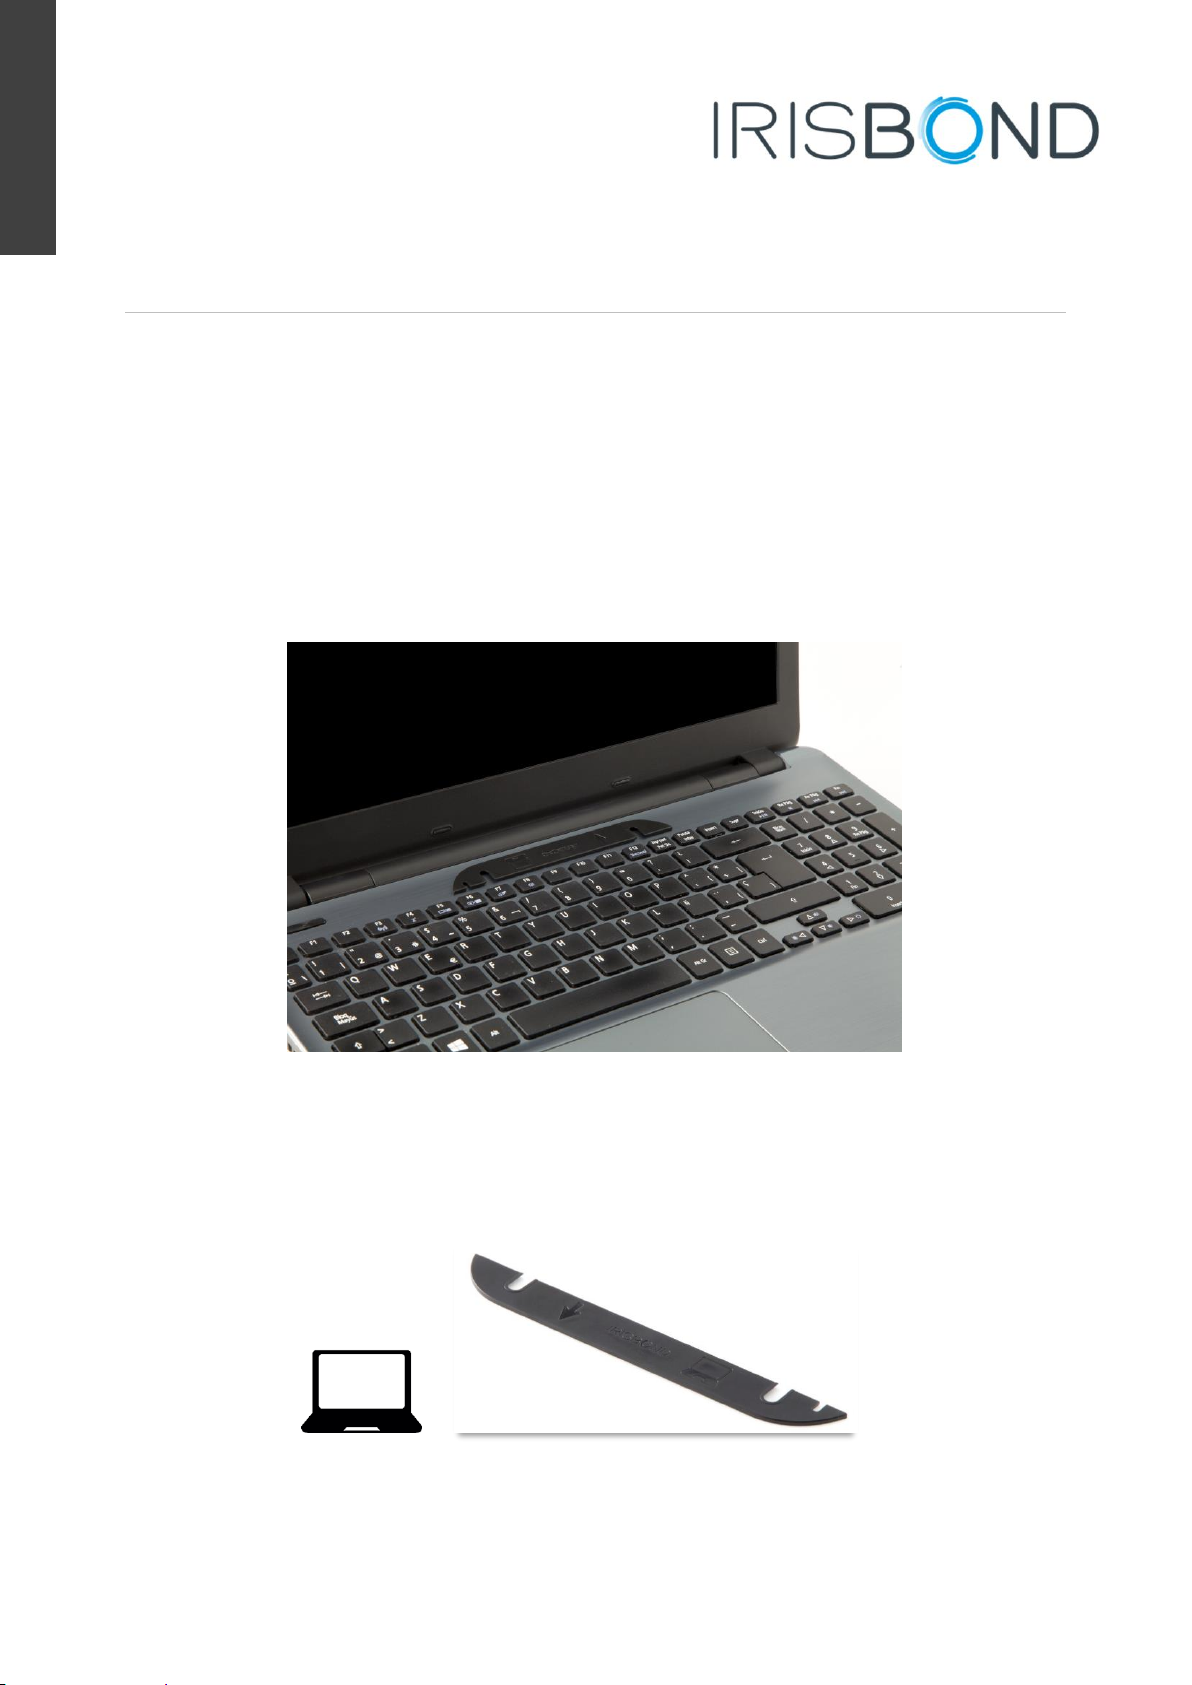
Option A. Attached to the laptop in the space between the screen and the keyboard
Instructions:
1. Should you wish to attach the eyetracker to the laptop in the space between the screen
and the keyboard, you must first identify the adhesive mount specifically designed for
use with a laptop. You will be able to recognize it as it has a laptop design on it.
Laptop symbol
Adhesive mount for laptops
2. Remove the protective paper from the adhesive strip and place the mount (adhesive strip
side down) on a clean and flat area between the screen and the keyboard with the arrow
User Manual
IRISBOND DUO
Positioning
www.irisbond.com Page 7
pointing towards the screen. Allow at least 8 hours before attaching the eyetracker
support to the mount.
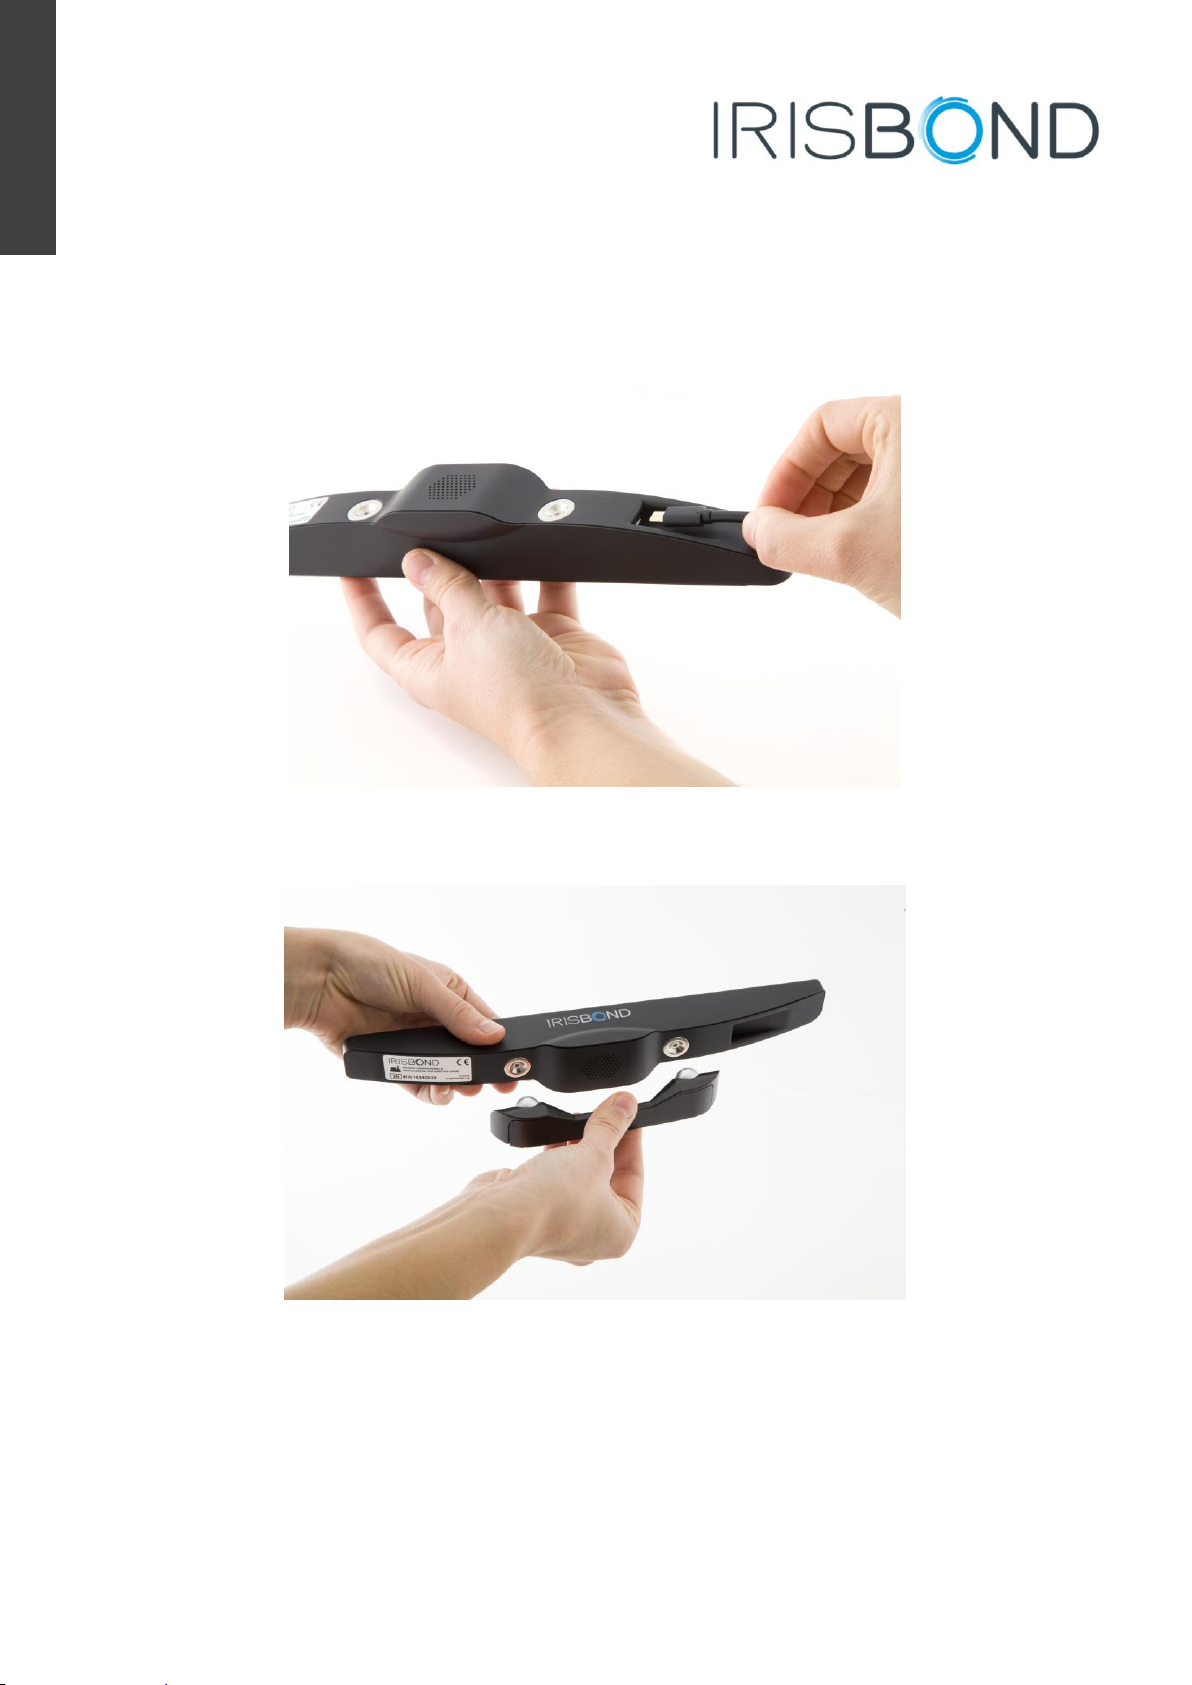
3. Connect the USB cable to the Irisbond eyetracker.
4. Attach the support to the Irisbond eyetracker by bringing together the metal contacts on
the back of the Irisbond device and the magnets on the support. When bringing these
into contact, be sure that both tabs are facing downwards.

User Manual
IRISBOND DUO
Positioning
www.irisbond.com Page 8
5. Slot the support (now holding the Irisbond eyetracker) in the mount attached to
the laptop.
Option B. Attached to the bottom section of the laptop screen
Instructions:
1. Should you wish to attach the eyetracker to the bottom section of the laptop screen you
must first identify the adhesive mount specifically designed for use with a laptop. You will
be able to recognize it as it has a laptop design on it.
Laptop symbol
Adhesive mount for laptops
2. Remove the protective paper from the adhesive strip and place the mount (adhesive strip
side down) on the bottom area of the screen with the arrow pointing downwards. Allow at
least 8 hours before attaching the eyetracker support to the mount.
WARNING The strip on the mount is made of a strong adhesive
material. We recommend carefully considering where to place the mount
before attaching to the computer as the adhesive is semi-permanent.
User Manual
IRISBOND DUO
Positioning
www.irisbond.com Page 9
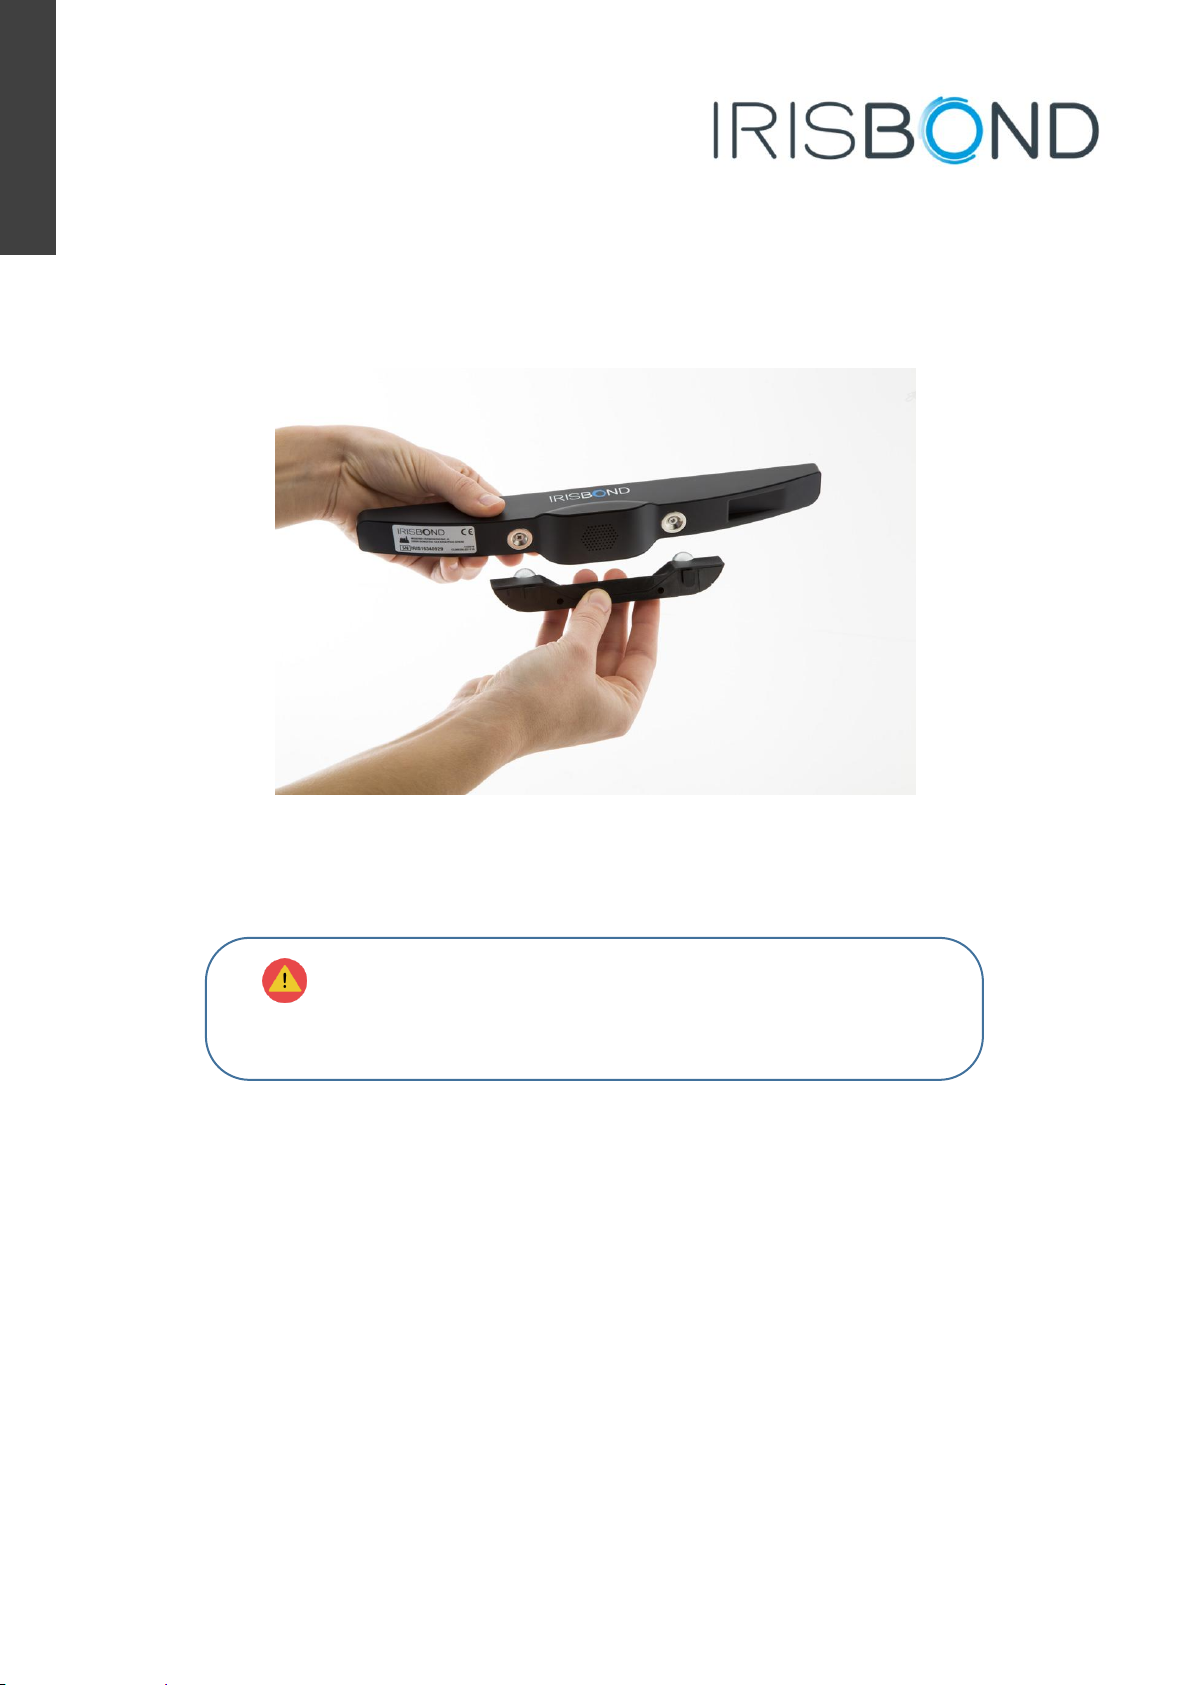
3. Attach the support to the Irisbond eyetracker by bringing together the metal contacts on
the back of the Irisbond device and the magnets on the support. When bringing these
into contact, be sure that the tabs are facing upwards.
4. Slot the support (now holding the Irisbond eyetracker) in the mount attached to the
laptop.
WARNING The strip on the mount is made of a strong adhesive
material. We recommend carefully considering where to place the mount
before attaching to the computer as the adhesive is semi-permanent.
Other manuals for DUO
2
Table of contents
Other IRISBOND Computer Accessories manuals


