iRobot Roomba 800 User manual

Roomba®800
b
®
8
00
Owner’s Guide


Roomba®800 Series Owner’s Guide 1
EN
Table of Contents
Getting Started ................................................................................................................................................................2
Robot Anatomy.................................................................................................................................................................4
Using Your Roomba.......................................................................................................................................................6
Scheduling...........................................................................................................................................................................7
Accessories .........................................................................................................................................................................8
Robot Care....................................................................................................................................................................... 11
Troubleshooting ............................................................................................................................................................ 15
Important Safety and Compliance Information ................................................................................... 18

EN
2 For Customer Care go to irobot.com/support
To get started, you will need your Roomba, Home Base®
charging station and line cord. For a full list of box contents,
refer to the package.
Getting Started
Set up the Home Base®
Place the Home Base against a wall and
use the power cord to connect it to a socket.
1Wake up Roomba
Turn your robot over and remove the yellow bin
insert and battery pull tab. Then, place Roomba
on the Home Base to activate the battery.
2
Note: Position the Home Base® on
a hard, level surface against a wall.
Make sure it’s at least four feet
(1.2 meters) from any stairs and that
Roomba has a clear path to reach it.

Roomba®800 Series Owner’s Guide 3
EN
Roomba is ready to clean
Roomba has a partial battery
charge so it’s ready to start
cleaning. Press CLEAN to wake
up Roomba, then press CLEAN
again to begin cleaning.
3
Register your Roomba at irobot.com/register
to activate your warranty and enjoy access to:
• Easy-to-follow instructional videos to help you maintain
your Roomba and keep it running at peak performance.
• Support tailored to your specific robot, including answers
to questions, maintenance tips, and live chat with iRobot’s
award-winning customer care team.

EN
4 For Customer Care go to irobot.com/support
Faceplate
Bin Release
Button
High-Capacity
Powered Bin
RCON Sensor
Carry Handle
Right Wheel Module
Cli Sensors
Home Base®
Contact Point
Removable
Caster Wheel
Battery Door
Home Base®
Contact Point
AeroForce™
Extractors Spinning Side Brush
Robot Anatomy
Bottom View
Top View
Left Wheel Module Cli Sensors

Roomba®800 Series Owner’s Guide 5
EN
Buttons & Lights
Battery Light
Dirt Detect™
Full Bin Light
Anti-Tangle Light
Troubleshooting Light
CLEAN/Power Button
HOUR
CLOCK
MINUTE
SCHEDULE
OK
SPOT
DAY
BACK
CLEAN

EN
6 For Customer Care go to irobot.com/support
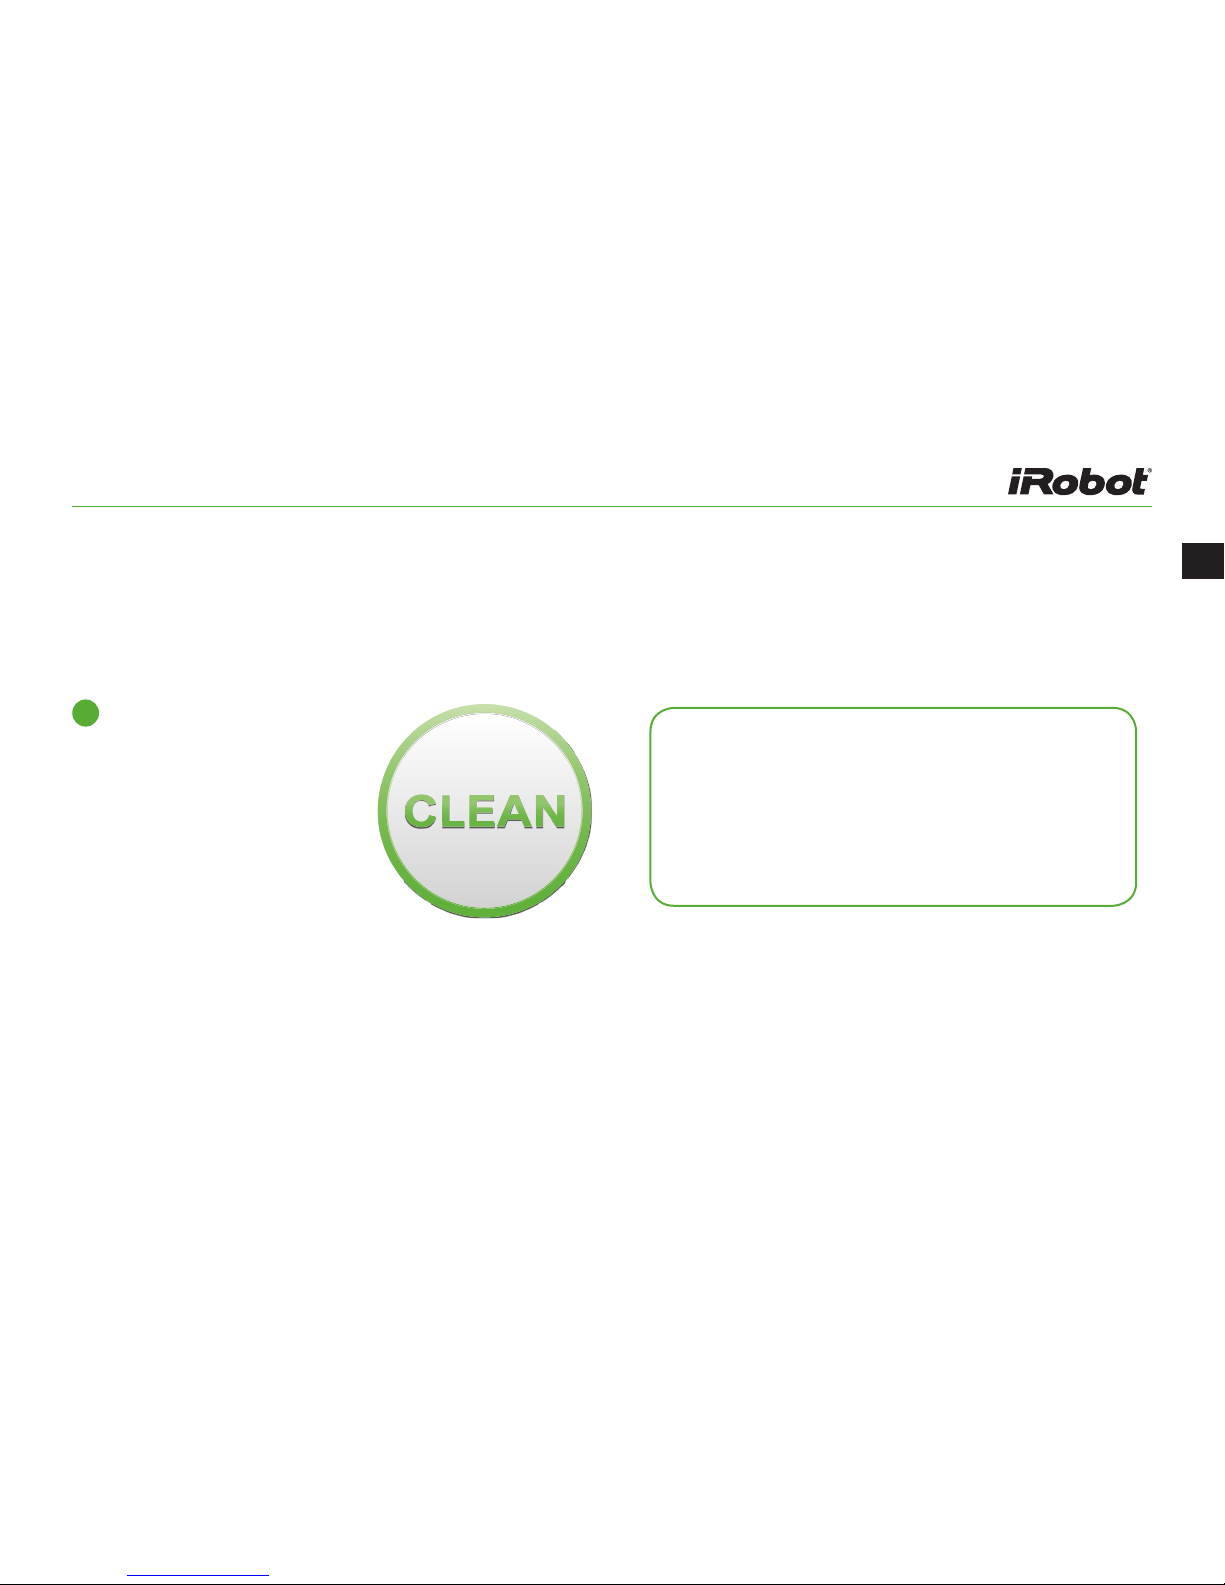
To wake Roomba, press CLEAN. Press CLEAN again to begin a
cleaning cycle.
• To pause Roomba during a cycle, press CLEAN.
» To resume the cleaning cycle, press CLEAN again.
» To send Roomba back to the Home Base, press DOCK.
• To use spot cleaning, place Roomba on top of the localised
debris and press SPOT on the robot.
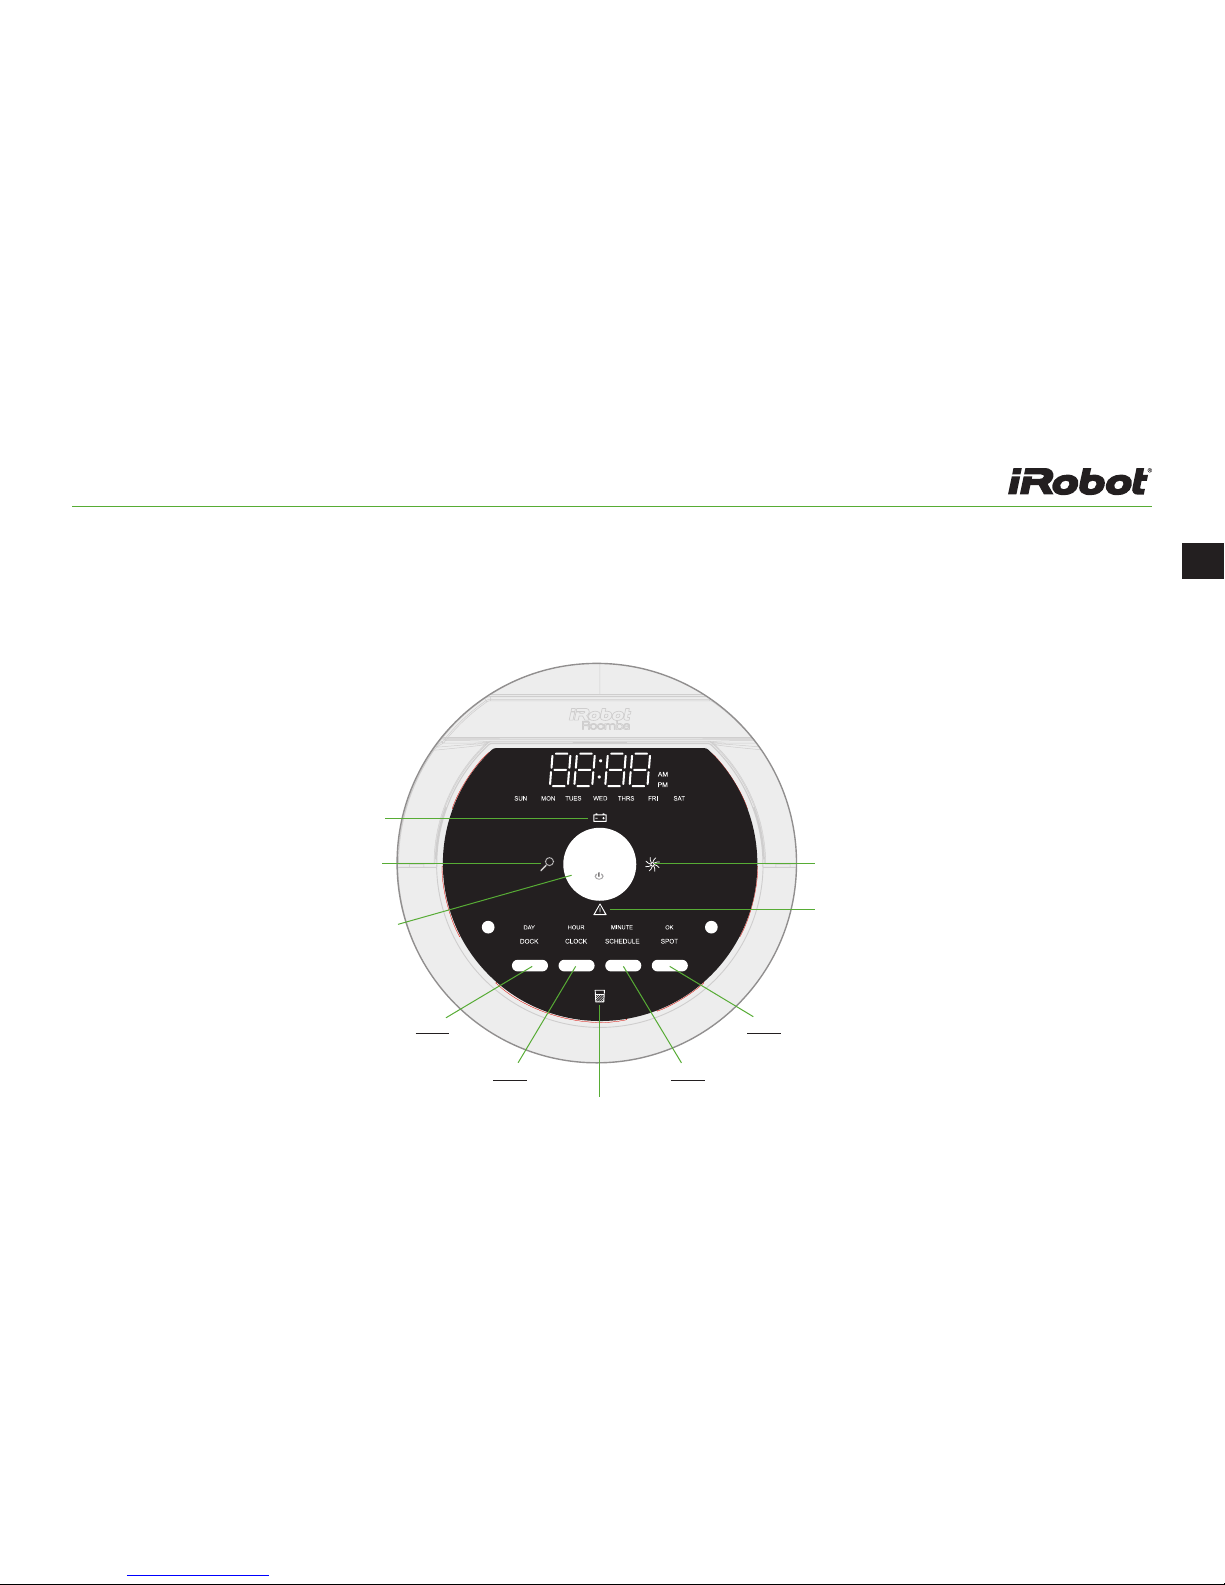
Note: Your Roomba can be set to 16 dierent languages.
For more information visit global.irobot.com.
Note: Indicator lights will turn o after 60 seconds to conserve
energy while Roomba is charging. Check status of the battery
by pressing the CLEAN button.
Using Your Roomba
Tips for Optimising Performance
• Store Roomba on the Home Base so it’s always charged
and ready to clean when you need it.
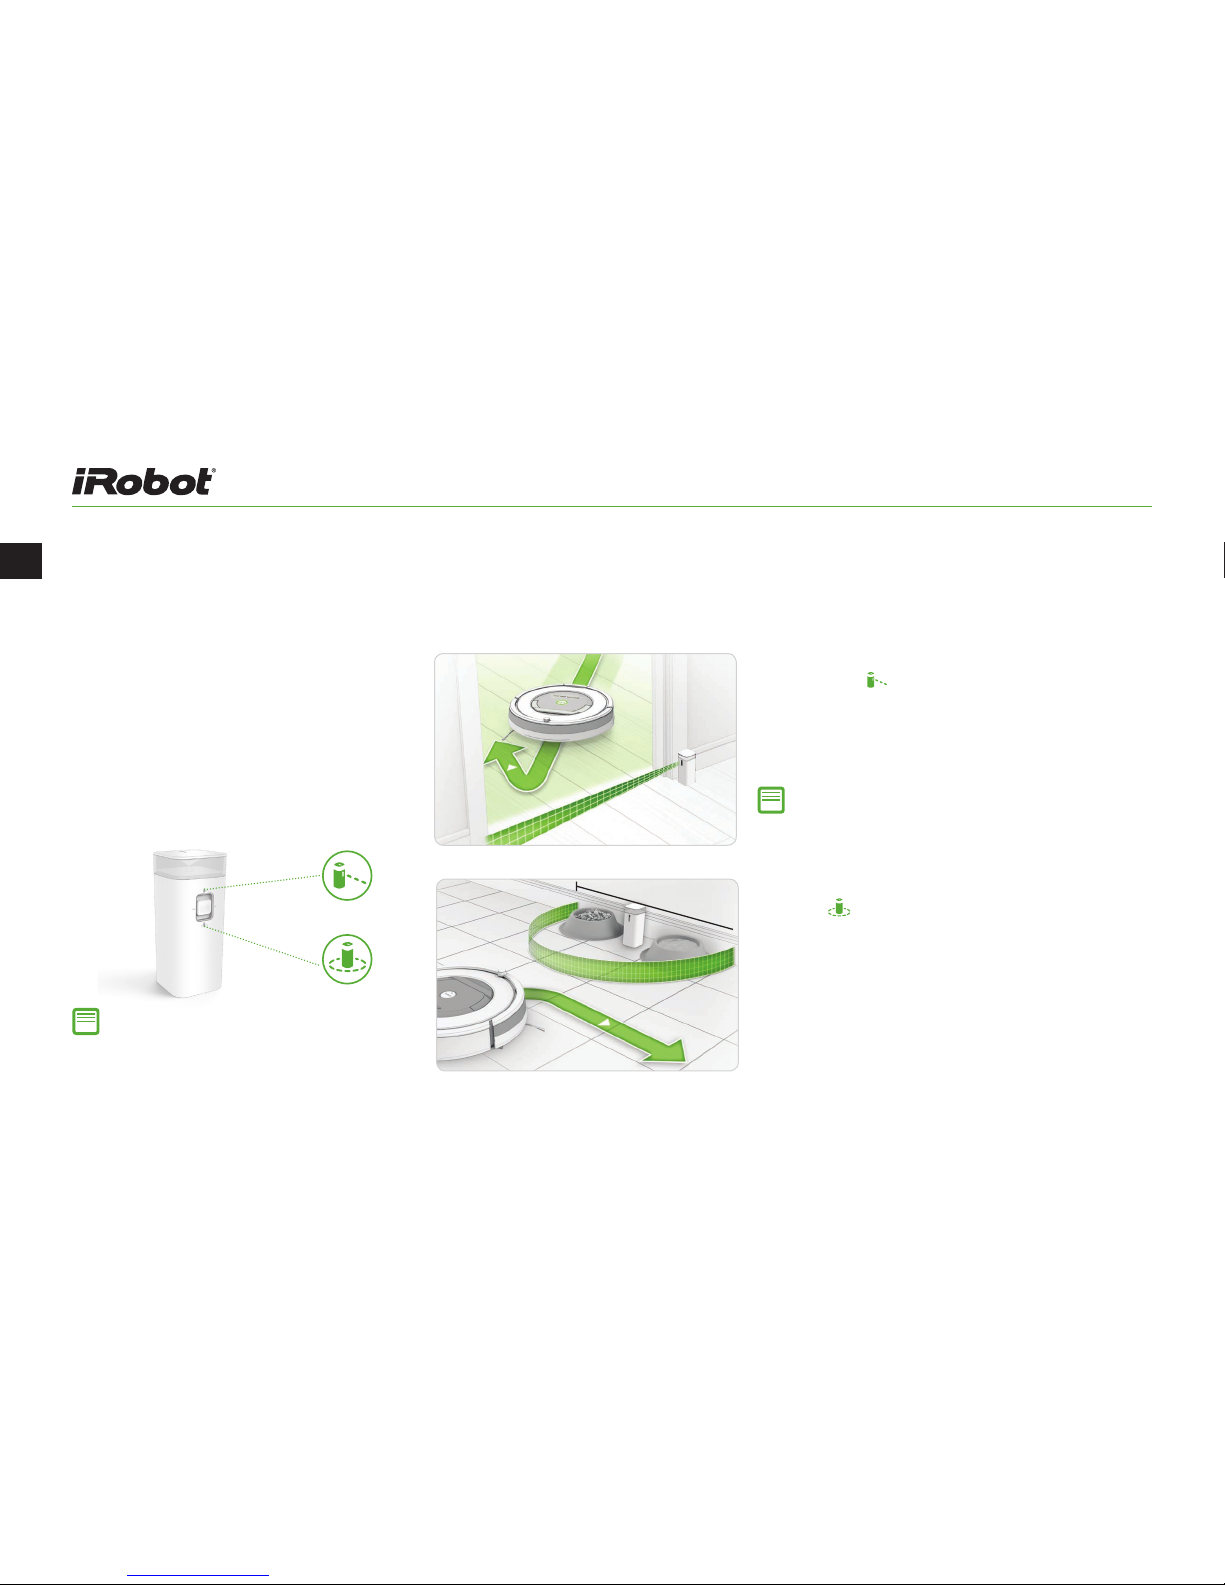
• Remove excess clutter from the floors before cleaning (e.g.
clothing, toys, etc.), and use a Virtual Wall® device (optional
accessory) to keep Roomba cleaning where you
want it and out of the areas you don’t.
• Empty the bin, clean the filter, and charge the battery after
each use.
• Use Roomba daily to maintain well-conditioned floors.
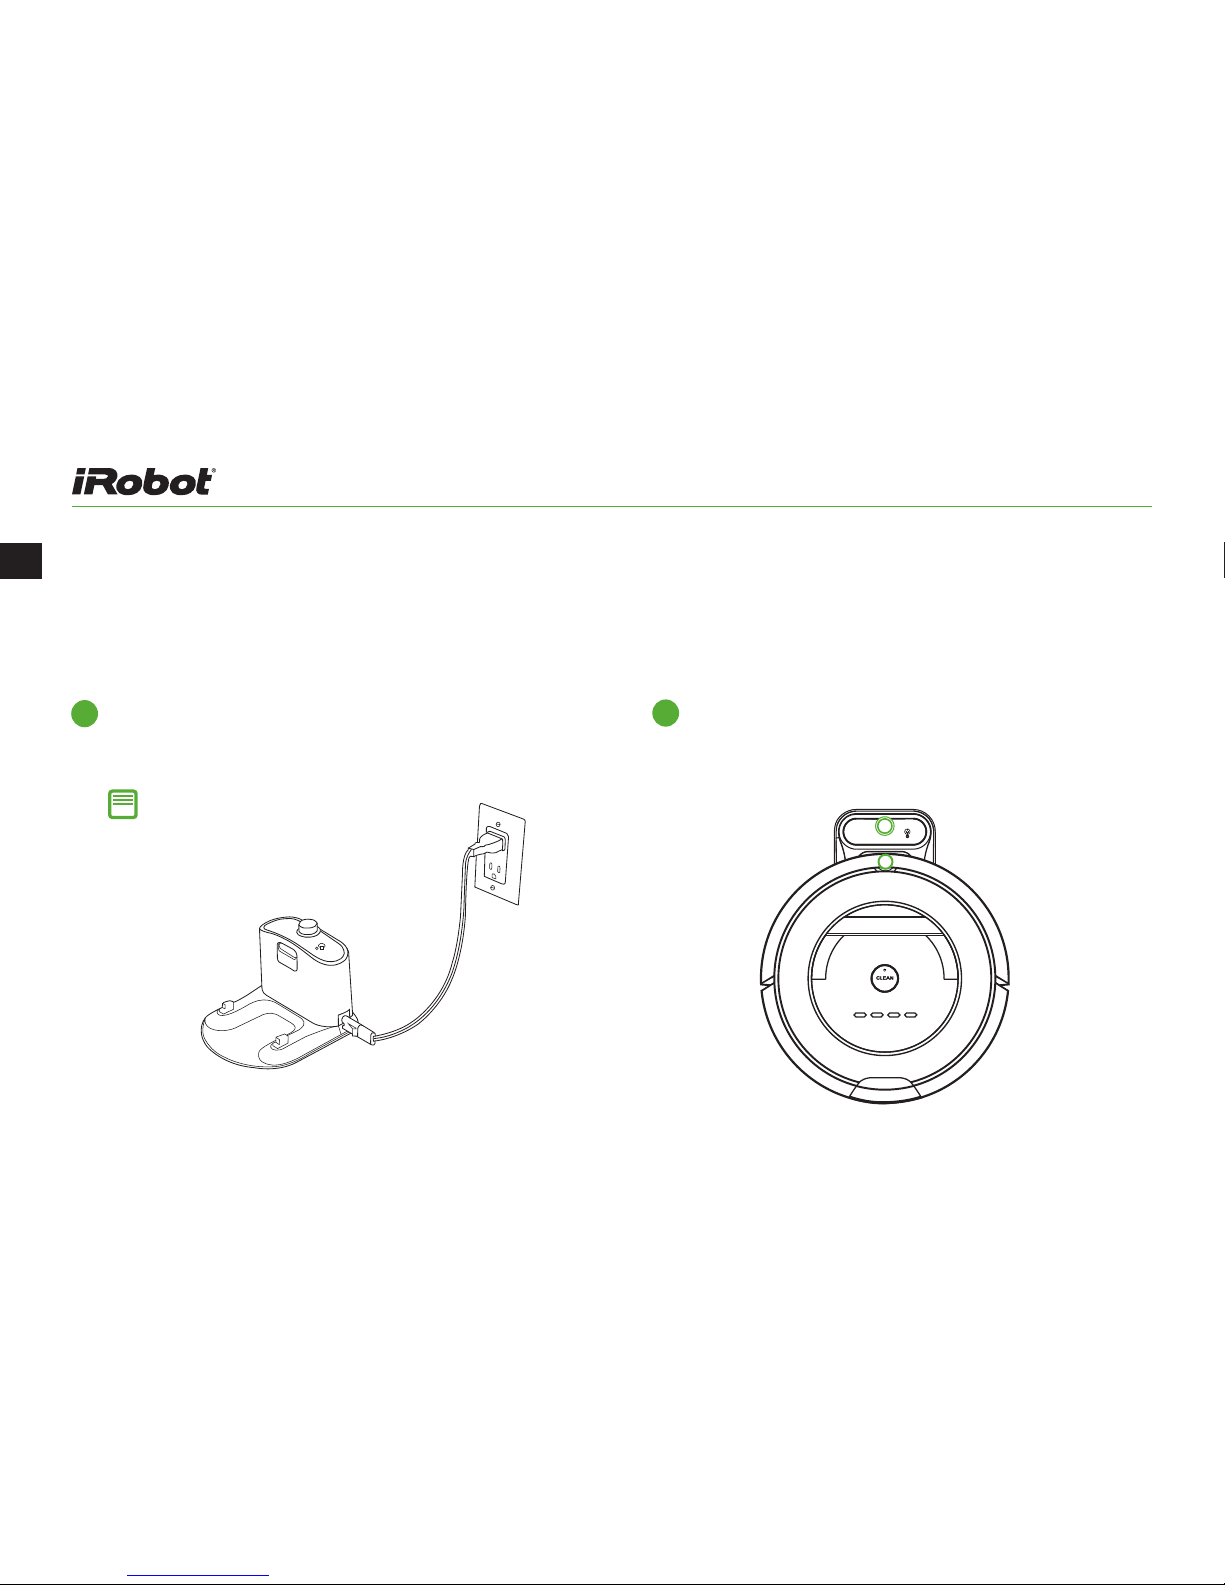
Charge Roomba using the Home Base. Roomba uses the
battery icon light to indicate it is charging. Indicator lights will
turn o after 60 seconds to conserve energy while Roomba is
charging. Check status of the battery by pressing the CLEAN
button. Use this chart to determine the status of the battery.
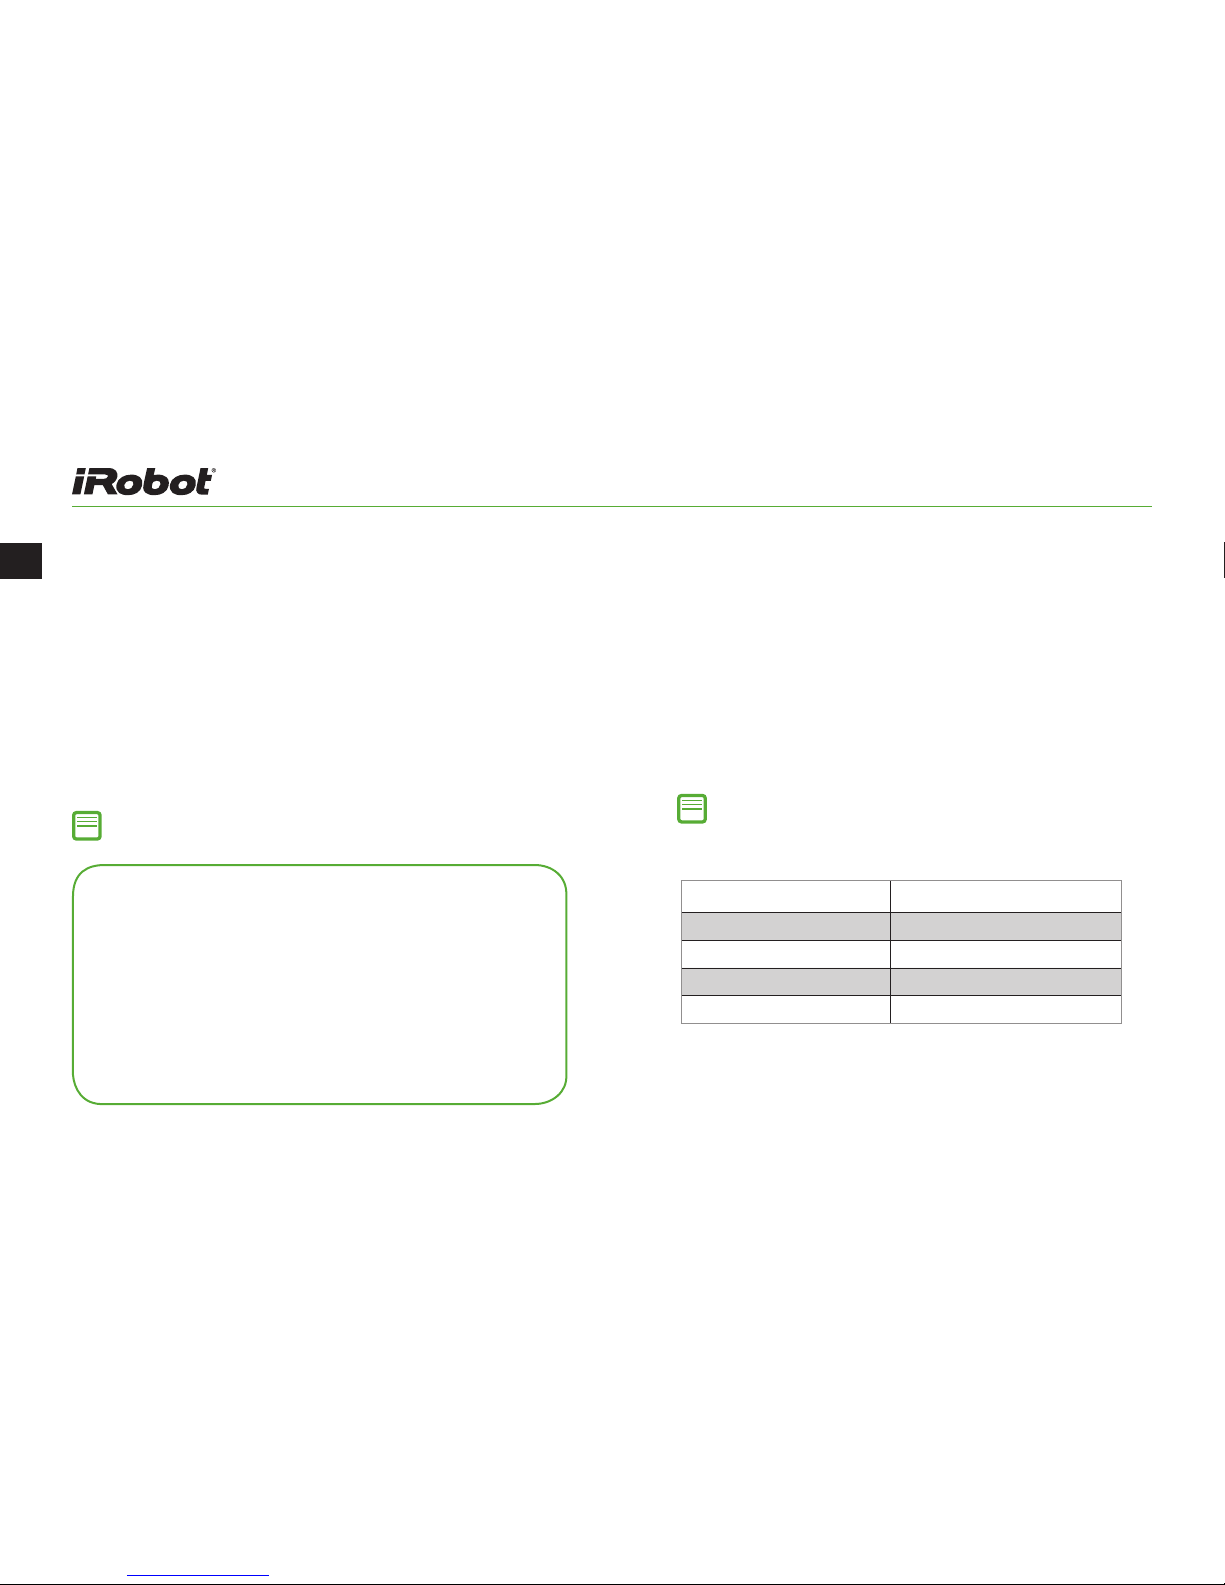
Battery and Charging
Battery Light Battery Status
Solid red Battery empty
Amber pulse Charging
Solid green Fully charged
Quick amber pulse 16-hour refresh charge

Roomba®800 Series Owner’s Guide 7
EN
You can schedule Roomba to clean once per day, up to seven
times per week. You must set the time before setting a schedule.
Scheduling
To Set or Change the Cleaning Schedule
To Delete a Scheduled Cleaning Time
Press SCHEDULE.
Press DAY to cycle through the scheduled cleaning times
When Roomba displays the scheduled cleaning time you’d like to
delete, press and hold DAY for five seconds. Roomba will beep to
indicate the cleaning time has been deleted.
Press OK
DAY
BACK
HOUR
CLOCK
OK
SPOT
MINUTE
SCHEDULE
Note: Roomba’s clock can be viewed in either the 12-hour (AM/PM) format or
the 24-hour format. To toggle between the two views, press and hold CLOCK for
5 seconds. Toggle between 12-hour and 24-hour format using the CLOCK button.
Press OK to save.
1
1
2
2
3
3
4
Press SCHEDULE.
Use HOUR and MINUTE buttons individually to set the schedule.
Press OK, Roomba will beep to indicate the schedule has been set.

EN
8 For Customer Care go to irobot.com/support
Accessories
The Dual Mode Virtual Wall barrier keeps
Roomba in the places you want to be
cleaned — and out of the ones you don’t.
In between cleaning cycles, you can leave
the device operating in its position on the
floor. You can set your device to one of two
modes to fit your home’s cleaning needs:
Virtual Wall Mode: When the switch is in the
“up” position ( ), the device functions as a
Virtual Wall. This means that you can set it to
block openings of up to 10 feet (3 meters).
It creates an invisible, cone-shaped barrier
that only Roomba can see.
Note: This barrier gets wider as it gets further
from the device (refer to illustration).
Note: Under normal use, batteries will last 8-10
months. If you are not planning on using your
Virtual Wall device for an extended period of
time and you would like to store it, be sure to
switch it to the “O ” (middle) position.
Halo Mode: When the switch is in the “down”
position ( ), the device creates a protective
zone that Roomba will not enter. This prevents
Roomba from bumping into items you want to
protect (e.g. a dog bowl or vase) or crossing into
undesired areas (e.g. a corner or under a desk).
The Halo is invisible and reaches approximately
24 inches (60 centimeters) from the center of
the device.
The Dual Mode Virtual Wall barrier
(optional accessory for all models)
10ft / 3m
4ft / 1.2m

Roomba®800 Series Owner’s Guide 9
EN
The Virtual Wall Lighthouse can act as
both a Lighthouse and a Virtual Wall.
Simply use the Mode Selector to make
your choice. The device turns on and o
automatically as you turn Roomba on
and o. When on, the light on top is lit.
A flashing power light means the batteries
need replacing soon.
Virtual Wall Mode: When the switch is in the
“Virtual Wall” position, the device functions as a
Virtual Wall. This means that you can set it to block
openings of up to 8 feet (2.4 meters). It creates an
invisible, cone-shaped barrier that only Roomba
can see.
Note: This barrier gets wider as it gets further from the
device (refer to illustration).
Lighthouse Mode: When switch is in “Lighthouse”
mode, the device allows Roomba to eciently
clean multiple rooms before returning to Home Base.
Place a Lighthouse in the doorway with logo facing
forward, when Roomba has completed the first
room, the Lighthouse will help it navigate to the next.
You can use Lighthouse devices and Virtual Wall
barriers at the same time. However, please avoid
placing them too close to each other, to the
Home Base, or to furniture that could block the
invisible beams.
The Virtual Wall Lighthouse
(optional accessory for select models)
8ft / 2.4m

EN
10 For Customer Care go to irobot.com/support
The Remote Control lets you conveniently control Roomba’s
functions. You can use it to turn Roomba on and o and steer it
around your room without bending down. It also gives you remote
access to these commands:
Directional Buttons
SPOT Button
CLEAN / Power Button
DOCK Button
Important: The remote control, Virtual Wall®, Lighthouse™
and Home Base® operate using an invisible infrared beam. If
they are all used in the same area, Roomba may see multiple
infrared signals and will not operate. The remote WILL NOT
work when Roomba is near a Virtual Wall.
Note: Make sure there is a direct line of sight from
the remote control to Roomba and that the remote is
pointed at Roomba.
Remote Control (optional accessory for all models)

Roomba®800 Series Owner’s Guide 11
EN
To keep Roomba running at peak
performance, perform the following
care procedures. If you notice Roomba
picking up less debris from your floor,
then empty the bin, clean the filter and
clean the extractors.
Robot Part Care Frequency Replacement Frequency
Bin After each use -
Filter Once per week (twice per
week in homes with pets)
Every 2 months
Full Bin Sensors Once every 2 weeks -
Front Caster Wheel
Side Brush
Cli Sensors
Charging Contacts Once per month -
Extractors Once every 4 months
(once every 3 months in
homes with pets)
Every 6-12 months
Note: iRobot manufactures various replacement parts and assemblies. If you think you need a replacement
part, please contact iRobot Customer Care for more information.
Recommended Robot Care
Robot Care

EN
12 For Customer Care go to irobot.com/support
Cleaning the Front Caster Wheel:
Wheel
Axle
Housing
Wheel
Housing
Pull firmly on the front wheel
to remove it.
Remove any debris from inside
the wheel cavity.
Spin the wheel by hand.
If rotation is restricted, remove
the wheel from its housing and
push firmly to remove the axle
and clear any debris or hair
wrapped around it.
Reinstall all parts when finished.
Make sure the wheel clicks
back into place.
1
2
4
3
Use a coin or small screwdriver to remove the screw.
Remove the brush, clean the brush and the brush
post, and then reinstall the brush.
1
2
Cleaning the Side Brush:
Important: A front wheel clogged
with hair and debris could result in
floor damage.

Roomba®800 Series Owner’s Guide 13
EN
Emptying the Bin: Cleaning the Filter:
Shake o debris by
tapping the filter against
your trash container.
2
Open bin door to
empty bin.
2
Important: The filter door
won’t close unless a filter is
reinserted. Insert the filter with
the yellow tab facing up.
Remove filter by grasping
the yellow tab.
1
Press bin release
button to remove bin.
1
Important: The filter door
won’t close unless a filter is
reinserted. Insert the filter with
the yellow tab facing up.

EN
14 For Customer Care go to irobot.com/support
Cleaning the Extractors:
Pinch the yellow extractor frame release
tabs, lift up the extractor frame and
remove any obstructions.
1Remove the extractors and remove the
yellow extractor caps. Remove any hair
or debris that has collected underneath
the caps and around the metal axles.
2Clear Roomba’s Vacuum Path.
4
Reinstall the extractors. Match the color
and shape of the extractor pegs with the
color and shape of the extractor icons on
the cleaning head module.
5
For Customer Care go to irobot.com/supportFor Customer Care go to irobot.com/support
Remove hair and debris from the square
and hexagonal plastic pegs on the other
side of the extractors. Reinstall
the extractor caps.
3

Roomba®800 Series Owner’s Guide 15
EN
Roomba will tell you something is wrong with a two-tone distress
sound followed by a spoken message. The troubleshooting
indicator ( ) will also blink. Follow the audible instructions.
Additional troubleshooting information, along with more detailed
support and videos, are available online. If the problem is not
resolved, visit www.irobot.com/support.
Repeating Runtime Error Messages
To repeat Roomba’s error message, press CLEAN. If Roomba is on,
press the bumper to repeat the message.
If you have questions or comments about this product, please contact
iRobot before contacting a retailer.
iRobot Customer Care Team
877.855.8593.
Visit the iRobot home support site at www.irobot.com/support for
support tips, frequently asked questions, and information about
accessories and other iRobot products.
For best results, only use the iRobot Lithium Ion Battery that comes
with Roomba. While Roomba will operate with older-model batteries,
its performance will be limited.
Lithium Ion Battery
Important: Lithium ion batteries and products that contain lithium ion
batteries are subject to stringent transportation regulations. If you need to ship
this product (with the battery included) for service, travel or any other reason,
you MUST comply with the following shipping instructions:
Troubleshooting
Important: To reset Roomba’s software, hold down the CLEAN button for
10 seconds. This will clear all scheduled cleaning times, reset the clock
and resolve some software issues.
» Remove the lithium ion battery from the product
» Place a piece of tape over the battery’s metal charging contacts
» Reinstall the battery (with the tape on it) in the product and secure
the battery door
» Package the product in its original packaging or in your own
packaging that prevents any movement during transportation
» Ship via ground transportation only (no air shipping)

EN
16 For Customer Care go to irobot.com/support
Battery Removal
Follow these instructions to remove and reinstall Roomba’s battery:
Unscrew the two screws on the battery door, then remove the door and battery.
1

Roomba®800 Series Owner’s Guide 17
EN
Reinstall the battery door and the two
screws. Take care not to pinch the
side brush in the battery door when
re-installing the battery.
3
Reinstall the battery with the battery
label and tabs facing up.
2

EN
18 For Customer Care go to irobot.com/support
Important Safety and Compliance Information
THIS APPLIANCE CAN BE USED BY CHILDREN AGED FROM 8 YEARS AND ABOVE AND PEOPLE
WITH REDUCED PHYSICAL, SENSORY OR MENTAL CAPABILITIES OR LACK OF EXPERIENCE AND
KNOWLEDGE IF THEY HAVE BEEN GIVEN SUPERVISION OR INSTRUCTION CONCERNING THE
USE OF THE APPLIANCE IN A SAFE WAY AND UNDERSTAND THE HAZARDS INVOLVED. CHILDREN
MUST NOT PLAY WITH THE APPLIANCE. CLEANING AND USER MAINTENANCE MUST NOT BE
CARRIED OUT BY CHILDREN WITHOUT SUPERVISION.
CAUTION: DO NOT EXPOSE THE ELECTRONICS OF YOUR ROBOT, ITS BATTERY OR THE
INTEGRATED DOCK CHARGER KNOWN AS THE HOME BASE. THERE ARE NO USER-SERVICEABLE
PARTS INSIDE. REFER SERVICING TO QUALIFIED SERVICE PERSONNEL. PLEASE ENSURE THAT THE
VOLTAGE RATING FOR THE ENCLOSED HOME BASE MATCHES THE STANDARD SOCKET VOLTAGE.
Table of contents
Other iRobot Batteries Charger manuals