ISARIA PRO Compact User manual

Version V1.1 / 20. Januar 2020
ISARIA PRO Compact®
Operating Instructions

2 / 48 FRITZMEIER Umwelttechnik GmbH & Co. KG V1.1
ISARIA PRO Compact®Contents
1 INTRODUCTION 4
2 PRODUCT DESCRIPTION 5
2.1 Scope of delivery 6
2.2 Operation, prior knowledge 7
2.3 Operating and display elements 8
3 NOTES ON THIS MANUAL 8
3.1 General information 8
3.2 Symbols used 9
3.3 Brand names and trademarks 9
3.4 Gender-specific writing style 9
4 SAFETY 10
4.1 Proper use/warranty 10
4.2 Selecting personnel and required qualifications 10
4.3 Organisational safety 10
4.4 Safety information 11
4.5 Dangers arising from the ISARIA 12
4.5.1 Danger through high magnetic forces on E sensor 12
4.5.2 Risk to safety in public and non-public road transport 12
4.5.3 Damage to the environment or crops due to excessively high application quantities 13
4.6 Workplace 13
5 ASSEMBLY 14
5.1 R sensors 14
5.2 Job computer 16
5.3 E sensor 17
5.4 Cables 18
5.4.1 R sensors <=> E sensor 18
5.4.2 E sensor <=> Job computer 19
5.4.3 Job computer <=> Terminal 20
5.4.4 Job computer <=> ISOBUS 20
6 INITIAL COMMISSIONING 21
6.1 Configuring TOUCH800 21
6.1.1 Operating mode 21
6.1.2 GPS connection 22
6.1.3 Initialising storage medium, USB data medium 23
6.1.4 Notifications in the main menu when driving (CXP) 23
Contents

FRITZMEIER Umwelttechnik GmbH & Co. KG V1.1 3 / 48
Contents ISARIA PRO Compact®
7 OPERATION 24
7.1 General information on processing a task 24
7.2 Operating scheme 24
7.3 Creating a task 26
7.4 Selecting task and starting 28
7.5 Stopping a task 28
7.6 Copying task 29
7.7 Organisational data 30
7.7.1 Creating and saving organisational data 30
7.7.2 Data export of organisational data 31
7.7.3 Data import of organisational data 32
7.8 Parametrising ISARIA 33
7.8.1 Basic data for fertilisation I 34
7.8.2 Basic data for fertilisation II 35
7.9 Key data of application device 36
7.10 Calibration run 37
7.11 Notifications on the screen while driving 38
7.11.1 Switching notifications on and off 38
7.11.2 Status and error notifications 39
7.12 Output of fertiliser 40
7.12.1 Automatic operation 40
7.12.2 Manual operation 40
7.13 The most important symbols and their meaning 41
7.14 Table with range recommendations 42
8 SPECIAL SETTINGS 43
8.1 Biomass – calibrating threshold value 43
8.1.1 Connecting and disconnecting USB storage medium 45
9 TROUBLESHOOTING 46
9.1 Version number of the installed software 46
9.2 Possible errors and how to fix them 47
9.3 Repair instructions 47
10 MAINTENANCE 47
11 TECHNICAL DATA 48
12 DISPOSAL 48

4 / 48 FRITZMEIER Umwelttechnik GmbH & Co. KG V1.1
ISARIA PRO Compact®Introduction
1Introduction
We are glad you have opted for one of our products. We wish you flawless and successful
operation.
The distributing company is Fritzmeier Umwelttechnik under the name of ISARIA PRO Compact®
(hereinafter called ISARIA). Distribution is handled via the company “CNH Industrial” with the brand
“AgXtend” under the product name “CropXplorer Basic”
Any questions? We are looking forward to hearing from you.
FRITZMEIER Umwelttechnik GmbH & Co. KG
Dorfstrasse 7
85653 Großhelfendorf
Germany
Telephone +49 (0) 8095 87339-400
Fax +49 (0) 8095 87339-472
www.umwelt.fritzmeier.de
umwelt@fritzmeier.de

FRITZMEIER Umwelttechnik GmbH & Co. KG V1.1 5 / 48
Product description ISARIA PRO Compact®
2Product description
The ISOBUS-compatible ISARIA has been specially developed for use in daylight.
This version of the instruction manual was created for the Müller Touch800 terminal.
ISARIA is intended to precisely determine the nutrient condition of crops and is used for the sub-
field optimisation (site-specific) of the application substance (spreadable fertiliser, liquids, crop
protection products or growth regulators).
The system includes two sensor units (R sensors), which can be attached to the tractor cab (e.g.
side mirrors) and a job computer. The reference sensor (E sensor) on the tractor roof supplements
the system by measuring lighting conditions.
When working with ISARIA, the output quantities can be manually corrected and current status
messages from the system can be displayed.
The task data (measurements, organisation and GPS data) can be saved on a removable storage
medium (USB stick) and thus exported. It can be edited in ISARIA Connect (www.isaria-
connect.com).
Functional principle
fig. 1
E sensor
R sensor
R sensor
Terminal
Job computer ISOBUS
Application device

6 / 48 FRITZMEIER Umwelttechnik GmbH & Co. KG V1.1
ISARIA PRO Compact®Product description
2.1 Scope of delivery
fig. 2
1
2
4
16
5
6
711
13
14
15
8
1
3
40
1Bracket for attaching the R sensor to the
vehicle mirror
2E sensor
3R sensor, left vehicle side
4R sensor, right vehicle side
5Resistor for R sensor (2x)
6Connection cable, R sensor (2x)
7Connection cable, job computer
8Operating and maintenance manual
11 Cable clips for secure routing of cables
13 InCab T-Connect adapter cable
(optional)
14 Metal plate with adhesive tape for
attaching E sensor to vehicle roof
15 TOUCH800 operating terminal with
instruction manual
16 Job computer
40 Reducers for bracket (3)

FRITZMEIER Umwelttechnik GmbH & Co. KG V1.1 7 / 48
Product description ISARIA PRO Compact®
2.2 Operation, prior knowledge
When it comes to operation, prior knowledge in regards to dealing with software programmes and
operating a touchscreen (touch-sensitive screen) is expected.
The instruction manual of the touchscreen terminal must have been read and understood. The
safety notes and warnings therein are to be taken into account.
General information on menu navigation/operation
The ISARIA is operated via a touchscreen terminal
The operating menu is largely self-explanatory. System statuses are displayed through symbols
and plain text displays.
The depiction of figures for the software in this instruction manual may differ from your system.
Reasons for this:
-Different versions (settings)
-Different operating systems
-Different manufacturers
Description of software operation
In order not to unnecessarily impede readability, we have not described any details that could be
considered common knowledge or self-evident with regard to operating a software interface.
If, for example, a specific button is pressed, the universally understandable information is not
mentioned; the required operation and the expected result will be described in short form.
Example
Detailed Short form
Use the left mouse button to click the “Save” button and the XY
window will open.
<Save> ► XY opens

8 / 48 FRITZMEIER Umwelttechnik GmbH & Co. KG V1.1
ISARIA PRO Compact®Notes on this manual
2.3 Operating and display elements
3Notes on this manual
3.1 General information
This instruction manual contains all information and descriptions required to operate the system.
We have taken special care during the creation of this documentation. We are grateful to receive
any tips and suggestions you may have.
To facilitate transparency, we have included illustrations, schematic representations of the machine
and its assemblies to accompany the descriptions.
1LED, green There is measurement data from the sensors
2LED, blue Power supply established
3LED, blue Power supply established
4See instruction manual from manufacturer
fig. 3

FRITZMEIER Umwelttechnik GmbH & Co. KG V1.1 9 / 48
Notes on this manual ISARIA PRO Compact®
3.2 Symbols used
This manual contains the following symbols:
CAUTION: warns of a risk to persons and materials. Disregarding information marked with
this symbol may result in severe injury and material damage.
ATTENTION: warns of material damage. Disregarding information marked with this symbol
may result in material damage.
NOTE: technical information that requires special attention.
3.3 Brand names and trademarks
Product designations and/or company names listed in this document may be registered trademarks
of the respective companies.
The same also applies to (mostly common or colloquial) short names and abbreviations relating to
the product.
3.4 Gender-specific writing style
For the purposes of better readability, simultaneous use of masculine, neutral and feminine
linguistic forms has been omitted. All personal designations apply to all genders the same.
• Step, step sequence
- List
(1) (A) Legend number for component on figure
7.2 / 23 Cross-reference, see section 7.2 on page 23
Bold text Structure, note
<XY>Operating software button

10 / 48 FRITZMEIER Umwelttechnik GmbH & Co. KG V1.1
ISARIA PRO Compact®Safety
4Safety
4.1 Proper use/warranty
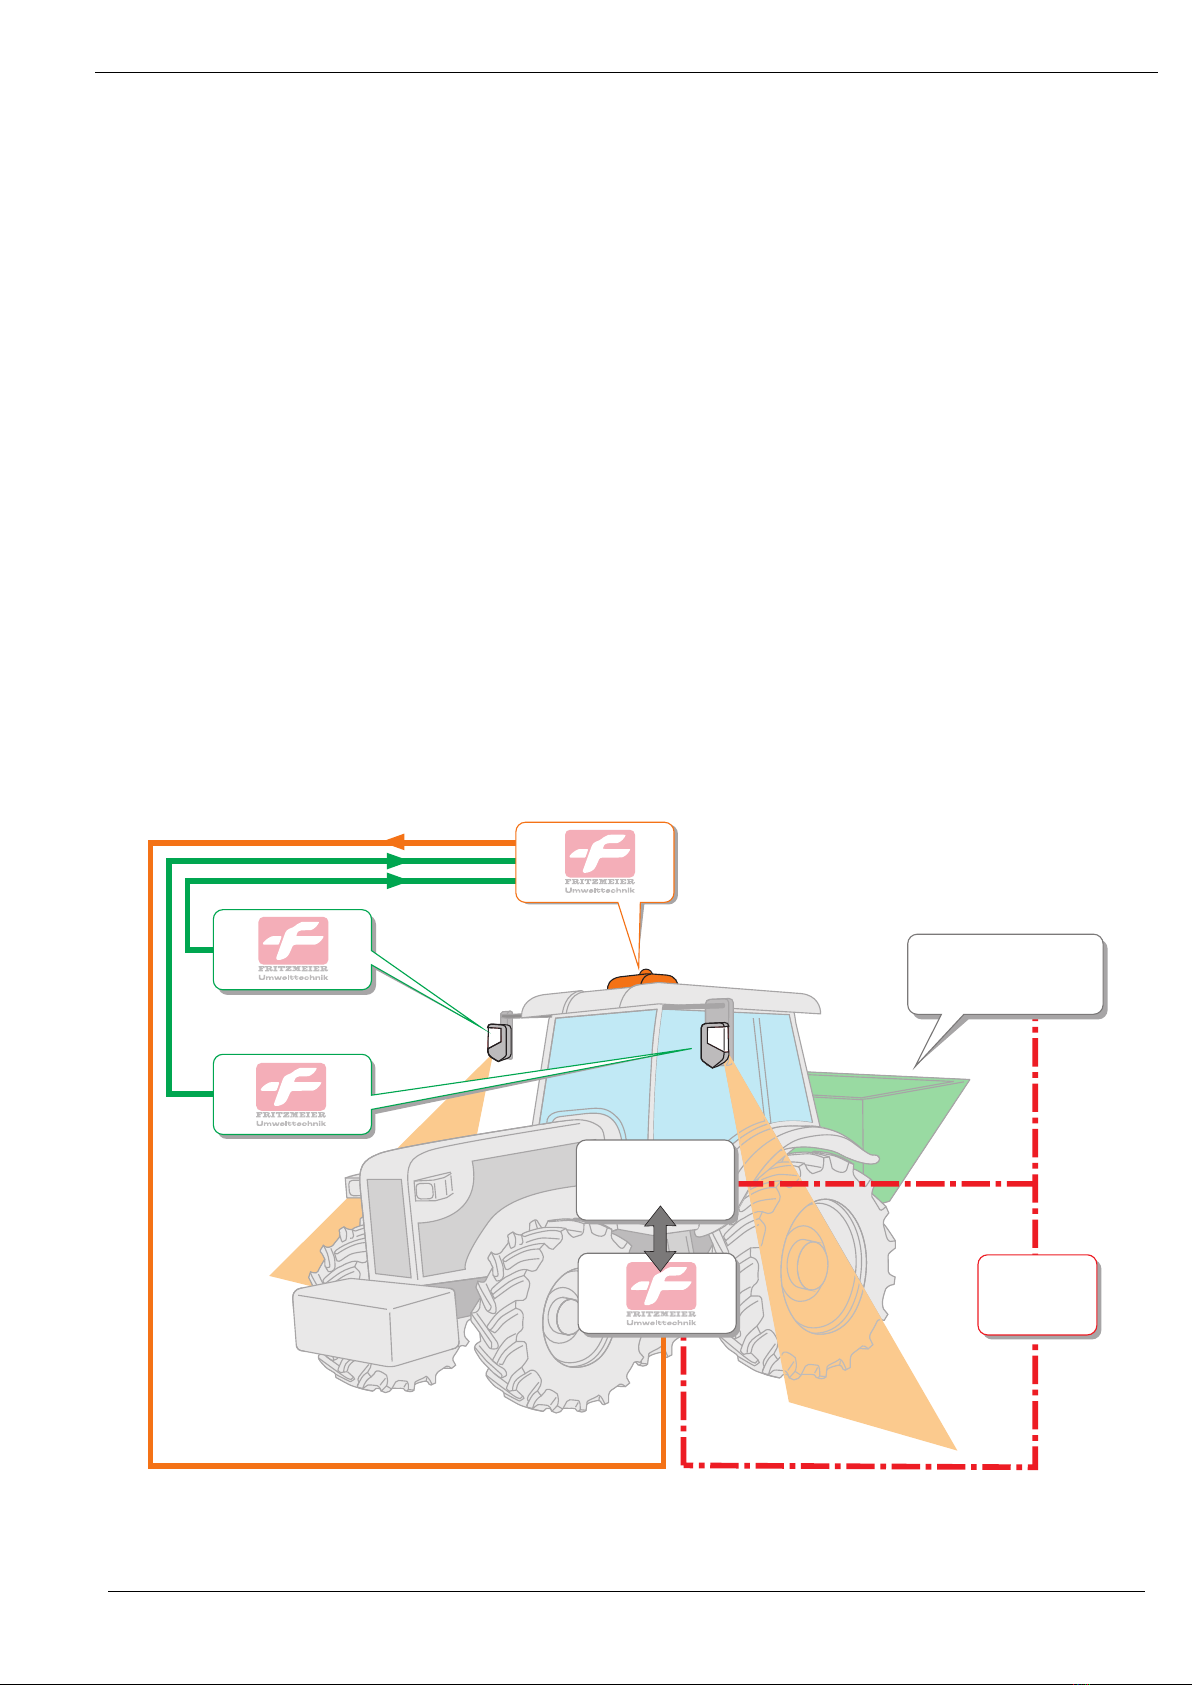
The ISARIA is intended to determine the development state of crops and to optimise crop
management.
Every other use is classified as improper.
Any conversions performed or add-ons fitted without explicit written approval of the manufacturer,
the use of spare parts that are not genuine and repairs performed by any persons or companies not
authorised by the manufacturer, as well as modifications (operating system, software* and
hardware) may render the warranty void.
* Updates to the operating system must be made available with the explicit approval of the
manufacturer. Mass storage devices that are to be connected to the terminal must be classified as
free from malware and malicious code using state-of-the-art technology.
4.2 Selecting personnel and required qualifications
Persons working with the ISARIA must be
-at least 18 years of age.
-adequately trained for the respective activities.
-aware of and comply with relevant technical regulations and safety guidelines.
The operator decides on the required qualifications for
-operating personnel
-maintenance personnel
-repair personnel
The operator must ensure that only commissioned personnel work with the ISARIA.
Personnel to be trained, taught, instructed or personnel currently undergoing general professional
training must be supervised by experienced persons at all times when working on the ISARIA!
All work on the ISARIA must be performed only by trained specialist personnel, and in compliance
with all valid accident prevention regulations (UVV).
4.3 Organisational safety
The operator must ensure that the operating and maintenance manual is always made available
immediately to persons performing assembly, operation and maintenance on the ISARIA.

FRITZMEIER Umwelttechnik GmbH & Co. KG V1.1 11 / 48
Safety ISARIA PRO Compact®
4.4 Safety information
The ISARIA features the following safety information stickers. The operator must at all times ensure
that these are complete and in perfect, legible and recognisable condition.
In accordance with ISO 7010
Meaning Attachment location
Next to plugs
of the E sensor
Next to case handle
Underside of E sensor
Dimension in mm ► 10 20 20
1Warning of high magnetic force x x x
2Warning of effect on pacemakers and
defibrillators xxx
3Read instruction manual x x
[1] [2] [3]
W006 P007 M002

12 / 48 FRITZMEIER Umwelttechnik GmbH & Co. KG V1.1
ISARIA PRO Compact®Safety
4.5 Dangers arising from the ISARIA
The following hazardous areas can be found on the system. Thoroughly instructing and training the
operating personnel contributes towards minimising the risk to persons and equipment.
Regular checks of the level of information and compliance with safety guidelines contribute
considerably to a continuous accident-free operation.
4.5.1 Danger through high magnetic forces on E sensor
Risk of injury due to high magnetic forces. The magnet on the underside of the E sensor is very
strong. Positioning on the metal plate (chapter 5.3, page 17) or another metallic surface can lead to
crushing of fingers and/or material damage.
Electromagnetic fields can affect and disturb pacemakers and defibrillators. The E sensor of the
ISARIA (It. 2, fig. 1) is attached to the anchor plate (14) with a strong magnet.
People and animals with a pacemaker and/or defibrillator must be kept at a sufficient safety distance
away. This applies to:
Carrying and assembling the E sensor
We recommend a minimum distance of 0.5 metres. If the E sensor is on the anchor plate, the
magnetic field is reduced.
Storage
The E sensor must be stored in such a way that no damage can occur as a result of the magnetic
field. In this regard, the magnet of the E sensor must be fitted with a metal plate which fully covers
it (size as anchor plate (14)).
4.5.2 Risk to safety in public and non-public road transport
Distraction of the driver through operation of the ISARIA Compact®
The device may only be operated when the vehicle is stationary, so that the driver is not distracted
and overlooks obstacles, for example.
Adhere to permissible vehicle width
The total width of the vehicle which is permissible according to road traffic regulations may not be
exceeded. If need be, the R sensors must be attached in such a way that they can be folded in when
the vehicle is driving on public roads.
Secure attachment of the sensors to the vehicle
The driver is responsible for the secure attachment of the sensors to the vehicle. All brackets are to
be regularly checked for proper positioning and stability. If there is any doubt in regard to stability,
the vehicle may not be driven until the attached components have been re-attached or removed.
They can otherwise fall off and endanger other road users or cause material damage.

FRITZMEIER Umwelttechnik GmbH & Co. KG V1.1 13 / 48
Safety ISARIA PRO Compact®
Secure attachment of the cables to the vehicle
The driver is responsible for the secure attachment of the assembly cables to the vehicle. All cable
brackets are to be regularly checked for proper positioning and stability. If there is any doubt in
regards to their stability, the vehicle may not be driven until it has been ensured that no dangers can
arise as a result of the cables. Otherwise, they could pose a risk when entering and exiting the
vehicle (risk of tripping). They can also fall off and endanger other road users or cause material
damage.
4.5.3 Damage to the environment or crops due to excessively high application quantities
Application quantity set too high
If the application quantity has been set too high, this can result in damage to crops and the
environment. The maximum application quantity corresponding to the application scenario cannot
be exceeded; manufacturer specifications regarding this are to be adhered to.
Application quantity set properly; however, too much is still output
It may also be (as a result of incorrectly set parameters) that communication with the application
device does not correspond to the requirements. For every change to the components connected
to the ISOBUS, it must be ensured that the output quantity calculated by the ISARIA corresponds
to the quantity which is actually output.
A check of the actual application quantity of the application device is to be carried out.
If there is continuously updated feedback to the application device regarding the current output
quantity, this must be regularly monitored during the application drive.
4.6 Workplace
ISARIA workplace is located in front of the terminal. The operator must provide a suitable workplace
with sufficient lighting in compliance with the relevant regulations.

14 / 48 FRITZMEIER Umwelttechnik GmbH & Co. KG V1.1
ISARIA PRO Compact®Assembly
5Assembly
5.1 R sensors
•Attach both R sensors (1) to the side on the vehicle cab
and align
Determine suitable assembly location. E.g. bracket of the
rear mirror
Important:
-Assembly location must be selected in such a way
that the R sensors are subjected to as little vibration
as possible.
-The structure to which the R sensors are assembled cannot be put under so much strain by
the sensors (weight) that it becomes damaged (e.g. due to weight and/or vibration).
-Aligning the sensors to direction of travel (A) as shown:
-left R sensor (3)
-right R sensor (4)
-Labelling (CropXplorer marking) must be read from the front (in accordance with the
direction of travel)
fig. 4
fig. 5

FRITZMEIER Umwelttechnik GmbH & Co. KG V1.1 15 / 48
Assembly ISARIA PRO Compact®
•If need be, select a reducer (40) which fits the
attachment location and attach bracket (3) to
attachment location.
•Align R sensors as shown (direction of travel (A))
40
3
fig. 6
fig. 7

16 / 48 FRITZMEIER Umwelttechnik GmbH & Co. KG V1.1
ISARIA PRO Compact®Assembly
5.2 Job computer
•Position the job computer (4) in a suitable location in the
interior of the cab (if need be, bolt down) in such a way that
the cables can be easily connected.
In doing so, ensure that the following distances (cable
length) are adhered to:
-ISOBUS socket
-Terminal
fig. 8

FRITZMEIER Umwelttechnik GmbH & Co. KG V1.1 17 / 48
Assembly ISARIA PRO Compact®
5.3 E sensor
Attaching E sensor (2) to the roof of the vehicle cab
•Attach metal plate (14) to a suitable location (adhesive
strip1)).
ATTENTION Risk of injury due to high magnetic forces. The
magnet on the underside of the E sensor (2) is very strong.
Positioning on the metal plate (14) or another metallic
surface can lead to crushing of fingers and material damage.
When placing the E sensor (2) on the metal plate (14) only
hold it by the outer edge. Do not place fingers under the
sensor and wear sturdy gloves.
ATTENTION strong magnetic field
Danger due to effect or interference of pacemakers and/or defibrillators. Keep safe distance away
from magnet (see chapter 4.5.1,page 12)
•Position E sensor (2) with magnet
(underside) on the metal plate (14)
1) Surface must be free of dirt and grease
fig. 9
fig. 10

18 / 48 FRITZMEIER Umwelttechnik GmbH & Co. KG V1.1
ISARIA PRO Compact®Assembly
5.4 Cables
5.4.1 R sensors <=> E sensor
•Connect resistors (5) to the plugs (36) of the R sensors (1)
•Connect extension cable (6) to resistor (5) and connect
with E sensor (2).
Observe connections:
-Left R sensor plug (A)
-Right R sensor plug (B)
•Fix all cables using the cable clips (11)
fig. 11
fig. 12

FRITZMEIER Umwelttechnik GmbH & Co. KG V1.1 19 / 48
Assembly ISARIA PRO Compact®
5.4.2 E sensor <=> Job computer
•Connect connection cable of job computer (7) to plug-in
location (C) of the E sensor (2), guide to job computer
•Connect connection cable of job computer (7) to job
computer (16)
fig. 13
fig. 14

20 / 48 FRITZMEIER Umwelttechnik GmbH & Co. KG V1.1
ISARIA PRO Compact®Assembly
5.4.3 Job computer <=> Terminal
•Connect plug (A) of connection cable of job computer (7) to the terminal (connection C on the
TOUCH800)
5.4.4 Job computer <=> ISOBUS
•Connect plug (B) of connection cable of job computer (7) to a free ISOBUS plug-in location (C)
•Fix all cables using the cable clips (11)
fig. 15
fig. 16
fig. 17
Other manuals for PRO Compact
1
Table of contents
Other ISARIA Farm Equipment manuals