Wichtig
Vor dem Gebrauch des Kindersitzes diese
Anleitung bitte aufmerksam lesen. Alle Hinweise
beachten und dieses Handbuch zum späteren
Nachschlagen aufbewahren. Für weitere
Informationen wenden Sie sich bitte an den
Hersteller oder Händler.
Helfen Sie uns dabei, unsere Produkte zu
verbessern und füllen Sie den Fragebogen auf
unserer Webseite unter www.isigo.eu aus.
Hinweise
1 - Dieses Produkt ist eine „Universalkinder-
sicherung“ mit Zulassung Nr. 44 einschließlich
Ergänzungen Serie 04. Der Sitz ist für die
allgemeine Anwendung in Fahrzeugen
konzipiert und ist mit den meisten, aber nicht
allen, Autositzen kompatibel.
2 - Die perfekte Kompatibilität ist gewährleistet,
wenn in der Bedienungsanleitung des Kfz-
Herstellers die Eignung für die Montage von
„Universalkindersicherungen“ für die entspre-
chende Altersgruppe ausgewiesen ist.
3 - Die Klassifizierung als „Universalkinder-
sicherung“ erfolgt nach strengeren Kriterien
als bei älteren Modellen, die diese
Bezeichnung nicht tragen.
4 - Der Kindersitz eignet sich zur Montage in
Fahrzeugen mit festen oder aufrollbaren 3-
Punkt-Sicherheitsgurten und ist gemäß
UN/ECE 16 oder gleichwertigen Standards
zugelassen.
5 - Bei beliebigen Fragen oder Zweifeln wenden
Sie sich bitte an den Hersteller oder Händler.
Wichtige Informationen
Für die Sicherheit
Achtung: Eine falsche Montage oder ein
unsachgemäßer Gebrauch des Kindersitzes
können ein schwerwiegendes Sicherheitsrisiko
für das Kind darstellen. Aus diesem Grund wird
dringend empfohlen:
•sich strikt an vorliegende
Gebrauchsanleitung zu halten;
•den Kindersitz unter keinen Umständen zu
manipulieren oder zu verändern.
Den Kindersitz so positionieren, dass er beim
Schließen der Türen, bei der Regulierung der Sitze
oder sonstigen Tätigkeiten nicht beschädigt wird.
Das Kind auf dem Sitz nicht unbeaufsichtigt
lassen.
Den Kindersitz bei direkter Sonneneinstrahlung
nicht im Auto lassen: die Kunststoffteile könnten
sich überhitzen.
Gepäck oder andere im Fahrgastraum befindliche
Gegenstände sicher befestigen. Alle Passagiere
müssen während der Fahrt angeschnallt sein.
Den Kindersitz mit Hilfe der Sicherheitsgurte am
Autositz befestigen, auch wenn kein Kind
transportiert wird.
Den Zustand des Kindersitzes regelmäßig
überprüfen. Bei Schäden oder Abnutzung den
Sitz austauschen.
Den Sitz nicht benutzen, wenn Teile fehlen oder
beschädigt sind.
Nur Originalersatzteile verwenden.
Darauf achten, dass das Kind während der Fahrt
keine Gegenstände (z.B. Spielzeug) in den
Taschen der Kleidung hat, da diese bei Unfällen
zwischen Gurt und Körper eingequetscht
werden und Verletzungen verursachen könnten.
Eventuelle Gegenstände vor dem Anschnallen
daher aus den Taschen entfernen. Dieser
Hinweis gilt auch für Erwachsene.
Kinder sind naturgemäß unbesorgt und oft sehr
lebhaft: Erklären Sie Ihrem Kind daher in aller
Ruhe, wie wichtig es ist, bei geschlossenem
Sicherheitsgurt während der ganzen Fahrt
sitzen zu bleiben. Dies trägt dazu bei, die
gewünschte Sicherheit zu gewährleisten.
Bei einem Unfall
Alle mitfahrenden Passagiere müssen wissen,
wie der Sicherheitsgurt des Kindersitzes
geöffnet wird.
Nach einem Unfall den Kindersitz ersetzen, da
er Schäden aufweisen kann, die von außen
nicht sichtbar sind.
Komfort
Die Sicherheitsgurte am Körper des Kindes
nicht zu fest anziehen.
Wird der Kindersitz auf der Rücksitz montiert,
darauf achten, dass genügend Freiraum für die
Füße des Kindes vorhanden ist. Andernfalls den
Vordersitz entsprechend verstellen.
Während langer Fahrten öfter Pausen einlegen,
in denen sich das Kind frei bewegen kann.
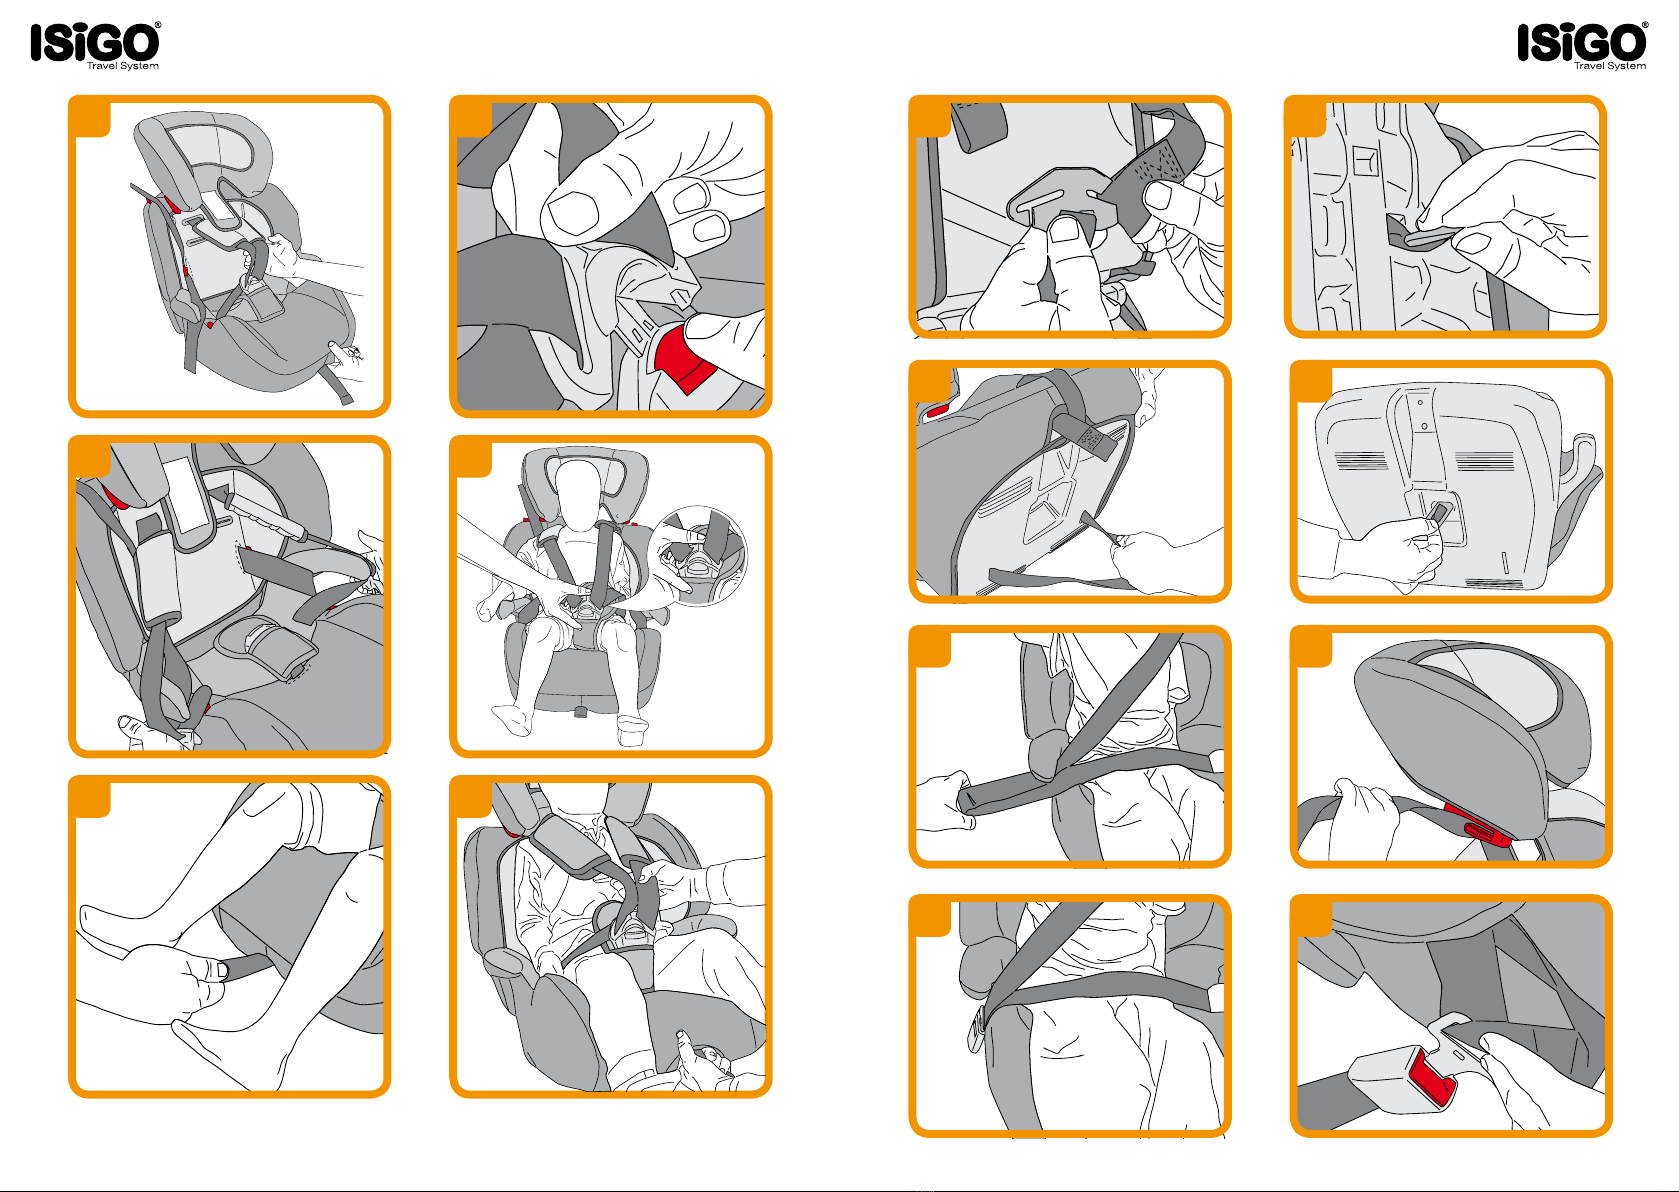
Montage des Kindersitzes
Vergewissern Sie sich vor dem Gebrauch bitte,
dass alle im Folgenden dargelegten Bestandteile
vorhanden sind. Siehe hierzu Abbildung 1.
Stellen Sie den Sitz auf eine ebene Fläche. Die
DE
Rückenlehne nach vorne kippen, damit sich am
hinteren Teil des Sitzes befindlichen Gurte
eingesetzt werden können. Überprüfen Sie, ob
die Befestigungen richtig sitzen. Der
Metallhaken muss sich hinter der Rückenlehne
befinden (Abb. 2).
A. Kopfstütze
B. Führungsgurt
C. Rückenlehne
D. Sitz
E. Längenregler
F. Riemen des Neigungsreglers
G. Verschluss
H. Gurtpolsterung
I. Sicherheitsgurte
J. Metallhaken
K. Polsterung der Befestigungsklammern
L. Metallklip
Vorbereitungsregeln für den Kindersitz
Die Höhe der Sicherheitsgurte und der Kopfstütze
muss vor der Montage des Kindersitzes überprüft
und ggf. eingestellt werden.
Wie die Höhe der Sicherheitsgurte und der
Kopfstütze überprüft werden.
Den Kindersitz auf den Boden stellen und das
Kind so hineinsetzen, dass es gut am Kindersitz
anliegt.
Überprüfen Sie, ob sich die Gurte (i) an der
Position befinden, die den Schultern des Kindes
am nächsten ist, idealerweise kurz über
Schulterhöhe (Abb.3).
Stellen Sie die Höhe der Kopfstütze (A) so ein,
dass der Kopf des Kindes gut geschützt ist. Die
Kopfstütze darf die Schultern des Kindes dabei
nicht berühren (Abb. 4).
Wie die Sicherheitsgurte des Kindersitzes
eingestellt werden
Einen der Sicherheitsgurte (I) aus dem
Metallhaken (J) lösen, der sich hinter der
Rückenlehne des Kindersitzes befindet (Abb. 5).
Den Gurt aus der Lehne ziehen (Abb. 6).
Die Befestigungsklammer der Polsterung (K)
aus der Lehne ziehen (Abb. 7).
Die Befestigungsklammer der Polsterung (K)
ziehen bis der Sicherheitsgurt (I) in der Öffnung
der Rückenlehne die gewünschte Höhe erreicht
hat (Abb. 8).
Den Gurt (I) wieder am Metallhaken (J)
befestigen (Abb. 9).
Zur Regulierung des anderen Gurts analog
vorgehen.
Achtung: Sicherstellen, dass die Gurte (I) durch
die Polsterungen gezogen wurden und die mit
Schaumgummi verkleidete Seite der Polsterun-
gen zum Kind ausgerichtet ist.
Achtung: Vergewissern Sie sich, dass die Gurte
nicht verdreht sind und sich die Befestigungs-
klammer der Polsterung (K) nicht aus der Lehne
lösen kann.
Wie die Höhe der Kopfstütze eingestellt wird
Zur Erhöhung der Kopfstütze (A), diese nach
oben und zum Senken nach unten drücken. Eine
Schnappvorrichtung zeigt den Übergang von
einer Höheneinstellung zur anderen an (Abb. 10).
Achtung: Die richtige Positionierung der
Kopfstütze ist für die Sicherheit des Kindes
zwingend notwendig. Nehmen Sie die
Kopfstütze niemals ab.
Benutzung des Kindersitzes
Den Kindersitz auf einem Platz des Rücksitzes
oder auf dem Beifahrersitz positionieren.
Achtung: In einigen Ländern verbietet die
Straßenverkehrsordnung die Montage von
Kindersitzen auf dem Beifahrersitz. Informieren
Sie sich in jedem Aufenthaltsland über die
diesbezügliche Vorschrift der Straßenverkehrs-
ordnung.
Achtung: Den Kindersitz nicht auf dem
Beifahrersitz positionieren, wenn dort ein Airbag
aktiv ist.
Achtung: Den Kindersitz nicht auf Autositzen
montieren, die nur mit einem horizontalen Gurt
ausgestattet sind.
Achtung: Nichts zwischen Kindersitz und
Autositz positionieren.
Gruppe 1 (von 9 bis 18 kg)
Den Kindersitz auf dem Autositz so
positionieren, dass er vollständig am Sitz und
an der Lehne anliegt.
Achtung: Die Übergangspunkte der Sicherheits-
gurte sind rot markiert. Die Sicherheitsgurte des
Autos dürfen sich nicht in einer anderen als der
angegebenen Position befinden.
Den quer liegenden Kfz-Gurt am oberen Teil der
Rückenlehne anlegen (Abb. 11).
Den unteren Kfz-Gurt unter die Armlehne des
Kindersitzes anlegen.
Beide Sicherheitsgurte quer über die Öffnung