www.iso-tip.com
Tel: (715) 831-6353
Fax: (419) 818-0897
704 Bartlett Avenue
Altoona, WI 54720 USA
The QUICK CHARGE #7740
Up to 125 solder joints per charge•
Fully recharges in 3-1/2 to 4 hours•
READ ALL INSTRUCTIONS BEFORE
USING. When using your QUICK CHARGE,
basic precautions should always be
followed.
Danger.
When the QUICK CHARGE operating•
button is pressed, the tip heats up over
900°F, almost immediately.
Warning:
DO NOT hold the tip when pushing the•
button.
Wheneveryouarenishedsoldering,•
make sure to rotate button back to lock
position.
DO NOT allow metal objects to touch•
or “short” across the recessed charging
contact points. The metal could get very
hot.
DO NOT lay against any surface after•
using until the TIP HAS COOLED.
General Soldering Information
For fast and accurate soldering, a clean and•
well-tinned tip is required.
Heat and gently wipe with a rag or an•
emery cloth to clean tip.
Re-tin to minimize oxidation.•
Use good quality solder.•
UseResinCoreorsolidwiththeproperux•
for electronics work.
Apply solder ONLY at the point of the tip.•
Recommended Practices and Answers to Frequently Asked
Questions:
You• CAN leave your QUICK CHARGE in its charging stand all of the
time when not in use - it will NEVER overcharge. To save electricity,
the charger can be unplugged if long periods of non-use are expected.
If the soldering iron is left in the stand and the recharging stand is
disconnected or turned off, the iron will discharge.
The iron should be used frequently to insure a longer life of its•
batteries. Even when you don’t solder, it is a good practice to
completely discharge the batteries by normal use at least once a
month. If this is not done, the batteries will gradually lose their
maximum capacity. However, when discharging, DO NOT hold the
iron continuously in the ON position without a HEAT SINK to prevent
abnormally high tip temperature.
NEVER charge your QUICK CHARGE soldering iron in a RECHARGER•
stand that is a different color than the iron. The higher charge rate of
different colored stands may cause overcharging and overheating of
the iron’s rechargeable cells, and this will shorten battery life.
When soldering, touch only the nose of the tip to the area you are•
soldering and not the thin sidewalls. Do not feed the solder onto the
side of the tip. This practice will rapidly eat a hole through the side
of the copper tip. Feed the solder onto the very end of the tip at the
junction with the work.
All tips should be kept tinned for fast heat transfer to the work and•
longest tip life. (See directions under General Soldering Information.)
Tip temperature can be controlled by pressing the button momentarily•
off and on in use. This may be necessary when working with micro
printed circuits.
How To Use QUICK CHARGE
Operation
1.1 Turn button to “use” position.
1.2 Depress button to operate.
1.3 When not in use, turn button to “lock” position
Soldering on Printed Circuit Boards, Wiring and General Work
Make sure work is clean and make a good mechanical connection where possible. Flux the joint, if necessary.•
Remove QUICK CHARGE from its recharging stand, depress push button, wait 3-5 seconds and apply tip to•
joint that is to be soldered.
Immediately apply solder at the point of the tip and the joint so that melted solder will help in heat transfer.•
Whensolderowsandhaswettedconnection,removesolderandsolderingironandreleasepushbutton.•
Soldering cycle should be completed within 15 seconds.•
Unnecessary usage will reduce joint capacity as will too large of work.•
Check your work; a good solder joint should look smooth and bright.•
After connection has cooled, trim off excess wire.•
Installing Tip
2.1 Align tip leads over the terminal holes.
2.2 Push inward and upward until tip is full seated.
2.3 To remove, pull straight out.
2.4 To attach the tip permanently, remove the two terminal screws and take off the two springs. Then insert
the tip into the tip holders. Replace the screws and tighten.
Replacing the Batteries
In the unlikely event that you have to replace the soldering iron’s Ni-Cad batteries:
3.1 Remove three screws from case. Remove cover carefully.
3.2 Remove switch contact screw. Lift switch spring and tip holder assembly up and remove from unit.
3.3 Remove 2 screws located on ends of battery pack.
3.4 Remove battery pack.
3.5 Install new battery pack with 2 screws.
3.6 Replace switch spring and tip assembly in case. Use caution! Do not touch the other tip assembly.
3.7 Replace switch contact screw.
3.8 Replace cover and 3 screws.
Recharging
The recharging stand is designed to be operated on 100 to 120 Volts, 50-60 Cycle.•
To recharge, place QUICK CHARGE in the recharging stand with the push button toward the front.•
To recharge using the wall plug transformer, plug charger cord into bottom of iron and plug charger only into•
a 120 Volt AC, 50/60 Cycle receptacle.
Recharge from “DEAD” to “FULL CHARGE” (recharging stand) #7700, #7740, #7904, #7944, Quick Charge•
and Power Pro units in 3-4 1/2 hours.
Using the wall plug transformer charging time is 12-16 hours and can be used with all models except for•
#7800, #7840.
It is suggested to charge iron when received and to leave in recharging stand or plugged into wall plug•
transformer when not in use. Soldering iron will not overcharge.
The recharging stand for the 7944 and 7904 has a LED to indicate charging status. “RED” indicates that the•
iron is not charging; “YELLOW/GREEN” indicates that the iron is charging. If the “RED” light appears when
you place the iron in the stand, always check to see that the stand is connected to a power source.
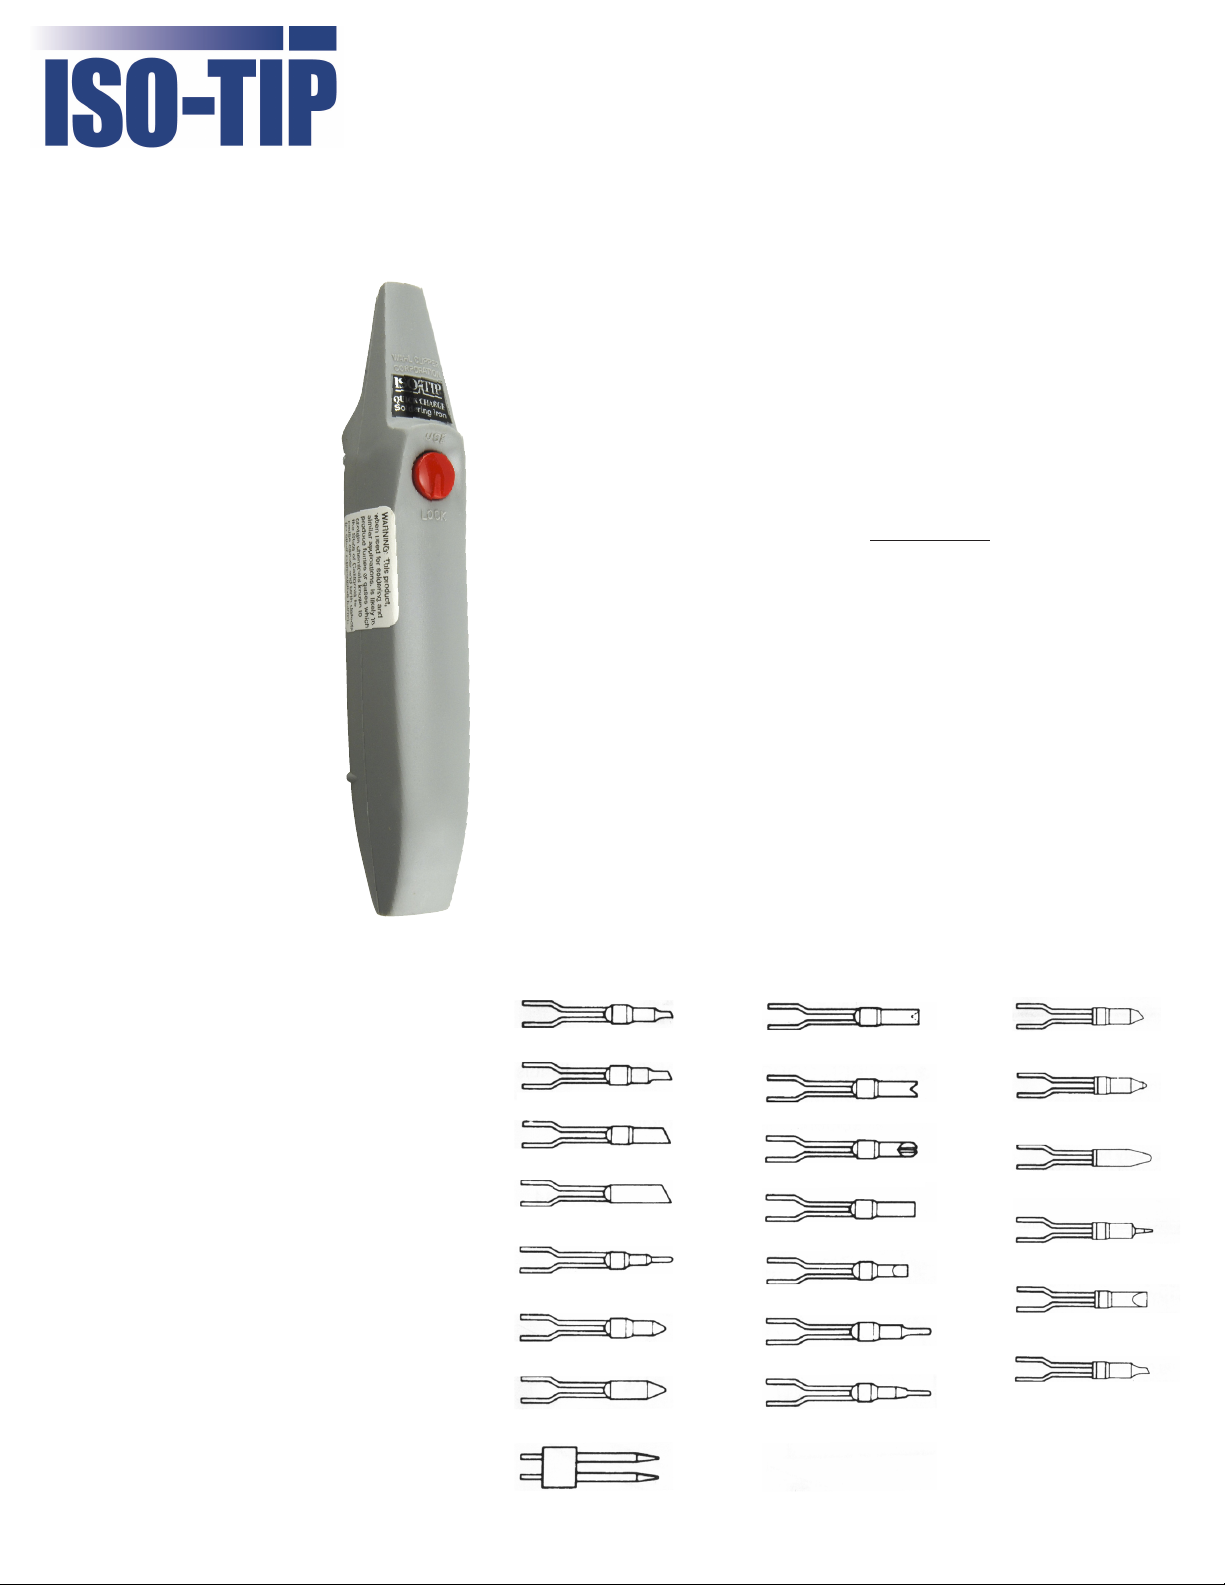
Replacement Tips
RegularTips HighEfciencyTips
No. 7571 Beveled Tip
1/16” (1.6mm) No. 7574 Concave Centering Tip
5/32” (4mm)
No. 7579 Beveled Tip
3/32” (2.4mm)
No. 7592 Beveled Tip
5/32” (4mm)
No. 7593 Beveled Tip
High Wattage 3/16” (4.8mm)
No. 7573 Tinning Tip
5/32” (4mm)
No. 7569 “V” Tip
5/32” (4mm)
No. 7572 Blunt Tip
5/32” (4mm)
No. 7577 Chisel Tip
5/32” (4mm)
No. 7545 Fine Tip
1/16” (1.6mm)
No. 7596 Knife Tip
1/32” (.8mm)
No. 7566 Micro Soldering Tip
1/64” (.4mm)
No. 7535 Regular Tip
5/32” (4mm)
No. 7546 Heavy Duty Tip
High Wattage 3/16” (4.8mm)
No. 7541 Circuit Breaker Tip
No. 7535-100 HI-E Regular Tip
5/32” (4mm)
No. 7545-100 HI-E Fine Tip
1/16” (1.6mm)
No. 7546-100 HI-E Heavy Duty Tip
High Wattage 3/16” (4.8mm)
No. 7546-100 HI-E Beveled Tip
3/32” (2.4mm)
No. 7577-100 HI-E Chisel Tip
5/32” (4mm)
No. 7566-100 HI-E Micro Soldering Tip
1/16” (.4mm)
Warranty
Pleasecontactusviaphoneore-mailforspecicproductwarrantiesoranyotherquestionsyoumayhave.


