ITAL PEK WING User manual

7 cm
WING / FILO_4 - SOTTOPENSILE_Istruzioni di montaggio
- utilizzo di trasformatori non idonei o non conformi alle caratteristiche tecniche della barra;
- utilizzo oltre le temperature d’esercizio indicate nel presente manuale;
- manomissione o mancata osservanza delle indicazioni contenute nel presente manuale.
SMALTIMENTO (RAEE) Autorizzazione n. IT09020000005786 del 10/02/2009 - La barra, incluse le sue parti removibili e accessori, al termine della vita utile non deve
essere smaltita insieme ai riuti urbani ma in conformità alla direttiva Europea 220/96/EC. Dovendo essere trattata separatamente dai riuti domestici, deve essere conferita
in un centro di raccolta differenziata per apparecchiature elettriche ed elettroniche.
Consultare i dati tecnici e le avvertenze riportate sull’etichetta applicata alla barra luminosa.
Conservare il presente foglio di istruzioni poiché contiene importanti informazioni che devono essere disponibili per future referenze.
REV. 03.2020
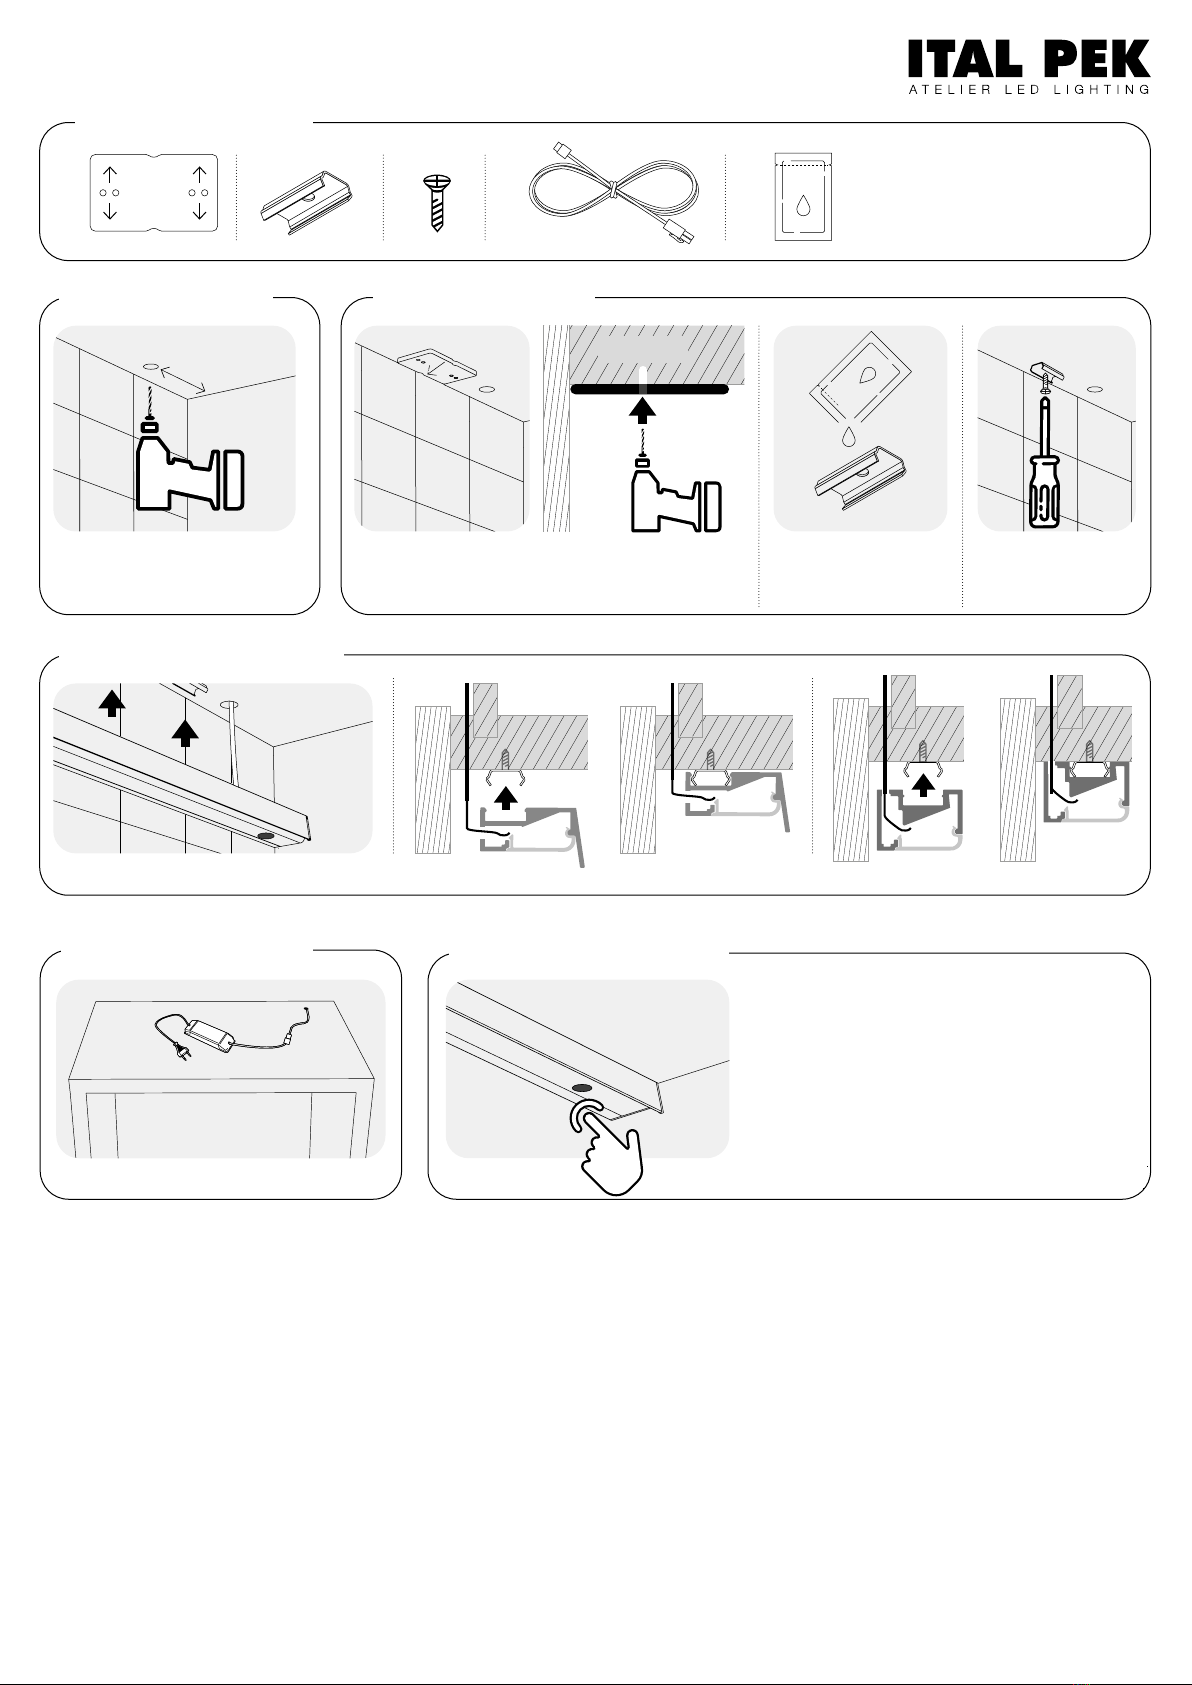
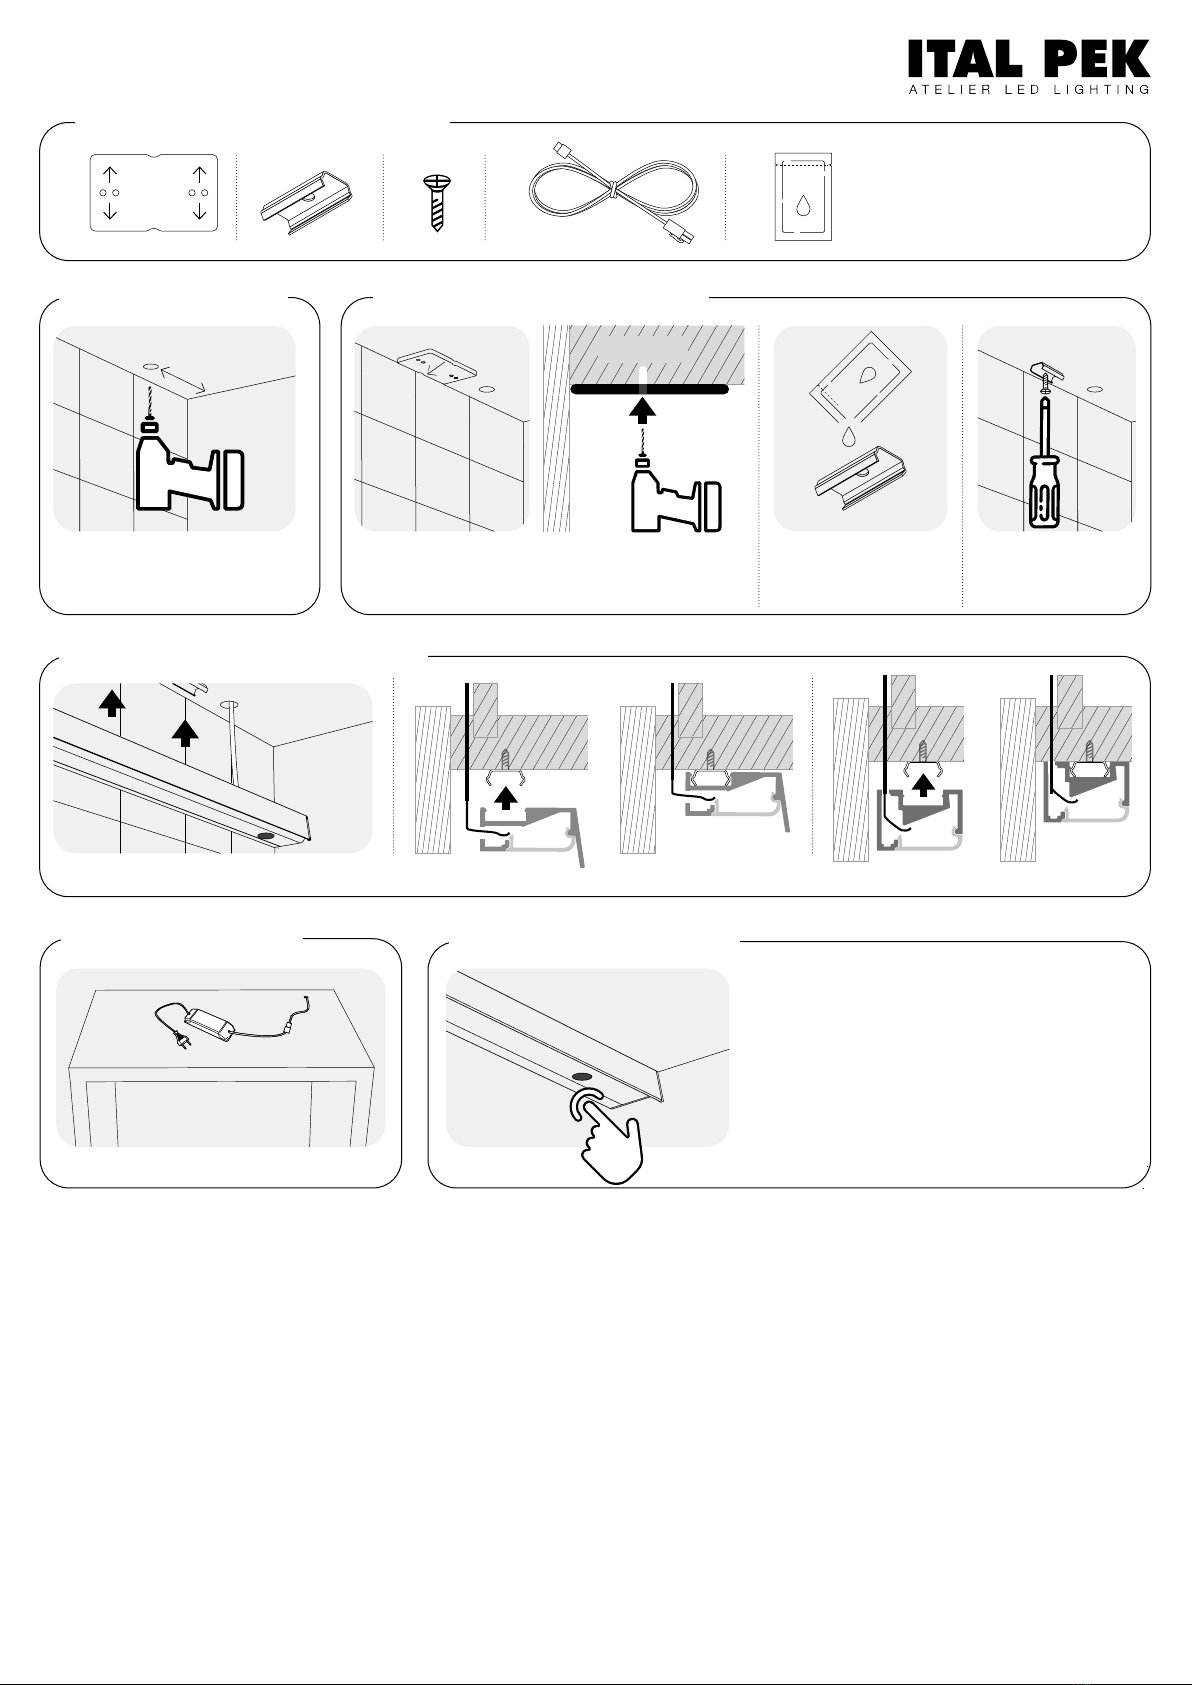
Aggancio della lampada alla clip (B)
Prolo Wing Prolo Filo_4
3
Agganciare la lampada alle clips.
Effettuare un foro (Ø10,5 mm)
per il passaggio del cavo.
Posizionando la dima (A) in appoggio contro
lo schienale, effettuare le tracciature per il ssaggio
delle clips (B). Utilizzare una punta trapano Ø 2,5mm.
Fissare le clips (B)
con le viti (C).
Lubricare le clips (B)
con grasso siliconico
in dotazione (E).
Fase di montaggio delle clips (B)
A
Tracciatura
max 0,5 mm
21
Foro cavo lampada
Accessori per l’installazione della lampada
AA Dima di foratura
B Clips ssaggio
C Viti
D Cavo di collegamento
E Grasso siliconico
B C E
2,8 m
D
Collegamenti elettrici
4
Collegare la lampada al trasformatore.
Accensione e spegnimento
Attenzione:
dopo un temporale o black-out, la lampada tornerà all’ultima posizione memorizzata.
TOUCH BUTTON
1 - Al 1° tocco la lampada si accende al 100%.
2 - Al 2° tocco la lampada si accende al 50%.
3- Al 3° tocco la lampada si spegne.
4 - Tenendo il dito sul touch button (LED) si può
regolare l’intensità della luce (DIMMER).
VERSIONE DUAL COLOR (3000/4000K)
A lampada spenta posizionare un dito e tenerlo per
circa 10 secondi sul touch button indicato dal
LED/molla: la tonalità della luce cambia da 3000 K a
4000 K o viceversa. Togliere il dito e procedere alla
accensione e regolazione come da punti 1 + 2 + 3.
5
APPLICAZIONE: Solo per uso interno. Grado di protezione IP44.
SPECIFICHE TECNICHE: I LED della barra non sono sostituibili.
Connettere la barra LED alla rete elettrica esclusivamente mediante l’alimentatore 220-24V della potenza conforme alla composizione. Vericare l’assorbimento di ogni barra
sull’etichetta apposta sul retro. Temperatura d’esercizio: -20°C~30°C.
CERTIFICAZIONI: Apparecchio con radiazione LED di classe 0 secondo CEI EN 60825. Ciononostante si consiglia di non guardare direttamente il fascio di luce prodotto
dal LED per un periodo prolungato.
PULIZIA E MANUTENZIONE: Pulire con un panno morbido leggermente inumidito con acqua e detersivo neutro. Non spruzzare detergenti aggressivi, solventi e acqua
direttamente sulla barra. Controllare periodicamente lo stato degli isolanti dei cavi elettrici. In caso di danneggiamento del cavo essibile esterno di alimentazione, sostituirlo
con uno analogo.
ESCLUSIONE GARANZIA: Il produttore non garantisce la lampada nei seguenti casi:

A Drilling template
B Fastening clips
C Screws
D Connecting cable
E Silicone grease
7 cm
A
Marking
max 0,5 mm
WING / FILO_4 - UNDER WALL UNIT_Mounting instructions
APPLICATION: Only for indoor use. Protection degree IP44.
TECHNICAL SPECIFICATIONS: Non replaceable LED. Voltage: 24 Vdc - Working temperature: -20°C-30°C.
WING/FILO_4 lighting units must be connected to the mains exclusively by means of their specic power supply or similar ones with the same technical features.
WING/FILO_4 lighting units are rated Class O within the laser safety classication according to IEC EN 60825. Nevertheless please avoid to stare at the LED beam for a
prolonged period of time.
CLEANING AND MAINTENANCE: Clean gently with a soft cloth that can be slightly moistened with water and some neutral detergent. Do not spray any aggressive
cleaning agent, solvent acid or water directly neither on the aluminum bar nor on the diffuser. Please check regularly that the insulation of the cables is in good conditions.
lf it becomes damaged or worn, please replace the cable with a similar one.
GUARANTEE: The guarantee is invalid in case of improper use and in the following cases:
- when unsuitable or inappropriate power adapters are used to power the lighting units;
- when the lighting units are used at a different ambient temperature from that mentioned in this leaet;
- in case of alteration and/or attempted repair of the lighting units/power adapters and if you remove the batch date label.
Disposal according to WEEE (Waste Electrical and Electronic Equipment).
WING/FILO_4 LED lighting units and power supply, including their accessories, cannot be disposed of as urban waste, but they must be pre-sorted and carried to authorized
public collection sites according to the 220/96/EC. Refer to the technical data and information mentioned on the silver label of the lighting unit.
Please read these instructions carefully before installation and leave a copy for the user for future reference.
Make a Ø 10,5 mm drillhole
for cable pass through.
1
Drillhole for cable
Lighting unit fastening (B)
3
REV. 03.2020
Wing prole Filo_4 prole
Accessories for installation
Electrical connections
4
Connect the lighting unit to the power supply
Touch button functioning
2,8 m
A
Warning: after a black-out or temporary power cut, light gets back at the latest intensity.
B C
5
D E
Place the drill template (A) against the splashback
and trace the position of the metal clips (B) using a
Ø 2,5 mm drillbit.
Fasten the clips (B)
by means of
screws (C).
Lubricate (B) clips
using the silicone
grease provided (C).
Clips mounting (B)
2
Snap the lighting unit into the metal clips.
TOUCH BUTTON
1 - Touching and releasing the touch button
(white LED behind the diffuser) light turns on.
2- At the second touch light is dimmed at 50%
3- At the third touch light turns off.
4 - Keeping a finger on the touch button, light intensity
can be adjusted (dimmer).
DUAL COLOUR VERSION (3000K - 4000K)
While light is off, place a finger on the touch button (LED/
spring) holding it for 10 seconds. LED colour temperature
changes from 3000 K (warm) to 4000 K (natural) and
viceversa. Take off your finger and follow the above steps
1 + 2 + 3 to switch on and off the lighting unit (no DIM).
This manual suits for next models
1
Table of contents
Languages:
Popular Lighting Equipment manuals by other brands

Apoolco
Apoolco SALT PRO Quick installation instructions

Code 3
Code 3 CD3974 Series Installation and operation instructions

Leuze electronic
Leuze electronic Advanced Tower Light Series operating instructions

Byiba
Byiba P002 manual

Speck pumps
Speck pumps Badu Stream II Installation, operating and service manual

Compulite
Compulite Sabre user guide