Positioningand Mounting
(continued)
smallbeadof silicone or latex sealantmay
be
appliedaroundbase
where itmntadsthe mounting surfaceto prevent moisNre
horn
getting
under the toilet base.
NOTICE: Donot use Polysulfidebase sealants becausethey may
chemically attackthe plasticwhich can resultinbreakage.
Plumbing
If
lnstalltng new Inletthm-hulllseacock,ensurethat 111s posltlonedon
a panof the hullwh~ch1s wettedat allanglosof heel or blm andhee of
water b~rbulenceat anv hull s&. If dischamina waste overboard
(che& legalrestrictio& for o;erboard dlschario): ensure discharge
thm-hulVseaco& Isboth aftof and hlgher than the lnlet mm-hull/
seacock. Allinlet
dmbiia
shwld
be
a minimwnof
34'
IDand
dlschargepumoinga mlnhumof 1-112'ID. All hose ends should be
doubledampedwith stainless steelhoseclamps
If
the toilot is above
waterline mute hoses to seacocks, holding tank or treatment device via
-
a routeas direct as poss~bleHowever, for maxlmum sealingeffoct on
the dlschargejokervalve. ~t
IS
recommended that the d~schargehoseis
loopedupwardabout
8'
above the discharmelbow before itdescends
to itsteril~tionpoint All bendsand elbows inplumbingshould
be
kept to a minimum. It shouldnot bo
necessary
to useany sealing
compoundwhen attaching hoses to the inlet
or
discharge porn.
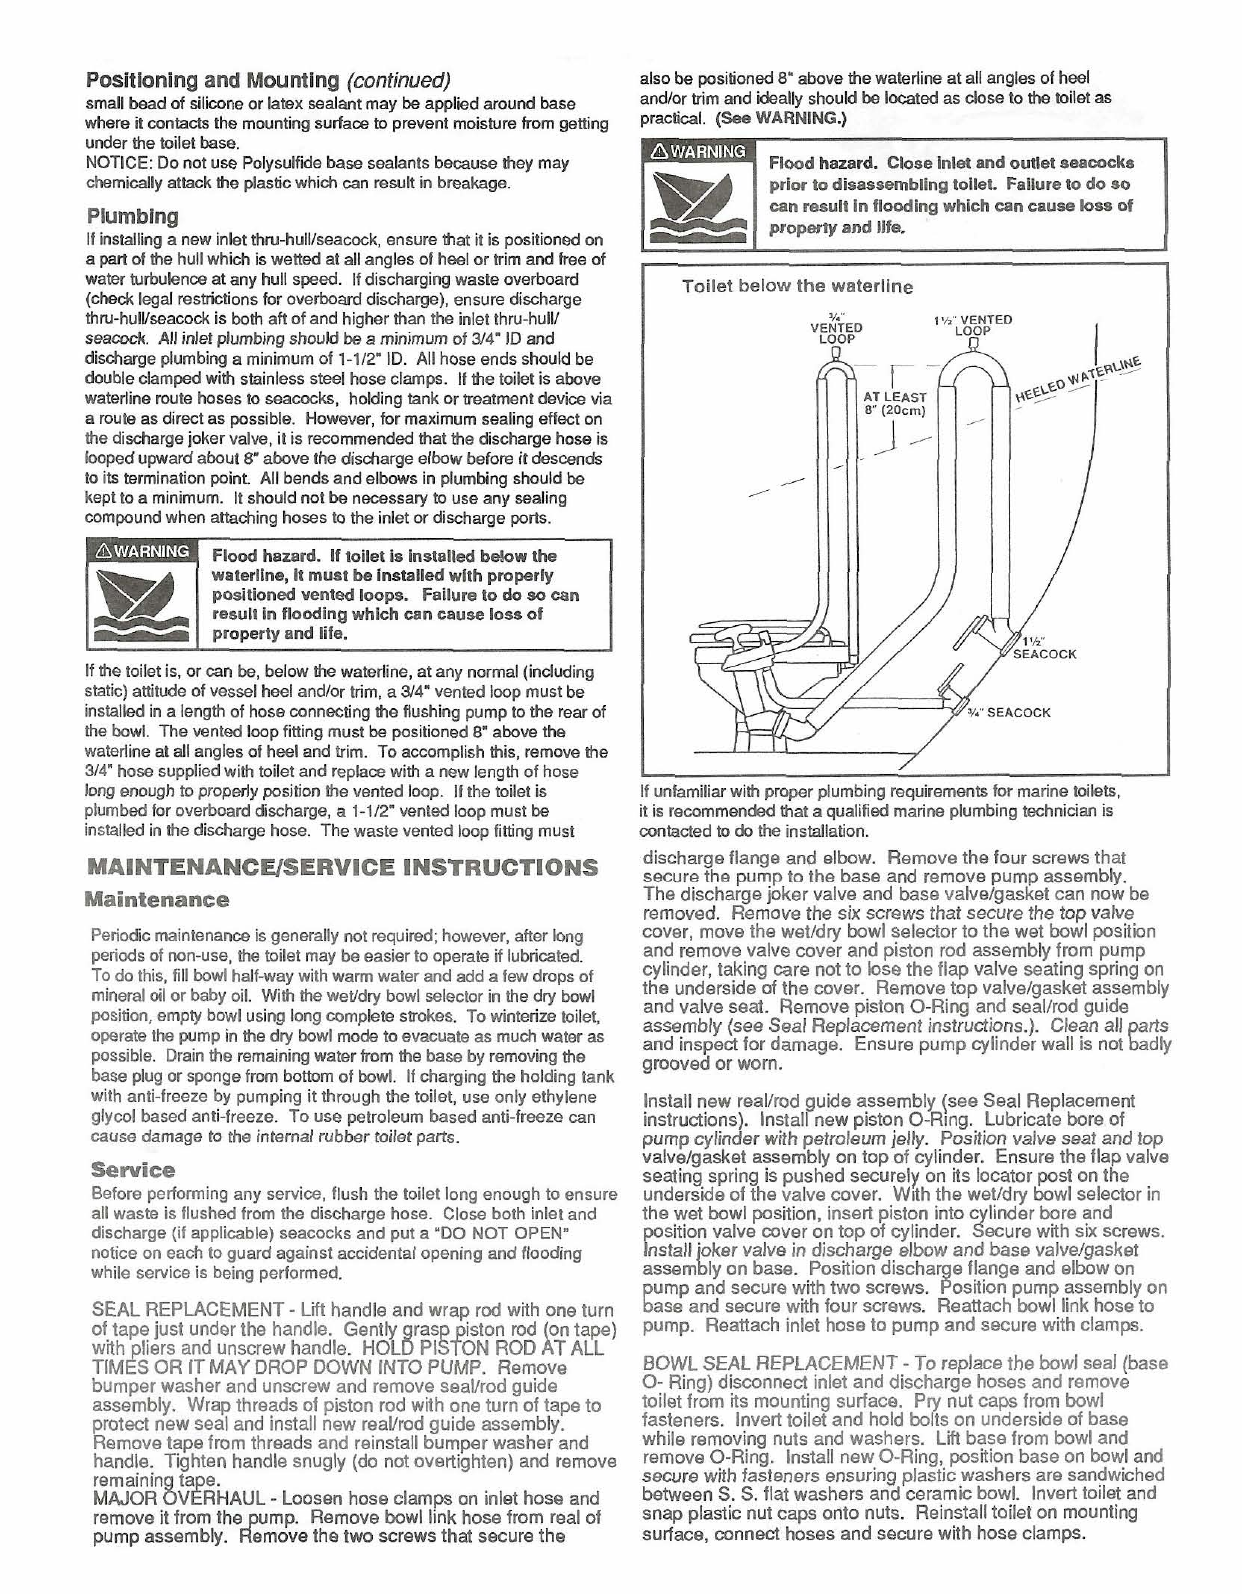
Floodhazard. Iftoilet isInstalledbelow the
waterline,
it
mustbeInstalledwith pmperly
positionedventedloops. Failureto do
so
can
result infloodingwhich cancauselossof
Ifthe toiletis,
or
can
be,
belowthe waterline, at any normal(induding
static) attitude of vessel heeland/or trim. a
314"
vented
IWD
must be
InstalledIn a longthof hosemnnecnngthe flush~ng iothe rear of
me bowl The vontedlwpflnlngmust
be
possoned
8'
above the
waterlineat allanales of heelandtrim. To amm~lishthis. removethe
314. hosesuppllodwlth toilet andreplacswlth a new lengiof hose
longenough to properly positionthe vented loop.
If
the toilet is
plumbedforoverboarddischarge, a 1-112" vented loop must
be
installedin the discharge hose. The waste vented loop fitting must
MAlNTENANCElSERVlCE INSTRUCTIONS
Maintenance
Periodicmaintenanceis generally notrequired;however, after long
periodsof non-use, the toilet may beeasier to operate if lubricated.
To do this, fill bowlhalf-waywith warm water and addafew dmps of
mineraloil or baby oil. With
the
wetldw bowl selectorinthe dw bowl
poslbon,empty bowluslnglongcomplete strokes To wlntenzi tollet.
operate the pump Inthe dry bowl mo& to evacuate as much water as
possible. Drainthe remainingwater from the base by removingthe
baseplugor spongefrom bottomof bowl. if charging the holding tank
with anti-freeze by pumpingitthrough the toilet, use only ethylene
glycol basedanti-freeze. To use petroleum based anti-freezecan
cause damage to the internalrubber toilet parts.
Service
Before ~erforminaanv service. flush the toilet lona enouoh to ensure
allwade 1s flushid frbm the dlschargo hose ~lo;e bothlnlet and
dlscharge (11appltcaolc)seacocks and put a 'DO NOT OPEN"
noticeon each to guardagainstaccidentalopeningandflooding
while service is being performed.
SEAL REPLACEMENT
-
Ltfl handle andwrap rod with one t~rn
o! tape just under the handle. Gently ras iston rod on lape)
w th Cers and unscrew handle.
HOLB
PI~ON
ROD
A
TALL
TIMI&
OR ITMAY DROP DOWN INTOPUMP. Remove
bumper washer and unscrew and remove seallrod guide
assembly. Wrap threads
01
piston rod with one turn of tape to
protect new seal and install new reallrodguide assemoly.
Removetape from threads and reinstallbumper washer and
handle. Tiahten handle snugly (do not overlighten) and remove
-.
. -.
remainin fa e.
MPJOR
~V~RHAUL
-
Loosen hoseclam~son inlet hose and
remove it from the ump Remove bowl link hosefrom real of
pump assembly. &move the two screws that secure the
also
be
positioned
8'
above me waterline at all angles of heel
ancVor trim and ideally should
be
located
as
closeto the toilet
as
~racbl.
(See
WARNING.)
Floodhazard. CloseInlet andoutlet seearcks
prlor todisassembllngtoilet Failuretodo
so
canresultinfloodingwhich cancauselossof
propertyandUfe.
I
Toilet below the
waterline
I
Y."
VENTEO
I'/<'
VENTEO
LOOP
LOOP
n
I
I
I
/
If unfamiliar with proper plumbing requirementsformarine toilets.
it is recommendedthat aqualifiedmarineplumbingtechnician is
contactedto
&
the installation.
discharge flange and elbow. Removethefour screwsthat
secure the pumpto the base and remove pump assembly.
The dischargejoker valve and basevalvelgasket can now be
removed. Removethe six screws that secure the topvalve
cover, move the wetldry bowl selectortothe wet bowlposition
and remove valve cover and piston rod assembly from pump
cylinder, taking care not to losetheflap valve seating spring on
the underside
of
the cover. Removetopvalvelgasket assembly
andvalve seat. Remove piston 0-Ring and seallrod guide
assembly (see Seal Replacement instructions.). Clean all
and inspect for damage. Ensure pumpcylinder wall isnot
g$
groovedor worn.
lnstall new reallrod guide assembly (see Seal Replacement
instruct~ons).Install new plston0-R~ng.Lubricateboreof
pumpcylinder with petroleumjelly. Position valve
seat
andtop
valvelaasket assemblv on topof cvlinder. Ensure the flap valve
seating spring ispushbdsecurely on its locator post onthe
underside of the valve cover. With the wetld~bowl selector in
~
~
~~
~
the wet bowlposit;on, inserl piston into lind6r bore and
'3
postionvalve cover on top of qlinder. ec-re witn six screws.
Install oker valve
in
discharge e.bow and base varve/gasket
assembly on base. Positiono.scharge flange and elbow on
gump and secure with two screws. Positionpump assembly on
ase and secure with four screws. Reattachbowl link hoseto
pump. Reattach inlet hoseto pumpandsecure with clamps,
BOWL SEAL REPLACEMENT
-
To replacerhe bowl seal (base
0-
Rng)disconnect inlet and discharge hoses and remove
toilet from its mounting surface. Pry nut caps from bowl
fasteners. Inverttoilet and hold bolts on underside of base
while removing nuts and washers.
Lii
basefrom bowl and
remove 0-Rina. Install new 0-Rina. wsitionbaseonbowl and
secure with faienersensuring plagi~cwashers are sandw~cned
between S. S. flat washers andceramic bowl. lnventoilet and
snap plastic nut caps onto nuts. Reinstall toilet on mount~ng
sufiace, connect hoses and secure with hoseclamps.