manuals.online logo
Brands
  1. Home
  2. •
  3. Brands
  4. •
  5. Jamara
  6. •
  7. Test Equipment
  8. •
  9. Jamara ACCU MASTER 7 BAL User manual

Jamara ACCU MASTER 7 BAL User manual

ACCU MASTER 7 BAL
DE - Allgemeine Hinweise
Jamara e. K. übernimmt keine Haftung für Schäden, die an dem Produkt selbst oder durch dieses entstehen, sofern die-
se auf falsche Bedienung oder Handhabungsfehler zurückzuführen sind. Der Kunde allein trägt die volle Verantwortung
für die richtige Bedienung und Handhabung; dies umfasst insbesondere die Montage, den Ladevorgang, die Verwen-
dung bis hin zur Wahl des Einsatzbereiches. Bitte beachten Sie hierzu die Bedienungs- und Gebrauchsanleitung, diese
enthält wichtige Informationen und Warnhinweise.
GB - General information
Jamara e.K. is not liable for any damage caused to the product itself or through this, provided this is due to improper
operation or handling errors. The Customer alone bears the full responsibility for the proper use and handling, including
without limitation, the assembly, the charging process, the use and choice of the operation area. Please refer to the
operating and user instructions, it contains important information and warnings.
FR - Remarques générales
La société Jamara e. K. n’est pas responsable de dommages, que ce soit au niveau du modèle ou causé par celui-ci,
résultant d’une utilisation non appropriée. Seul le client est responsable concernant la mise en oeuvre et l’utilisation con-
forme du matériel; cela va de l’assemblage, en passant par la charge des accus et allant jusqu’au domaine d’utilisation.
Pour cela, veillez lire attentivement la notice d’assemblage et d’utilisation, celle-ci contient d’importantes informations
ainsi que les consignes de sécurités.
IT - Informazioni generali
Jamara e. K. non e´responsabile per danni, sostenute al prodotto stesso o attraverso questo, dovuti ad una gestione
non corretta del articolo. Solo il cliente si assume la piena responsabilità per la manutenzione e l´utilizzo corretto dello
stesso; questo include il montaggio, la ricarica, l´utilizzo, no alla scelta della aerea di applicazione. Si prega di notare e
rispettare le istruzioni d´uso, questi contengono informazioni e avvertimenti molto importanti.
ES - Información general
Jamara K. no se hace responsable de los daños causados al producto en sí o por medio de esto, a menos que esto
se debe al mal funcionamiento o errores de manejo. El cliente solo tiene la responsabilidad completa para el uso y
manejo adecuado, incluyendo, sin limitaciones, el montaje, el proceso de carga, el uso de hasta la elección de la zona
de aplicación. Por favor, consulte las instrucciones de uso y funcionamiento, contiene información y avisos importantes.
DE - Konformitätserklärung
Hiermit erklärt Jamara e.K., dass sich dieser Artikel „Accu Master 7 Bal, No. 066045“ in Übereinstimmung mit den
grundlegenden Anforderungen und den anderen relevanten Vorschriften der Richtlinie 2004/108/EG sowie 2011/65EU
bendet.
Weitere Informationen nden Sie auch unter: www.jamara-shop.com/Konformitaet
GB - Certicate of Conformity
JAMARA hereby declare that „Accu Master 7 Bal, No. 066045“ follow the regulations and requirements as well as any
other relivant directives of the EEC directive 2004/108/EC, 2011/65/EU.
Further information can also be found at: www.jamara-shop.com/Conformity
FR - Déclaration de conformité
Par la présente, la société Jamara e. K. déclare que ce l‘article „Accu Master 7 Bal, No. 066045“ est conforme en tous
points avec les textes de la directive de l’union européenne 2004/108/CE ainsi que 2011/65/EU.
Vos pourrez également trouver des informations sur notre site Internet: www.jamara-shop.com/Conformite
IT - Dichiarazione di conformita’
La Jamara e.K. dichiara, che questo articolo „Accu Master 7 Bal, No. 066045“ è in linea con le norme ed altre rilevanti
disposizioni comunitarie 2004/108/CE come 2011/65/EU.
Piu informazioni: www.jamara-shop.com/Conformita
ES - Declaración de conformidad
Por la presente, la empresa “Jamara e.K.”, declara que este artículo „Accu Master 7 Bal, No. 066045“ cumple con los
requisitos esenciales y cualesquiera otras disposiciones adicionales de la normativa CE 2004/108/CE, 2011/65/EU.
Encontrará más información en: www.jamara-shop.com/Conformidad
DE - Entsorgungshinweise
Bitte sorgen Sie für fachgerechte, den gesetzliche Vorschriften entsprechende Entsorgung der Elektro-
bauteile (Fernsteuerung, Ladegerät und Modell usw.). Bitte werfen Sie diese nur in die dafür vorgesehe-
nen Sammelboxen bei den Kommunen.
GB - Disposal Instructions
All parts of this model should be disposed of correctly, in particular electronic components may be
subject to local restrictions. Your dealer will advise you.
FR - Consignes de recyclage
Veillez à respecter les consignes de recyclage des appareils électroniques (radiocommande, chargeur ou modèle, …)
en fonction des directives en vigueurs. Jetez uniquement ceux-ci dans les poubelles les bacs de ramassages que vous
trouverez dans les magasins ou dans votre commune.
IT - Disposizioni per l‘eliminazione nel Rispetto dell‘ ambiente
Importante per pezzi elettronici Smaltire i pezzi elettronici secondo le norme di legge (Radio/Caricatore/Modello ecc.).
Gettari questi articoli solo negli contenitori appositi.
ES - Notas sobre el reciclado
Por favor, respete la normativa sobre reciclado de materiales eléctricos/electrónicos cuando se deshaga de dispositivos
de este tipo (Emisoras, cargadores, modelos, etc.). Por favor, Lleve a reciclar estos componentes
DE - Lieferumfang:
• Accu Master 7 Bal • Anleitung
Highlights
• Akkutester für 4 - 7 NiCd, NiMh und
für 2 - 7 Li-Ion, LiPo LiFe
• Selbstständige Akkutyp-Erkennung
• Großes 3-Zeiliges LCD-Display
• Keine externe Spannungsversorgung
nötig
• Warnton bei Unterspannung
• Li-Balancerfunktion
GB - Box contents:
• Accu Master 7 Bal • Instructions
Highlights:
• Battery Tester for 4 - 7 NiCd, NiMh and
for 2 - 7 Li-ion, LiPo, LiFe
• Automatic battery type detection
• Large 3-line LCD display
• No external power supply needed
• Warning sound for undervoltage
• Li-balancer function
FR - Contenu du kit:
• Accu Master 7 Bal • Notice
Highlights:
• Testeur de batterie pour 4 - 7 NiCd, NiMh
et pour 2 - 7 Li-Ion, LiFe Lipo
• Reconnait tout de suite le type d’accu
• Grand écran LCD à 3 lignes
• Pas besoin d’alimentation externe
• Signal sonore en cas de sous-tension
• Fonction Li-balancer
IT - Contenuto del kit:
• Accu Master 7 Bal • Istruzioni
Highlights:
• Tester di batterie per 4-7 NiCd, NiMh e
per 2 - 7 Li-Ion, LiPo LiFe
• Rilevamento di tipo di batteria in modo
autonomo
• Ampio display LCD con 3 righe
• Nessuna necessità di alimentazione
esterna
• Suono di allarme in caso di sottotensione
• Funzione Li-balancer
ES - Contenido del kit:
• Accu Master 7 Bal • Instrucciones
Highlights:
• Testador de batería para 4 - 7 NiCd, NiMh
y para 2 - 7 Li-Ion, LiPo LiFe
• Reconocimiento automático del tipo de
batería
• LCD-Display grande de 3 líneas de visu
alización
• No requiere alimentación externa
• Sonido de advertencia en subtensión
• Función Li-balancer
DE - NiCd/NiMh-Akkus
1. Akkuspannung zeigt die gesamte Span-
nung und Restkapazität an.
2. Zellenzahl einstellen Sollte die Zellen-
zahl der NiCd oder NiMH Akkus nicht richtig
angezeigt werden müssen Sie diese korrekt
einstellen.
3. Am Akku Master 7 BAL können auch
NiCd/NiMH Akkus für Empfänger bzw. Sen-
der (4 ~ 7 Zellen) angeschlossen werden.
GB - NiCd/NiMh batteries
1. Battery total voltage Total voltages, and
remaining capacity(%).
2. Set cell numbers The capacity shown for
NiCd/NiMh cells ist not accurate and should
not be relied upon.
3. NiCd and NiMh batteries for the TX and
RX (4 - 7 cells) can be connected to this ca-
pacity checker.
FR - Accus NiCd/NiMh
1. Tension de l’accu Indique la tension glo-
bale et la capacité restante.
2. Réglage du nombre d’éléments Si le
nombre afché d’éléments de votre accu
NiCd ou NiMH n’est pas correcte il faut le
corriger.
3. Vous pouvez également brancher des
accus de réception ou émetteur (4 ~ 7 élé-
ments) du type NiCd/NiMH sur votre Accu
Master 7 BAL
IT - Batterie NiCd/NiMh
1. Tensione della batteria indica la tensio-
ne totale e capacità.
2. Indicare il numero di celle Se il numero
di celle di NiCd o NiMH non viene visualiz-
zato correttamente, è necessario impostarlo
correttamente.
3. Al AkkuMaster 7 BAL si possano anche
collegare batterie NiCd / NiMH per il ricevi-
tore o trasmettitore (4 ~ 7 cellule).
ES - Baterías-NiCd/NiMh
1. Tensión de la batería Muestra la tención
total y la capacidad restante.
2. Ajuste el número de células Si el nú-
mero de baterías NiCd o NiMH no estan
correcto indicado, se deben congurar cor-
rectamente.
3. En el Akku Master 7 BAL se pueden
conectar también baterías NiCd/NiMH para
receptor o emisora (4 ~ 7 células).
No. 06 6045
DE - Gebrauchsanleitung
GB - Instruction
FR - Notice
IT - Istruzione
ES - Instrucciones
DE - Funktionsübersicht
1 Eingang NiCd/NiMh Akkus/Servoanschluss
2 Eingang Li-Akkus (mit Balancer-Anschluß)
GB - Functionalverview
1 NiCd/NiMh battery input/Servo connection
2 Lithium battery input (using balancing connector)
FR - Aperçu des fonctions
1 Entrée pour accu NiCd/ NiMh/Connexion Servo
2 Entrée pour accu LiXX (avec prise d’équilibrage)
IT - Panoramica delle funzioni
1 Entrata NiCd/NiMh Batteria/Collegamento servo
2 Entrata Li-Akkus (con connettore di bilanciamento)
ES - Resumen de las funciones
1 Entrada NiCd/NiMh/Conexión servo
2 Entrada batería-Li (con conector- Balancador)
1
2
1 2 3
Irrtum und technische Änderungen vorbehalten. Copyright JAMARA e.K. 2015
Kopie und Nachdruck, auch auszugsweise, nur mit Genehmigung von JAMARA e. K.
All rights reserved. Copyright JAMARA e.K. 2015
Copying or reproduction in whole or part, only with the expressed permission of JAMARA e.K.
JAMARA e.K.
Inh. Manuel Natterer
Am Lauerbühl 5 - DE-88317 Aichstetten
Tel. +49 (0) 75 65/94 12-0 - Fax +49 (0) 75 65/94 12-23
[email protected] ●www.jamara.com
Service - Tel. +49 (0) 75 65/94 12-66
kundenservice@ jamara.com
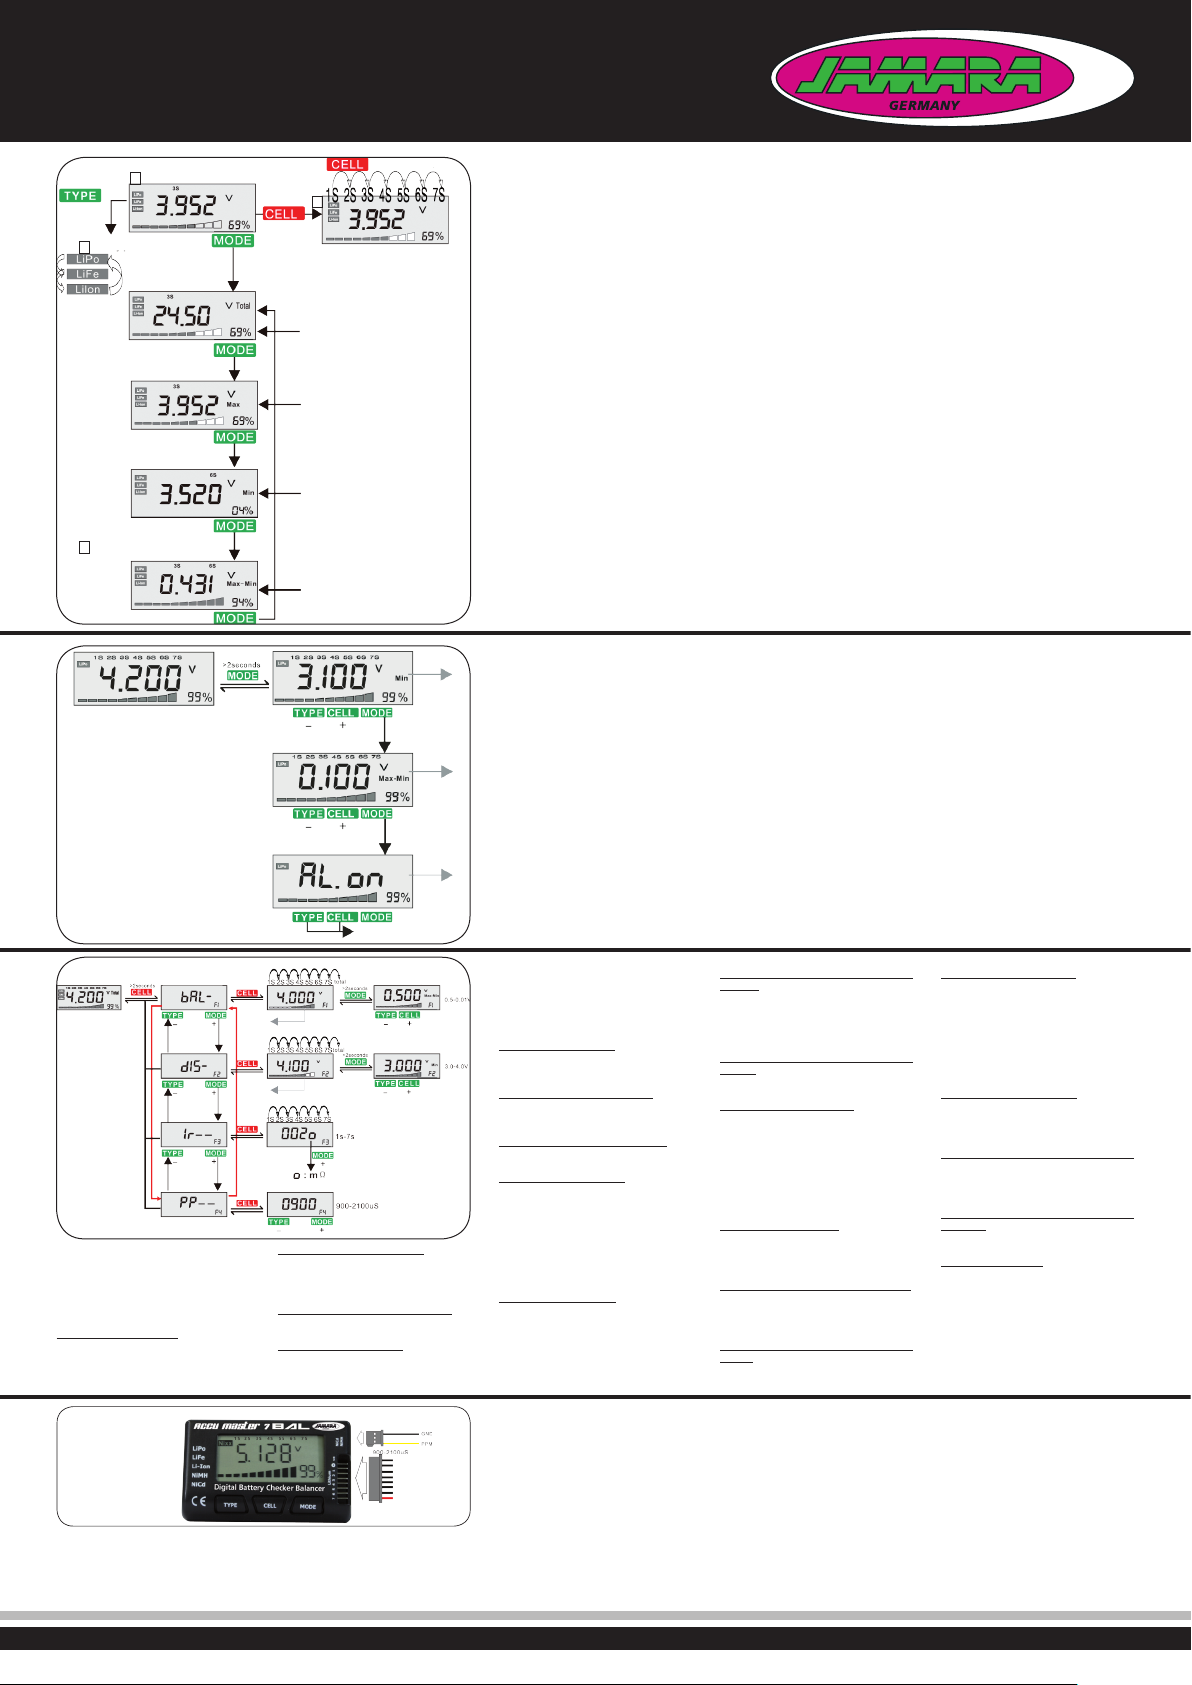
DE - Lithium-Akkus
1. Akku-Komplettspannung
2. Für jede einzelne Zelle werden die
Spannung sowie die Kapazität an-
gezeigt.
3. Durch drücken der Typ-Taste wählen
Sie den Akku Typ aus.
4. Gesamtkapazität (%)
5. Höchste Zellenspannung
Zeigt die Zelle (hier Zelle 1) mit der
höchsten Spannung und Kapazität an.
6. Niedrigste Zellenspannung
Zeigt die Zelle (hier Zelle 2) mit der
niedrigsten Spannung und Kapazität an.
7. Zeigt die höchsten bzw. niedrigsten Zel-
lenspannungen sowie die Spannungdif-
ferenzen der einzelnen Zellen an.
GB - Lithium batteries
1. Battery total voltage
2. Display voltage and capacity for each
cell.
3. Select battery type
4. Total capacity
5. Highest cell voltage
Showing the highest cell number,
voltage and capacity
6. Lowest cell voltage
Showing the lowest cell number,
voltage and capacity.
7. Highest/lowest cell voltage display
showing highest cell number/lowest cell
number and the voltage gap.
FR - Accus Lithium
1. Tension globale de l’accu
2. Pour chaque élément, la tension ainsi
que la capacité sont afchées.
3. Par action sur la touche Type vous
pouvez sélectionner le type d’accu.
4. Tension capacité (%)
5. Tension d’élément la plus élevée
Vous indique l’élément (dans notre cas
élément 1) avec la tension la plus forte
et la capacité.
6. Tension d’élément la plus faible
Vous indique l’élément le plus faible
(dans notre cas l’élément 2) avec la
tension la plus basse et la capacité .
7. Vous indique la tension d’élément la
plus élevée et la plus faible ainsi que
la différence de tension entre chaque
élément.
IT - Batterie al Litio
1. Tensione totale della batteria
2. Per ogni cella, viene visualizzata la
tensione completa e capacità.
3. Premendo il pulsante TYP e´possibile
selezionare il tipo di batteria.
4. Capacità totale ( %)
5. Massima tensione di cella
Mostra la cella (qui cella 1)con la
tensione e capacità più alta.
6. Tensione minima della cella
Mostra la cella (qui la cella 2) con la
tensione e la capacità più bassa.
7. Mostra le tensioni più alte o più bassi
delle celle e le differenze di tensione tra
le singole celle.
ES - Baterías-Lithium
1. Tensión de la batería completa
2. Para cada célula se muestra el voltaje
como la capacidad.
3. Al pulsar el botón TYP, seleccione el
tipo de batería.
4. Capacidad total ( %)
5. Voltaje alto de la célula
Muestra la célula (célula 1 aqui) con el
voltaje más alto y la capacidad.
6. Voltaje de la célula más baja
Muestra la célula (célula 2 aqui) con el
voltaje más abajo y la capacidad.
7. Indica los más altos y más bajos volta-
jes de célula y las diferencias de voltaje
de cada células individuales.
3
1
1
2
4
5
1
2
3
4
A
A
6
7
DE - Spannungsalarm
1. Drücken Sie für 2 Sek. Mode und Sie
gelangen in den Alarmmodus.
2. Stellen Sie den Wert der Spannung
zwischen „Max - Min“ ein.
3. Standard Spannungsalarm „OFF“.
4. Alarm-Funktion ON/OFF
5. Zum bestätigen der Einstellungen
wieder 2 Sek. Mode drücken.
GB - Voltage alarm
1. Press and hold “Mode” for 2 sec to enter
the alarm mode
2. Set the value of the voltage between
„max - min“
3. Standard voltage alarm „OFF“
4. Alarm function ON / OFF
5. To conrm the settings press “Mode”
for 2 sec.
FR - Alerte Tension,
1. Appuyez pendant 2 secondes sur la
touche mode et vous accédez au mode
alerte.
2. Réglez la valeur de la tension entre
« min et max «
3. Alerte tension standard « Off »
4. Fonction alerte ON/OFF
5. Pour conrmer les réglages, appuyer de
nouveau pendant 2 secondes sur la
touche Mode
IT - Allarme tensione
1. Premere per 2 secondi Mode e entra
nella modalità di allarme.
2. Impostare il valore della tensione tra
„Max – Min“.
3. Standard allarme tensione „OFF“.
4. Funzione-Allarme ON/OFF
5. Per confermare le impostazioni premere
2 secondi Mode.
ES - Alarma tensión
1. Mantenga pulsado durante 2 segundos
Mode y se entra en el modo de alarma.
2. Regular el valor de la tensión entre
„Max - Min“.
3. Alarma tensión estándar „OFF“.
4. Función de alarma ON/OFF
5. Para conrmar la conguración pulse
de nuevo para 2 seg. Mode.
DE - Weitere Funktionen
Um weitere Einstellungen vorzunehmen,
drücken Sie für 3 Sek. die „CELL“-Taste.
Um im Funktionsmenü die einzelnen
Funktionen zu wechseln, die Taste „Type“
drücken.
F1 BAL - Batterie-Balancer
Taste „Mode“ 2 Sek. drücken = Untermenü
Hier können Sie die Zellendifferenzen durch
drücken der Taste „Type/Cell“ einstellen.
F2 DIS - Batterie Entladefunktion
Taste „Mode“ 2 Sek. drücken = Untermenü
Hier können Sie dieUnterspannungsgren-
ze durch drücken der Taste „Type/Cell“
einstellen.
F3 IR - Batterie-Test Innenwiederstand
Zeigt den Innenwiederstand der einzelnen
Zelle (Diashow) an.
F4 PP - Servotesterfunktion
Hier kann am Anschluss NiMh/NiCd ein
Servo angesteckt und auf Funktion der Ser-
vowege getestet werden.
GB - Other Features
To make further settings, press the “CELL”
button for 3 sec. To change the single set-
ting is the function menu press the „Type“
button.
F1 BAL - Battery Balancer
Press „Mode“ button for 2 sec. = submenu
Here you can set the cell differences by
pressing the button „Type / Cell“.
F2 DIS - battery discharge function
„Mode“ button for 2 sec. = Press submenu
Here you can set the under voltage limit by
pressing the set „Type / Cell“ button.
F3 IR - Battery internal resistance test
Displays the internal resistance of the indivi-
dual cell (slide show).
F4 PP - servo tester function
Connect a Servo to the NiMh / NiCd socket
to test the function.
FR - Autres fonctions
Pour procéder à d’autres réglages appuyer
pendant 3 secondes la touche « CELL »
Pour passer au menu des différentes fonc-
tions, appuyer sur la touche « Type »
F1-BAL- Batterie Balancer
Appuyer sur la touche « Mode » pendant 2
Secondes= Sous-menu
Ici vous pouvez régler les différences de
cellules en appuyant sur la touche « Type/
Cell »
F2 DIS – Fonction de déchargement de la
batterie
Appuyer sur la touche « Mode » pendant 2
Secondes= Sous-menu
Ici vous pouvez régler la limite minimum de
tension en appuyant sur la touche « Type/
Cell »
F3 IR – Test de résistance interne de la
batterie
Montre la résistance interne des différentes
cellules en Diashow
F4 PP – Fonction test - Servo
Ici on peut brancher un Servo aux bornes
NiMh/NiCd puis tester les voies de servo.
IT - Ulteriori funzioni
Per effettuare ulteriori impostazioni, preme-
re per 3 secondi il tasto „CELL“. Per cam-
biare le singole funzioni nel menu-funzioni,
premere il tasto „Type“.
F1 BAL - Batteria-Balancer
Premere tasto „Mode“ per 2 Sec. = Sotto-
menu
Qui é possibile impostare le differenze delle
celle premendo il tasto „Type/Cell“.
F2 DIS – Funzione di scarica della batteria
Premere il tasto „Mode“ per 2 Sec. = Sotto
menu
Qui é possibile impostare il limite della sot-
totensione premendo il tasto „Type/Cell“.
F3 IR – Test di resistenza interna della
batteria
Mostra la resistenza interna delle singole
celle (Diashow).
F4 PP – Funzione servo tester
Qui al attacco NiMh/NiCd si puo conettare
un servo e puo essere testato
ES - Funciónes adicional
Para hacer más ajustes, pulse para 3 se-
gundo el botón „CELL“. Para cambiar cada
funciones en el menú de funciones pulse el
botón „Type“.
F1 BAL – Balanceador-Batería
Pulse el botón „Mode“ para 2 seg. = Sub-
menú
Aqui se pueden ajustar las diferencias de
celulas pulsando el botón „Type/Cell“.
F2 DIS – Función de descarga de la batería
Primir el botón„Mode“ para 2 seg. = Sub-
menù
Aqui se puede ajustar el limite de la subten-
sión pulsando el botón„Type/Cell“.
F3 IR – Prueba de la resistencia interna de
la batería
Muestra la resistencia interna de las celulas
singola (Diashow).
F4 PP – Función servo
Aqui en la conexión NiMh/NiCd se puede
conectar un servo y se puede testar.
DE - Lithium-Akkus mit JST EH oder JST
XH Balancersteckern können direkt am
Akku-Master angeschlossen werden.
GB - Lithium batteries with JST EH or JST
XH Balancer plug can be directly connected
to the battery master.
FR - Batterie en Lithium avec JST ou JST
XH prises de balance peuvent être directe-
ment branchées à l’ accumulateur .
IT - Le batterie litio con spine a balancer
JST EH o JST XH possono essere conettati
direttamente al Akku-Master.
ES - Las baterías de litio con enchufe-ba-
lancer JST EH o JST XH se pueden conec-
tar directamente al Akku-Master.
Display Function

Other Jamara Test Equipment manuals

Jamara ACCU MASTER 8 BAL User manual

Jamara

Jamara ACCU MASTER 8 BAL User manual

Jamara ACCU MASTER 8 BAL User manual

Jamara

Jamara ACCU MASTER 8 BAL User manual

Popular Test Equipment manuals by other brands

AstroNova DDX100 quick start guide

AstroNova

AstroNova DDX100 quick start guide

Antec UCC 13#: 0761345-77203-7 Specification sheet

Antec

Antec UCC 13#: 0761345-77203-7 Specification sheet

Nielsen ID3 user guide

Nielsen

Nielsen ID3 user guide

Wetekom ST 9901 instruction manual

Wetekom

Wetekom ST 9901 instruction manual

MARTINDALE TEK 402 instructions

MARTINDALE

MARTINDALE TEK 402 instructions

trendmedic TM-8500 Premium Operational manual

trendmedic

trendmedic TM-8500 Premium Operational manual

Huazheng KH530 user manual

Huazheng

Huazheng KH530 user manual

SCS 770030 user guide

SCS

SCS 770030 user guide

Desco EMIT 500524 operating instructions

Desco

Desco EMIT 500524 operating instructions

HP 37717C Configuration guide

HP

HP 37717C Configuration guide

GRAS 50GI-R instruction manual

GRAS

GRAS 50GI-R instruction manual

novaris SPT-02 quick start guide

novaris

novaris SPT-02 quick start guide

NewAE CHIPSHOUTER CW520 user manual

NewAE

NewAE CHIPSHOUTER CW520 user manual

Bosch MTS 6513 user manual

Bosch

Bosch MTS 6513 user manual

impact CN842 user guide

impact

impact CN842 user guide

LR-Cal LLC 100 operating manual

LR-Cal

LR-Cal LLC 100 operating manual

Alcoscan AL7000 user manual

Alcoscan

Alcoscan AL7000 user manual

alkitronic MDS Operation and maintenance manual

alkitronic

alkitronic MDS Operation and maintenance manual

manuals.online logo
manuals.online logoBrands
  • About & Mission
  • Contact us
  • Privacy Policy
  • Terms and Conditions

Copyright 2025 Manuals.Online. All Rights Reserved.