JBL ProTerra TempSet Heat User manual

UK
DE
FR
Bulb Holder with Heat Guard
and Protective Mesh
for ceramic heat lamps
Wärmestrahlgerät
für Heizstrahler
Dispositif de chauffage
rayonnant
Pour émetteur de chaleur
heat
80cm -
150cm
DE UK FR NL
IT DK ES
SE CZ PL RU
PT
DE
UK
FR
NL
IT
DK
ES
SE
CZ
PL
RU
PT
13 71185 00 0 V01
heat
4,5 mm
25 mm
4,5 mm
A B
15 71185 00 0 V01
JBL
TempSet heat
1
2
2a
3
4
5
6
7
4,5 mm2x
heat
4,5 mm
25 mm
4,5 mm
A B
15 71185 00 0 V01
ca. 10 cm
25 mm1x
4,5 mm2x
25 mm1x


1
JBL
TempSet heat
Wärmestrahlgerät für Heizstrahler
•Komplett vorinstalliertes Wärmestrahlgerät für Reptilien gemäß
DIN EN 60335-2-71*.
•Mit Keramikfassung E27 und fest montiertem Schutzschirm mit Schutzgitter.
•Schirm aus stabilem, hitzefestem Spezialkunststo mit schmalen Schlitzen, Gitter
aus Eisen verzinkt (stabiler als Aluminium).
•Die schmalen Schlitze im Schirm und die enge Maschenweite des Schutzgitters
verhindern, dass Jungtiere eindringen und sich verbrennen.
•Abstand des Heizstrahlers zu Tieren und brennbarer Einstreu mindestens 50 cm.
*) Besondere Anforderungen für Elektrowärmegeräte für Tieraufzucht und Tierhaltung
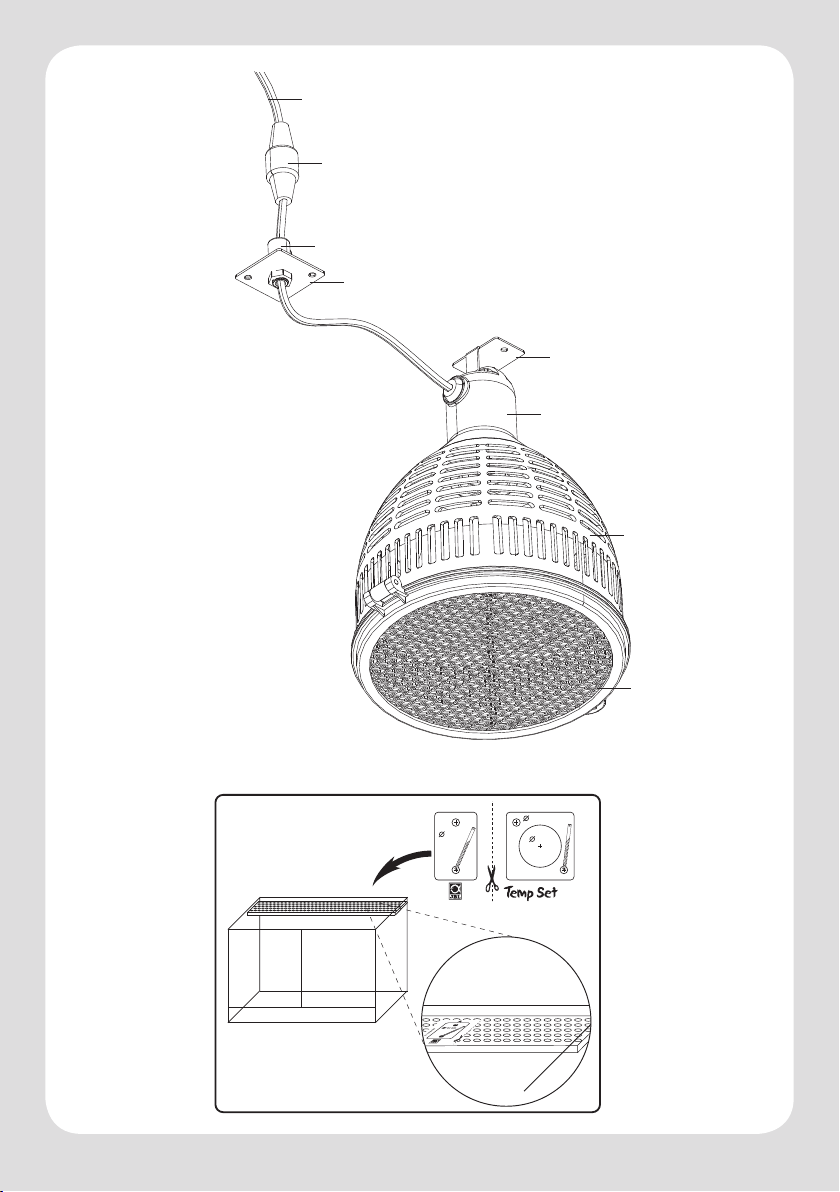
Inhalt:
1. Keramikfassung E27 mit Gehäuse (1a)
2. Schutzschirm mit Gitter (2a)
3. 2 m Kabel mit Stecker
4. Schnellverbinder
5. Kabeldurchführung mit Zugentlastung
6. Metallplatte für Zugentlastung
7. Aufhängehaken,
8. Gewindeschrauben M 4x15, 2 St.
9. Gewindeschrauben M 4x10 mit Muttern, 2 St.
230 V ~ max. 150 W IPX4
DE
UK
FR
NL
IT
DK
ES
SE
CZ
PL
RU
PT

2
Warnhinweise:
Achtung, Brandgefahr!
Gerät nicht abdecken!
Mindestabstand zwischen Strahler und Tieren oder brennbaren Stoen: 0,5 m
Sicherheitshinweise:
Lesen und beachten Sie die Gebrauchsanleitung und bewahren Sie sie zum
späteren Nachlesen gut auf.
1. Vergewissern Sie sich, dass die auf dem Typenschild angegebene Betriebsspan-
nung mit der Netzspannung übereinstimmt.
2. Nur für Keramikheizstrahler bis 150 W, z. B. JBL ReptilHeat.
3. Zum Strahlerwechsel ziehen Sie immer zuerst den Netzstecker und lassen Sie den
Strahler und die Fassung erkalten. Verwenden Sie nur Keramikheizstrahler der
oben genannten Art.
4. Beim Ein- und Ausschrauben der Strahler halten Sie immer mit einer Hand die Fas-
sung fest, um so das Kabel gegen Verdrehen zu sichern.
5. Das Gerät darf nur in Innenräumen betrieben werden.
6. Das Gerät darf für keine anderen als in dieser Gebrauchsinformation genannte
Zwecke verwendet werden.
7. Die Netzzuleitung des Gerätes ist so anzubringen, dass sie für Tiere nicht zugäng-
lich ist.
8. Ist die Netzzuleitung oder das TempSet heat selbst beschädigt, darf dieses nicht in
Betrieb genommen werden.
9. Im Falle einer beschädigten Netzzuleitung wenden Sie sich an einen Elektrofach-
mann oder den Hersteller.
10. Der Heizstrahler, sowie das Gerät selbst sind frei von Staub und Schmutzteilchen zu
halten.
11. Trennen Sie bei Reinigungs- und Wartungsarbeiten das Gerät immer vom Netz.
0.5m

3
12. Reparaturen an diesem Gerät dürfen nur von qualizierten Personen durchgeführt
werden.
13. Unter Aufsicht kann dieses Gerät von Kindern über 8 Jahre und von Menschen mit
eingeschränkten körperlichen, sensorischen oder mentalen Fähigkeiten, sowie
unerfahrenen Menschen verwendet werden. Dafür sollten sie eine Einführung in
die Funktionsweise des Geräts bekommen haben und sich der Gefahren der An-
wendung bewusst sein. Das Gerät ist kein Spielzeug. Kinder sollten das Gerät nicht
säubern oder warten, es sei denn, sie sind über 8 Jahre alt und werden beaufsich-
tigt.
14. Gerät und darin montierten Wärme-Strahler niemals mit Wasser besprühen.
15. Eine von der nachfolgend beschriebenen Vorgehensweise abweichende Montage,
die ein Lösen elektrischer Verbindungen erfordert, darf nur von geschultem Fach-
personal durchgeführt werden! Bei unsachgemäß durchgeführten elektrischen
Verbindungen besteht Verletzungsgefahr durch elektrischen Schlag und Brandge-
fahr!
Montagehinweise:
Zur Montage erforderlich:
Bei Montage an Lüftungsgitter aus Metall: Bohrmaschine oder Akku-Bohrschrauber mit
HSS-Bohrer 4,5 und 25 mm, Schraubendreher, Schleifpapier für Metall.
Bei Montage an Holzplatten: Bohrmaschine mit HSS-Bohrer 25 mm, Schraubendreher,
Schleifpapier für Holz.
Kleben Sie die beiliegende, selbstklebende Bohrschablone a) an der für das Temp-
Set heat vorgesehenen Stelle von außen auf das obere Lüftungsgitter des Terra-
riums. Bei Holzterrarien ist die Schablone a) nicht erforderlich. Achten Sie jedoch
immer auf ausreichenden Abstand zu Tieren und brennbaren Stoen.
Terrarien mit Lüftungsgitter aus Metall:
Bohren Sie zwei Löcher von 4,5 mm Durchmesser in das Lüftungsgitter, an dem Sie
das TempSet heat befestigen wollen.
DE
UK
FR
NL
IT
DK
ES
SE
CZ
PL
RU
PT

4
Stecken Sie zwei der mitgelieferten Gewindeschrauben von innen durch den Auf-
hängehaken und das Lüftungsgitter und schrauben Sie die zwei mitgelieferten
Muttern von außen auf und ziehen Sie sie fest.
Holzterrarien:
Befestigen Sie den Aufhängehaken an der vorgesehenen Stelle von Innen an der
Terrariendecke mit zwei selbstschneidenden Holzschrauben.
Terrarien mit Lüftungsgitter aus Metall:
Kleben Sie die beiliegende Bohrschablone b) im Abstand von ca. 10 cm zum be-
festigten Aufhängehaken von außen auf das Lüftungsgitter. Bohren Sie nun das
zentrale Loch von 25 mm und die beiden kleinen Löcher von 4,5 mm Durchmesser
in das Lüftungsgitter.
Holzterrarien:
Bohren Sie im Abstand von etwa 10 cm zum bereits befestigten Aufhängehaken
ein Loch von 25 mm Durchmesser in die Terrariendecke.
Trennen Sie die Schnellkupplung in der Zuleitung des TempSet heat indem Sie die
Überwurfmutter lösen und die beiden Hälften auseinanderziehen. Legen Sie die
Netzzuleitung zur späteren Montage beiseite. Hängen Sie das TempSet heat in den
montierten Aufhängehaken.
Führen Sie das am TempSet heat verbliebene Kabel mit Schnellkupplung, von
innen durch das vorgebohrte Loch, bis dieses durch die Metallplatte mit Zugentlas-
tung verschlossen wird.
Terrarien mit Lüftungsgitter aus Metall:
Fixieren Sie die Metallplatte mit den restlichen zwei Gewindeschrauben, indem Sie
diese von außen durch das Lüftungsgitter in die Gewinde der Metallplatte schrau-
ben.
Holzterrarien:
Fixieren Sie die Metallplatte von innen mit zwei selbstschneidenden Holzschrau-
ben in der Decke des Terrariums.
Lösen Sie die Madenschraube an der Zugentlastung und ziehen das Kabel soweit
nach außen, dass im Terrarium möglichst keine durchhängende Schlaufe gebildet
wird. Fixieren Sie das Kabel wieder mit der Madenschraube in der Zugentlastung.
Önen Sie das Schutzgitter am TempSet heat, indem Sie die dem Scharnier gegen-
über liegende Befestigungsschraube lösen. Schrauben Sie einen passenden Kera-
mik-Wärmestrahler (z. B. JBL ReptilHeat) in die Fassung. Halten Sie dabei die Fas-
sung mit der anderen Hand fest, um sie gegen eventuelles Verdrehen zu sichern.
Schließen Sie das Abdeckgitter und xieren es mit der Befestigungsschraube.

5
Verbinden Sie nun die Schnellkupplung zwischen TempSet heat und der zuvor bei-
seitegelegten Netzzuleitung. Verbinden Sie die Netzzuleitung mit dem Stromnetz.
Zum Ausschalten ziehen Sie den Netzstecker. Alternativ kann für automatisches
Aus- und Einschalten auch eine handelsübliche Schaltuhr verwendet werden.
Hinweis:
Als Alternative zu der Befestigung des Aufhängehakens und der Metallplatte mit Schrau-
ben können diese sowohl auf dem Lüftungsgitter, als auch auf der Holzplatte mit einem
sog. MS Polymerkleber befestigt werden. Solche Kleber sind meist unter der Bezeichnung
Universalkleber oder Unterwassersilikon (z.B. JBL Haru) im gut sortierten Fachgeschäft zu
bekommen. Geben Sie 4 größere Kleberpunkte auf die Ecken der Platte und drücken Sie
diese auf die Unterlage (Gitter oder Holzplatte). Achten Sie darauf eine Kleberstärke von ca.
1 mm zwischen Unterlage und Platte zu lassen, damit eine eventuelle Entfernung mit einem
Cuttermesser später möglich ist. Beachten Sie die Aushärtezeit, die in der Regel 24 Stunden
beträgt.
DE
UK
FR
NL
IT
DK
ES
SE
CZ
PL
RU
PT
6
Garantie
Dem Endabnehmer dieses JBL-Gerätes leisten wir eine Garantie von 2 Jahren ab Kaufda-
tum.
Die Garantie erstreckt sich auf Montage- und Materialfehler. Verschleißteile, wie
Heizstrahler sowie Schäden durch äußere Einüsse und unsachgemäße Behandlung
sind von der Garantie ausgeschlossen. Die Garantieleistung erfolgt nach unserer
Wahl durch Austausch oder Reparatur der mangelhaften Teile.
Weitere Garantieansprüche bestehen nicht, insbesondere wird, soweit gesetzlich
zulässig, keine Haftung für Folgeschäden übernommen, die durch dieses Gerät ent-
stehen. Im Garantiefall wenden Sie sich an Ihren Zoofachhändler oder schicken das Gerät
ausreichend frankiert mit gültigem Kaufbeleg an uns ein.*
* Im Garantiefall bitte ausgefüllt einsenden an:
JBL GmbH & Co. KG, Abt. Service, Wattstr. 4, 67141 Neuhofen, Germany
Gerät: JBL TempSet heat o
Serien-Nr: .......................................
Kaufdatum: _ _ / _ _ / _ _
(bitte unbedingt Kaufbeleg beilegen,
den Sie mit dem Gerät wieder zurück erhalten)
Grund der Beanstandung:
Datum:................................................ Unterschrift:................................................
Platz für Kaufbeleg:

7
DE
UK
FR
NL
IT
DK
ES
SE
CZ
PL
RU
PT
JBL
TempSet heat
Bulb Holder with Heat Guard and
Protective Mesh for ceramic heat lamps
•Pre-wired bulb holder with heat guard and protective mesh for reptiles conforming
to DIN EN 60335-2-71*.
•Fitted with an E27 ceramic bulb holder and a non-removable heat guard and pro-
tective mesh.
•Heat guard made from robust, heat-resistant special plastic with narrow slits, galva-
nised steel mesh (tougher than aluminium).
•The narrow slits in the heat guard and the small mesh size of the protective mesh
prevent young animals from penetrating and getting burned.
•Keep ceramic lamp at a minimum distance of 50 cm from pets and substrate.
*) Special requirements for electric heat appliances for breeding and keeping animals
Contents:
1. E27 ceramic bulb holder with shell (1a)
2. Heat guard with protective mesh (2a)
3. 2 m cable with plug
4. Quick connection
5. Strain relief bushing
6. Metal plate for strain relief
7. Hang-up hook,
8. Threaded screws, M 4x15, 2 pc
9. Threaded screws, M 4x10 with nuts, 2 pc
230 V ~ max. 150 W IPX4

8
Warnings:
Caution, re hazard!
Do not cover the appliance!
Minimum distance between the spotlight and the animals or combustible sub-
stances: 0.5 m
Safety instructions:
Please read and observe the Instructions for Use and keep them in a safe place
for later reference.
1. Make sure that the operating voltage indicated on the name-plate agrees with the
mains voltage.
2. Only for use with ceramic heat lamps up to 150 W, e.g. JBL ReptilHeat.
3. When changing bulbs, always disconnect the power plug and allow the bulb and
the bulb holder to cool o rst. Use ceramic heat lamps of the above-mentioned
type only.
4. When screwing the bulb in and out, always make sure to hold the bulb holder with
one hand in order to prevent the cable from twisting.
5. The appliance is for indoor use only.
6. The appliance may not be used for any purpose besides that indicated in the In-
structions for Use.
7. The mains lead of the appliance must be placed in such a way that it is out of reach
of the animals.
8. If the mains lead or the TempSet heat itself is damaged, it may not be used.
9. If the mains lead is damaged, please consult an electrician or the manufacturer.
10. Both the ceramic heat lamp and the appliance itself must be kept free from dust
and dirt particles.
11. Always disconnect the appliance from the mains when carrying out repairs or
maintenance work.
12. This appliance may only be repaired by a qualied person.
0.5m

9
13. The appliance may be used by children over the age of 8 and by persons with a
physical, sensory or mental impairment, as well as by inexperienced persons, if
they are under supervision. They should have received an introduction to how to
use the appliance for this purpose and be aware of the risks of use. The appliance
is not a toy. Children should not clean the appliance or do maintenance or repair
work on it unless they are over the age of 8 and are being supervised.
14. Never spray the appliance and the heat lamp mounted inside with water.
15. Any assembly or mounting deviating from the procedure described in the above
and requiring the removal of electrical connections may only be carried out by a
trained specialist! Improper electrical connections may cause injury from electri-
cal shock and pose a re hazard!
Mounting instructions:
What you will need:
When mounting on a ventilation screen made from metal: Power drill or rechargeable screw
drill with 4.5 and 25 mm HSS drill bits, screwdriver, sandpaper for metal.
When mounting on a wooden panel: A power drill with a 25 mm HSS drill bit, screwdriver,
sandpaper for wood.
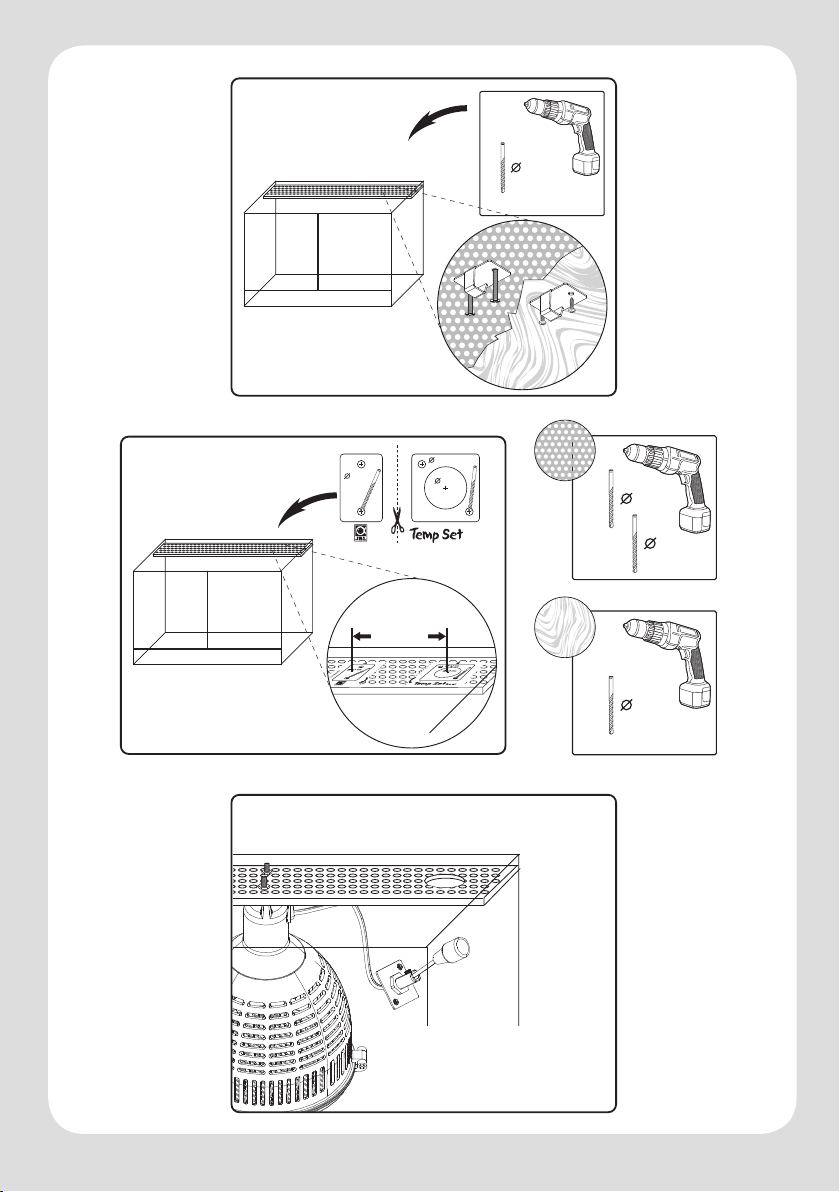
Stick the enclosed self-adhesive drilling template a) onto the upper air screen of
the terrarium from the outside in the spot where you wish to mount the TempSet
heat. The template a) is not needed for terrariums made of wood. However, please
always make sure that the distance from animals and combustible substances is
sucient.
Terrariums with ventilation screens made from metal:
Drill two holes of 4.5 mm diameter into the ventilation screen on which you wish to
mount the TempSet heat.
Insert two of the threaded screws supplied with the kit from the inside through the
hang-up hook and the ventilation screen and screw in the two nuts supplied with
the kit from the outside and tighten them.
Terrariums made of wood:
Fasten the hang-up hooks in the designated spot on the terrarium top from the
inside with two self-cutting wood screws.
Terrariums with ventilation screens made from metal:
Stick the enclosed drilling template b) onto the ventilation screen from the outside
at a distance of approx. 10 cm from the mounted hook. Now, please drill the central
hole of 25 mm diameter and the two small holes of 4.5 mm diameter in the ventila-
tion screen.
Space for purchase receipt:
DE
UK
FR
NL
IT
DK
ES
SE
CZ
PL
RU
PT
10
Terrariums made of wood:
Drill a hole of 25 mm diameter in the terrarium top at a distance of approx. 10 cm
from the mounted hook.
Disconnect the quick connection in the lead of the TempSet heat by unscrewing
the union nut and pulling the two halves apart. Put the mains lead to the side so it
can be tted later. Hang the TempSet heat from the mounted hook.
Insert the cable with the quick connection, which is still attached to the TempSet
heat, through the predrilled hole until it is sealed o by the metal plate with strain
relief.
Terrariums with ventilation screens made from metal:
Secure the metal plate with the last two threaded screws by screwing them
through the ventilation screen from the outside and into the thread of the metal
plate.
Terrariums made of wood:
Secure the metal plate in the top of the terrarium from the inside with two self-cut-
ting wood screws .
Unscrew the grub screw on the strain relief and pull the cable from the outside un-
til there is barely a hanging loop, or none at all, left in the terrarium. Use the grub
screw to secure the cable in the strain relief again.
Open the protective mesh on the TempSet heat by unscrewing the xing screw
opposite the hinge. Screw a suitable ceramic heat lamp (e.g. JBL ReptilHeat) into
the socket. Make sure to hold the socket with the other hand to prevent it from
twisting. Close the mesh cover and secure it with the xing screw.
Now connect the quick connection between the TempSet heat and the mains lead
which was put to the side earlier. Connect the mains lead to the power supply. To
switch o the light, disconnect the power plug. A standard automatic timer can be
used instead to have the light switched on and o automatically.
Please note:
As an alternative to using screws to mount the hang-up hook and metal plate, an MS poly-
mer adhesive can be used to mount them on the ventilation screen or the wooden panel.
Adhesives of this kind are usually sold as general-purpose glues or underwater silicones (e.g.
JBL Haru) in specialist shops that have a wide range of products. Apply 4 larger-sized dots
of adhesive on the corners of the plate and press it onto the mounting surface (screen or
wooden panel). Make sure to keep an adhesive layer of approx. 1 mm between the mount-
ing surface and the metal plate so that it can be removed by a cutter blade later on if neces-
sary. Please note that the setting time is normally 24 hours.
11
Guarantee
We oer the end buyer of this JBL product a guarantee of 2 years from the date of pur-
chase.
The guarantee covers defects in material and workmanship. Wearing parts such as the
ceramic heat lamp and damage caused by external inuences and improper handling
are exempt from the guarantee. We reserve the right to replace or repair the defective
parts under guarantee at our discretion.
No further guarantee claims will be accepted. In particular, to the extent permitted by
law, no liability can be accepted for consequential damage caused by this product. In
the event of a claim under the guarantee, please contact your specialist pet shop or send the
appliance to us with proof of purchase and postage paid.*
* In the event of a claim under the guarantee, please ll in and return to:
JBL GmbH & Co. KG, Service Dept., Wattstr. 4, 67141 Neuhofen, Germany
Product: JBL TempSet heat o
Serial No .......................................
Date of purchase: _ _ / _ _ / _ _
(please make sure to include the purchase receipt,
which will be returned with the product)
Reason for claim:
Date:................................................ Signature:................................................
DE
UK
FR
NL
IT
DK
ES
SE
CZ
PL
RU
PT
Space for purchase receipt:
12
JBL
TempSet heat
Dispositif de chauage rayonnant
Pour émetteur de chaleur
• Dispositif de chauage rayonnant pour reptiles, complet, pré-monté, conforme à la
norme DIN EN 60335-2-71*.
• Avec douille céramique E27, réecteur et grille de protection préinstallés.
• Réecteur en matière plastique solide, spécialement adaptée, résistante à la cha-
leur, dotée de fentes étroites, grille en acier zingué (plus solide que l’aluminium).
• Les fentes étroites du réecteur et les petites mailles de la grille de protection em-
pêchent les jeunes reptiles de pénétrer à l’intérieur et de se brûler.
• Distance minimale entre le chauage et les animaux ou la litière inammable 50
cm.
*) Règles particulières pour les appareils de chauage électrique destinés à la reproduc-
tion et à l’élevage des animaux.
Contenu :
1. Douille céramique E27 avec boitier (1a)
2. Réecteur avec grille (2a)
3. 2 m de câble avec prise
4. Connecteur rapide
5. Passage de câble avec grie de maintien
6. Plaque métallique pour grie de maintien
7. Crochet de suspension
8. Vis letées M 4x15, 2 pièces
9. Vis letées M 4x10 avec écrous, 2 pièces.
230 V ~ max. 150 W IPX4
13
DE
UK
FR
NL
IT
DK
ES
SE
CZ
PL
RU
PT
Avertissements :
Attention, risque d’incendie !
Ne pas couvrir l’appareil.
Distance minimale entre le chauage et les animaux ou des matières inam-
mables : 0,5 m
Consignes de sécurité :
Lire attentivement et respecter les indications de ce mode d’emploi et le conser-
ver soigneusement.
1. Assurez-vous que la tension d’utilisation indiquée sur l’étiquette de marquage du
produit correspond eectivement à la tension de votre réseau.
2. A utiliser exclusivement avec un émetteur de chaleur jusqu’à 150 W, par exemple
JBL ReptilHeat.
3. Toujours débrancher l’appareil et laisser refroidir la douille et l’émetteur avant de le
changer. Utiliser toujours des émetteurs de chaleur du type indiqué ci-dessus.
4. Toujours tenir la douille d’une main lorsqu’on visse ou dévisse l’émetteur de cha-
leur an d’éviter que le câble ne s’entortille.
5. L’appareil doit être utilisé exclusivement à l’intérieur.
6. L’appareil ne doit pas être utilisé à d’autres ns que celles indiquées dans cette
notice d’utilisation.
7. L’alimentation électrique de l’appareil doit être installée de manière à ne pas être
accessible aux animaux.
8. Ne pas utiliser l’appareil si le câble d’alimentation électrique ou le TempSet heat
lui-même sont endommagés.
9. Si le câble d’alimentation électrique est endommagé, s’adresser à un électricien ou
au fabricant.
10. Retirer régulièrement poussières et salissures sur l’émetteur de chaleur ou l’appa-
reil lui-même.
11. Toujours débrancher l’appareil avant d’eectuer le nettoyage ou l’entretien de
l’appareil.
0.5m

14
12. L’appareil devra être réparé exclusivement par un spécialiste qualié.
13. Cet appareil peut être utilisé sous surveillance par des enfants de plus de 8 ans, par
des personnes dont les capacités physiques, mentales ou sensorielles sont limitées
ou par des personnes qui ne possèderaient pas l’expérience nécessaire, à condition
d’avoir reçu des instructions relatives à l’usage de cet appareil et d’être conscients
des dangers de son utilisation. L’appareil n’est pas un jouet. Les enfants ne doivent
pas le nettoyer ou eectuer son entretien, sauf s’ils ont plus de 8 ans et sont sous
surveillance.
14. Ne jamais vaporiser d’eau sur l’appareil ou sur l’émetteur de chaleur se trouvant à
l’intérieur.
15. Un montage diérent de la méthode décrite ci-dessous, et qui entraîne un démon-
tage des connexions électriques, ne peut être réalisé que par du personnel spécia-
lisé ayant la formation adéquate. Des branchements électriques non conformes
peuvent entraîner des blessures par choc électrique ou un risque d’incendie.
Instructions de montage :
Matériel nécessaire pour le montage :
Pour montage sur grille de ventilation métallique: perceuse ou perceuse-visseuse sans l
avec forets HSS de 4,5 et 25 mm, tournevis, papier abrasif pour métal.
Pour montage sur panneau de bois: perceuse avec foret HSS de 25 mm, tournevis, papier
abrasif pour bois.
Coller l’autocollant du schéma de perçage a) ci-joint à l’endroit prévu pour le
montage du TempSet heat à l’extérieur de la grille supérieure de ventilation du
terrarium. Pour les terrariums en bois, le schéma de perçage a) n’est pas nécessaire.
Veiller cependant à ce que la distance entre l’appareil et les animaux ou les ma-
tières inammables soit susante.
Terrariums avec grille de ventilation métallique :
Percer deux trous de 4,5 mm de diamètre dans la grille de ventilation sur laquelle le
TempSet heat doit être installé.
Introduire deux des vis letées dans les trous, à partir de l’intérieur, au travers du
crochet de suspension et de la grille de ventilation, placer les deux écrous fournis
sur les vis et les serrer.
Terrariums en bois :
Fixer le crochet de suspension de l’intérieur sur la partie supérieure du terrarium, à
l’endroit prévu, à l’aide de deux vis à bois auto-foreuses.
Terrariums avec grille de ventilation métallique :
Coller le schéma de perçage b) joint à l’extérieur de la grille de ventilation, à une
15
DE
UK
FR
NL
IT
DK
ES
SE
CZ
PL
RU
PT
distance de 10 cm environ du crochet de suspension xé. Percer le trou central de
25 mm et les deux petits trous de 4,5 mm de diamètre dans la grille de ventilation.
Terrariums en bois :
Percer un trou de 25 mm de diamètre dans la partie supérieure du terrarium, à
environ 10 cm du crochet de suspension qui vient d’être xé.
Ouvrir le raccord rapide du câble d’alimentation du TempSet heat en desserrant
l’écrou-raccord et en séparant les deux parties. Mettre le câble de côté pour le
mettre en place ultérieurement. Accrocher le TempSet heat au crochet de suspen-
sion.
Faire passer la partie du câble avec le raccord rapide se trouvant sur le TempSet
heat de l’intérieur à travers le trou percé précédemment jusqu’à ce que celui-ci soit
bloqué par la plaque métallique avec la grie de maintien.
Terrariums avec grille de ventilation métallique :
Fixer la plaque métallique avec les deux vis letées restantes en les vissant de
l’extérieur, au travers de la grille de ventilation, dans les trous letés de la plaque
métallique.
Terrariums en bois:
Fixer la plaque métallique de l’intérieur dans la partie supérieure du terrarium à
l’aide de deux vis à bois auto-foreuses.
Desserrer la vis sans tête de la grie de maintien et tirer le câble vers l’extérieur de
telle sorte qu’il ne fasse pas de boucle à l’intérieur du terrarium. Fixer à nouveau le
câble sur la grie de maintien à l’aide de la vis sans tête.
Ouvrir la grille de protection du TempSet heat en desserrant la vis de xation
qui se trouve en face de la charnière. Visser un émetteur de chaleur en céramique
adapté (par ex. JBL ReptilHeat) dans la douille. Toujours tenir la douille de l’autre
main pour lui éviter de tourner. Fermer la grille et la xer à l’aide de la vis.
Relier maintenant le raccord rapide entre le TempSet heat et le câble de l’alimen-
tation électrique mis de côté. Brancher le câble au réseau électrique. Pour couper
l’alimentation électrique, débrancher la prise. On peut aussi utiliser une minuterie
du commerce pour automatiser l’allumage et l’extinction de l’appareil.
Remarque :
Au lieu d’utiliser des vis, il est possible également de xer le crochet de suspension et la
plaque métallique à l’aide d’une colle polymère MS, aussi bien sur la grille de protection
métallique que sur le panneau de bois. Ces colles, connues sous le nom de colle universelle
ou de silicone applicable sous l’eau, se trouvent dans les magasins spécialisés. Placer quatre
plots de colle assez gros aux angles de la plaque métallique et appliquer celle-ci sur le sup-
16
port (grille ou panneau de bois) en exerçant une pression. Veiller à laisser une couche de
colle d’environ 1 mm entre la plaque et le support, an de pouvoir éventuellement la retirer
ultérieurement en utilisant la lame d’un cutter. Respecter le temps de séchage, qui est en
règle générale de 24 h.
Garantie
Nous orons à l’acheteur de cet appareil JBL une garantie de 2 ans à partir de la date d’achat.
La garantie couvre les défauts liés aux matériaux et au montage. Les pièces d’usure, comme l’émetteur
de chaleur, ainsi que les dommages liés à des inuences extérieures ou provenant d’une manipulation
inappropriée ne sont pas couverts par cette garantie. Il nous appartiendra de décider si cette presta-
tion de garantie doit être eectuée par remplacement ou réparation des pièces défectueuses.
Il n’existe pas d’autres droits à garantie ; en particulier, dans la mesure de ce qui est
légalement admissible, aucune responsabilité n’est supportée pour les dommages
qui seraient consécutifs à l’utilisation de cet appareil. Pour faire valoir cette garantie,
adressez-vous à votre magasin spécialisé ou bien envoyez-nous l’appareil, preuve d’achat
valable jointe, franco de port et d’emballage.*
* Pour bénécier de la garantie, en cas de réclamation, veuillez compléter le formu-
laire ci-dessous et le retourner à :
JBL GmbH & Co. KG, Abt. Service, Wattstr. 4, 67141 Neuhofen, Germany
Modèle : JBL TempSet heat o
N° série : _ _ - _ _- _ _ _ _ _
Date d’achat : _ _ / _ _ / _ _
(Joindre impérativement la preuve d’achat qui
vous sera retournée avec l’appareil.)
Motif de la réclamation :
Date :................................................ Signature :................................................
12a27
Emplacement de la preuve d’achat :
Table of contents
Languages:
Other JBL Pet Care Product manuals


