JCM RS3 TGL868NF User manual

jcmtechnologies
RS3 TGL868NF
RadioSens 3 System
EN
User manual
RADIOSENS 3

RS3 SYSTEM
jcmtechnologies
2
IMPORTANT SAFETY INSTRUCTIONS 3
1. Introduction 4
1.1 General description 4
2. Installation 7
2.1 Mechanical installation 7
3. Operation 10
4. Programming 11
4.1 Memorizing transmitter into receiver 11
4.2 System programming 12
5. Checking and maintenance 13
5.1 Troubleshooting 13
5.2 Replacing transmitter battery 14
5.3 Use of the system 14
6. Technical Data Summary 15
6.1 Technical data 15
6.2 Battery life table 15
7. EU Declaration of conformity 16

RS3 SYSTEM
jcmtechnologies
3
IMPORTANT SAFETY INSTRUCTIONS
Disconnect power supply whenever you proceed any installation or repair of the equipment.
In accordance with the European low voltage directive, the following requirements are informed:
· For permanently connected equipments, an easy-access connection device must be provided.
· This system must only be installed by qualified persons with experience in automatic doors/gates installations
and with knowledge of the applicable EU standards.
· The instructions for use of this equipment must always remain in the possession of the user.
· RADIOSENS system’s work frequency does not interfere with the 868 MHz remote control systems.
· Follow all the recommendations given in this manual to avoid serious dangerous to persons.
More tips, interactive demos and online videos

RS3 SYSTEM
jcmtechnologies
4
1. Introduction
1.1 General description
RadioSens3 system is designed for Fast doors and Flat-slat rolling shutters in an Industrial, Commercial or
Residential environment. RadioSens3 is an impact detection system installed at the principal edge of the door. It
works detecting any obstacle before the strength exceeds regulations limits and then inverting door movement.
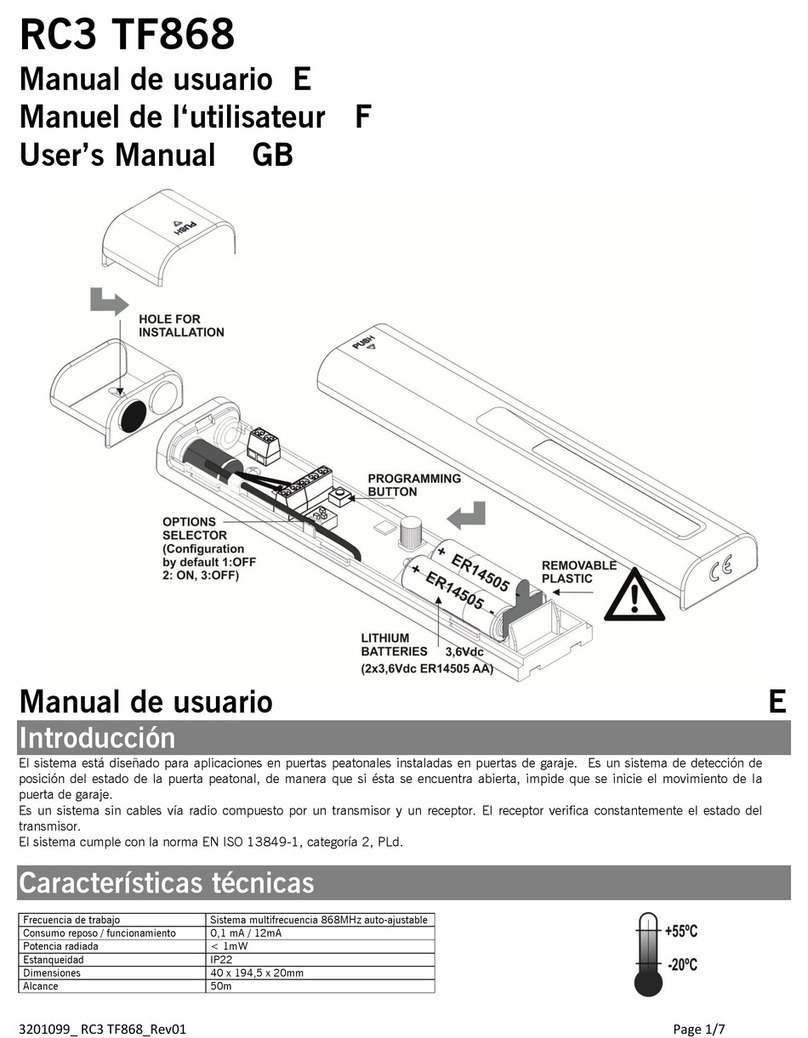
RadioSens3 is a wireless system based on an RF transmitter and a receiver card plugged in the control panel
which permanently monitors the status of the transmitter programmed.
The RadioSens3 system (RS3 T868, RS3 TGL868 and RSEC3) complies with the EN ISO 13849-1:2015
standard, category 2, PLd. Certified by TÜV NORD CERT GmbH.
MINIMUM REQUIREMENTS:
- Minimum speed at any point of the door: 0,1m/s
- Door Maximum width: 4 meters
- Maximum tolerance in door repetitive movements: 5%
- Minimum distance between the last 2 slats: 2mm
- RS3 installation in the central part of the door

RS3 SYSTEM
jcmtechnologies
5
Typical installation shown in the figure below. A RadioSens3 transmitter set at the last slat of a roller door
aluminium and connected via radio to RSEC3 receiver with a VERSUS control panel.
RSEC3

RS3 SYSTEM
jcmtechnologies
6
Options and sensibility
selectors must be set
before programming. Any
later change will have no
effect.

RS3 SYSTEM
jcmtechnologies
7
2. Installation
2.1 Mechanical installation
Install the transmitter following the steps and recommendations below. Pass the cables through the holes
indicated (only if you use the lock connection).
Install the transmitter in a horizontal position, at the middle of the last slat (it must have a tolerance of minimum
2mm of movement). Avoid placing metallic surfaces between the receiver and the transmitter.
It is recommended to use limit switches in the installation and to have them properly connected, or to assure
that the door will stop always at the same point. The speed of the door must be uniform.
Options and sensibility selectors must be set before programming. Any later change will have no effect.
SWIPE TO OPEN COVER REMOVE PLASTIC DRILL DOOR
Maximum width of the
door: 4 m
Recommended door
speed: 0.1m/s or higher
(and 17 rpm motors).
<10m

RS3 SYSTEM
jcmtechnologies
8
Install the transmitter in horizontal position, at the middle of the last slat. Avoid placing metallic surfaces
between the receiver and the transmitter.
First, place the visor on the surface
of the door to use it as template to
make the holes in the door.
Then place the bottom part of the
device. Screw the two pieces
together.
Finally close the equipment with
the top cover.

RS3 SYSTEM
jcmtechnologies
9
The last slat must have a
tolerance of minimum 2mm of
movement
The slat where the RS3 is fixed
should stay in a perfect vertical
position while the shutter is on the
opened position.
The settings of the upper
limit switch of the motor
should not allow the RS3 to go
inside the aluminium box
where the shutter is rolled
while opened.

RS3 SYSTEM
jcmtechnologies
10
3. Operation
D1 and D2 LEDs of the transmitter will pass to battery saving mode (off) in 25 maneuvers after pressing PROG on
the transmitter. They can re-awaken again pressing the PROG button on the transmitter.
In order to detect obstacles, the RadioSens3 system compares the behaviour of the door in each maneuver with a
previously learned one when installing the equipment.
Normal operation of the system will only be allowed after a satisfactory learning of door movement. The control
panel will not allow the door to move if this learning has had errors or has not been done.
The RadioSens3 system has some conditions of use:
- The closing movement must start with the door fully open. It is not allowed to close the door from
intermediate points.
- If the door is half open, only the opening movement is allowed.
In order to adapt the operation of the system to the irregular conditions of the floor, the equipment can be inhibited
in some point at the end of the travel of the door. In the inhibition zone, obstacles will not be detected.
Setting the inhibition point is optional. In case it is desired, it can be fixed in two ways: automatically or manually.
If the inhibition point is set automatically, put the switch SW1: 2 to ON. During the programming of the maneuver
the equipment will automatically detect the ground and set the inhibition point automatically.
If the inhibition point is set manually, proceed as defined in the control panel manual.

RS3 SYSTEM
jcmtechnologies
11
4. Programming
4.1 Memorizing transmitter into receiver
Receiver only keeps one RadioSens3 transmitter in memory at the same time. This is stored always as security on
closing.
PRESS PROG PUSHBUTTON LED TURNS ON PRESS TRANSMITTER PROG ONE BEEP AND PROGRAMMED
PRESS PROG PUSHBUTTON LED TURNS OFF AND END PROG

RS3 SYSTEM
jcmtechnologies
12
4.2 System programming
After storage of the transmitter, perform the programming of the control panel with the security element stored.
See programming section on control panel user’s manual.
If you change the position of RadioSens3
transmitter, you must perform the system
programming again, otherwise the transmitter
will indicate a safety error, and the door will
not work properly.

RS3 SYSTEM
jcmtechnologies
13
5. Checking and maintenance
5.1 Troubleshooting
Equipment
D1 red
led
D2
green
led
Check
led
Beeps
Message / error
Solution
RS3
transmitter
Flash at
beginning
of
opening
OFF
---
---
Control panel asks RS3 correct signal
transmitter to start the manoeuvre
---
RS3
transmitter
Flash at
beginning
of closing
OFF
---
---
Indicates calibration failure of RS3
transmitter in open door status
Reprogram the manoeuvre until
no calibration failure.
RS3
transmitter
ON
OFF
---
---
Indicates that the door is passing through
the inhibition zones. It is only indicated in
the first 25 manoeuvres
RS3
transmitter
OFF
ON
---
---
Indicates very good coverage
RS3
transmitter
OFF
Flash
---
---
Indicates regular coverage
Align parallel the RS3 transmitter
antenna and REC3 antenna.
RS3
transmitter
OFF
OFF
---
---
Indicates poor coverage or no coverage
Align parallel the RS3 transmitter
antenna and REC3 antenna or
change equipments location.

RS3 SYSTEM
jcmtechnologies
14
5.2 Replacing transmitter battery
Remove the box cover. Replace the two used batteries with new ones, considering the polarity indicated by the
connector. Check that new batteries support the same temperature range as the replaced ones.
Use 1.5V AA Alkaline batteries only.
5.3 Use of the system
RadioSens3 is designed to be installed in Fast doors and Flat-slat rolling shutters. Other applications than
specified are not guaranteed.
Manufacturer reserves the right to change the equipment specification without prior warning.
Equipment
D1
red
led
D2
green
led
Check
led
Beeps
Message / error
Solution
RSEC3
OFF
OFF
OFF
4 beeps every 20
seconds
RS3 transmitter low battery
Verify the batteries of the
transmitter
RSEC3
OFF
OFF
OFF
4 beeps every 20
seconds
Communication failure between
RSEC3 and RS3 transmitter.
Verify the radio signal with the
Check function (see RSEC3
manual)

RS3 SYSTEM
jcmtechnologies
15
6. Technical Data Summary
6.1 Technical data
6.2 Battery life table
RS3
Frequency
Multifrequency system, auto-
adjustable 868 MHz
Standby / Operating consumption
0,1 mA / 12 mA
Radiated power
<1 mW
Range (in open field)
50 m
Operating temperature
-20ºC to +55ºC
Watertighness
IP22
Reaction time (typical)
18 ms (max 48 ms)
Maximum reaction time when
interferences
466ms

RS3 SYSTEM
jcmtechnologies
16
7. EU Declaration of conformity
JCM TECHNOLOGIES, S.A. hereby declares that the product RS3 TGL868NF complies with the relevant fundamental
requirements of the RED Directive 2014/53/EU, as well as with the Machine Directive 2006/42/EC whenever its usage
is foreseen; and with the 2011/65/EU RoHS Directive.
See website www.jcm-tech.com/en/declarations
JCM TECHNOLOGIES, SA
C/ COSTA D'EN PARATGE, 6B
08500 VIC (BARCELONA)
SPAIN
UM_3201219_RS3 TGL868NNF_EN_Rev01
This manual suits for next models
1
Table of contents
Other JCM Transmitter manuals