JDiag TopDiag BT400 User manual

USER’S MANUAL
Battery replacement + leakage detection + OBD voltage detection + battery detection BT400

Prolinx GmbH
Brehmstr. 56, 40239 Duesseldorf
Germany
JDiag Electronics Technology Co.,Ltd.
Tel: +86-755-21005135
Web: www.jdiag.org
Add: Floor 3, building B2, zone B.Jindida Science Park, Langkou Community, Dalang
Street,Longhua District, Shenzhen, China

CATALOGUE
CATALOGUE
safety instructions
1.1
1
Product parameters
1.3
3
Product introduction
1.2
2
about BT400
2.4
7
Battery Analyzer
2.5
8
System Setting
2.6
9
10
Electric Leakage Data Playback
Electric Leakage Calibration
2.7
Software Upgrade
11
2.8
4
Battery Replacement
2.1
5
OBD2 Voltage Detection
2.2
Automobile Electric Leakage Detection
2.3
6
Product usage
13
One-Year Warranty
3.1
13
Service process
3.2
Warranty and Service

SAFETY PRECAUTIONS AND WARNINGS
To prevent personal injury or damage to the vehicle and / or scanning tools, please read
this user manual carefully before working on the vehicle, and at least observe the
following safety precautions:
Always perform automotive testing in a safe Environment.
Do not attempt to operate or observe the tool while driving the vehicle. Operating or observing the tool can
distract the driver and may result in an accident.
Wear safety goggles that meet ANSI standards.
Keep clothes, hair, hands, tools, testing equipment, etc. Keep away from all moving or hot engine components.
Operate the vehicle in a well-ventilated work area. Exhaust gases are poisonous.
Place obstacles in front of the drive wheels and do not leave the vehicle unattended during the test.
Be especially careful when working around ignition coils, distributor caps, ignition wires, and spark plugs.
The engine is running when these components generate dangerous voltages.
Shift the transmission to P or N and make sure the parking brake is engaged.
Put a fire extinguisher suitable for gasoline / chemical / electrical fires nearby.
Don't connect or disconnect any test equipments while the ignition is ON or the engine is running.
Keep the instrument dry, clean and free of oil/water or grease. If necessary, wipe the exterior of the
instrument with a mild detergent.
Our company is not responsible for any damage caused by the unintentional or intentional misuse of our
products or tools.
1

PRODUCT INTRODUCTION
BT400 Power Tool is an comprehensive and multi functions
automotive diagnostic tool, you can use it for fast replace
vehicle battery with ECU Memory Data saved, OBD2 PIN
OUT BREAKOUT Voltage Values,Electric Current Leakage
detection and Professional Battery Condition Analyzing,
BT400 Power Tool makes vehicle maintenance and service
to be fast, easy and convenience.
PRODUCT ADVANTAGES
Battery replacement with ECU Memory Saved
Current leakage detection and Record data and waveform up to 30 minutes.
OBD2 PIN OUT Voltage display,
Professional Battery analyzing, start testing, charging testing.
2

1. Connection Unit : OBD2 Adapter with Battery Clip
2. Device working voltage : 8- 30VDC
3. Leakage current detection range : 15mA - 5A
4. Battery CCA Standards range : 20-2000 CCA
5. Circuit Breaker Limitation : 5A
PRODUCT PARAMETERS
3
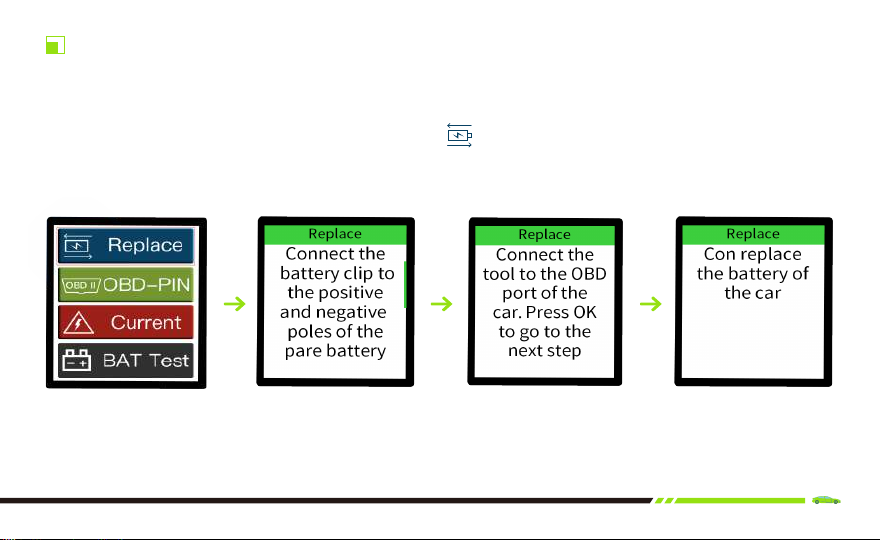
BATTERY REPLACEMENT
Prepare an extra spare vehicle battery , Connect the device to the spare battery correctly
with red clip to positive black clip to negative pole, Plug OBD2 adapte r to the Data Link
Connector socket in the Vehicle.Selecte the “ Replace battery ” function, Press OK key
to enter, and follow the steps as displayed to continue.
(Picture1) (Picture2) (Picture3) (Picture4)
4

OBD VOLTAGE DETECTION
choose“ OBD-PIN ”Function,Press the OK key to enter, and you can view the
voltage value of each pin of OBD2 Connector, as shown in (picture2)
OBD II
(Picture1) (Picture2)
5
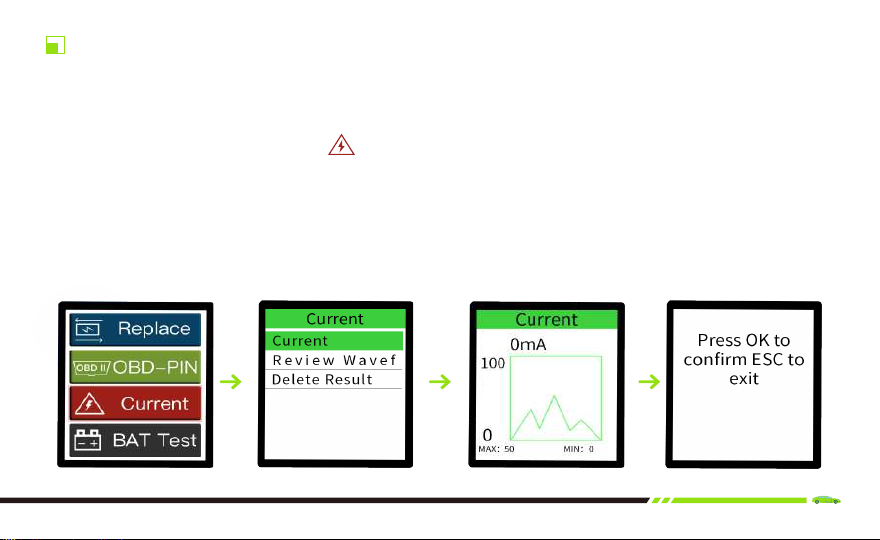
AUTOMOBILE ELECTRIC LEAKAGE DETECTION
1. Prepare an extra spare vehicle battery , Connect the device to the spare battery
correctly with red clip to positive black clip to negative pole, Plug OBD2 adapter to the
Data Link Connector socket in the Vehicle.
2. Select Current menu under “
Current
” functions. It will enter in the waveform
monitoring interface as fugure 3.
3. Unplug and the car fuse or related electrical components on the car to observe the
current changes, if there is a current drop instantly or abnormal, it proves that there is a
possibility of leakage in the fuse circuit or the related components issue, Compare the
circuit diagram of the car electrical system and locate the leakage point.
The device can save the data of leakage current for 30 minutes, and view the results through "playback waveform".
(Picture1) (Picture2) (Picture3) (Picture4)
*
6

ELECTRIC LEAKAGE PLAYBACK
Select Review Waveform menu under“ Current ”Function , you can view the
data recorded.
(Picture1) (Picture2) (Picture3) (Picture4)
7
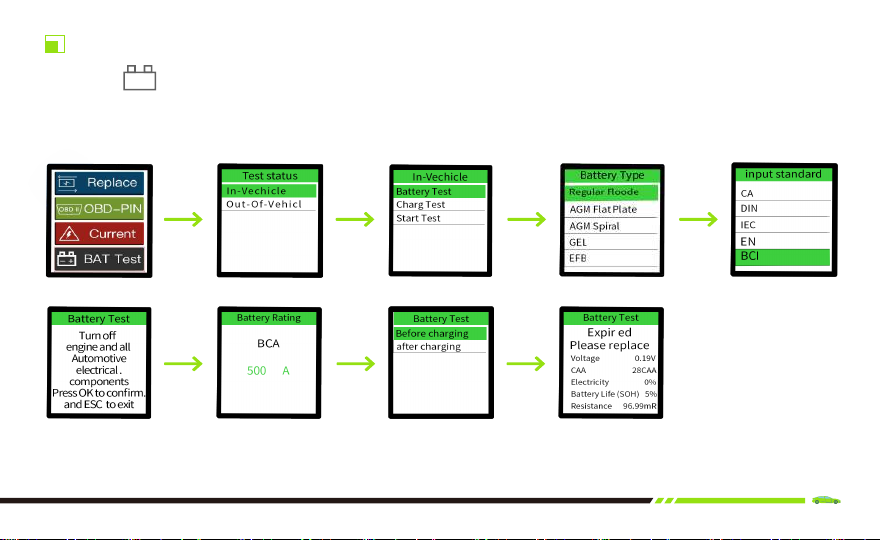
BATTERY ANALYZER
choose“ BAT Test ”Function,Then press OK to enter, there are CCA
、
JIS
、
GB
、
SAE
、
MCA
、
CA
、
DIN
、
IEC
、
EN
、
BCI and other different test standards.
- +
8

ELECTRIC LEAKAGE CALIBRATION
Select “ BAT Test ” Function,Press OK key to Enter, Select “Calibration” to
enter in the calibration mode, For Example, If the Non-Load current is display as 3mA,
and input -3mA in this mode to save it , then the calibration is completed. This functions
will be hidden automatically after operates. If needs to enter calibration mode again,
Press key : LEFT->LEFT->RIGHT->RIGHT->UP->DOWN->OK
- +
(Picture1) (Picture2) (Picture3)
0
m
A
9
(This functions is only designed for abnormal current display with Non-load circuit system)

SYSTEM SETTINGS AND LANGUAGE SWITCHING
Select“ BAT Test ”Function,You can change the device language as you want,
Press OK key to save.
(Picture1) (Picture2) (Picture3) (Picture4)
- +
10
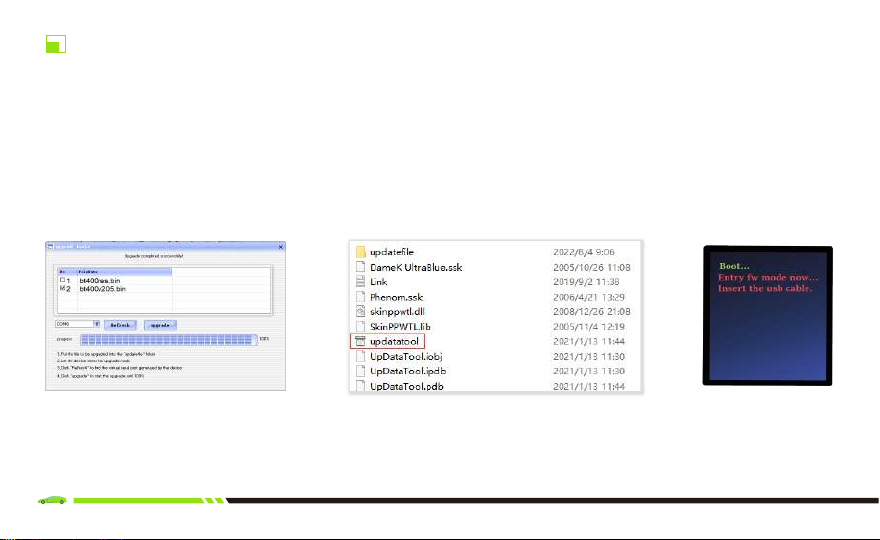
1. Connect device to the computer though a USB cable , Select “Battery Test” - “
Setting” - “USB Upgrade” on the device , It will enters to the upgrade mode as shown in
Picture3.
2. Download upgrade tool from official website and Run the “updatetool” Click
“refresh ” to find the virtual serial port generated by the device.
SOFTWARE UPGRADE
(Picture1) (Picture2) (Picture3)
11

3. Select the Update files name as bt400vXXX.bin and bt400res.bin (select one file
each time), click “Upgrade” to start updating unit to 100%.
(Do not unplug device while update in progressing)
(Picture1) (Picture2)
12

One year warranty
Service Process
If you have any questions in the process of using this product, please contact your local authorized dealer directly, or visit our official
website for consultation.
JDiag Technology promises to provide warranty service for 1 year from the date of original purchase, if this product is purchased from
an official channel, which must meet the following conditions:
1) The warranty are limited to repairing or replacing new equipment, without additional cost, but need to mention for regular sales
invoices or copies of invoices.
2) The warranty does not cover the unauthorized disassembly of this product due to flooding, lightning strikes, or outside repair shops
not authorized by the company ,The personnel have repaired it and considered damage caused by improper use.
3) JDiag Technology is not responsible for any damages caused by use, misuse or installation and testing. Some countries limitations
on the duration of implied warranties are not allowed, so the above limitations may not apply to you.
4) All information in this manual is based on the latest and effective information at the time of publication, and there is no guarantee of
its accuracy or completeness. JDiag Technology reserves the right to make changes at any time without notice.
WARRANTY AND SERVICE
13

设计说明
尺寸:155*95mm
工艺:哑胶 材质:封面(封面和封底)200g铜版纸,内页157g铜版纸
装订方式:骑马钉装订
Table of contents
Other JDiag Diagnostic Equipment manuals


