Jenoptik 5.3z3 EasyShot User manual
User’s Guide
User’s Guide
www.jenoptik-camera.com
5.3z3 EasyShot

1
ENGLISH
Table of Contents
GETTING STARTED............................................................................................................3
STANDARD ACCESSORIES............................................................................................................ 3
Attaching the Wrist Strap........................................................................................................... 3
Using the Soft Case................................................................................................................... 4
NAMES OF PARTS........................................................................................................................... 4
INSTALLING THE BATTERY PACK ................................................................................................. 5
Low Battery Indicator................................................................................................................. 5
CHARGING THE BATTERY PACK................................................................................................... 5
INSERTING A MEMORY CARD ....................................................................................................... 6
About Camera Memory.............................................................................................................. 6
DCF Protocol ............................................................................................................................. 6
SETTING THE DATE AND TIME......................................................................................................6
BASIC OPERATIONS..........................................................................................................7
TURNING THE POWER ON AND OFF............................................................................................ 7
Power Saving Function.............................................................................................................. 7
SWITCHING BETWEEN RECORD AND PLAYBACK...................................................................... 7
In Record mode ......................................................................................................................... 7
In Playback mode ...................................................................................................................... 7
USING THE MENUS ........................................................................................................................ 8
Recording Menu / Playback Menu............................................................................................. 8
ADJ. Menu ................................................................................................................................. 9
Setup Menu ............................................................................................................................... 9
USING THE LCD MONITOR ..........................................................................................................10
LCD Screen Indicator .............................................................................................................. 10
Switching the Screen Display .................................................................................................. 10
RECORDING......................................................................................................................11
RECORDING STILL IMAGES......................................................................................................... 11
Using the Zoom Function ........................................................................................................11
Using the Flash........................................................................................................................ 12
Using the Self-timer & Burst .................................................................................................... 12
Using the Macro mode ............................................................................................................ 13
RECORDING MOVIE CLIPS ..........................................................................................................14
VOICES RECORDING.................................................................................................................... 14
SETTING THE RECORDING FUNCTIONS ................................................................................... 14
Using the Scene Mode ............................................................................................................ 14
Setting the Resolution and Quality .......................................................................................... 15
Setting the Movie Size............................................................................................................. 16
Setting the Stabilizer................................................................................................................ 16
Setting the White Balance ....................................................................................................... 16
Setting the ISO ........................................................................................................................ 17
Setting the Exposure ............................................................................................................... 17
Setting the Metering................................................................................................................. 17
Setting the Sharpness ............................................................................................................. 17
Setting the Photo Effect........................................................................................................... 18
Setting Date Stamp.................................................................................................................. 18
PLAYBACK........................................................................................................................19
PLAYING BACK IMAGES............................................................................................................... 19
Using the Thumbnail................................................................................................................ 19

2
Magnifying and Trimming Still Images..................................................................................... 19
Playing Back Movie Clips ........................................................................................................ 19
PLAYING BACK SOUNDS ............................................................................................................. 20
Recording a Voice Memo ........................................................................................................ 20
Playing Back a Voice Memo.................................................................................................... 20
DELETING FILES ........................................................................................................................... 20
Deleting a Single File............................................................................................................... 20
Deleting All Files ...................................................................................................................... 21
Protecting Files ........................................................................................................................ 21
EDITING IMAGES........................................................................................................................... 22
Rotating Still Images................................................................................................................ 22
Changing the Image Size ........................................................................................................22
Adding Stickers to a Still Image...............................................................................................22
Setting Photo Effect................................................................................................................. 22
SETTING THE DPOF ..................................................................................................................... 23
PLAYING A SLIDE SHOW .............................................................................................................. 24
COPYING THE FILES .................................................................................................................... 24
ADVANCE SETTINGS.......................................................................................................25
ADJUSTING SOUNDS ................................................................................................................... 25
SETTING AUTO REVIEW .............................................................................................................. 25
SETTING THE POWER SAVE ....................................................................................................... 25
SETTING THE LANGUAGE ...........................................................................................................25
RESETTING THE FILE NUMBERS................................................................................................ 26
About the Folder & File Name ................................................................................................. 26
File Naming.............................................................................................................................. 26
SETTING THE TV OUT .................................................................................................................. 26
SETTING USB PORT ..................................................................................................................... 26
CHOOSING A STARTUP IMAGE ................................................................................................... 27
FORMATTING THE MEMORY ....................................................................................................... 27
RESETTING TO DEFAULT SETTINGS.......................................................................................... 27
MAKING CONNECTIONS .................................................................................................28
CONNECTING THE CAMERA TO A TV......................................................................................... 28
CONNECTING THE CAMERA TO A PC ........................................................................................ 28
Using the Card Reader............................................................................................................ 28
Connecting the Camera to a Computer with a USB Cable ..................................................... 28
PRINGTING PICTURES DIRECTLY..................................................................................30
SOFTWARE INSTALLATION ............................................................................................31
SYSTEM REQUIREMENTS ........................................................................................................... 31
USING THE INSTALLER SPLASH SCREEN................................................................................. 31
INSTALLING YOUR CAMERA DRIVER ......................................................................................... 32
INSTALLING XVID CODEC............................................................................................................ 33
INSTALLING WINDOWS MEDIA PLAYER 9.................................................................................. 36
INSTALLING ARCSOFT PHOTOIMPRESSION ............................................................................ 38
INSTALLING ADOBE ACROBAT READER .................................................................................... 40
USING ARCSOFT PHOTOIMPRESSION ...................................................................................... 43
INSTALLING SOFTWARE-FOR MAC USERS .................................................................44
APPENDIX .........................................................................................................................45
TROUBLESHOOTING .................................................................................................................... 45
SPECIFICATIONS .......................................................................................................................... 46
GETTING HELP.............................................................................................................................. 47
SAFETY TIPS AND MANITENANCE ............................................................................................. 48
REGULATORY INFORMATION...................................................................................................... 50
3
GETTING STARTED
GETTING STARTED
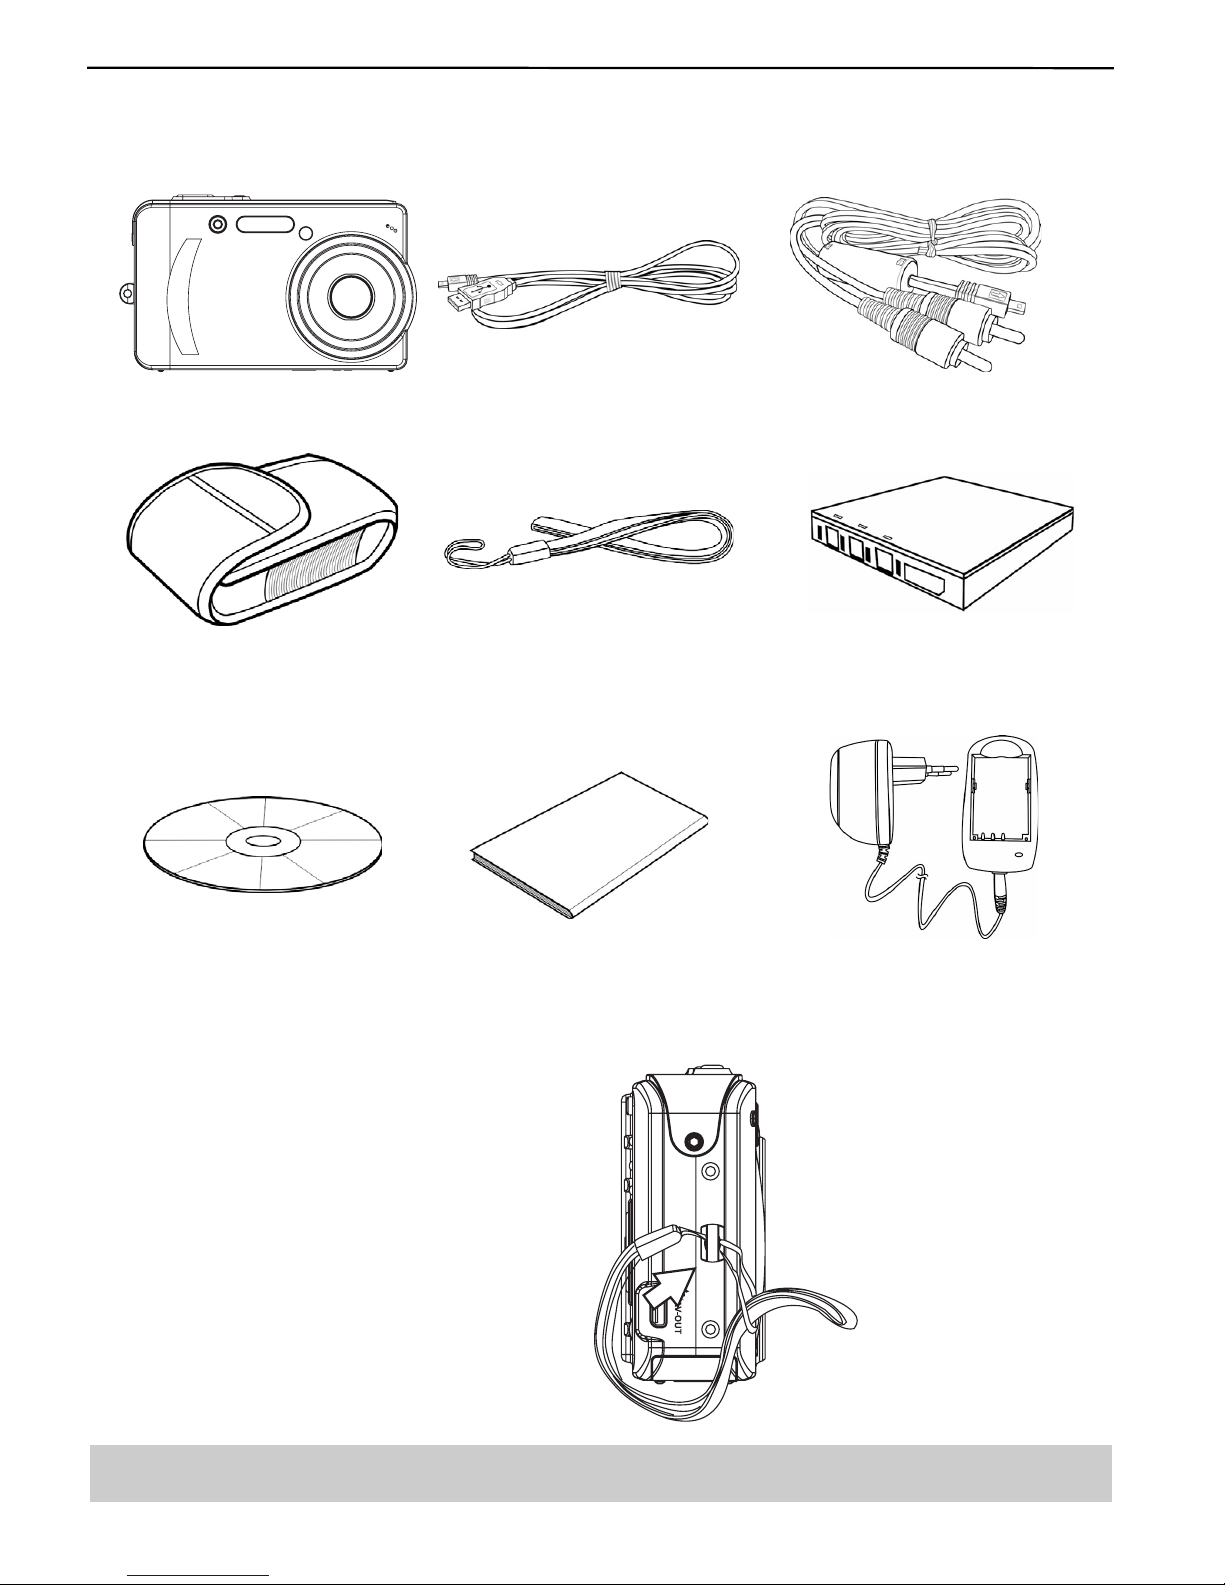
STANDARD ACCESSORIES
Camera USB Cable Video out Cable
Soft Case Strap Rechargeable Lithium-ion
Battery (NP-40)
Software Installation CD-ROM Quick Start Guide Battery Charger & Adaptor
Attaching the Wrist Strap
Attach the wrist strap to your camera as shown.
Note: Do not swing the camera when carrying by the wrist strap.
4
GETTING STARTED
Using the Soft Case
When not using the digital camera, keep it in the soft case for protection.
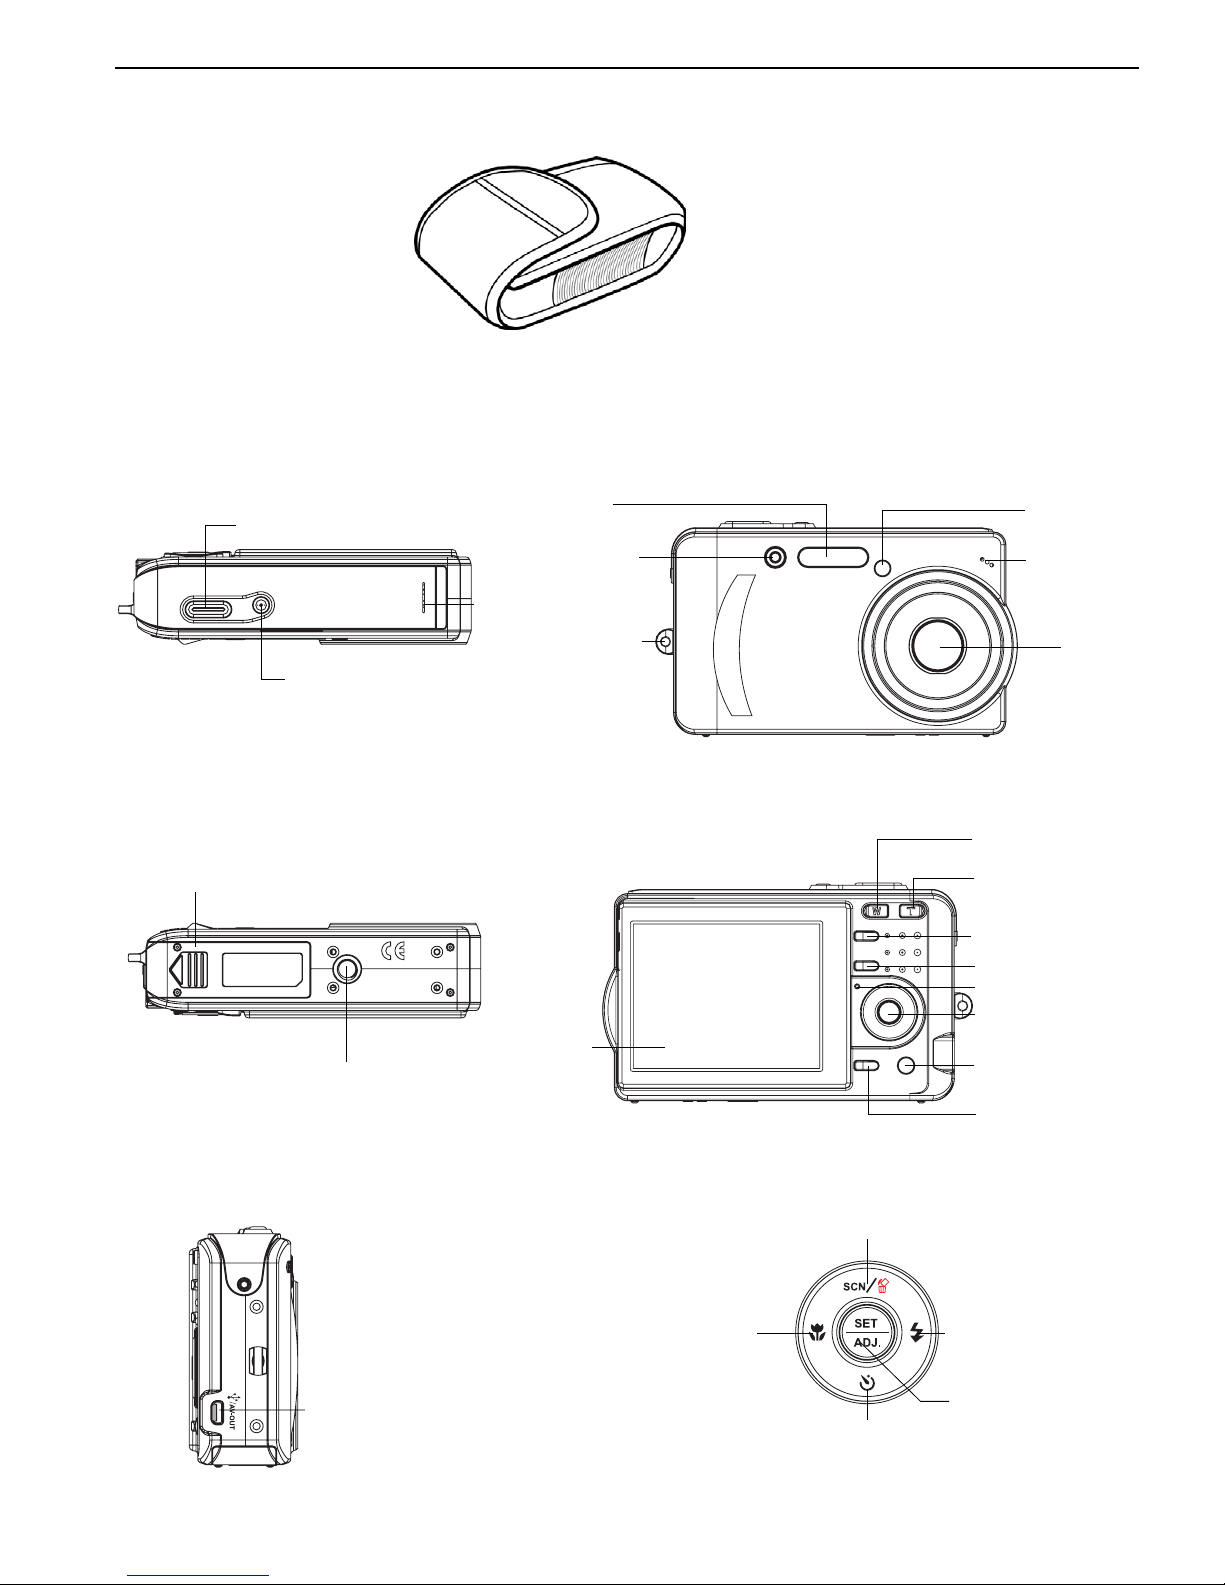
NAMES OF PARTS
Top Front
Bottom Back
Side 5-function button
Power button
Shutter button
Speaker
USB connector
/ AV-OUT
Scene/Delete/
Up button
Flash/Right
button
SET / ADJ
button
Self-timer/
Continue/
Down button
Macro/Left
button
Battery/card
chamber cover
Tripod socket
LCD monitor
Zoom W button
(Thumbnail)
Zoom T button
(Digital zoom)
Play mode button
MENU button
Operation lamp
5-function button
Mode dial
DISP button
Flash
Strap ring
Self-portrait
mirror
Lens
Microphone
Self-timer
lamp
5
GETTING STARTED
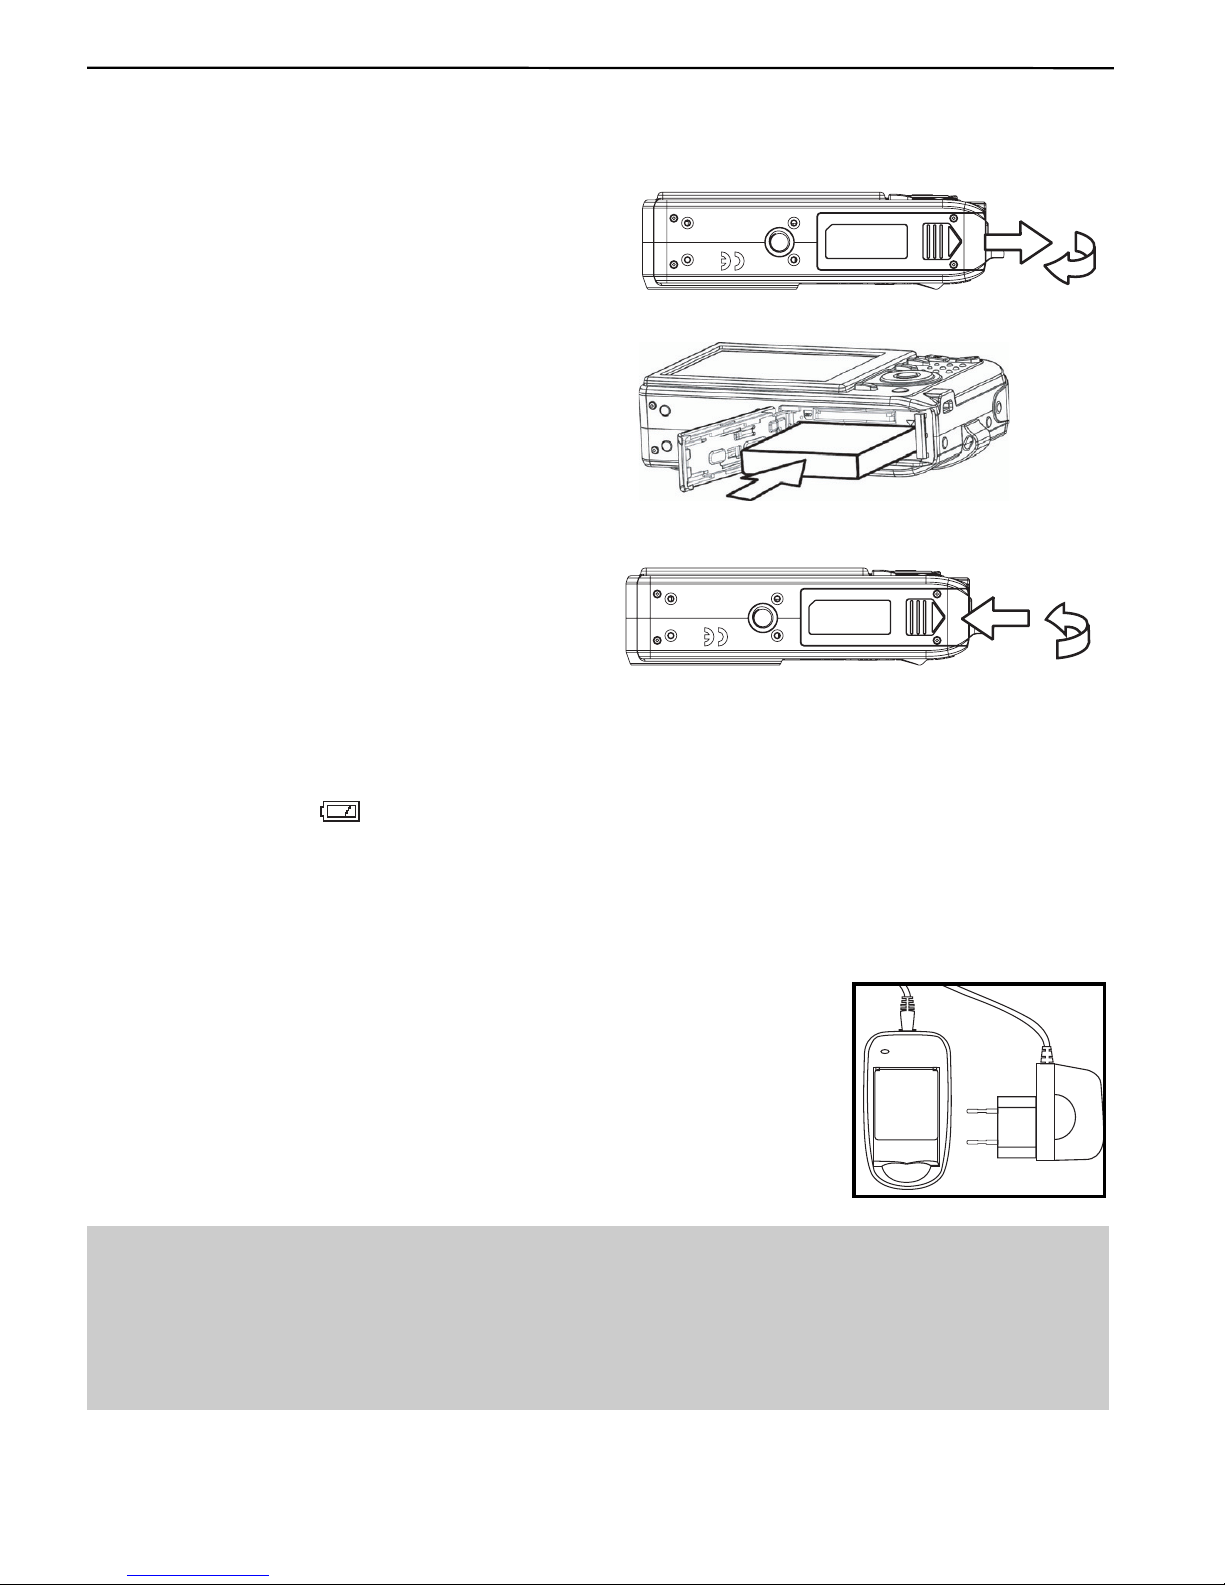
INSERTING THE BATTERY PACK
The camera is powered by a rechargeable lithium-ion battery (NP-40). Charge the Battery Pack before
you use it.
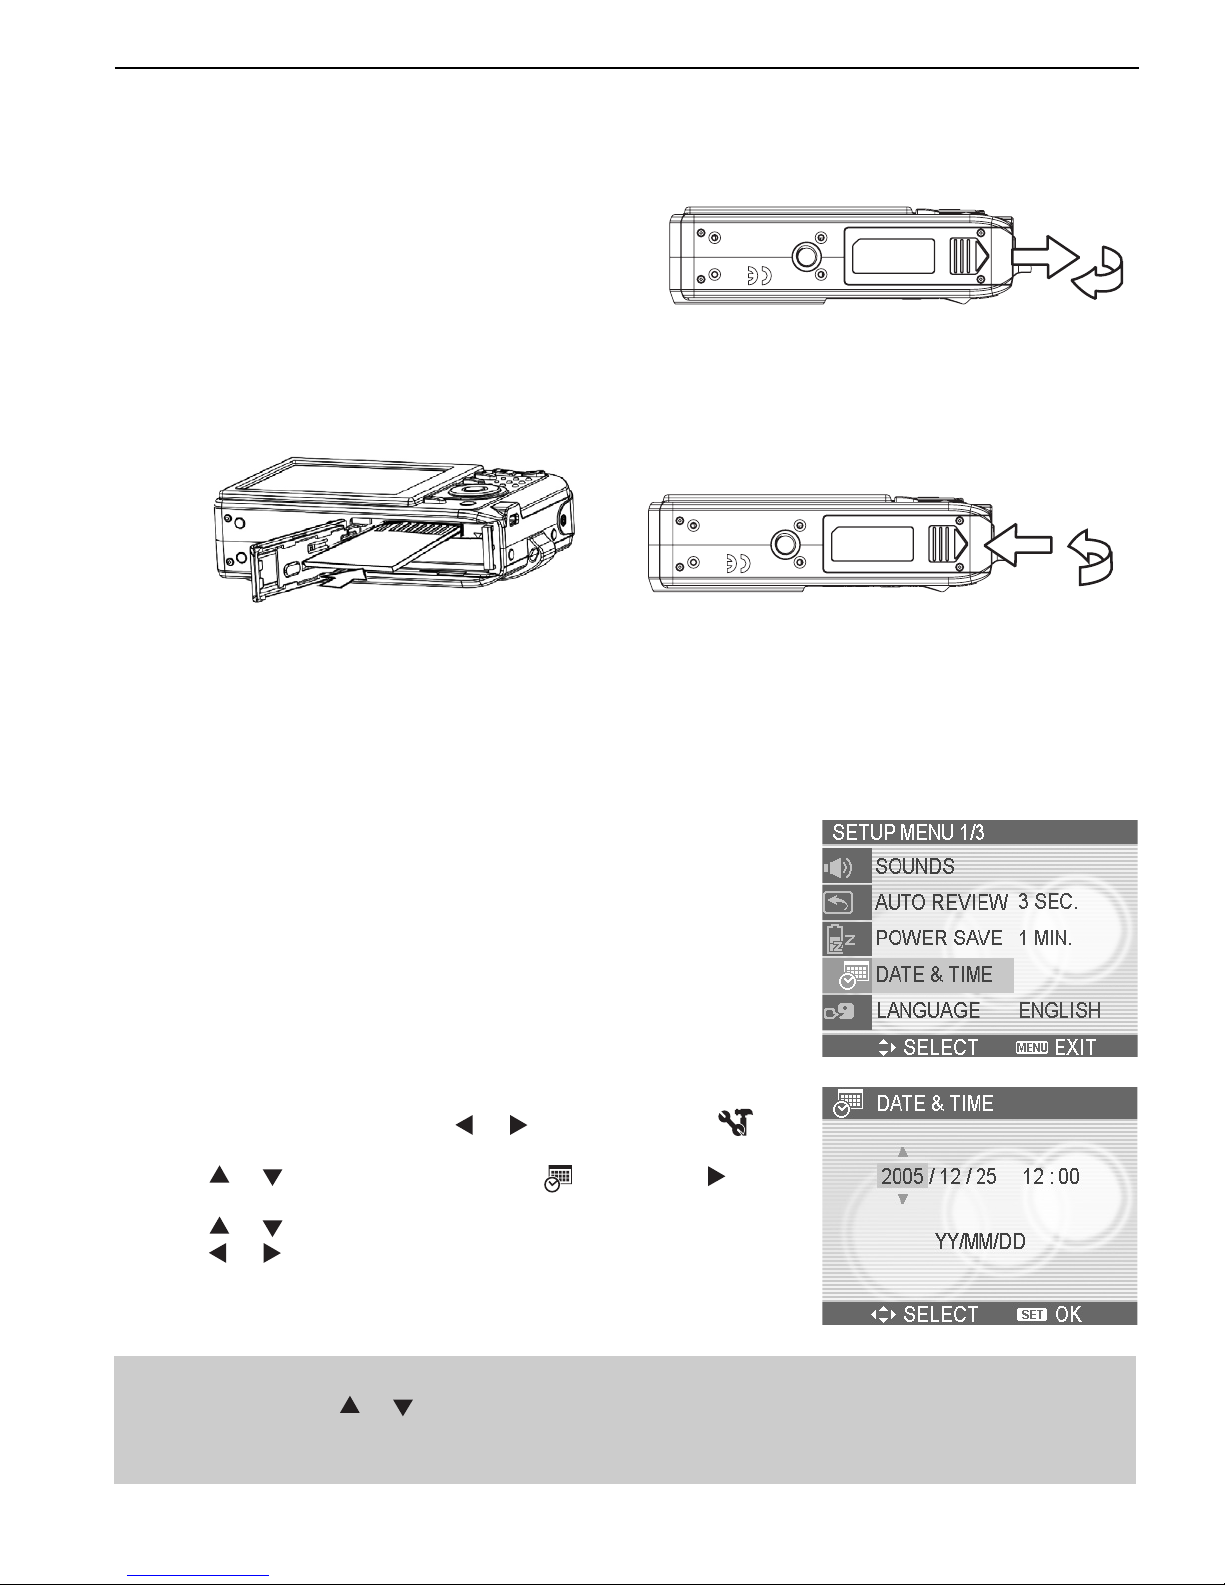
1. Slide the battery cover open.
2. Install the battery with the terminal facing
inside the camera.
3. Slide the battery cover closed.
Low Battery Indicator
A low battery indicator
640
320
160
appears on the LCD screen when the battery are nearly exhausted. The
battery should be replaced promptly when the low battery indicator appears.
CHARGING THE BATTERY PACK
The battery is not charged when you purchase the camera. You need to charge the battery before
using the camera.
1. Place the battery pack in the charger.
2. Connect the AC adaptor to the charger, and then plug it into a power
outlet.
• The charger lamp lights red and battery charging begins. When
charging is completed, the lamp
becomes green.
Note:
• Use only the special NP-40 rechargeable lithium-ion battery to power this camera.
• Remove battery from the camera if you will not be using the camera for a long time.
• Normal charging time is about 230 minutes. Charging time is varying with current battery
capacity and charging conditions.
• During charging both charger and battery pack get hot, this is normal.
6
INSERTING A MEMORY CARD
You can use SD Card with this digital camera. The memory card slot is located beneath the battery
cover, adjacent to the battery compartment.
1. Be sure that the camera is turned off.
2. Slide the battery cover and open it.
3. Insert the SD card as shown in the diagram.
4. Close the battery cover.
To remove the memory card, gently press on the edge of the card and release it. Pull the card out
and close the battery cover.
About Camera Memory
The digital camera is equipped with internal memory. If the memory card is not inserted in the camera,
all images and movie clips recorded by the camera will be stored in the internal memory. If the
memory card is inserted, images and movie clips are stored on the memory card.
DCF Protocol
The DCF protocol defines the format for image file data as well as
the directory structure for the memory card. Images that are taken
by a DCF camera can be viewed on DCF-compatible cameras
from other manufacturers.
SETTING THE DATE AND TIME
When the camera is first turned on, the date and time setting will
not be correct. So before using, be sure to set date and time.
1. Press the MENU button, using
640
320
160
or
640
320
160
to select SETUP (
640
320
160
)
and press the SET button.
2. Press
640
320
160
or
640
320
160
to select DATE & TIME (
640
320
160
) then press
640
320
160
or
the SET button to launch the Date & Time screen.
3. Press
640
320
160
or
640
320
160
tto change the value of the highlighted field.
Press
640
320
160
or
640
320
160
to highlight another field.
4. After adjusting the settings, press the SET or the MENU button
to apply the setting.
Note:
• If you hold down
640
320
160
or
640
320
160
, you can change the value quickly.
• If the batteries are removed for about two days, the Date & Time setting will be lost. In this
case, make these settings again.
GETTING STARTED
7
BASIC OPERATIONS
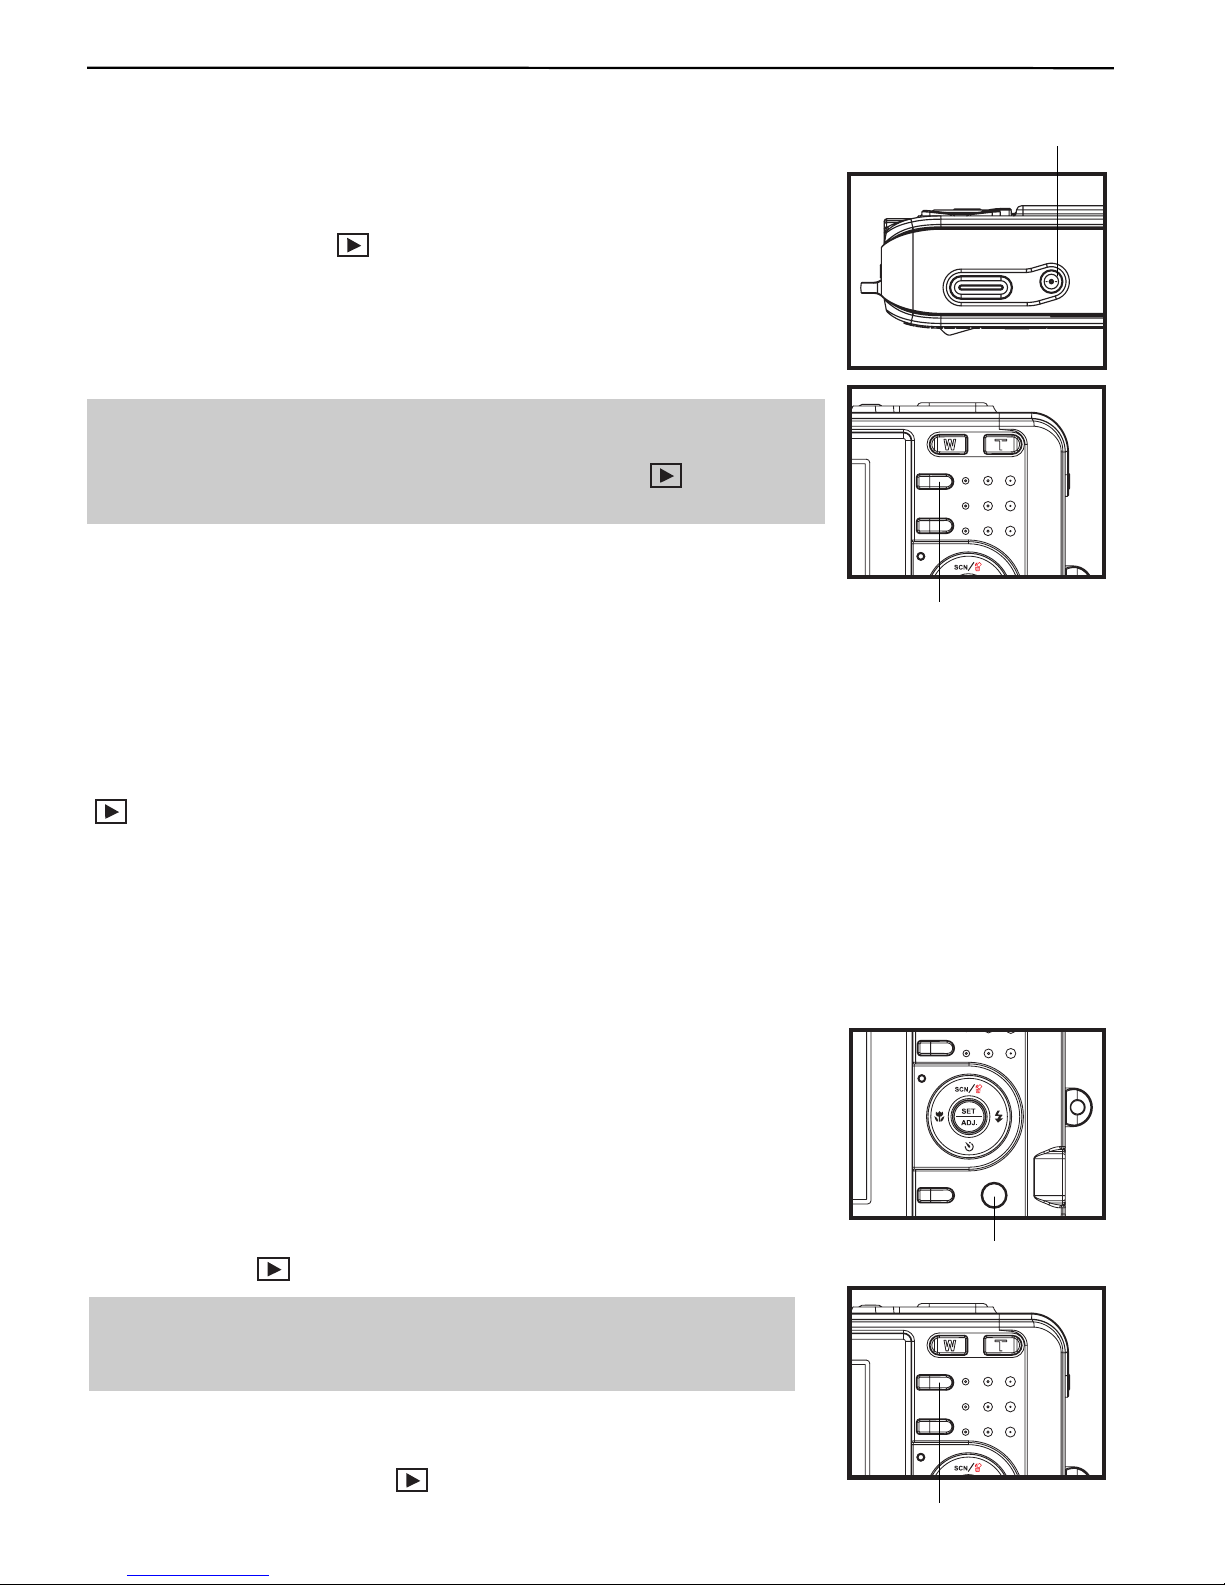
Power button
Play mode button
Mode dial
Play mode button
BASIC OPERATIONS
TURNING THE POWER ON AND OFF
1. Press the POWER button to turn on the camera in the Record mode.
Or you can press the
640
320
160
button to turn on the camera in the Playback
mode.
2. Press the POWER button again to turn the power off.
Hint:
• You can turn on the camera without the start-up and operating
sound by pressing and holding the POWER or the
640
320
160
button over
1.5 seconds.
Power Saving Function
When the camera’s power saving function is turned on, the LCD monitor will automatically turn off in a
specified amount of time after the last function is accessed. Press any button to turn on the LCD
monitor.
The camera power will auto shut off after LCD monitor turning off 1 minute, press the POWER or the
640
320
160
button to restore the power.
The Power Save feature does not work in the following situation:
• Connecting the camera to a computer or printer with the USB cable.
• During a slideshow.
• Recording a Video or Audio file.
• Playing back a Video or Audio file.
SWITCHING BETWEEN RECORD AND PLAYBACK
You can switch between the Record mode and the Playback mode in
following ways:
In Record mode
• Press the MODE button to cycle through the still image shooting,
voice recording, and movie recording.
• Press the
640
320
160
button to switch to the Playback mode.
Note:
• If you switch to Playback mode, the lens will retract after
approximately 10 seconds.
In Playback mode
• Press the MODE or the
640
320
160
button switch to the previous used
Record mode.

8
USING THE MENUS
Recording Menu / Playback Menu
When a menu screen is displayed, the arrow button and the SET button are used to make the desired
settings.
1. Press the MENU button to display the menu.
• The menu displays depends on whether you are in the Record mode or the Playback mode.
2. Press
640
320
160
or
640
320
160
to select a menu item.
3. Press
640
320
160
or
640
320
160
to change the setting.
• In playback menu, press
640
320
160
or
640
320
160
to select an option, and then press the SET button to display a
confirmation screen or apply the setting.
4. Press the MENU or the SET button to save the settings and close the menu.
• In playback menu, press the MENU button to close the menu.
Menu Item Available Setting(for still image)
Resolution 5M
640
320
160
/ 3:2
640
320
160
/4M
640
320
160
/3M
640
320
160
/2M
640
320
160
/VGA
640
320
160
Quality
640
320
160
/
640
320
160
/
640
320
160
Metering
640
320
160
/
640
320
160
/
640
320
160
Sharpness
640
320
160
/
640
320
160
/
640
320
160
Effect Off / B&W / Sepia / Neg. Art / Red / Green / Blue
Date Stamp Off / Date / Date & Time
Digital Zoom Off / On
Menu Item Available Setting (for movie)
Movie Size 640
640
640
320
160
/
640
320
320
320
160
/
640
320
160
160
160
Metering
640
320
160
/
640
320
160
/
640
320
160
Stabilizer Off / On
Menu Item Available Setting (for playback)
Protect Single / Lock All / Unlock All
Delete Single / All
Slide Show Playing stored images in a slide show.
DPOF Single / All / Reset
Copy to Card Single / All
Effect PhotoRite / B&W / Sepia / Neg. Art / Mosaic / Red / Green / Blue
Rotate Right 90 / Left 90 / Horizontal / Vertical
Resize Reduces image size to smaller.
Sticker Add funny stickers to images.
Voice Memo Recording a voice memo to a stored image.
S.Image User 1 / User 2
BASIC OPERATIONS
9
ADJ. Menu
You can quickly adjust the White Balance, ISO and Exposure in Record mode.
1. Press the SET button to display the menu.
• When movie recording, only White Balance can be adjusted.
2. Press
640
320
160
or
640
320
160
to select a menu item.
3. Press
640
320
160
or
640
320
160
to select an option
4. Press the SET button to confirm the settings and close the menu.
Menu Item Available Setting
White Balance
640
320
160
AUTO
/
640
320
160
/
640
320
160
/
640
320
160
/
640
320
160
/
640
320
160
/
640
320
160
ISO AUTO / 50 / 100 / 200
Exposure -2.0 to +2.0
Setup Menu
You can change the basic settings of the camera in Record mode and Playback mode.
1. Press the MENU button to display the menu.
• The menu displays depends on whether you are in the Record mode or the Playback mode.
2. Press
640
320
160
or
640
320
160
to select SETUP (
640
320
160
) and then press the SET button to display the Setup menu.
3. Press
640
320
160
or
640
320
160
to select a menu item and then press
640
320
160
or the SET button to launch the submenu.
4. Press
640
320
160
or
640
320
160
to select an option and press the SET button to apply the setting.
5. Press the MENU button to close the menu.
Menu Item Available Setting
Sounds Sets the camera sounds and volume.
Auto Review Off / 3 sec. / 5 sec.
Power Save Off / 1 min. / 3 min. / 5 min.
Date & Time Sets the date & time.
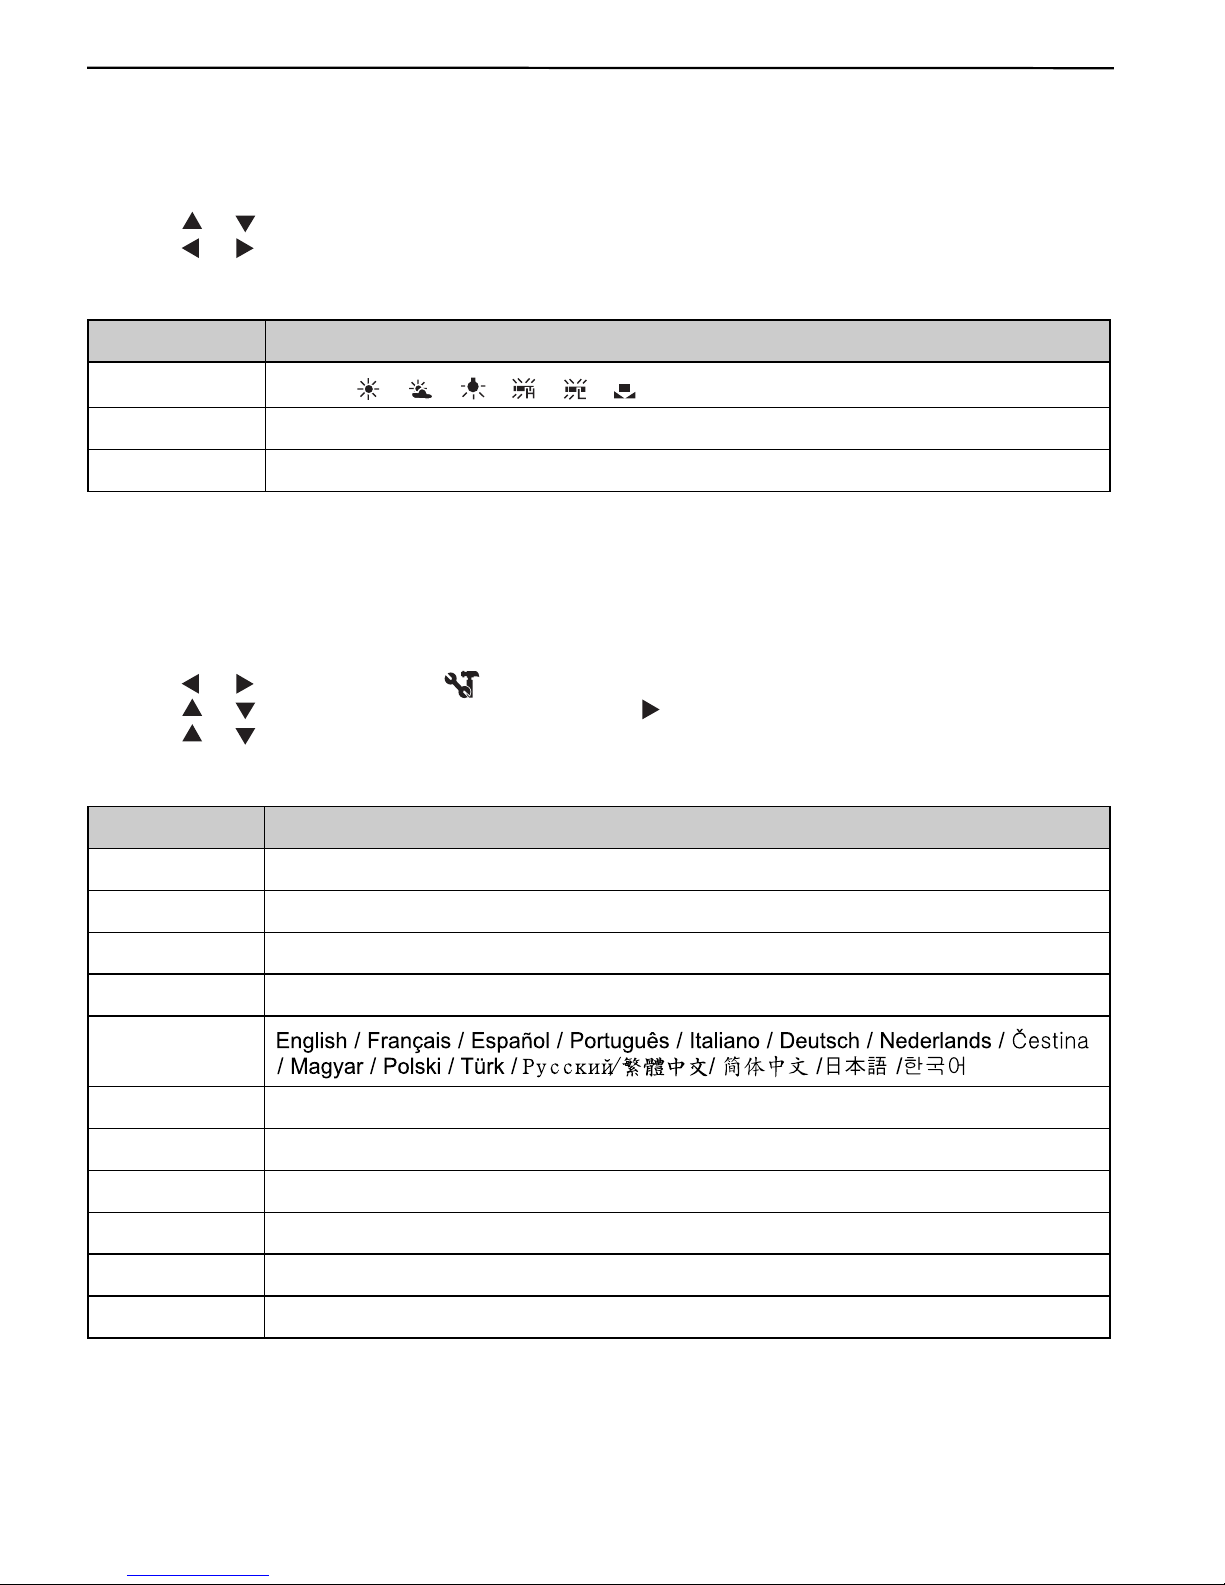
Language
File No. Series / Reset
TV Out NTSC / PAL
USB Computer / Printer
S.Image Sets the start-up image.
Format Formats the internal memory or memory card.
Reset All Resets all camera settings to initial default.
BASIC OPERATIONS
10
BASIC OPERATIONS
USING THE LCD MONITOR
The LCD monitor is used to compose images while recording, adjust settings and replay images.
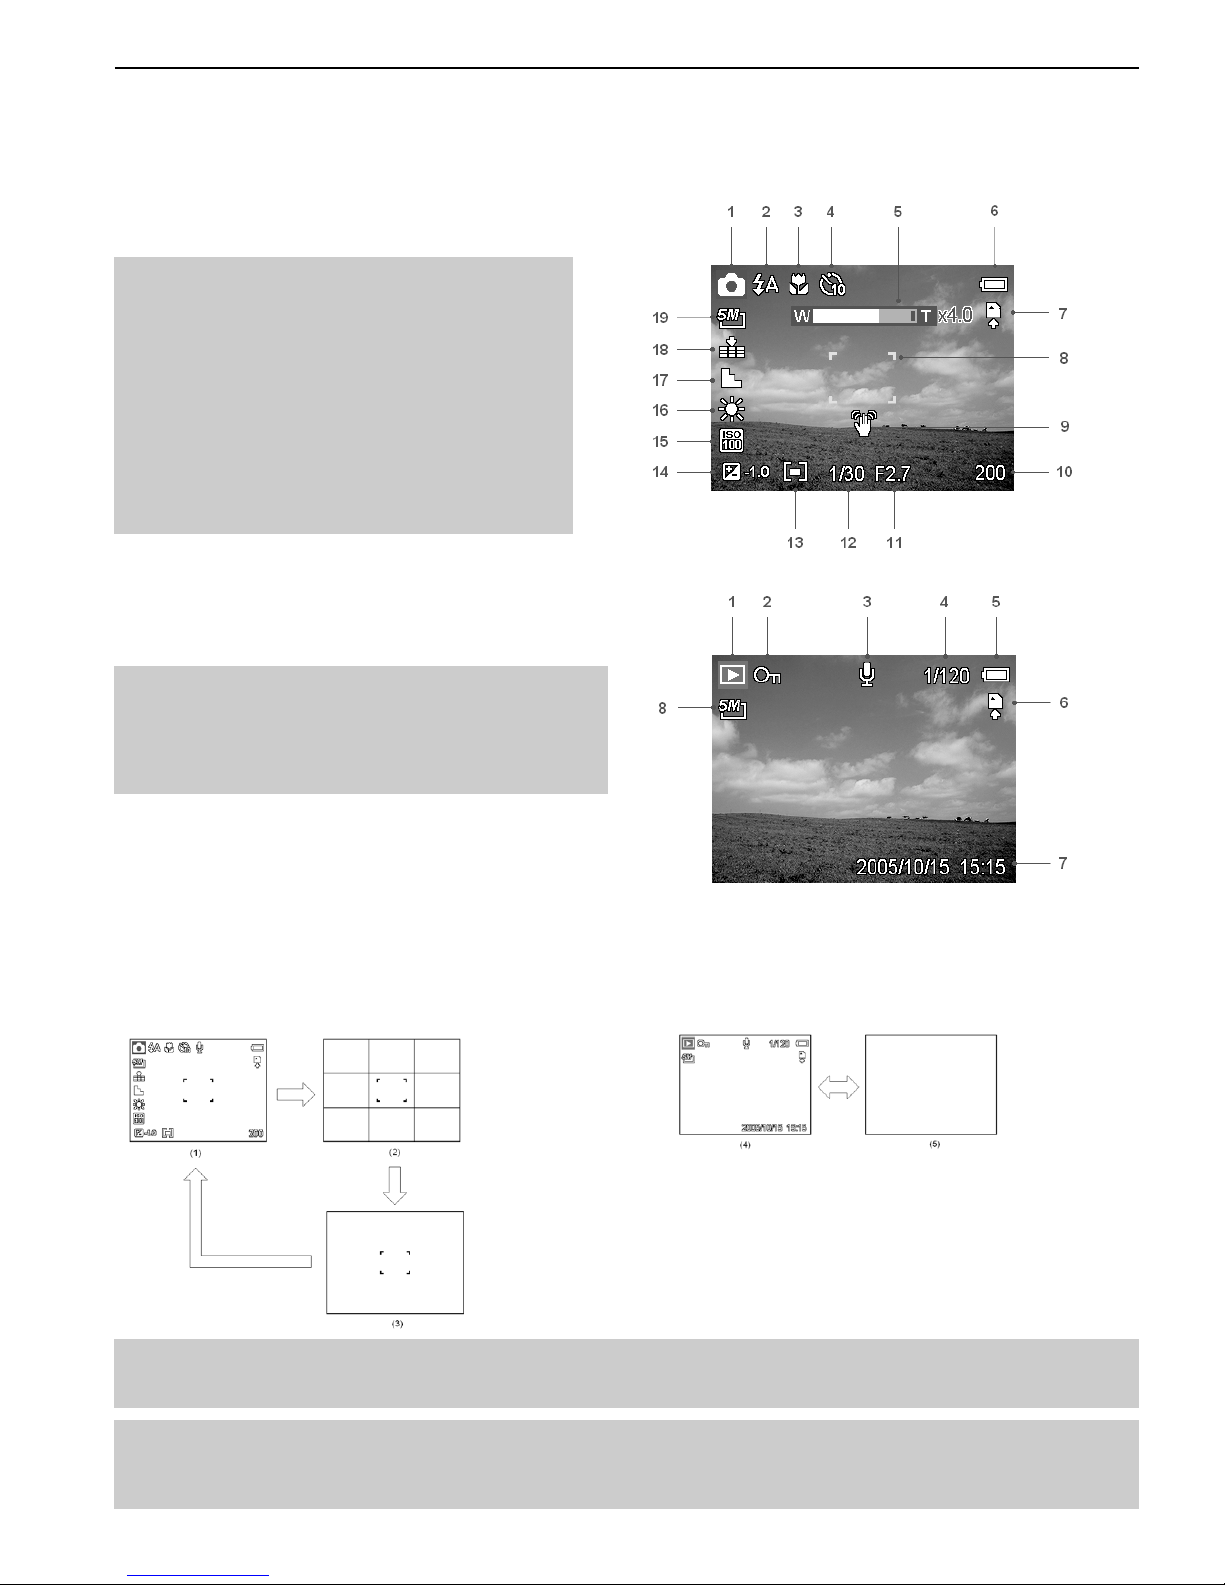
LCD Screen Indicator
In Recording
1 Mode icon 11 Aperture value
2 Flash 12 Shutter speed
3 Macro 13 Metering
4 Self-timer / Burst 14 Exposure
5 Zoom indicator 15 ISO
6 Battery 16 White balance
7 Storage media 17 Sharpness
8 Focus area 18 Quality
9 Shake warning 19 Resolution
10Shots remaining
In Playback
1 Mode icon 5 Battery
2 Protect 6 Storage media
3 Voice memo 7 Capture date & time
4 File number / Total 8 Resolution
Switching the Screen Display
Press the DISP button changes the next display mode of the LCD monitor as shown below:
In Record mode In Playback mode
(1) OSD on (2) Guide line (3) OSD off
(4) OSD on (5) OSD off
Hint:
• Use the “Guide line” mode to compose images easily before shooting images.
Note:
• When the LCD display is not in “OSD on”, press Macro, Self-timer, Flash will change the
display mode to “OSD on” automatically.
11
RECORDING
RECORDING
RECORDING STILL IMAGES
1. Set the camera to the Record mode.
2. Hold the camera with both hands and make sure the camera is stable.
3. Aim the focus area to the subject that you want to take and press the shutter release button
halfway.
• The focus area on the LCD monitor will light green when the camera is in focus.
• If the shutter speed is slow or the possibility that image may be blurred, the shake warning icon
640
320
160
may appear on the LCD monitor. To avoid it, use a tripod to stabilize the camera when
recording images.
4. Fully press the shutter release button to take an image.
Note:
• Make sure that your fingers or the wrist strap does not block the lens.
• When the shutter release button is pressed halfway down, check the exposure value that
appears on the LCD monitor to make sure that it is appropriate for the lighting conditions.
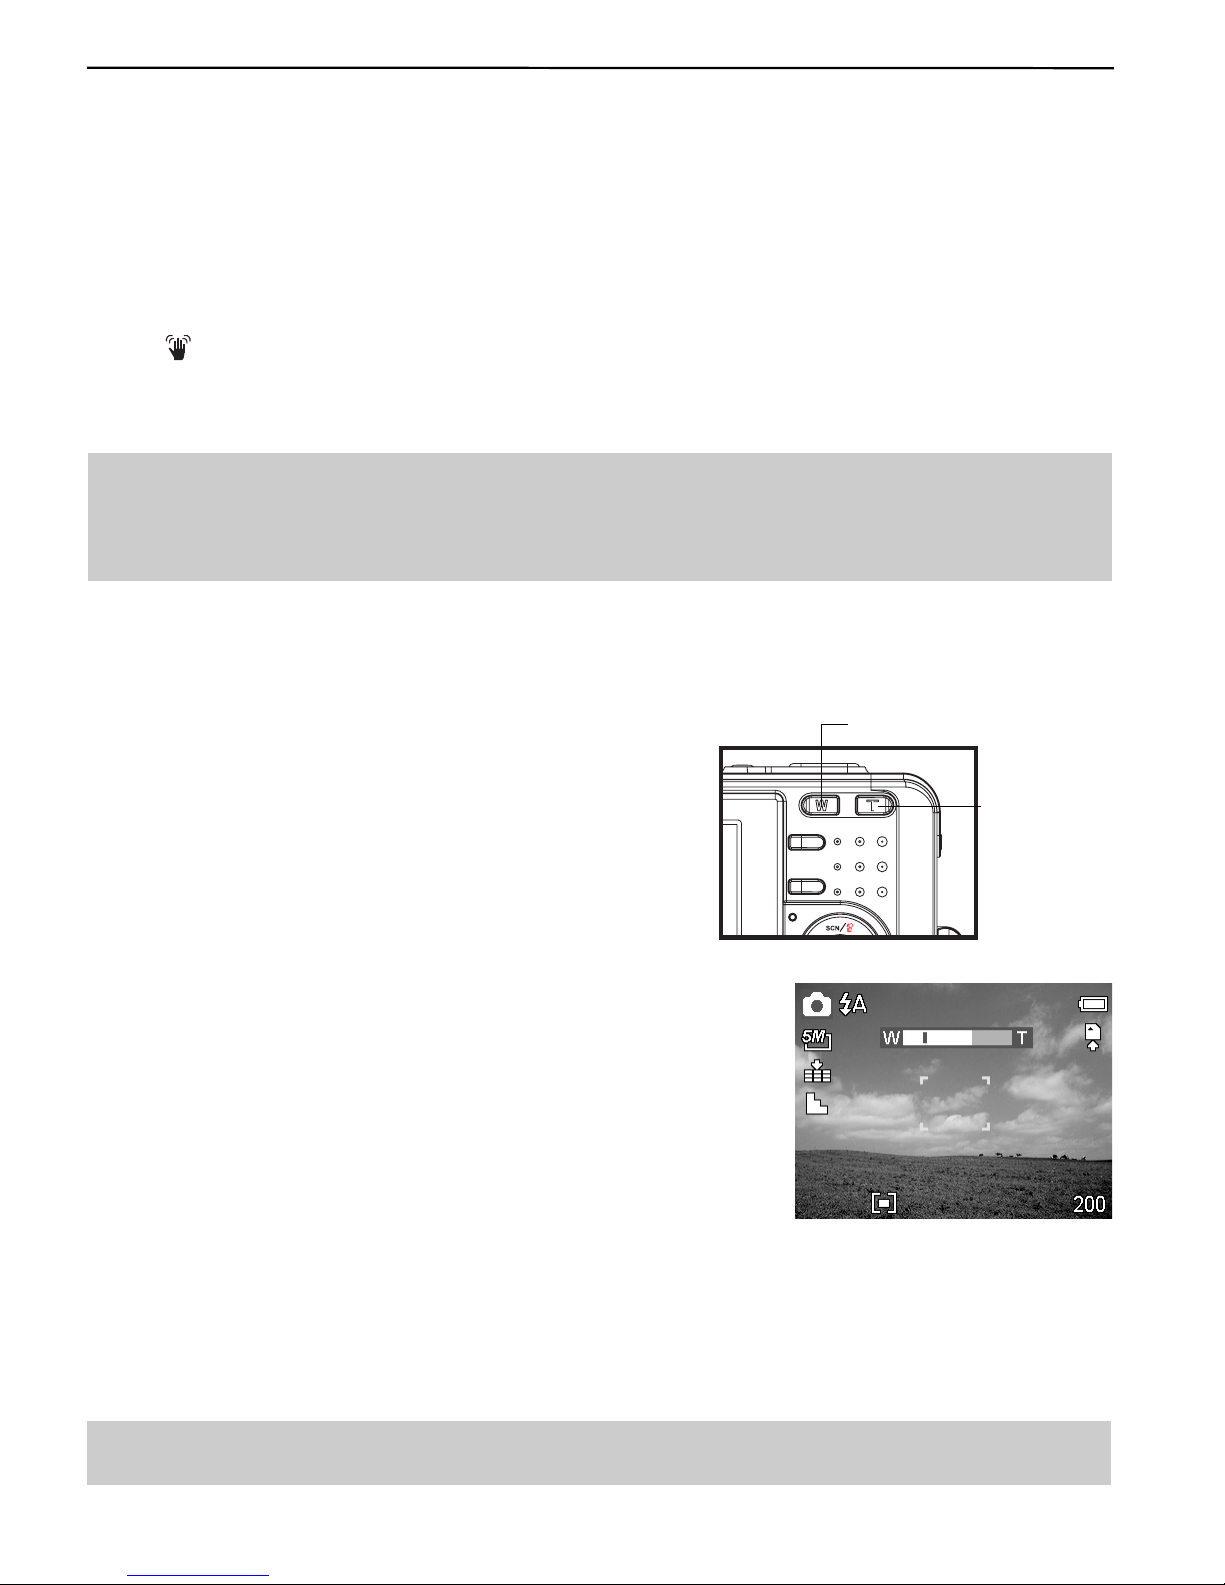
Using the Zoom Function
Your camera has a combination of optical and digital zoom
functions that allow you to zoom in on far away subjects or
zoom out for a wide angle shot.
The optical zoom is achieved by mechanically adjusting the
lens of the camera. The digital zoom enlarges or shrinks the
image using a software process.
When the zoom lever is pressed, the zoom bar appears on the LCD
monitor.
Press [W] to zoom out for a wide-angle shot.
Press [T] to zoom in for a telephoto shot.
When the optical zoom factor is at maximum, zooming stops temporarily. Press the [T] again, the
camera switches to the digital zoom automatically and zooming continues.
Digital zoom works by enlarging the center portion of an image through a software interpolation
process. The digital zoom is used to achieve magnification levels up to approx. 4 times.
Note: Digital zoom is unavailable when recording movies.
Zoom W button
(Thmbnail)
Zoom T button
(Digital zoom)

12
RECORDING
Using the Flash
Press the flash button cycles your camera through the various flash modes. A symbol appears on the
LCD screen to indicate the flash mode. The flash cannot be used when movie recording.
1. Set the camera to the Record mode.
• The flash function only used in still image shooting.
2. Press the
640
320
160
button to change the flash mode:
Display Option Description
640
320
160
A
Auto flash Flash fires automatically when shooting
conditions require extra lighting.
640
320
160
Red eye reduction
Flash strobes to let the subject’s eyes adjust
to the flash, then fires again to take the actual
image. The digital camera will detect the
subject brightness and use the flash only when
required.
640
320
160
Always on Flash fires every time you take a photo,
regardless of lighting conditions.
640
320
160
S
Slow sync Flash fires with a slow shutter speed.
640
320
160
Always off The flash never fires even in dark situation.
3. Shoot the image.
Note: The flash charging time may increase when the battery is low.
Using the Self-timer & Burst
Use the self-timer to set a delay from the time the shutter button is pressed to the time the image is
shot. Use the burst to record four continuous still images shooting.
1. Set the camera to the Record mode .
• This function only used in still image shooting.
2. Press the
640
320
160
button to change the settings:
Flash
Flash
Self-timer

13
RECORDING
Display Option Description
- Single shot Record a single image.
640
320
160
2
2-SEC The shutter release will be delay for 2
seconds.
640
320
160
10
10-SEC The shutter release will be delay for 10
seconds.
640
320
160
Double
Record two images in a shot after
pressing the shutter release button 10 and
12 seconds.
640
320
160
Burst For capturing 4 images in succession.
3. Shoot the image.
Each option automatically switches to single shot in the following situation:
• After each shot.
• When the mode switched.
• When the camera is turned off.
Note: When using the self-timer function, be sure to use a tripod or place the digital camera on a
level, stable surface.
Using the Macro mode
Your camera is equipped with a macro function that allows you to focus on very close subjects.
In macro mode you can focus on subjects 10 cm from the lens when in the maximum wide angle
(zoomed out) setting and 80 cm in the maximum telephoto (zoomed in) setting.
1. Set the camera to the Record mode .
• You can use the macro mode in still image shooting or movie
recording.
2. Press the
640
320
160
button to enter the macro mode.
• The macro mode icon (
640
320
160
) appears on the LCD monitor.
3. To leave the macro mode, press the
640
320
160
button again.
Note: Distances referred to measure the distance between the camera lens surface and the
subject.
Macro
640
320
160

14
RECORDING
RECORDING MOVIE CLIPS
Your camera can record movie clips with audio.
1. Set the camera to the Record mode .
• The LCD monitor displays the available recording time.
2. Press the shutter to start recording.
3. Press the shutter again to end recording.
• The camera will stop recording automatically when the
memory capacity has been reached.
Note:
• The voices of the movie clips are recorded from the microphone of the camera. Be careful to
avoid touching the microphone while recording.
• The White Balance is set and locked to the settings of the first frame.
• The voice will not be recorded when the zoom buttons are being pressed during movie.
VOICES RECORDING
You can record voices using this camera.
1. Set the camera to the Record mode .
• The LCD monitor displays the available recording time.
2. Press the shutter to start recording.
3. Press the shutter again to end recording.
• The camera will stop recording automatically when the
memory capacity has been reached.
Note: The voices are recorded from the microphone of the camera. Be careful to avoid touching
the microphone while recording.
SETTING THE RECORDING FUNCTIONS
Using the Scene Mode
You can select from various scene mode for specific shooting
conditions.
1. Set the camera to the Record mode .
• The scene mode function only used in still image shooting.
2. Press the
640
320
160
button to show the Scene Mode screen.
3. Use the arrow button to select a desired scene mode and press
the SET button to confirm the setting.

15
RECORDING
Display Option Description
640
320
160
Program All settings can be changed in this mode.
640
320
160
Portrait Blurring the background to focus on the subject.
640
320
160
Landscape Used for the wide scenic views.
640
320
160
Night Scene Shooting the subject while keeping the
background night scenery.
640
320
160
Kids Take a still image to capture moving kids.
640
320
160
Beach & Snow Used for the beach or snow scenes.
640
320
160
Backlight Shooting the image of backlight object by
changing metering.
640
320
160
Close-up Close-up shooting for small subject.
640
320
160
ID Photo Take an ID photo and print out on a postcard-
sized paper.
640
320
160
Fireworks Used for the fireworks scenes.
640
320
160
Sunset Enhance the red hue for recording sunset images.
640
320
160
Text Enhance the black & white contrast.
Setting the Resolution and Quality
You can select lower image resolution and quality to decrease the image size to capture more images.
Choose a suitable setting according to the desired image quality and purpose.
Resolution
Option Description
5M
640
320
160
2592x1944 pixels
3:2
640
320
160
2560x1712 pixels
4M
640
320
160
2272x1704 pixels
3M
640
320
160
2048x1536 pixels
2M
640
320
160
1600x1200 pixels
VGA
640
320
160
640x480 pixels

16
RECORDING
Quality
Option Description
640
320
160
Stores the image with an extremely low compression.
640
320
160
Stores the image with a low compression.
640
320
160
Stores the image with normal compression.
Setting the Movie Size
Movie clips can be shot with different size.
Option Description
640
640
640
320
160
640x480 - Suitable for viewing on TV.
640
320
320
320
160
320x240 - Suitable for viewing on PC.
640
320
160
160
160 160x128 - Suitable for attaching to e-mails or using in websites.
Setting the Stabilizer
Use this function to create smooth, gliding shots when you’re walking or moving around, reducing the
camera shakes. It only works when the memory card has been inserted and the camera is ensured to
set in video mode.
Option Description
Off Turn off the frame stabilizer.
On Helps you to prevent camera shake. When you turn on this function, the
frame range becomes narrow and preview frames may not display smoothly.
Setting the White Balance
Adjust the white balance to match different light sources such as sunlight, incandescent (tungsten)
lighting or, fluorescent lighting.
Option Description
640
320
160
AUTO
Automatically corrects white balance. Ideal for general photography.
640
320
160
Adjusts for bright sun conditions, or natural light conditions.
640
320
160
Adjusts for cloudy days or twilight conditions
640
320
160
Adjusts for normal indoor lighting conditions. Corrects the orange hue of
household light bulbs. Ideal for indoor photos under tungsten or halogen
lighting without a flash.
640
320
160
/
640
320
160
Adjusts for fluorescent lighting. Corrects the green hue of fluorescent lighting.
Ideal for indoor photos under fluorescent lighting without a flash.
640
320
160
For more accurate adjustment or when the light source cannot be specified.
Note: Point the camera at a white piece of paper or similar object under the lighting conditions
for which you want to set the white balance, and then press the SET button.

17
RECORDING
Setting the ISO
With the initial settings, the ISO sensitivity is automatically set according to the brightness of the
subject.
Option Description
Auto Sets the ISO sensitivity automatically.
ISO 50 Sets the sensitivity to ISO 50 equivalent.
ISO 100 Sets the sensitivity to ISO 100 equivalent.
ISO 200 Sets the sensitivity to ISO 200 equivalent.
Note: Higher ISO speeds increase the image noise. To take clean images, use as low an ISO
speed as possible.
Setting the Exposure
Set the exposure value manually to compensate for unusual lighting conditions such as indirect indoor
lighting, dark backgrounds, and strong backlighting.
Setting the Metering
There are 3 different light metering options available on your camera.
Option Description
640
320
160
Light is measured from the entire shooting screen, but gives more importance
to the values near the center.
640
320
160
Selects an exposure based on readings from multiple points in the subject
area
640
320
160
Selects an exposure based on a single reading taken from the center of your
picture.
Setting the Sharpness
You can select whether you want the image to have sharp or soft outlines.
Option Description
640
320
160
The edges of the image are emphasized. The edges will become sharp, but
noise may occur in the recording image.
640
320
160
The edges of the image are sharp. This is suitable for printing.
640
320
160
The edges of the image are softened. This is suitable for editing images on
PC.

18
RECORDING
Setting the Photo Effect
You can add special effects to your images in Record mode.
Option Description
Off No effect is added to the image.
B&W Convert image to black & white.
Sepia Recorded image will be stored in a sepia tone.
Neg. Art Opposite what they were in the original image.
Red The image becomes reddish.
Green The image becomes greenish.
Blue The image becomes bluish.
Setting Date Stamp
The Date Stamp function can be used to add a date to your pictures as you take them.
Option Description
Off Do not add the recorded date & time to printed images.
Date Only add the recorded date to printed images.
Date & Time Add the recorded date & time to printed images.

19
PLAYBACK
PLAYBACK
PLAYING BACK IMAGES
1. Set the camera to the Playback mode .
2. Press
640
320
160
to play back the previous image; press
640
320
160
to play back the next image.
Hint: Holding down
640
320
160
or
640
320
160
scrolls images in a high speed.
Using the Thumbnail
When in Playback mode, you can view all your stored images in thumbnail format.
1. Set the camera to the Playback mode .
2. Press the zoom lever [W], a thumbnail screen is displayed.
3. Use the arrow button to select the desired image, and press [T]
or the SET button to show the selected image in full screen.
Magnifying and Trimming Still Images
1. Set the camera to the Playback mode.
2. Press
640
320
160
or
640
320
160
to select the image that you want to magnify or
trimming.
3. Press [T] to magnify the image, and the central portion of the
image is displayed. You can use the arrow button to view
different parts of the magnified image.
• Press the MENU button to return to the normal size.
4. Press the SET button to set the image trimming.
5. Press the SET button again to trim the selected image and save
it as a new one.
• Press the MENU button to cancel it.
NOTE: Only still images can be magnified and trimmed.
Playing Back Movie Clips
1. Set the camera to the Playback mode .
2. Press
640
320
160
or
640
320
160
to select the movie clip that you want to playback.
3. Press the SET button to start the movie.
• The movie clip will play on the LCD monitor.
4. Press the MENU button to stop the movie, or press the SET button to pause the movie.
• When movie clip paused, press the SET button again to resume.
Table of contents
Other Jenoptik Digital Camera manuals

Jenoptik
Jenoptik Jendigital JD 1300 ds User manual

Jenoptik
Jenoptik JD4.1 User manual

Jenoptik
Jenoptik B3LCD User manual

Jenoptik
Jenoptik JDC 3.0S User manual

Jenoptik
Jenoptik JD 1300F User manual

Jenoptik
Jenoptik 10.0z3 EasyShot User manual

Jenoptik
Jenoptik JD 4.1Z8 User manual

Jenoptik
Jenoptik JD 2100m User manual

Jenoptik
Jenoptik JD C3.1z3 User manual

Jenoptik
Jenoptik JD210F User manual


Popular Digital Camera manuals by other brands


 function instruction manual")
Canon
Canon EOS 77D Wi-fi (wireless communication) function instruction manual

HP
HP M415 user manual

Polaroid
Polaroid PDC 3050 Betriebsanleitung

Nikon
Nikon CoolPix 800 user guide

Panasonic
Panasonic Lumix DMC-FZ60 Operating instructions for advanced features

Konica Minolta
Konica Minolta AUTOREFLEX T4 manual