4
UK
N
DK
FIN
JENSEN AQTIVE I
INTRODUCTION
Congratulations on choosing a Jensen Aqtive I moving bed. We hope that it
will provide you with good sleep and rest for many years to come. Please
read the instructions carefully before you assemble/install the bed.
WARRANTY
Jensen Aqtive I beds have a ve-year warranty covering normal use. A
receipt showing the date of purchase serves as your warranty certicate.
If there are any faults or operational problems, please contact the store
where you purchased the bed. Please mention the motor’s item no. and date
(Figure 7).
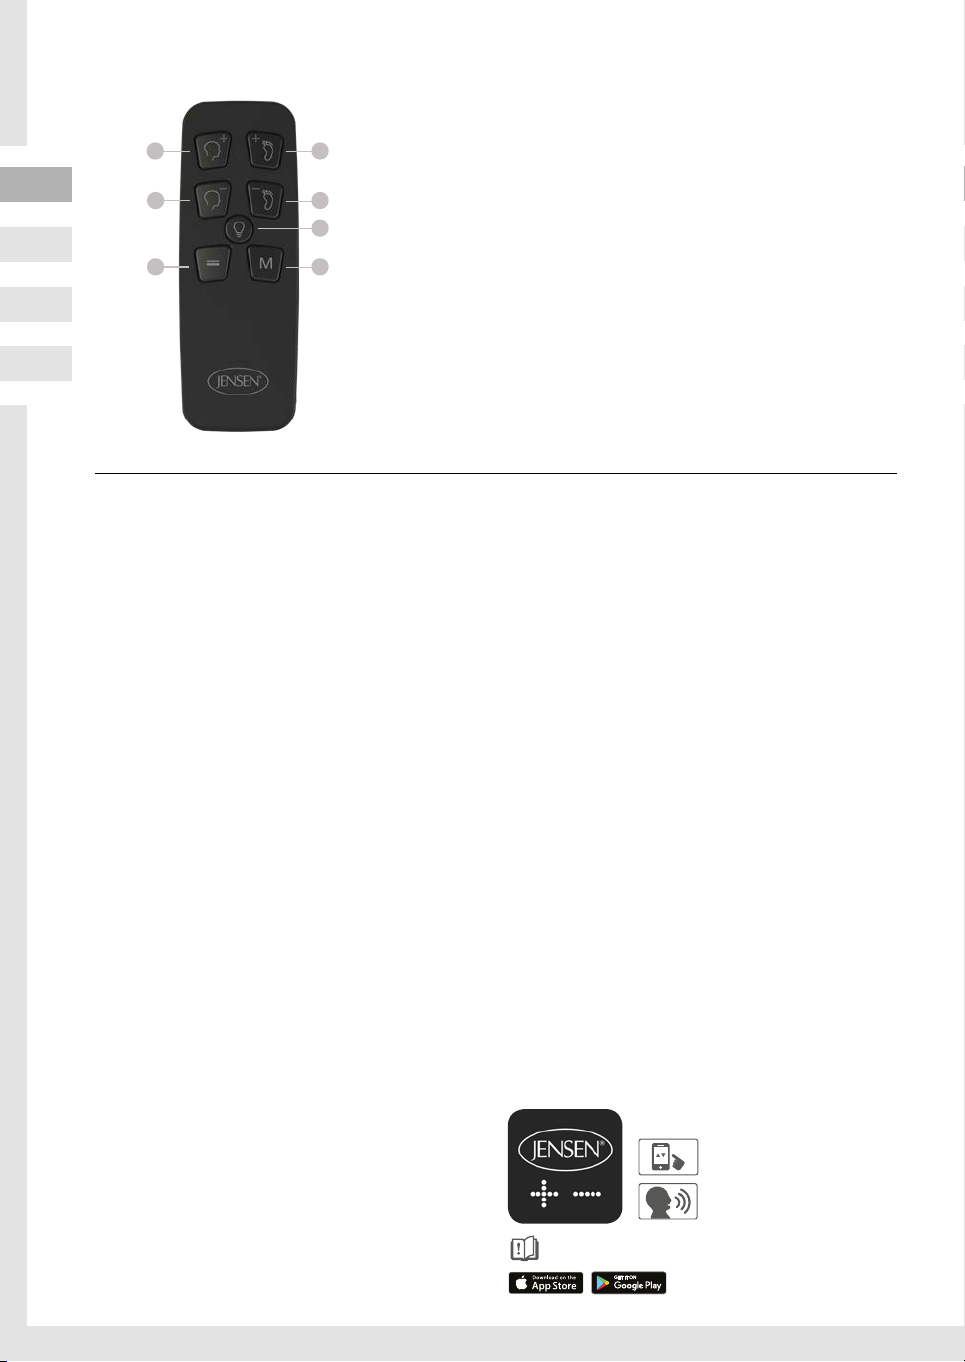
USING THE REMOTE CONTROL
3You use the remote control to control the bed’s movements.
List of remote control functions:
ASSEMBLING/STARTING TO OPERATE THE BED
Check that all the parts have been supplied by referring to the list on page 2
of the brochure.
1. Lay the mattress upside down on the oor (Figure 1).
2. Then lay the frame on top of the mattress (Figure 1).
3. Secure the frame to the underside of the mattress using 4+4 screws
(Figure 2-3).
4. Secure the mattress to the side of the frame using two brackets and
screws (Figure 4).
5. Cut the plastic straps on the frame.
6. Fit the legs to the corner attachments on the lower frame (Figure 5).
7. Connect the supply cable to the motor. Wait to connect the motor to a
socket (Figure 6).
8. Connect the supply cable and power cable to the power adapter.
9. Place the bed on its legs.
10. If you have a Seamless cover, put this on now. Refer to the separate
assembly instructions for this.
11. The main mattress may have shifted inside the cover in transit and
may need to be adjusted. Make sure that the corners of the cover are
rmly pulled into place.
12. The main mattress is loose inside the cover. To ensure that you get
many years’ use from your mattress, we recommend that you turn it
regularly (preferably four times a year).
SETTING THE REMOTE CONTROL FOR THE BED
1. Insert the plug into the wall socket. The motor will now go into
pairing mode and the light under the motor will begin to ash.
Pairing mode lasts three minutes.
2. Press the “head +” and “feet +” buttons down simultaneously for
about three seconds until a short, steady light appears under the
motor. The motor and remote control are now paired.
ELECTRICAL DATA
Power supply: 230 V AC 50/60 Hz.
Standby power: Max. 0.1 W.
MEMORY
1. Put the bed into the position that you want to store in the memory.
2. Hold down the memory button, “M”, for at least three seconds. Your
favourite position is now stored in the memory.
3. If you quickly press “=”, the bed moves into a at position.
4. If you press the Memory button again, the bed moves into your stored
position.
UNDER-BED LIGHT
Press the “light bulb” icon to turn the light off or on.
SIMULTANEOUS OPERATION OF TWO BEDS
If you want to operate two beds simultaneously, you can buy a pairing cable
separately or download APP (smartphone).
BATTERY IN REMOTE CONTROL IS FLAT
Undo the screw keeping the battery compartment closed. Replace the battery
(CR 2032) and close the cover again.
TROUBLESHOOTING
If you cannot adjust the bed, do the following:
• Check that the plug has been properly inserted into the mains sockets
(wall, power adapter and motor).
• Check the battery in the remote control and replace it, if necessary.
• Remove the plug from the wall, if necessary, wait for 10 minutes and
then insert it in again.
• Reset the remote control; see the separate section.
• Check whether the motor is working with APP (smartphone).
• Do not open the motor or electrical components yourself. The
manufacturer waives all liability if these actions are carried out by
an unauthorised person. New components should be supplied by an
authorised supplier.
NOISE
An adjustable bed is not silent. The noise coming from the bed may be
amplied by the acoustics of the room it is in.
POWER FAILURE
If the bed is in a raised position when the power failure occurs: Disconnect
the plug from the wall. Loosen the Allen key from the motor. Wind down the
head end and foot end separately (Figure 8).
USING THE BED
The bed’s lifting motors are not intended for continual operation. Reliable
operation and a normal service life can be achieved when the motors do not
run for more than two minutes during a period of 18 minutes. Exceeding this
limit will shorten the product’s service life.
The bed is designed to be able to support a person weighing up to 150 kg,
naturally distributed across the entire bed from head end to foot end. It is
important that you do not sit on the bed’s head end or foot end while the bed
is in a raised position or being moved.
Exceeding these limits will damage the product and void the warranty.
NB!
If used carelessly, items may become trapped by the bed’s moving
parts. You should therefore keep the remote control out of the reach
of children!
1 3
2 4
6 7
5
1. Head up
2. Head down
3. Foot up
4. Foot down
5. Under-bed light
6. Flat position
7. Memory
With our app for adjustable beds
you can easily find and store your
favourite position.
Adjust the bed position by
using voice control.
JENSEN ADJUSTABLE SLEEP APP
www.jensen-beds.com/assembly-usage