Jensen JiSS-85 User manual

OWNER'S MANUAL
JiSS-85
®
(iPod Not Included)
SERVICE
12
SPECIFICATIONS
DOCKING AM/FM SHOWER RADIO WITH LCD CLOCK For iPod
Power Requirement
Battery operation : 4 x 1.5V "C" (UM-2) Batteriesor
DC input : DC 8V, 1000mA
Battery back upfor clock : 1 x 1.5V(G13)Button Cell
Frequency Range
Radio : AM 530 -1710kHz
FM 88 -108Mhz
Please refer to the instructions on the enclosed warranty card for returning your unit for service. When
returning the unit, please remove batteries to prevent damage to the unit in transit and/or from possible
leakage. We are not responsible for batteries returned with the product or for the cost of replacement.
Distributed by:
SPECTRA Merchandising International, Inc.
Chicago Industry Tech Park
4230 North Normandy Avenue
Chicago, IL 60634, U.S.A.
Please have model number ready, for Customer Service, call 1-800-777-5331.
*The specification and external appearance of the set are subject to change without prior notice.*
.
jiss-85 STD IB
folder size: 148.5 x 210mm
use 3pages 297 X 210mm total 12pages
80g paper BK+BK white background on black text 2008.01.02
Printed in China

2
®
DEAR JENSEN CUSTOMER
IMPORTANT SAFETY INSTRUCTIONS
COMPLIANCE WITH FCC REGULATIONS
PRODUCT FEATURES
INSTALLATION
LOCATION OF CONTROLS
RADIO OPERATIONS
®
iPod DOCKING
AUXILIARY INPUT
CLOCK SETTINGS
CARE AND MAINTENANCE
SPECIFICATIONS
SERVICE
TROUBLESHOOTING GUIDE
TABLE OF CONTENTS
3
4
5
6
6-7
8
9
9
10
10
10
11
12
12
Selecting fine audio equipment such as the unit you've just purchased is only the start of your musical
enjoyment. Now it's time to consider how you can maximize the fun and excitement your equipment offers.
This manufacturer and the Electronic Industries Association's Consumer Electronics Group want you to get
the most out of your equipment by playing it at a safe level. One that lets the sound come through loud and
clear without annoying blaring or distortion and, most importantly, without affecting your sensitive hearing.
Sound can be deceiving. Over time your hearing "comfort level" adapts to higher volumes of sound. So what
sounds "normal" can actually be loud and harmful to your hearing. Guard against this by setting your
equipment at a safe level BEFORE your hearing adapts.
To establish a safe level:
Start your volume control at a low setting.
Slowly increase the sound until you can hear it comfortably and clearly, and without distortion.
Once you have established a comfortable sound level:
Set the dial and leave it there.
Taking a minute to do this now will help to prevent hearing damage or loss in the future.After all, we want
you listening for a lifetime.
We Want You Listening For a Lifetime
Used wisely, your new sound equipment will provide a lifetime of fun and enjoyment. Since hearing damage
from loud noise is often undetectable until it is too late, this manufacturer and the Electronic Industries
Association's Consumer Electronics Group recommend you avoid prolonged exposure to excessive noise.
Customer's Record:
The serial number of this product is found on its bottom cover. You should note the serial number of this unit
in the space provided as a permanent record of your purchase to aid in identification in the event of theft of
loss.
Model Number: JiSS-85 Serial Number:
®
DEAR JENSEN CUSTOMER
3
®® ® ®
iPod , iPod mini, iPod nano , iPod shuffle,iPod classic and iPod touch are trademarks of Apple
Computer Inc.,registered in the U.S. and other countries.

4
IMPORTANT SAFETY INSTRUCTIONS
THE IMPORTANT SAFETY INSTRUCTIONS SHALL INCLUDE, AS APPLICABLE TO THE APPLIANCE,
STATEMENTS THAT CONVEY TO THE USER THE INFORMATION ITEMIZED IN THIS PARAGRAPH:
1.Read these instructions - All the safety and operating instructions should be read before the appliance is
operated
2.Keep these instructions - The safety and operating instructions should be kept for future reference.
3.Heed all warnings - All warnings on the appliance and in the operating instructions should be adhered to.
4.Follow all instructions - All operation and use instructions should be followed.
5.Clean only with dry cloth - The appliance should be cleaned only as recommended by the manufacturer.
6.Do not block any ventilation openings. Install in accordance with the manufacturer's instructions. - The
appliance should be situated so that its location or position does not interfere with its proper ventilation.
For example, the appliance should not be situated on a bed, sofa, rug, or similar surface that may block
the ventilation openings; or placed in a built-in installation, such as a bookcase or cabinet that may
impede the flow of air through the ventilation openings.
7.Do not install near any heat sources such as radiators, heat registers, stoves or other apparatus
(including amplifiers) that produce heat.
8.Do not defeat the safety purpose of the polarized or grounding-type plug. A polarized plug has two blades
with one wider than the other. Agrounding type has two blades and a third grounding prong. The wide
blade or the third prong are provided for your safety. If the provided plug does not fit into your outlet,
consult an electrician for replacement of the obsolete outlet.
9.Only use attachments / accessories specified by the manufacturer
10.Use only with the cart, stand, tripod, bracket, or table specified by the
manufacturer, or sold with the apparatus. When a cart is used, use caution
when moving the cart/apparatus combination to avoid injury from tip-over.
11.Unplug this apparatus during lightning storms or when unused for a long
periods of time.
12.Power Sources - The appliance should be connected to a power supply only
of the type described in the operating instructions or as marked on the appliance. Do not overload wall
outlet.
13.Wall and Ceiling Mounting - The appliance should be mounted to a wall or ceiling only as recommended
by the manufacturer.
14.Object and Liquid Entry - Care should be taken so that objects do not fall and liquids are not spilled into
the enclosure through openings.
15.Refer all servicing to qualified service personnel. Servicing is required when the apparatus has been
damaged in any way, such as power-supply cord or plug is damaged, liquid has been spilled or objects
have fallen into the apparatus, the apparatus has been exposed to rain or moisture, does not operate
normally, or has been dropped.
16.Servicing - The user should not attempt to service the appliance beyond that described in the operating
instructions. All other servicing should be referred to qualified service personnel.
5
This device complieswith Part 15of the FCCRules. Operation issubject to thefollowing two
conditions:
(1) this devicemay not causeharmful interference, and
(2) this devicemust accept anyinterference received, includinginterference that maycause
undesired operation.
NOTE : This equipment has been tested and found to comply with the limits for a Class B digital
device, pursuant toPart 15 ofthe FCC Rules.These limits are designed to provide reasonable
protection against harmfulinterference in aresidential installation. This equipment generates,
uses and canradiate radio frequencyenergy and, ifnot installed andused in accordancewith the
instructions, may causeharmful interference toradio communications. However, there isno
guarantee that interferencewill not occurin a particularinstallation. If thisequipment does cause
harmful interference toradio or televisionreception, which canbe determined byturning the
equipment off and on, the user is encouraged to try to correct the interference by one or more of
the following measures:
- Reorient orrelocate the receivingantenna.
- Increase theseparation between theequipment and receiver.
- Connect theequipment into anoutlet on acircuit different from that to which the receiver is
connected.
- Consult thedealer or anexperienced radio/TV technicianfor help.
CAUTION:Changes ormodifications not expresslyapproved by theparty responsible for
compliance could voidthe user's authorityto operate theequipment.
COMPLIANCE WITH FCC REGULATIONS

PRODUCT FEATURES
INSTALLATION
6
JiSS-85 is ashower radio withdocking for iPodwhich incorporates thefollowing features:
st rd
- iPod, iPodmini, iPod 1 to 3 Gen nano, iPodclassic and iPodtouch Player /Recharger
- 2 BandRadio Receiver AM/FM band
- Build-in auxiliarycable to playmusic from MP3Player
- LCD displayfor Digital Clock
- Stereo HeadphonesJack for privatelistening
Clock Battery Installation
1.Open thefront iPod dockingCOMPARTMENTDOOR.
2.Lift upthe clock batterycover.
3.Remove theplastic battery insulationtab to activatethe 1.5V (G13),button cell (included).
4.Replace theclock battery (G13)when the clockdisplay becomes dim.
Main Batteries Installation
1.Open thebattery compartment doorlocated at thebottom of theunit.
2.Install 4x DC1.5V 'C'(UM-2) batteries (notincluded) in thebattery compartment followingthe
polarity markings shownon it.Alkaline batteries arerecommended.
3.Replace thebattery door onthe battery compartment.
NOTE:
1. In orderto operate theunit on batterypower the DCplug must bedisconnected from the
DC socket onthe back cabinet.
WARNING:
- Be sure thatthe batteries areinstalled correctly. Wrong polarity may damage the unit.
- Do not mixold and newbatteries.
- Do not mixalkaline, standard (carbon-zinc)or rechargeable (nickel-cadmium)batteries.
- Only batteries ofthe same orequivalent type asrecommend are tobe used.
- If the unitis not tobe used foran extended periodof time, removethe battery.
- Do not disposeof batteries infire, batteries mayexplode or leak.
INSTALLATION
7
AC Adaptor Connection
This unit mayalso be usedwith the included AC adaptor.
You can charge youriPod only when using the AC adaptor.
1. Firmly insertthe DC plugof the adaptor(included) into theDC Jack onthe back ofthe unit.
2. Plug theadaptor's ACplug into yourhousehold ACpower outlet (120VAC/60Hz). When the AC
adaptor is connectedto the DCJack the batteriesare automatically disconnected.
Warning: To avoid the risk of electric shock, batteries should only be used when operating this
unit in the bathroom or shower. Never use the AC adaptor when operating this unit near water.
Mounting
1.Use therope provided forhanging of theunit.
2.The detachablestand (included) canbe used fordesktop application.
CAUTION ON SPLASH RESISTANT:
This unit hasbeen constructed toresist mild steamand light splashesfrom the shower
or bath only. It should not be operated under running water and under no circumstances
should it befully immersed inwater.

8
LOCATION OF CONTROLS
Front View (Door Close) Front View (Door Open)
Rear View
1.FUNCTION SELECTOR: POWER OFF; Select iPod/ RADIO/ AUX modes.
2.AM/FM RADIOBAND SELECTOR: Select between FM STEREO/FM(mono)/AM.
3.VOLUME DIAL:Adjust the volumelevel up ordown.
4.TUNING DIAL:Adjust the radiochannel frequency upor down.
5.iPod PLAY/PAUSE BUTTON
6.iPod SKIP/ SEARCH FORWARD BUTTON
7.iPod SKIP/ SEARCH BACKWARD BUTTON
8.LCD DISPLAY
9.TIME SET BUTTON: Select clock setting mode.
10.HOUR BUTTON: Set hour value of clock.
11.MINBUTTON: Set minute valueof clock.
12.iPod DOCKINGCOMPARTMENT
13.COMPARTMENT DOOR LOCK
14.SPEAKERS
15.iPod DOCKINGCONNECTOR
16.AUX IN ---- An Audio Cable with a 3.5mm stereo plug for the connectionof external audiodevice.
17.FOLDING PLATFORM ---- A sitting platform for the external audio device.
18.CLOCK BATTERY COMPARTMENT
19.DC JACK ---- To connect to external DC power supply.
20.STEREO HEADPHONESJACK
21.MAIN BATTERY COMPARTMENT ---- To install main batteries for the Radio / Speaker operation.
22. DETACHABLE STAND ---- A plastic stand for the desk top sitting.
23.ROPE HOLDER ----For attaching hanger rope.
9
RADIO OPERATIONS
1.Slide theFUNCTION selector to Radiomode.
2.Slide the AM/FM BAND selector to selectdesired radio band.
3.Rotate theTUNING dial until thedesired broadcasting isreceived.
4.Rotate theVOLUME dial to adjustthe sound level.
REMINDER :
Make sure theFUNCTION selector at OFFposition when theradio is notin use.
TIPS FOR THEBEST RECEPTION :
Toobtain the bestAM/FM reception,slightly rotate theunit until theclearest signal isreceived or
place it nearoutdoor.
NOTE :
(1) When weakFM radio signalis received, theunit will automaticallyswitch to FMmono mode
even if the BAND selector is setat the FMstereo position.
(2) The iPod may cause interference to the AM reception if it is docked and turned ON. You should
turn off the iPod manually or remove it from the unit for better reception.
(3) Due to theuse of highefficiency AC adaptor in this product, it may cause some interference to
AM radio.We strongly recommend you use battery when listening to AM.
IPOD DOCKING
®
1.Release theiPod DOCKING COMPARTMENT DOOR LOCK.
2.Open thecompartment door.
3.Insert youriPod with itsconnector faced downwardand directly overthe dock connector inside
the compartment.
CAUTION : Pleasebe careful whenseating the iPodinto the dockingto avoid damagingthe
30-pin connector oniPod or thedocking system.
4.Close andlock the compartmentdoor.
5.Slide theFUNCTION selector to iPodposition. The iPod will start playing automatically.
6.Rotate theVOLUME dial to adjustvolume to yourdesired level.
NOTE : Thevolume level cannotbe adjusted bythe volume ofyour iPod afterbeing docked.
7.The iPodis charging evenin playback state.
NOTE : TheiPod recharge functionoperates in iPodand AUXmodes when theunit is
powered by externalAC adaptor. When theunit is operatedby the mainbattery
alone, the iPodrecharge function disabled.
8.To remove theiPod from theunit, press andhold the PLAY/PAUSE button for threeseconds
to switch off the deviceand then gentlytake the deviceout.
You may control the playback of your iPod by :
- Press thePLAY/PAUSE button to pauseor resume theiPod playback.
- Press theSKIP/SEARCH FORWARD or BACKWARD button to skipto next orprevious
song.
- Press andhold the SKIP/SEARCH FORWARD or BACKWARD button for fast-forwarding
or fast-rewinding duringplayback.
NOTE : To avoid water damage inside the docking compartment or water damage to your iPod,
please make sure your hands are dry and you only open the docking compartment when
you are not near water. It is important to tightly lock the compartment door properly
before using near water.
1
2
34
56
7
8910 11
12
13
14 14
15
16
18
17
19
20
2122
23

10
AUXILIARY INPUT
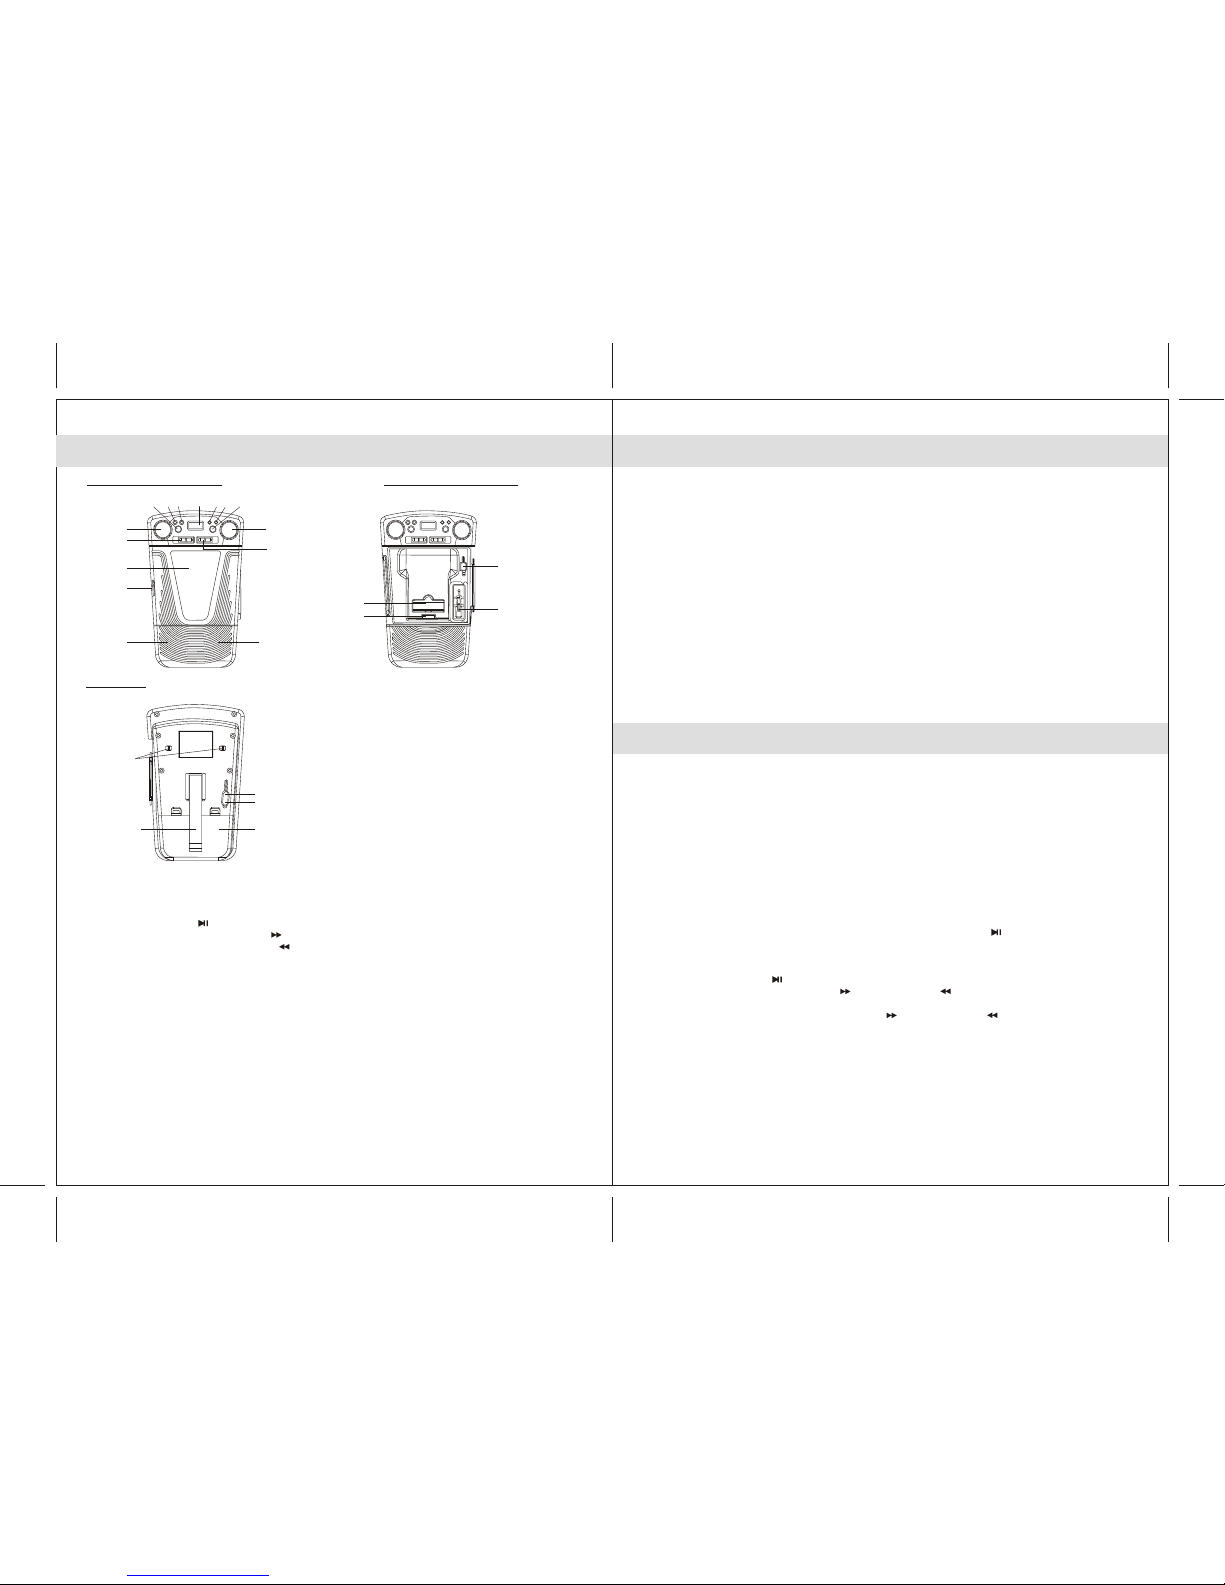
The auxiliary inputcable and plugare built inthe unit andallows users toconnect their MP3player
or other digitalaudio player tothe docking system.
1.Release theiPod DOCKING COMPARTMENT DOOR LOCK.
2.Open thecompartment door.
3.Take out theAUX IN stereo plug andunwire theAUX cable fromthe bobbin.
4.Connect theAUX IN stereo plug to the line-out jack or headphone jack of an externalaudio device.
5.Switch onthe external audiodevice.
6.Slide theFUNCTION selector toAUX position.
7.Rotate theVOLUME dial to adjustvolume level.
8.Fold down the FOLDING PLATFORM and sit theexternal audio deviceon the platform.
9.Close andlock the compartmentdoor.
NOTE: 1. If youconnect the line-outjack of yourexternal device thenyou only needto adjust the
volume control ofthis unit. Ifyou connected theheadphone jack ofyour external device
then you mayneed to adjustboth the volumecontrol of yourexternal device andthe
volume control ofthis unit tofind the mostdesirable volume setting.
2. Slide theFUNCTION selector to OFF position turning off the unit when you finish
listening. Don't forgetto switch off the power of your externaldevice as well.
3. To avoid water damage inside the compartment or damage to your digital audio player,
please make sure your hands are dry and you only open the compartment when you are
not near water. Tightly lock the compartment door properly before using near water.
CLOCK SETTINGS
1.Press andhold the TIME SET button then pressthe HOUR button to sethour.
2.Press andhold the TIME SET button then pressthe MIN button to setminute.
3.After theclock time isset, release theTIME SET button.
CARE ANDMAINTENANCE
•Do not subject the unit to excessive force, shock, dust or extreme temperature.
•Do not tamper with the unit's internal components.
•Clean your unit with a damp (never wet) cloth. Solvents or detergents should never be used.
•Avoid leaving your unit in direct sunlight or in hot, humid or dusty places.
•Keep your unit away from heating appliances and sources of electrical noise such as fluorescent lamps or
motors.
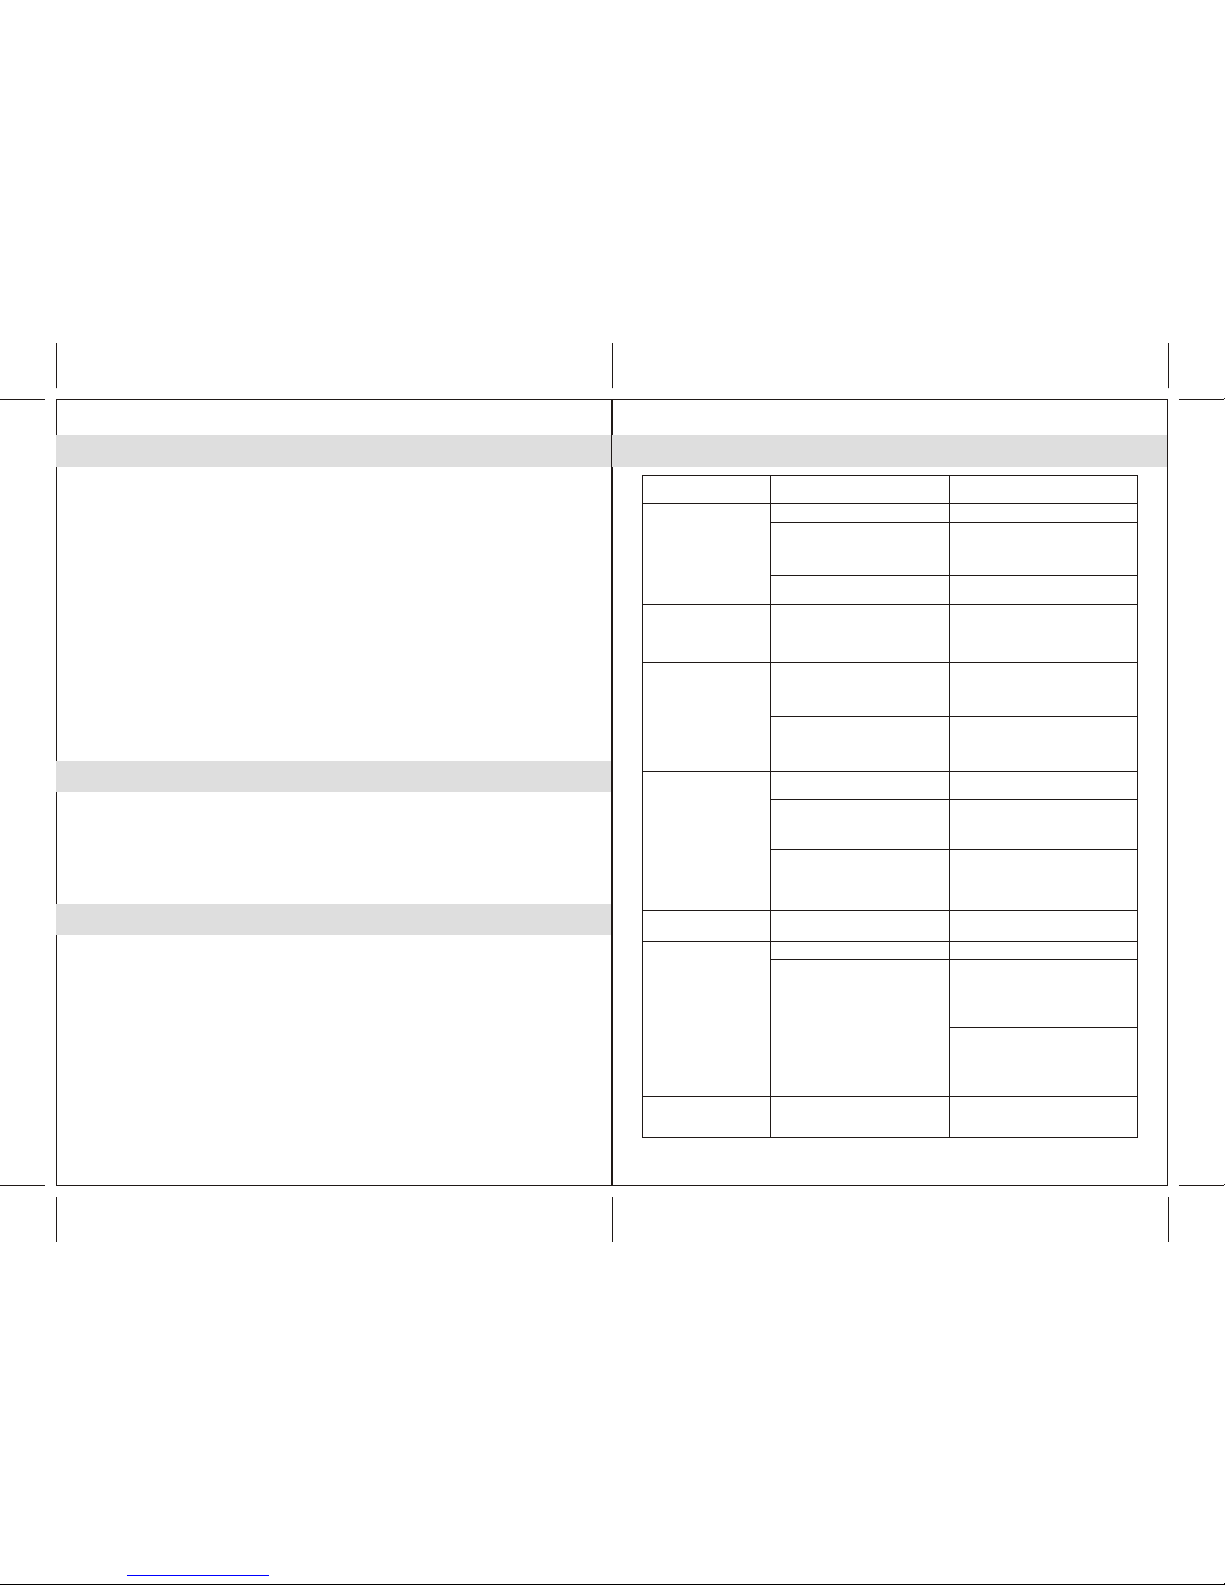
Symptom Possible Problem Solution
The unit does
not respond (no power)
Batteries are exhausted. Replace the batteries.
Wall outlet is not functioning. Plug another device into the same
outlet to confirm the outlet is working.
iPod does notinstall properly. Remove your iPod from the dock
and check for obstruction on the
connectors in the dock and on your
iPod. Then reseat it in the dock.
iPod does not
dock properly
iPod does not respond
to the speaker system
Remove your iPod from the dock
and check for obstruction on the
connectors in the dock and on your
iPod. Then reseat it on the dock.
Please make sure that your iPod is
working properly before docking into
the unit. Please refer to your iPod
manual for details.
iPod is not installed properly.
Your iPod is locked up.
Use AC adaptor for iPod charging at
dry location.
Please make sure your iPod is
working properly before docking into
the unit. Please refer to your iPod
manual for details.
Unit is powered by batteries.
iPod is locked up/ frozen.
iPod battery has problem.
iPod does not
charge up
Slightly rotate the unit for the best
reception.
The reception at the set location is
poor.
AM band is too noisy
Decrease the volume.Volume level is set too high.
If the iPod original sound source is of
poor quality, distortion and noise are
easily noticed with high-power
speakers. Try a different audio source
such as a music CD.
If you are using an external sound
source like older generation of iPod,
try reducing the output volume on the
device itself. Also try turning bass
boost OFF or change the EQ setting.
Sound source is distorted.
Sound is distorted
Turn the unit off for a period of time or
lower volume.
This is normal.
Unit gets warm after
extended play at
high volume
TROUBLESHOOTING GUIDE
11
AC Adaptor is not plugged into a
wall outlet or the connector is not
plugged into the power supply jack
on the back of the unit.
Plug the AC adaptor into a wall
outlet and plug the connector into
the supply jack on the unit.
Remove your iPod from the dock
and check for obstruction on the
connectors in the dock and on your
iPod. Then reseat it in the dock.
iPod is not installed properly.
Table of contents
Other Jensen Radio manuals

Jensen
Jensen JHD62 User manual

Jensen
Jensen SR-50 User manual

Jensen
Jensen JHD1130WP User manual

Jensen
Jensen BDSTEREO User manual

Jensen
Jensen SAB-55 User manual

Jensen
Jensen JHD922BT User manual

Jensen
Jensen Heavy Duty User manual

Jensen
Jensen JHD1510 - Heavy Duty AM/FM/Weather Band... User manual

Jensen
Jensen buddy dab User manual

Jensen
Jensen 29795 User manual

Jensen
Jensen JHD922BT User manual

Jensen
Jensen JHD1130 User manual

Jensen
Jensen JHD962BT User manual

Jensen
Jensen JEP-250 User manual

Jensen
Jensen FOX 1000I User manual

Jensen
Jensen JHD962BT User manual

Jensen
Jensen JHD22 User manual

Jensen
Jensen JCR-229 User manual

Jensen
Jensen JWM-120 User manual

Jensen
Jensen MCR-60 User manual