Jenx URBAN User manual

Note: Urban is an Prescribed Medical Device.
To be used only with the guidance of Therapist or Prescribing
Practitioner. Please read these instructions carefully before use.
All Users
GB
Section 2 Pages 9 - 18
Technical User Physiotherapist, Occupational Therapist.
Section 3 Pages 19 - 22
Home User Home or School Carer.
Section 4 Pages 23 - 27
Re-Issue Stores Personnel.
FOR FREE ADVICE ON THE USE OF THIS PRODUCT, PLEASE CONTACT OUR SALES SUPPORT TEAM
Jenx Limited, Wardsend Road, Sheffield, S6 1RQ. Tel: +44 (0)114 285 3376. Fax: +44 (0)114 285 3528. [email protected] www.jenx.com
1
Section 1 Pages 2 - 8
All Users Safety Information
URBAN
Instructions For Use
Urban offers supportive standing with an unrivalled range of adjustments.
Size 2
8 - 14 years
Max weight 55 Kg
Size 1
3 1/2 - 8 years
Max weight 35 Kg
Size 1A
6 - 14 years
Max weight 35 Kg
Ver; 003 JAN 2010 SPB

IMPORTANT SAFEGUARDS
FOR FREE ADVICE ON THE USE OF THIS PRODUCT, PLEASE CONTACT OUR SALES SUPPORT TEAM
Jenx Limited, Wardsend Road, Sheffield, S6 1RQ. Tel: +44 (0)114 285 3376. Fax: +44 (0)114 285 3528. [email protected] www.jenx.com
2
All Users
GB
Any service or repair carried out by persons other than a Jenx authorised service person will invalidate the
guarantee and Jenx can accept no liability for any injury or damage so caused.
Jenx Limited recommends that children are never left alone whilst using this Medical Device. Children may
slip or fall when left unattended and may suffer serious injury. It is the sole responsibility of the person
caring for a child using this Medical Device to ensure the safety of the child in the Device should they be left
alone.
Failure to follow instructions, especially with regard to moving parts may pose a risk to the user. Always read
instructions before use.
Do not use this product if you suspect it is faulty or broken.
Contact Jenx Limited immediately for advice. +44 (0) 114 285 3376
This product should be used on a level floor and never on raised or uneven surface.
Do Not use this product as a Mobility Device.
This product contains small parts which could present a choking hazard to small children.
All Jenx Limited products are tested to current fire regulations. Always keep products away from naked flames,
cigarettes and sources of heat. E.g. Radiators, Heaters etc.
Jenx supply tools to adjust certain products. The tools are supplied for adjustments to be made by the
therapist only. Store in a safe place. Keep Away from children.
Do Not make adjustments, other than instructed to do so.
Assemble product fully before use. Please contact Jenx Limited if you have any problems at this stage.
Look after your product well, clean regularly and do not use abrasive cleaners.
This product conforms to the European Medical Devices Directive. It has not been tested in conjunction with
other manufacturers products. Do not add any accessories other than Jenx Limited accessories to this
product.
If in doubt, contact us for advice. +44 (0)114 285 3376
When not in use store this product in a dry place that is not subject to extremes of temperature. E.g. Places
not to store this product are attics or garden sheds.
Ensure your Therapist has signed the inspection log as “Set Up” before using the product. If
this product has not been set up by your Therapist
DO NOT USE THE PRODUCT
All belts and harnesses should be used at all times. For therapy purposes it may be necessary to deviate from
this rule and any deviation should be fully documented as part of a Risk Assessment or Therapy Programme
and all relevant staff and carers appropriately trained. Secure client with straps before adjusting product.
Ensure finger‟s width between safety strap and client to prevent over tightening or client moving to
inappropriate position. Adjust straps for each client and changes of clothing. Minimum Velcro overlap: 3
inches (7.5cm) on all straps. If strap is not long enough, DO NOT USE PRODUCT

FOR FREE ADVICE ON THE USE OF THIS PRODUCT, PLEASE CONTACT OUR SALES SUPPORT TEAM
Jenx Limited, Wardsend Road, Sheffield, S6 1RQ. Tel: +44 (0)114 285 3376. Fax: +44 (0)114 285 3528. [email protected] www.jenx.com
3
All Users
GB
SAFETY LABEL
Each Jenx product has a pictorial safety label attached.
Refer to explanation below.
Warning / Attention.
Please read Instructions
Always fasten and adjust positioning straps and belts to suit the
child. Adjust to suit changes in clothing. Allow one fingers width
between the belt and the child.
DO NOT USE as a mobility device
Never use product on rough ground or uneven surface.
Only use indoors
Do not leave child unattended
Conforms to CE Marking Regulations
Medical Devices Directive (MDD) 93/42 EEC
Maximum user weight
Batch number
The Batch number is written on the fire
label (see picture below) which is located
on the inside of the product body. Or in
some instances on the underside of the
seat. Please quote this number on all
correspondence.
Batch Number or Serial Number
The Serial number is written on the silver
label (see picture below) which is located
on the frame of the product. Or in some
instances on the underside of the seat.
Please quote this number on all
correspondence.
Serial number

CARE AND CLEANING INSTRUCTIONS
4
Fabrics, Vinyl's and Cloth covers
1. Minor spills can be removed with kitchen roll and the area wiped with clean water.
2. Staining should be removed as quickly as possible after contact.
3. Do not rub, rubbing will spread the stain over a larger area and may distort the
surface texture of the fabric.
4. For water based spills such as food, drink and vegetable oils, blot up the spill by
applying pressure with non-coloured paper towels, tissues or dry absorbent cloths.
Soak a small piece of cloth in a solution of mild detergent and warm water (use
cold water for blood), using a small amount of the solution at a time and with a
dabbing or blotting motion, work inwards from the edge of the stain to prevent it
spreading. Do not over wet. Excessive soaking may cause rings on the surface
spreading the stain further and may also damage the fabric or foam.
5. This step may need to be repeated and is dependent on the nature of the stain and
the amount of staining present. Continue treatment until stain is removed, always
remembering to remove excess moisture from the fabric prior to the next
treatment.
6. Rinse by applying clear tepid water using a small piece of non-coloured sponge or
clean white cloth, again working inwards from the edge of the treated area.
7. Disinfectants which do not contain organic solvents may be used according to the
manufacturer‟s directions. Antibacterial spray or wipes can be used, be sure to dry
the product before use.
8. Do not soak the fabric.
9. Do not use organic solvents or dry cleaning fluids. Do not use abrasive cleaners.
10. For disinfectant purposes, a small quantity of household bleach diluted with water
(no more than 3% bleach) can be used, take care to rinse with water.
11. Do not use industrial bleaches such as Caustic Soda or Sodium Hypochlorite
12. Always ensure that the product is dry before use.
Wooden Products and Parts
1. For deep cleaning a low pressure Steam Cleaner can be used.
2. Do Not use solvents of any kind to clean Jenx Products.
3. Soap and water or antibacterial spray can be used.
4. Check for breaks or splintering of the wood before re-issuing.
5. Daily cleaning: Spray polish or wax polish can be used.
Metal Frames and Coated Parts.
1. For deep cleaning a low pressure Steam Cleaner can be used.
2. Do Not use solvents of any kind to clean Jenx Products.
3. Soap and water or antibacterial spray can be used.
4. Daily cleaning: wipe framework down with a damp cloth.
FOR FREE ADVICE ON THE USE OF THIS PRODUCT, PLEASE CONTACT OUR SALES SUPPORT TEAM
Jenx Limited, Wardsend Road, Sheffield, S6 1RQ. Tel: +44 (0)114 285 3376. Fax: +44 (0)114 285 3528. [email protected] www.jenx.com
All Users
GB

MAINTENANCE
Daily Checks of the equipment should be carried out by carers. These checks are
not technical but a basic understanding of the product is needed. Multiple daily
checks may be needed in schools or therapy rooms where the products are used by
multiple users.
Daily Checks
Replace any lost or worn washers or bolts.
Check tray for damage. Ensure that the tray edging is secure and that the tray
is clean and free of any rough or sharp corners.
Check all upholstery for any signs of wear and tear.
Brush Velcro® to remove fluff.
Check wooden parts for splitting or splintering.
Check straps for fraying and missing or broken buckles.
Clean any stains or spillages.
Contact Jenx Limited if any accessories not manufactured by Jenx Limited
have been attached to the product. Unauthorised accessories may affect the
safety of this product and invalidate your warranty.
We recommend that on a monthly basis a competent person who is familiar with
this piece of equipment and who has been trained in its use should carry out a more
detailed check
Monthly Checks
Check all nuts and bolts are secured and that none is missing.
Check all mechanical movements operate fully.
Check the structure of the product for signs of fatigue or splintering.
Castors: Lift base and check each wheel to ensure it is not loose or worn.
Remove any grease or dirt that has built up on the wheels, check that the
brake stops the wheels rotating (where applicable).
Check gas springs for creep by placing a weight on the chair at the highest
setting, (simulating the child) and leave for 1 hour. If the product has reduced
significantly in height contact our Customer Service Department for advice.
Please ensure the name of the therapist who recommended the equipment is noted
on the check/inspection log, along with the competent person who has been trained
in the use of the equipment. Please also ensure that this is updated for changes in
staff. Please note any “Set up” procedures should always be recorded.
5
FOR FREE ADVICE ON THE USE OF THIS PRODUCT, PLEASE CONTACT OUR SALES SUPPORT TEAM
Jenx Limited, Wardsend Road, Sheffield, S6 1RQ. Tel: +44 (0)114 285 3376. Fax: +44 (0)114 285 3528. [email protected] www.jenx.com
All Users
GB

6
PRODUCT INDUCTION and HAND OVER
This product is a Prescribed Medical device as such it is important that all users understand the
use and adjustments this product offers. This booklet shows the range of adjustments and gives
guidelines for each type of user to follow.
Technical users
This section refers to Physiotherapist, Occupational Therapist.
Ensure you read all sections in this booklet and are fully familiar with all adjustments.
As well as the selection, prescription and set up of the product to suit the child‟s needs.
The technical user has the responsibility for the induction of the Home User or Carer, ensuring
that the Home user has:
Familiarity with the product. What to use and what not to use.
Understanding of the care and cleaning procedures.
Understanding the safety aspects of the product.
A formal handover procedure should be adopted for this product. Use the recording sheet at the
rear of this booklet to record set ups and changes to the product.
Jenx Limited offer Product Courses for Technical Users please contact us for more information.
Home User
This section refers to Home or School Carer.
This product is a Prescribed Medical device it should only be used with the guidance of a
Physiotherapist or OT.
Do not perform any other adjustment than instructed to do so.
The Home User section of this guide gives the adjustments needed to aid the daily use only.
Any other adjustments are only to be preformed by the therapist.
Re-Issue
This section refers to Stores Personnel.
Stores personnel must follow the checks and maintenance guide before re issue. The MHRA
release regular bulletins regarding product updates and issues, these should be regularly
monitored.
Records should be kept on all products serviced or re-issued. Repairs or replaced parts
should be traceable.
The batch number identifier should always stay with the product and never be removed.
Instructions should always be issued with the product. Copies are available from Jenx
limited or can be downloaded from www.jenx.com
Technical users should always be informed when a product is issued to a home for set up
purposes.
If the product is to be redelivered ensure adequate and secure packaging is used.
If in any doubt to the safety of this product do not issue, contact Jenx Limited for advice.
Jenx Limited offer Stores Courses for Stores Personnel. The course gives guidance for:
Maintenance
Inspection the products
Regulatory information
Cleaning
Please contact us for more information.
FOR FREE ADVICE ON THE USE OF THIS PRODUCT, PLEASE CONTACT OUR SALES SUPPORT TEAM
Jenx Limited, Wardsend Road, Sheffield, S6 1RQ. Tel: +44 (0)114 285 3376. Fax: +44 (0)114 285 3528. [email protected] www.jenx.com
All Users
GB

SPECIFICATIONS
7
FOR FREE ADVICE ON THE USE OF THIS PRODUCT, PLEASE CONTACT OUR SALES SUPPORT TEAM
Jenx Limited, Wardsend Road, Sheffield, S6 1RQ. Tel: +44 (0)114 285 3376. Fax: +44 (0)114 285 3528. [email protected] www.jenx.com
All Users
GB
All measurements are in millimetres unless otherwise stated.
Jenx Ltd reserve the right to change specifications without prior notice.
Urban 1 Urban 1 A Urban 2
Height (From Footplate) 700-960 850-1080 980-1200
Hip Width 160-280 160-280 190-350
Chest Width 160-280 160-280 190-350
Hip Pad to Foot Plate 460-745 460-745 650-950
Knee Block to Foot Plate 180-405 180-405 200-510
Max Child weight 35 kg 35 kg 55 kg
Product weight 23 kg 23 kg 27 kg
Product Foot Print 630x580 630x580 630x580
Angle (Upright to Prone) 0-15° 0-15° 0-15°

8
WARRANTY
Jenx Limited warrants that the goods manufactured by Jenx
Limited will be free from defects in material and workmanship
for a period of 24 months* from the date of purchase.
Jenx Limited has sole obligation under this warranty to repair
or replace, at our discretion for any part or goods proving
defective within the terms of this period. The buyer must
provide immediate notice of the claimed defect.
Jenx Limited reserves the right to inspect the part or goods at
the buyer‟s premises.
In the event of an exchange or return, where a certain model
under this warranty is discontinued, Jenx Limited reserves the
right to replace with a new model of a similar quality and price.
The warranty does not cover the product for repair or
replacement due to failure or damage through; abuse, neglect,
accident, improper repair, exposure to corrosive or abrasive
material, weather, failure to follow care and cleaning
instructions or alterations or modifications carried out by any
person other than a Jenx Limited authorised person.
*For purchases placed on or after the 1st January 2006. Previous purchases will have 12 month warranty
from date of purchase
FOR FREE ADVICE ON THE USE OF THIS PRODUCT, PLEASE CONTACT OUR SALES SUPPORT TEAM
Jenx Limited, Wardsend Road, Sheffield, S6 1RQ. Tel: +44 (0)114 285 3376. Fax: +44 (0)114 285 3528. [email protected] www.jenx.com
All Users
GB

9
Technical User
GB
FOR FREE ADVICE ON THE USE OF THIS PRODUCT, PLEASE CONTACT OUR SALES SUPPORT TEAM
Jenx Limited, Wardsend Road, Sheffield, S6 1RQ. Tel: +44 (0)114 285 3376. Fax: +44 (0)114 285 3528. [email protected] www.jenx.com
Note: Urban is an Prescribed Medical Device.
To be used only with the guidance of Therapist or Prescribing
Practitioner. Please read these instructions carefully before use.
URBAN
Instructions For Use
Size 2
8 - 14 years
Max weight 60 Kg
Size 1
3 1/2 - 8 years
Max weight 35 Kg
Size 1A
6 - 14 years
Max weight 40 Kg
Section 2 Pages 9 - 18
Technical User Physiotherapist, Occupational Therapist.
Section 3 Pages 19 - 22
Home User Home or School Carer.
Section 4 Pages 23 - 27
Re-Issue Stores Personnel.
Section 1 Pages 2 - 8
All Users Safety Information

Assembly
10
Always secure the child by using all of the positioning straps and safety straps provided. Velcro
should overlap by at least 3 inches
(7.5 cm)
on all straps before you begin to make any other
adjustments. Ensure the safety strap and positioning strap are adjusted for each child and for
changes of clothing.
Technical User
GB
FOR FREE ADVICE ON THE USE OF THIS PRODUCT, PLEASE CONTACT OUR SALES SUPPORT TEAM
Jenx Limited, Wardsend Road, Sheffield, S6 1RQ. Tel: +44 (0)114 285 3376. Fax: +44 (0)114 285 3528. [email protected] www.jenx.com
Do not use this product if you suspect it is faulty or broken.
Contact Jenx Limited immediately for advice. +44 (0) 114 285 3376
Never Leave your child unattended while using this product
1. Fig 1. Shows the available adjustments.
Urban, a revolutionary new prone standing system, offering several new features. The
Urban provides solutions for many problems encountered when using traditional prone
standers. Offering a compact footprint, the Urban is ideal for use in homes and schools
where space is minimal. The Urban also uses contoured comfortable supports to aid
mid-line symmetry. The height adjustable tray is also removable enabling the user to
access other working surfaces whilst standing. Urban is suitable for children aged 3 ½ -
14. (depending on weight and size)
Tray Angle Adjustment
Angle Adjustment
Height
Adjustment
Lower Side Pads
Knee Blocks
Foot Sandals
Castor Brake
Upper Side Pads
Removable Bib
Fig 1
Knee Block Adjustment
Chest Pad

11
Technical User
GB
FOR FREE ADVICE ON THE USE OF THIS PRODUCT, PLEASE CONTACT OUR SALES SUPPORT TEAM
Jenx Limited, Wardsend Road, Sheffield, S6 1RQ. Tel: +44 (0)114 285 3376. Fax: +44 (0)114 285 3528. [email protected] www.jenx.com
Do not use this product if you suspect it is faulty or broken.
Contact Jenx Limited immediately for advice. +44 (0) 114 285 3376
Never Leave your child unattended while using this product
Main Areas of Adjustment
Always secure the child by using all of the positioning straps and safety straps provided. Velcro
should overlap by at least 3 inches
(7.5 cm)
on all straps before you begin to make any other
adjustments. Ensure the safety strap and positioning strap are adjusted for each child and for
changes of clothing.
POSITIONING SUGGESTIONS GIVEN IN THIS SECTION SHOULD BE TREATED AS A GUIDE ONLY. YOU SHOULD
ALWAYS CONSULT YOUR THERAPIST OR MEDICAL PRACTITIONER BEFORE USING THIS PRODUCT.
The side pads can be adjusted by height and depth Fig 2
1. Side pad depth adjustment, unscrew the thumb screw, adjust to suit and then screw
the thumb screw to finger tight.
2. Side pad height adjustment, unscrew the thumb screw, adjust to suit and then screw
the thumb screw to finger tight.
3. The lower side pads are adjusted in exactly as above.
4. The knee blocks are adjusted as follows, loosen the thumb screw and adjust the knee
block the desired angle, then tighten the thumb screw to finger tight.
Fig 2
2. Upper Side Pad
Height
1. Upper Side Pad
Depth
2. Lower Side Pad
Height
2. Lower Side Pad
Depth
3. Knee Block
Adjustment

12
Technical User
GB
FOR FREE ADVICE ON THE USE OF THIS PRODUCT, PLEASE CONTACT OUR SALES SUPPORT TEAM
Jenx Limited, Wardsend Road, Sheffield, S6 1RQ. Tel: +44 (0)114 285 3376. Fax: +44 (0)114 285 3528. [email protected] www.jenx.com
Making & Using the Adjustments
Do not use this product if you suspect it is faulty or broken.
Contact Jenx Limited immediately for advice. +44 (0) 114 285 3376
Never Leave your child unattended while using this product
Always secure the child by using all of the positioning straps and safety straps provided. Velcro
should overlap by at least 3 inches
(7.5 cm)
on all straps before you begin to make any other
adjustments. Ensure the safety strap and positioning strap are adjusted for each child and for
changes of clothing.
POSITIONING SUGGESTIONS GIVEN IN THIS SECTION SHOULD BE TREATED AS A GUIDE ONLY. YOU SHOULD
ALWAYS CONSULT YOUR THERAPIST OR MEDICAL PRACTITIONER BEFORE USING THIS PRODUCT.
Angle Adjustment
1. To adjust the angle of the Stander. Press the foot pedal, using the handles in front of the chest pad pull
the stander forward. The pedal can be flipped up out of the way when not in use.
2. Release the foot pedal when at desired angle
3. The tray can be angled to suit the stander position by loosening the tray angle thumb screws, position the
tray to the desired angle then tighten the thumb screws. (finger tight only)
Fig 5
Stander Angle Adjustment
foot pedal (Flip Away)
Fig 3
Fig 4
Maximum Angle - 15°

13
Technical User
GB
FOR FREE ADVICE ON THE USE OF THIS PRODUCT, PLEASE CONTACT OUR SALES SUPPORT TEAM
Jenx Limited, Wardsend Road, Sheffield, S6 1RQ. Tel: +44 (0)114 285 3376. Fax: +44 (0)114 285 3528. [email protected] www.jenx.com
Making & Using the Adjustments
Do not use this product if you suspect it is faulty or broken.
Contact Jenx Limited immediately for advice. +44 (0) 114 285 3376
Never Leave your child unattended while using this product
POSITIONING SUGGESTIONS GIVEN IN THIS SECTION SHOULD BE TREATED AS A GUIDE ONLY. YOU SHOULD
ALWAYS CONSULT YOUR THERAPIST OR MEDICAL PRACTITIONER BEFORE USING THIS PRODUCT.
Always secure the child by using all of the positioning straps and safety straps provided. Velcro
should overlap by at least 3 inches
(7.5 cm)
on all straps before you begin to make any other
adjustments. Ensure the safety strap and positioning strap are adjusted for each child and for
changes of clothing.
Urban height adjustment
Without occupant on stander.
1. To adjust the height of the stander, loosen the Height adjustment Cap Screw using the Allen key
provided.
2. Position the stander to desired height.
3. Retighten the adjustment screw.
Stander Height
Adjustment screw
Fig 6
Do Not unscrew the height adjustment screw completely, loosen only
14
Technical User
GB
FOR FREE ADVICE ON THE USE OF THIS PRODUCT, PLEASE CONTACT OUR SALES SUPPORT TEAM
Jenx Limited, Wardsend Road, Sheffield, S6 1RQ. Tel: +44 (0)114 285 3376. Fax: +44 (0)114 285 3528. [email protected] www.jenx.com
Making & Using the Adjustments
Do not use this product if you suspect it is faulty or broken.
Contact Jenx Limited immediately for advice. +44 (0) 114 285 3376
Never Leave your child unattended while using this product
POSITIONING SUGGESTIONS GIVEN IN THIS SECTION SHOULD BE TREATED AS A GUIDE ONLY. YOU SHOULD
ALWAYS CONSULT YOUR THERAPIST OR MEDICAL PRACTITIONER BEFORE USING THIS PRODUCT.
Always secure the child by using all of the positioning straps and safety straps provided. Velcro
should overlap by at least 3 inches
(7.5 cm)
on all straps before you begin to make any other
adjustments. Ensure the safety strap and positioning strap are adjusted for each child and for
changes of clothing.
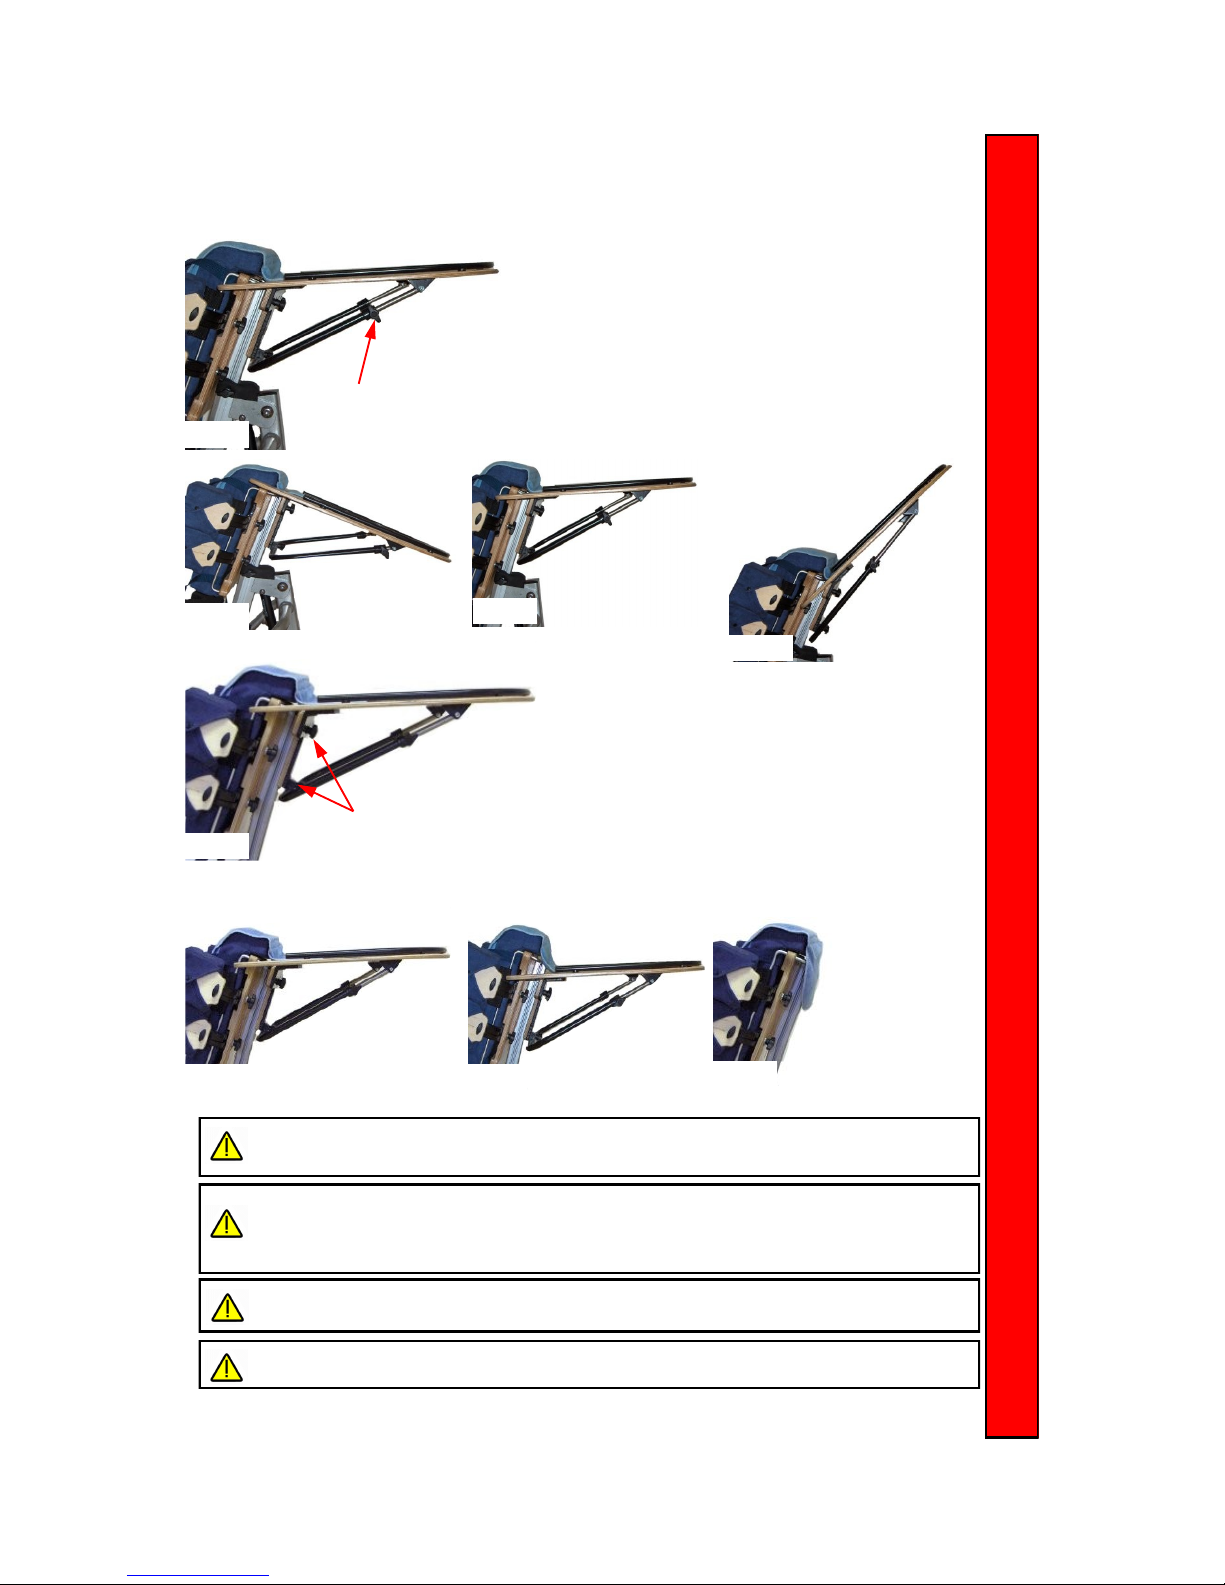
Tray adjustment
1.Loosen the tray adjustment screws.
2. Move the tray to desired angle.
3. Tighten the screws to finger tight only.
Tray Height adjustment
1.Loosen the tray height adjustment
screws.
2. Move the tray to desired height.
Tighten the screws to finger tight only.
Tray Angle Adjustment
Lowest Position Mid Position
Highest Position
Highest Position Lowest Position Tray can be removed
Tray Height Adjustment
Fig 7
Fig 8 Fig 9
Fig 10
Fig 11
Fig 12 Fig 13 Fig 14
Clear all items from the tray before adjustment.
Do not use hot or cold drinks on the tray while in the angled position.

15
Technical User
GB
FOR FREE ADVICE ON THE USE OF THIS PRODUCT, PLEASE CONTACT OUR SALES SUPPORT TEAM
Jenx Limited, Wardsend Road, Sheffield, S6 1RQ. Tel: +44 (0)114 285 3376. Fax: +44 (0)114 285 3528. [email protected] www.jenx.com
Do not use this product if you suspect it is faulty or broken.
Contact Jenx Limited immediately for advice. +44 (0) 114 285 3376
Never Leave your child unattended while using this product
Making & Using the Adjustments
POSITIONING SUGGESTIONS GIVEN IN THIS SECTION SHOULD BE TREATED AS A GUIDE ONLY. YOU SHOULD
ALWAYS CONSULT YOUR THERAPIST OR MEDICAL PRACTITIONER BEFORE USING THIS PRODUCT.
Always secure the child by using all of the positioning straps and safety straps provided. Velcro
should overlap by at least 3 inches
(7.5 cm)
on all straps before you begin to make any other
adjustments. Ensure the safety strap and positioning strap are adjusted for each child and for
changes of clothing.
Fig 16
Sandal adjustment
1.The sandals Fig 15 can be moved in any direction by loosening the thumb
screw located under the foot plate Fig 16
2. When the thumb screw is lose slide the sandal to desired position.
3. Tighten the thumb screw to hold sandal in place. Fig 17
Fig 15
Fig 17

16
Technical User
GB
FOR FREE ADVICE ON THE USE OF THIS PRODUCT, PLEASE CONTACT OUR SALES SUPPORT TEAM
Jenx Limited, Wardsend Road, Sheffield, S6 1RQ. Tel: +44 (0)114 285 3376. Fax: +44 (0)114 285 3528. [email protected] www.jenx.com
Do not use this product if you suspect it is faulty or broken.
Contact Jenx Limited immediately for advice. +44 (0) 114 285 3376
Never Leave your child unattended while using this product
Making & Using the Adjustments
Always secure the child by using all of the positioning straps and safety straps provided. Velcro
should overlap by at least 3 inches
(7.5 cm)
on all straps before you begin to make any other
adjustments. Ensure the safety strap and positioning strap are adjusted for each child and for
changes of clothing.
POSITIONING SUGGESTIONS GIVEN IN THIS SECTION SHOULD BE TREATED AS A GUIDE ONLY. YOU SHOULD
ALWAYS CONSULT YOUR THERAPIST OR MEDICAL PRACTITIONER BEFORE USING THIS PRODUCT.
Straps and Pads.
1. The urban should only be used with all straps and pads in use.
2. The upper and lower back pads should be firmly fastened using the velcro
fastening. Fig 18
Fig 18 Fig 19
Straps and Pads.
1. The urban should only be used with all straps and pads in use.
2. The upper and lower back pads should be firmly fastened using the velcro
fastening. Fig 18
3. To tighten the pads pull the end tab of the strap. Fig 19
4. To loosen push the buckle forward and the straps will loosen. Fig 20
5. When using Urban be sure to use the safety strap at all times.
Fig 20

17
Technical User
GB
FOR FREE ADVICE ON THE USE OF THIS PRODUCT, PLEASE CONTACT OUR SALES SUPPORT TEAM
Jenx Limited, Wardsend Road, Sheffield, S6 1RQ. Tel: +44 (0)114 285 3376. Fax: +44 (0)114 285 3528. [email protected] www.jenx.com
Do not use this product if you suspect it is faulty or broken.
Contact Jenx Limited immediately for advice. +44 (0) 114 285 3376
Never Leave your child unattended while using this product
Optional Extra’s
Always secure the child by using all of the positioning straps and safety straps provided. Velcro
should overlap by at least 3 inches
(7.5 cm)
on all straps before you begin to make any other
adjustments. Ensure the safety strap and positioning strap are adjusted for each child and for
changes of clothing.
POSITIONING SUGGESTIONS GIVEN IN THIS SECTION SHOULD BE TREATED AS A GUIDE ONLY. YOU SHOULD
ALWAYS CONSULT YOUR THERAPIST OR MEDICAL PRACTITIONER BEFORE USING THIS PRODUCT.
Urban Shoulder Harness
Place one strap with the buckle
facing upwards, on the top of the
chest pad in line with the handle
Thread the strap in to the handle
and bring back upwards
Thread the end in the buckle
Continue to thread the end in
the buckle
The other end of the strap fixing on to the inner side of
the upper pad using the Velcro.
Both straps are fixed using the same method, the outer
pad locks the velcro in place. Once the straps are in
place use the quick release clips for mounting and
dismounting of users.

18
Technical User
GB
Small tray pad
Step 1: Remove the self adhesive piece of Velcro from the small tray pad and stick it
to the tray.
Step 2: Stick the small tray pad onto the Velcro on the tray.
The small tray pad comes as standard with all models of the Urban. It can be fitted to the tray to ensure
nothing falls between the tray and the chest pad.

19
Home User
GB
FOR FREE ADVICE ON THE USE OF THIS PRODUCT, PLEASE CONTACT OUR SALES SUPPORT TEAM
Jenx Limited, Wardsend Road, Sheffield, S6 1RQ. Tel: +44 (0)114 285 3376. Fax: +44 (0)114 285 3528. [email protected] www.jenx.com
Note: Urban is an Prescribed Medical Device.
To be used only with the guidance of Therapist or Prescribing
Practitioner. Please read these instructions carefully before use.
URBAN
Instructions For Use
Size 2
8 - 14 years
Max weight 60 Kg
Size 1
3 1/2 - 8 years
Max weight 35 Kg
Size 1A
6 - 14 years
Max weight 40 Kg
Section 2 Pages 9 - 18
Technical User Physiotherapist, Occupational Therapist.
Section 3 Pages 19 - 22
Home User Home or School Carer.
Section 4 Pages 23 - 27
Re-Issue Stores Personnel.
Section 1 Pages 2 - 8
All Users Safety Information

20
Making & Using the Adjustments
Your Therapist has set the adjustments for this product to suit your child.
The adjustments given in this section are to aid the daily use only.
Your therapist will make any adjustment necessary. Do not make any other adjustment.
Home User
GB
FOR FREE ADVICE ON THE USE OF THIS PRODUCT, PLEASE CONTACT OUR SALES SUPPORT TEAM
Jenx Limited, Wardsend Road, Sheffield, S6 1RQ. Tel: +44 (0)114 285 3376. Fax: +44 (0)114 285 3528. [email protected] www.jenx.com
Do not use this product if you suspect it is faulty or broken.
Contact Jenx Limited immediately for advice. +44 (0) 114 285 3376
Never Leave your child unattended while using this product
Always secure the child by using all of the positioning straps and safety straps provided. Velcro
should overlap by at least 3 inches
(7.5 cm)
on all straps before you begin to make any other
adjustments. Ensure the safety strap and positioning strap are adjusted for each child and for
changes of clothing.
Straps and Pads.
1. The urban should only be used with all straps and pads in use.
2. The upper and lower back pads should be firmly fastened using the velcro
fastening. Fig 1
Fig 1 Fig 2
Straps and Pads.
1. The urban should only be used with all straps and pads in use.
2. The upper and lower back pads should be firmly fastened using the velcro
fastening. Fig 1
3. To tighten the pads pull the end tab of the strap. Fig 2
4. To loosen push the buckle forward and the straps will loosen. Fig 3
5. When using Urban be sure to use the safety strap at all times.
Fig 3
This manual suits for next models
4
Table of contents
Other Jenx Mobility Aid manuals


Popular Mobility Aid manuals by other brands


Drive
Drive GoLite 200 operating instructions

Drive DeVilbiss Healthcare
Drive DeVilbiss Healthcare ROOMBA Instructions for use

Decon wheel
Decon wheel Levo LAE Assembly instructions

human care
human care 72794 user manual

Guardian
Guardian MDS89664 quick start guide

Gordon Ellis
Gordon Ellis BIG FOOT Instructions for use


