Jilong 16026DE User manual

RF1-15-GB(V4)
IMPORTANT SAFETY RULES
READ, UNDERSTAND, AND FOLLOW ALL INSTRUCTIONS CAREFULLY
BEFORE INSTALLING AND USING THIS PRODUCT !
Round Steel Frame Pool
OWNER’S MANUAL
FOR FOLLOWING SIZES:
TYPE B: -Ф10
'
x30
"
(Ф3m x 76 cm)
-Ф12
'
x30
"
(Ф3.6mx76 cm)
-Ф14
'
x33
"
(Ф4.2mx84 cm)
1
DO NOT RETURN PRODUCT TO STORE
CONTACT YOUR LOCAL AFTER SALES SERVICE CENTER
Drawing for illustration purpose only. Actual product may vary. Not to scale.
Detailed information of product model and size is shown at the end of this manual!
STOP!
Please read carefully and keep for future reference.

32
RF1-15-GB(V4) RF1-15-GB(V4)
THE SAFETY INSTRUCTIONS------------------------------------------------------------------------------------------------02
PART REFERENCE---------------------------------------------------------------------------------------------------------------04
SITE SELECTION-------------------------------------------------------------------------------------------------------------------06
SET UP THE POOL---------------------------------------------------------------------------------------------------------------08
FILL THE POOL WITH WATER---------------------------------------------------------------------------------------------------08
WINTERISING AND LONG-TERM STORAGE---------------------------------------------------------------------------10
IN-SEASON POOL MAINTENANCE AND WATER CARE------------------------------------------------------------11
TROUBLE SHOOTING -------------------------------------------------------------------------------------------------------------11
LIMITED WARRANTY ------------------------------------------------------------------------------------------------------------ 12
CONTENTS PART1-THE SAFETY INSTRUCTIONS
PART1-THE SAFETY INSTRUCTIONS
Non Swimmers safety
1). Continuous, active, and vigilant supervision of weak swimmers and non-swimmers by a competent adult is required at all times
(remembering that children under ve are at the highest risk of drowning);
2). Designate a competent adult to supervise the pool each time it is being used;
3). Weak swimmers or non-swimmers should wear personal protection equipment when using the pool;
4). When the pool is not in use, or unsupervised, remove all toys from the swimming pool and its surrounding to avoid attracting
children to the pool.
Safety devices
1). It is recommended to install a barrier (and secure all doors and windows, where applicable) to prevent unauthorized access
to the swimming pool;
2). Barriers, pool covers, pool alarms, or similar safety devices are helpful aids, but they are not substitutes for continuous and
competent adult supervision.
Safety equipment
1). It is recommended to keep rescue equipment (e.g. a ring buoy) by the pool;
2). Keep a working phone and a list of emergency phone numbers near the pool.
Safe use of the pool
1). Encourage all users especially children to learn how to swim;
2). Learn Basic Life Support (Cardiopulmonary Resuscitation - CPR) and refresh this knowledge regularly. This can make a life-
saving difference in the event of an emergency;
3). Instruct all pool users, including children, what to do in case of an emergency;
4). Never dive into any shallow body of water. This can lead to serious injury or death;
5). Do not use the swimming pool when using alcohol or medication that may impair your ability to safely use the pool;
Carefully read, understand, and follow all information in this user manual before installing
and using the swimming pool. These warnings, instructions, and safety guidelines address
some common risks of water recreation, but they cannot cover all risks and dangers in all
cases. Always use caution, common sense, and good judgment when enjoying any water
activity. Please read carefully and keep for future reference.
6). When pool covers are used, remove them completely from the water surface before entering the pool;
7). Protect pool occupants from water related illnesses by keeping the pool water treated and practicing good hygiene. Consult the
water treatment guidelines in the user’s manual;
8). Store chemicals (e.g. water treatment, cleaning or disinfection products) out of the reach of children.
9). Use the signage as outlined below;
10). Removable ladders shall be placed on a horizontal surface.
11). Warning: a drained pool outdoors may cause unknown hazards.
WARNING: Installation and assembly shall be done by adults.
WARNING: Read and follow the the instruction for use and maintenance to ensure a safe use of the swimming-pool
kit. Not following the instructions for use and maintenance can cause serious health hazards, in particular for children.
WARNING: Only for domestic outdoor use.
WARNING: Drowning hazard. Children have drowned in portable swimming-pools.
WARNING: Empty the pool when not in use. Do not leave a small pool empty outdoor.
WARNING: Keep children under supervision in the aquatic environment.
WARNING: No diving.

54
RF1-15-GB(V4) RF1-15-GB(V4)
PART2-PART REFERENCE
Ф10'x30"
(Ф3m x 76 cm)
NO.NAME QUANTITY SERIAL NUMBER
1Horizontal
Beam A 8 290187
2PVC Pin 8 290181
3T-Joint 8 290317
4Vertical Leg 8 290188
5Vertical Leg
Cap 8 290185
6Drainage
Valve Cover 1 290366
7Stopper 2 290311
8Hole Strainer 2 290312
9
Drainage
Valve
Connector
1 290364
10 Pool Liner 1 11219
Color BLUE
1
2
3
7
8 9
5
4
610
TYPE B
Before assembling your pool, layout and review the contents to become familiar with all the parts you will
be using during the assembly:
NOTE: Drawing for illustration purpose only. Actual product may vary. Not to scale.
PART2-PART REFERENCE
Ф12'x30"
(Ф3.6m x 76 cm)
Ф14'x33"
(Ф4.2m x 84 cm)
NO.NAME QUANTITY SERIAL NUMBER QUANTITY SERIAL NUMBER
1Horizontal Beam
A10 290197 10 393131
2PVC Pin 10 290181 10 290181
3T-Joint 10 290318 10 290318
4Vertical Leg 10 290188 10 393132
5Vertical Leg Cap 10 290185 10 290185
6Drainage Valve
Cover 1 290366 1 290366
7Stopper 2 290311 2 290366
8Hole Strainer 2 290312 2 290312
9Drainage Valve
Connector 1 290364 1 290364
10 Pool Liner 1 11427 1 393130
Color BLUE BLUE
1
2
3
7
8 9
5
4
610
TYPE B
Before assembling your pool, layout and review the contents to become familiar with all the parts you will
be using during the assembly:
NOTE: Drawing for illustration purpose only. Actual product may vary. Not to scale.

76
RF1-15-GB(V4) RF1-15-GB(V4)
It is absolutely essential to select a suitable site for your pool BEFORE attempting to
ll it with any water. Please select a set-up site which strictly conforms to the following
guidelines:
Guide1. Ensure that the area is rm, at (no bumps or mounds of earth) and extremely level, with a grade not exceeding
3° of slope at any point in the set-up area.
Guide2. Make sure that the area you have selected to set-up the pool is completely free of sticks, stones, sharp objects or
other foreign debris.
Guide3. Select an area that is not directly underneath overhead power lines or trees. Additionally, make sure that the pool
set-up area does not contain underground utility pipes, lines, or cables or any kind.
Guide4. If a ground cloth is provided with your pool kit, its use is highly recommended. The ground cloth will help protect
the pool liner from damage due to weed growth, sharp objects, and debris.
Guide5. If at all possible, choose an open location on your property that is exposed to direct sunlight. This will help to
warm your pool.
WARNING:
Pools installed on inadequately level surfaces are subject to leak-
ing, forming irregularities, or collapse, which can result in property damage or
serious injury for those in or around the pool area!
WARNING:
Do not use sand during setup process. If it appears that there is a
need for use of a “leveling agent”, then your set-up site is likely unsuitable. FAIL-
URE TO OBEY THIS WARNING MAY RESULT IN SERIOUS PERSONAL INJURY.
CAUTION:
Please choose your set-up area carefully, as lawn and other desir-
able vegetation underneath the ground cloth(If applicable) will die. Furthermore,
try to avoid setting the ground cloth(If applicable)in areas prone to aggressive
plant and weed species, as they may grow through the ground cloth(If applica-
ble).
CAUTION:
The pool must be accessible to a 110 or 230-volt AC outlet pro-
tected by a Ground Fault Circuit Interrupter (GFCI). The pool should be set no
closer than 10 ft. to the power source, but no further than the length of the lter
pump cord. Under no circumstances should an extension cord be used to extend
the range of the connection.
+3°
Bumpy,Sloping Ground-INCORRECT
Flat,Level Ground-CORRECT
PART3-SITE SELECTION PART4-SET UP THE POOL
Step1. ACCOUNT FOR ALL PARTS.
Remove all the parts from the carton(s) and place them on the ground in the location where they are to be assembled
Check each part according to “PART REFERENCE” .Make sure all the pieces to be assembled are accounted for.
IMPORTANT: Do not start assembly if any pieces are missing. For replacement pieces call the Consumer Service
telephone number in your area.
The number of persons required for installation: 2 adult at least.
Total installation time except the time for site preparation and water lling :
30 minutes for size Ф10’×30”/Ф12’×30”/Ф12’×32”/Ф12’×39”/Ф12’×48”
60 minutes for size Ф15’×36”/Ф15’×42”/Ф15’×48”/Ф18’×48”
Step2. INSTALL DRAIN VALVES COVER AND STOPPER
Make sure that outer drain plug is inserted into the outer drain cap and drain valve cover is screwed on tightly.Plug the con-
nection holes with the stoppers. (The out drain plug changes according to different size of pool.)
STOPPER Out Drain Plug A Out Drain Plug BDrain Vavle Cover
Step3. INSTALL HORIZONTAL BEAM
BEAM A BEAM A
For all kinds of pool , the combination is A-A.
Slide combined beams into sleeve,the hole on the beams should face outwards.
Step4. INSTALL T-JOINT(FOR TYPE A)
3
4
2
5
1
4
1. Use the connection end of the T-Joint to
connect the adjacent horizontal tubes.
2. Insert the Pin into the hole of connected
horizontal tube and T-Joint rmly.
3. Install the vertical leg cap onto the vertical leg.
4. Insert the vertical leg into the T-Joint through
the belt.
5. Insert the pin into the hole of T-Joint and
Vertical Leg.
TIP: If you can’t nd the hole on the horizontal
tube or vertical leg please rotate the tubes until
the pin meets the hole.
BELT

98
RF1-15-GB(V4) RF1-15-GB(V4)
WARNING:
Do not leave pool unattended while lling with water.
WARNING:
If more than 1~2 inches of water collects on any one side before you
start lling in the center.The pool is not level enough, and must be corrected! You
shall pull out the drain plug, release the water completely, disassemble the pool
completely,locate the pool on a plane surface, repeat set up instructiion.
WARNING:
DO NOT OVERFILL as this could cause the pool to collapse.In times of
heavy rainfall you may need to empty some of the water to ensure the level is correct.
PART5-FILL THE POOL WITH WATER
1. Make sure the drain tting is plugged securely and the cap
is in place. Start lling the pool with water. After about 1-inch of
water is on the bottom, stop lling and smooth wrinkles out of the
bottom of the pool. Pull the outer wall out from the top edge, all
around the bottom of the pool, so that it lls evenly.
2. Contineue lling the pool until water level .
Step5. INSTALL T-JOINT(FOR TYPE B)
4
3
45
1
2
1. Use the connection end of the T-Joint to connect
the adjacent horizontal tubes.
2. Insert the Pin into the hole of connected
horizontal tube and T-Joint rmly.
3. Install the vertical leg cap onto the vertical leg.
4. Insert the vertical leg into the T-Joint through the
belt.
5. Insert the pin into the hole of T-Joint and Vertical
Leg.
TIP: If you can’t nd the hole on the horizontal
tube or vertical leg please rotate the tubes until the
pin meets the hole.
PART4-SET UP THE POOL
BELT
WARNING:
Do not let your children stand at downfold and face the water outlet
during the drainage. The water current may sweep your children.
WARNING:
Pool should be stored at places where is cool and dry, with no sharp
object surroued, or no heavy objects lying above, which may cause damage to the
pool.
PART6-WINTERISING AND LONG-TERM STORAGE
Step1. If you have a lter pump, make sure that the electricity source to the lter pump has been disconnected.
Step2. Check to ensure that the out drain plug is rmly inserted on the inside of the pool.
Step3. Attach your garden hose to the drainage valve connector, and placing the other end of the hose in an area where the
water can drain safely, such as a storm drain or street gutter. Remember that because water always nds its own level, the end
of the hose must be lower in elevation than the pool to ensure complete drainage.
Step4.If you have a lter pump, insert the stopper into the inlet and outlet xtures, on inside of pool, and then disconnect the
lter pump hoses.
Step5. Attach the drainage valve connector to the drain outlet by turning connector in a clockwise direction.
Step6. Open the out drain plug on the inside of the pool and the water will begin to drain immediately.
Step7. Disconnect the hose and drainage valve connector when nished.
Step8. Replace the out drain plug on the inside of the pool.
Step9. Be sure that the pool liner is completely dry before folding the pool for long-term storage. Leaving the pool exposed to
sunlight for a few hours will clean and speed the drying process and make it easier to fold the pool for storage. (Never attempt
to fold or stow a pool that is not completely dry as this could lead to a proliferation of mold or mildew build-up during the time
the pool is in storage.)
Step10. Remember, proper off-season storage is critical to protect your investment in your pool. (espeically in winter)Once
drained and dry, your pool should be carefully folded and wrapped in a ground cloth (if available) or other similar protective
tarp-like material. The pool and all applicable accessories such as the pump, cover, ground cloth, ladder, hoses, clamps, and
hardware should be kept together and stored indoors, in a reasonably warm, dry and weatherproof location.
Before folding, it’s better to dry all parts and pool completely by lying them in the sun
for one hour or so.(PIC.1). And then, spread some talcum powder to prevent the vinyl
from sticking together.
FOLDING INSTRUCTION
Step1. Please fold the protrusion sides inside to gain rectangle shape.(PIC.2).
Step2. Fold each half of the rectangle to gain a smaller rectangle shape.(PIC.3).
Step3. Fold each ends backwards. (PIC.4).
Step4. Fold the rest ends together to create an ultimate rectangle one.(PIC.5).
TIPS1. Please remove air inside to make the folded pool thin and at during each folding.
TIPS2. The original packing can be used for storage.
PIC.1 PIC.3 PIC.4PIC.2
PIC.5
90%

1110
RF1-15-GB(V4) RF1-15-GB(V4)
PART7-IN-SEASON POOL
MAINTENANCE AND WATER CARE
This product is designed to be storable, seasonal pools. If you live in a temperate area in which the pool will not be in use
year-round, it is STRONGLY RECOMMENDED that you drain your pool, clean and dry it thoroughly, and store it in a protected
area for the off-season. This will help extend the life of your pool and prevent a safety hazard from developing while the pool is
not in use. During the season of use of the pool kit, the ltration system (if applicable)must be put into service each day, long
enough to ensure at least a complete renewal of the volum of water.
In order to keep your pool water clean and hygienic all season long please closely adheres to the follow-
ing guidelines:
1. The proper and consistent use of basic pool chemicals are required to maintain the proper pH balance in your pool water.
Furthermore, the application of chemicals will help prevent the growth of harmful bacteria or algae in your pool, and assist your
lter-pump in keeping your water crystal clear. Chemicals that your pool may require include but are not limited to:
1) Tabular, Granular, or Liquid Chlorine: Disinfects pool water and inhibits algae growth.
2) PH Adjusting Chemicals: These are used to correct PH level and make water more or less acidic.
3) Algaecides: These chemicals are formulated to remove algae.
4) “Shock” (Super chlorinator): Eliminates certain organic and other combination compounds that can affect water clarity.
In order to obtain specic details on the use of chemicals, please consult a local pool supply retailer and provide them with
the volume of water in your specic pool, and if desired, a sample of your pool water. This will enable them to properly instruct
you on: 1) which chemicals to purchase, 2) what quantities of chemicals to purchase, and 3) how to use specic chemicals
safely and effectively.
2. Never let chlorine come into direct contact with the pool liner until it has completely dissolved. This means that granular or
tabulated chlorine is rst dissolved in a bucket of water before applying to pool water, and likewise, liquid chlorine is slowly and
evenly poured into pool water from various locations around perimeter of pool.
DANGER: NEVER add water to chemicals. INSTEAD, always add chemicals to water. Also, never mix separate chemicals
together, rather, add chemicals to the pool separately and allow them to circulate throughout the pool before adding additional
types of chemicals.
3.We recommend that you purchase a test kit, and frequently test your pool water to make sure that your PH balance and
chlorine levels are optimal. Your local pool supply retailer can provide information on purchasing and using a test kit that is
most suitable for your needs. NOTE: Excessive chlorine levels or low (acidic) pH levels can damage your pool liner, so please
take corrective action as soon as possible if testing reveals either condition.
The tasks of removing larger debris from your pool and keeping the inside of the pool liner clean are simplied by using a
Prompt Set Pool Maintenance Kit, which includes a leaf skimmer and garden hose powered vacuum. Maintenance Kits are
included as a bonus feature in larger pool systems, and can also be purchased separately as an accessory.Please contact
WARNING:
If applicable, the lter pump included with your pool is designed to remove dirt and
other small particles from your pool water. However, to maintain pool water that is perfectly clear, algae
free, and safe from harmful bacteria, it is VERY IMPORTANT TO ENGAGE IN A CONSISTENT REGIMEN
OF CHEMICAL TREATMENT. Contact your local pool supply retailer for guidance on the safe and effec-
tive use of chlorine, shock, algaecide and other such chemicals.
WARNING:
To avoid skin and eye irritation or even injury to bathers, never add chemicals to the
pool while it is occupied. Never add any chemicals or substances to your pool if you cannot verify the
exact quantity or type to add to the water. Consult a pool supply retailer for specic instructions and
guidelines concerning the use of chemicals in your pool.
WARNING:
It is highly recommended that pool owners frequently test their pool water to ensure
that the pH and chlorine concentration in the water is optimal for safe and enjoyable bathing throughout
the season. Please consult your pool supply retailer to nd a suitable testing kit and instructions on its
use.
WARNING:
Non-respect of the maintenance rules may result in serious hazards for health and
especially for the children.
PART7-IN-SEASON POOL
MAINTENANCE AND WATER CARE
your local after sale service center if you want to get advice on any repair during the life of the pool kit.
4. If applicable, check your lter-pump cartridge every two weeks (or more frequently during periods of heavy usage) to verify whether
it needs to be cleaned or replaced. If your cartridge is no longer white in color, attempt to spray it clean with a strong blast of water from
your garden hose. If your cartridge cannot be cleaned in this manner, the cartridge must be replaced. Failure to frequently clean and/
or replace your cartridges will affect the effectiveness of your lter pump and could shorten its useful life.
5. If your pool system included a cover, try to keep your pool covered at all times when not in use. This will help keep the wind and other
elements from depositing dirt and debris in your pool, and will also prevent excess rainwater from overlling your pool.
6. Remind your family and friends to always hose or rinse off any dirt or tanning oil from their hands, feet, and body prior to entering
the pool.
7. It’s necessary to monitor the bolts and hardware of the pool (eg. rust stain) when possible.
8. Once your pool has been lled with water for the season, take note if your pool becomes overlled due to rainwater or accidental
overll. If this should occur, it is important to drain or bale out the excess water as soon as possible. If it is an inatable ring pool, the
water level should never be higher than the bottom edge of the inatable ring.
9. Irrespective of materials used for swimming pool construction, accessible surfaces have to be checked regularly to avoid injuries.
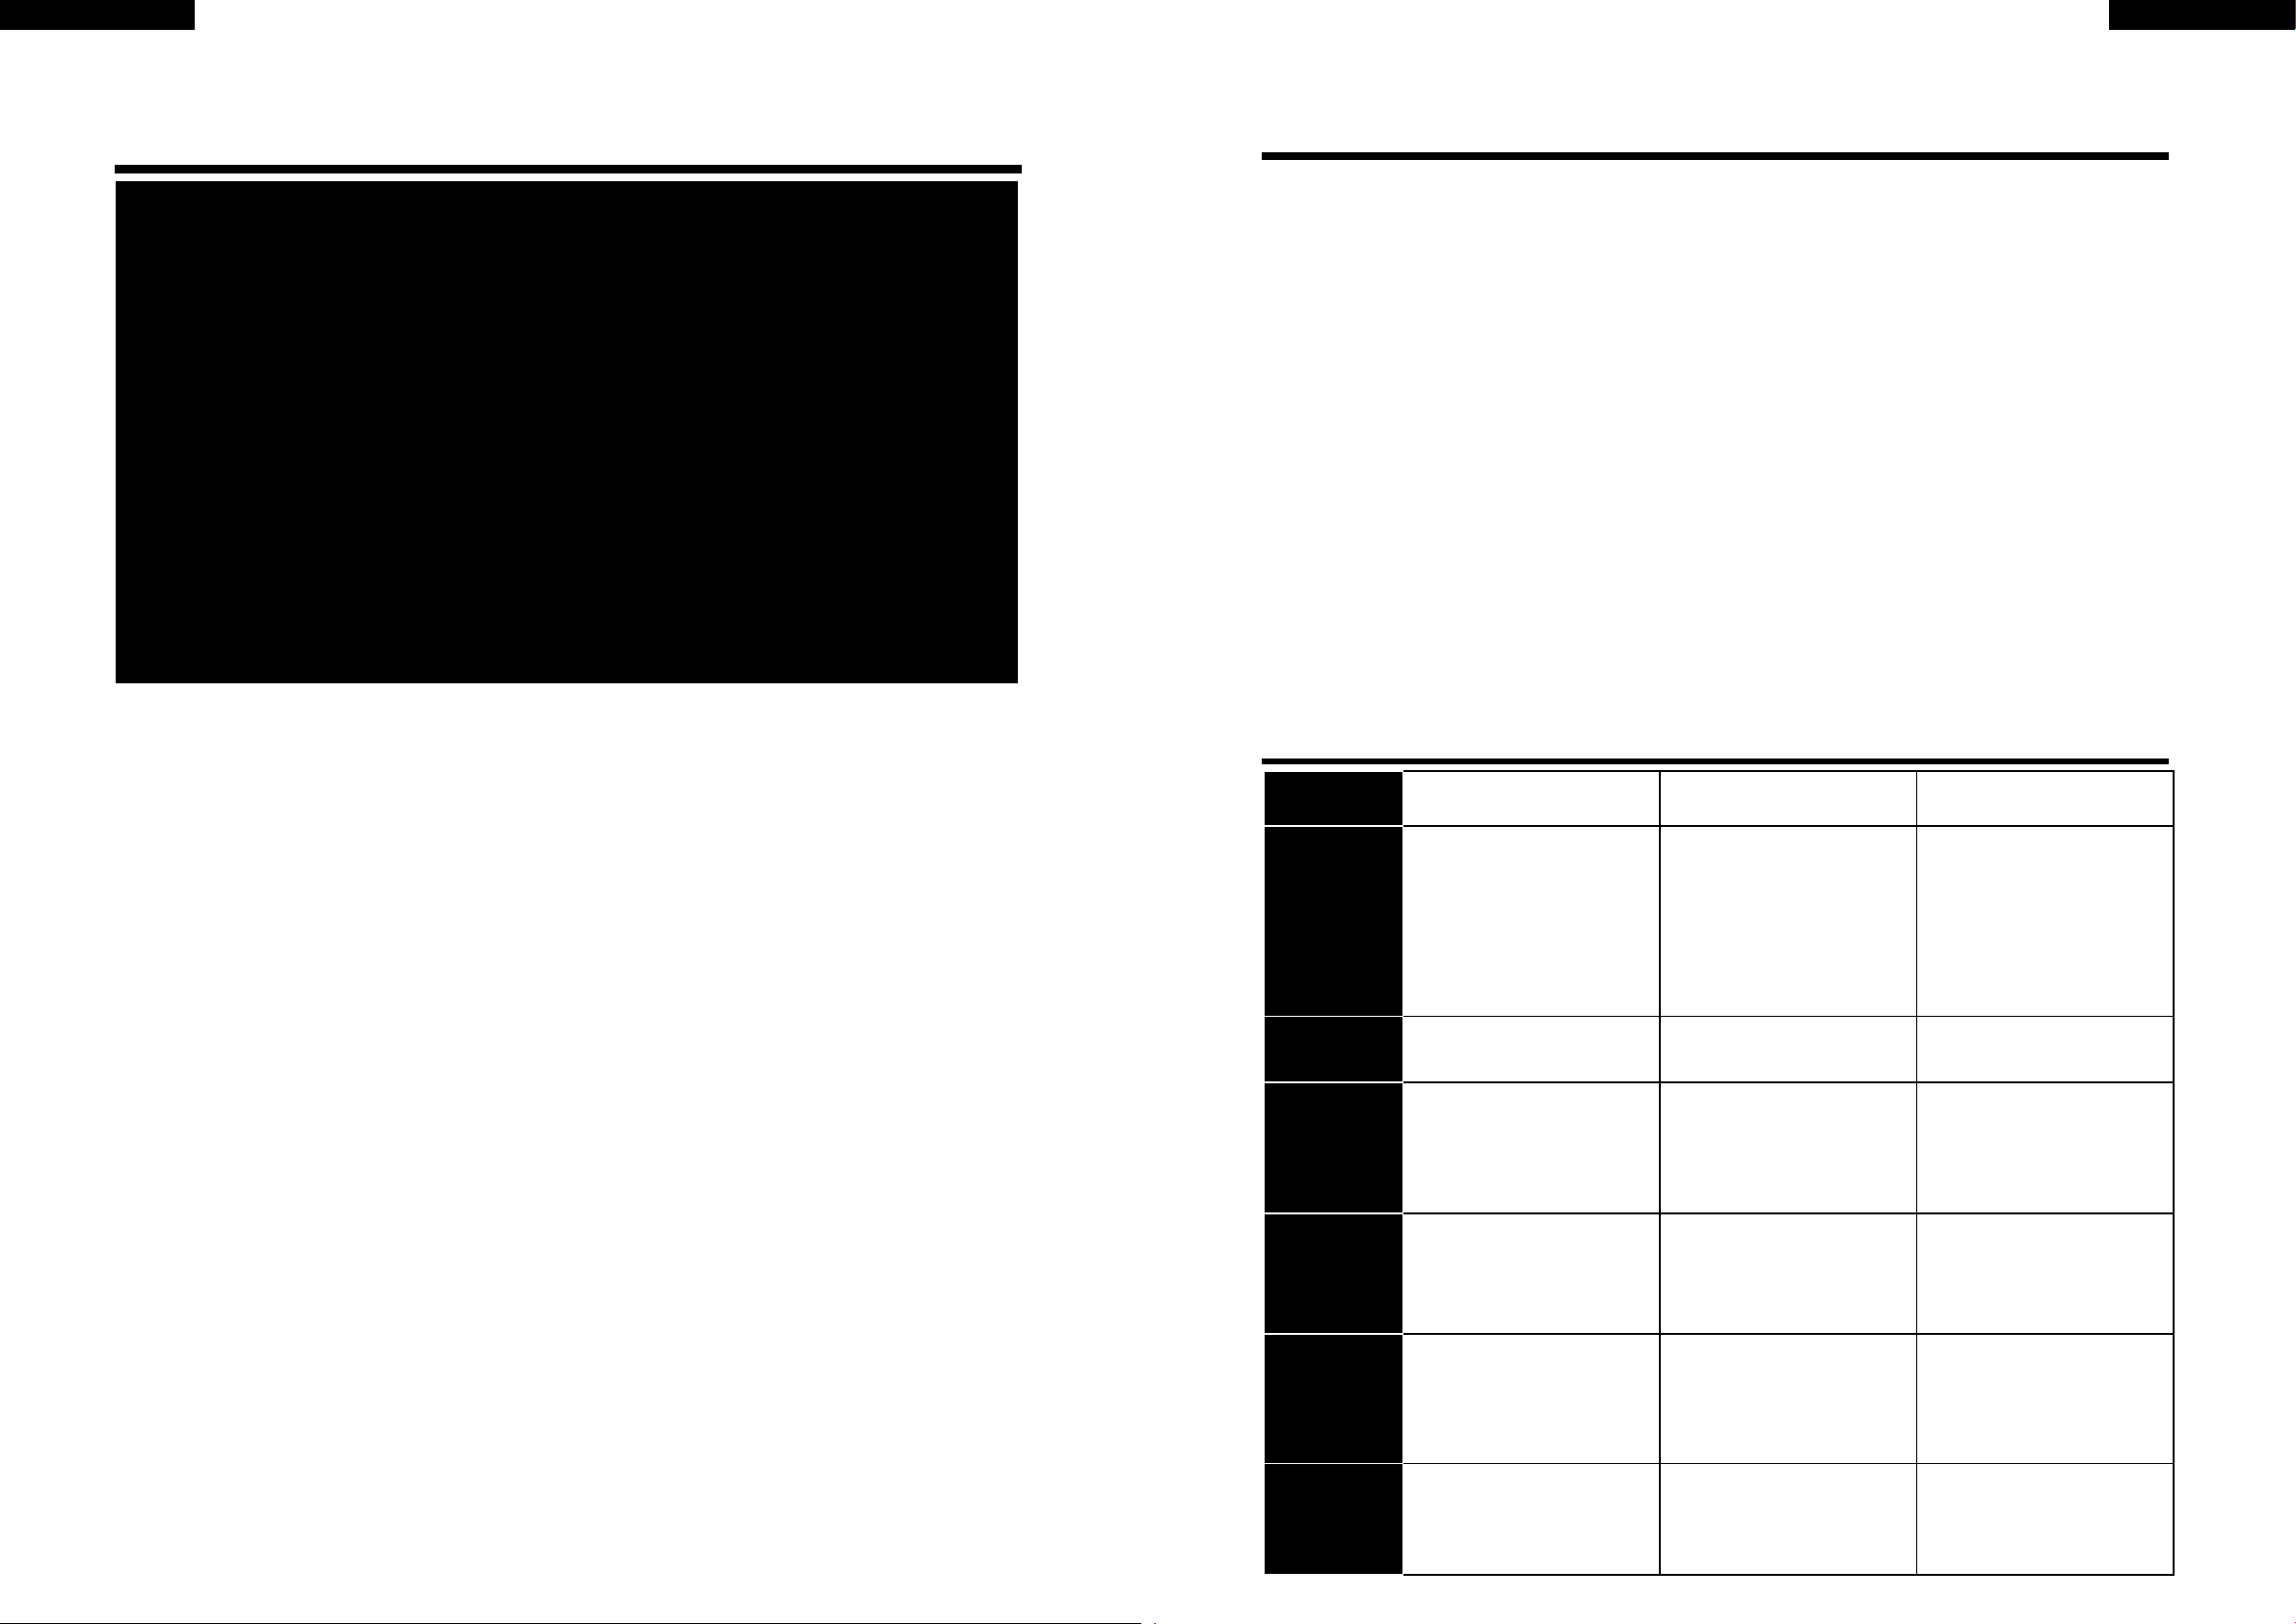
PART8-TROUBLE SHOOTING
PROBLEM DESCRIPTION CAUSE REMEDY
FILLED
POOL
IS NOT
ROUND
• Pool has taken on an oval, rectan-
gular or “egg-like” shape.
• Pool appears to slope to one side
or pool water depth is uneven.
• Wrinkles in bottom of liner were
not adequately smoothed out prior
to filling.
• Side walls were not properly
“pushed out” as pool was filled,
causing circumference of top ring
to be outside that of the pool's side
walls.
• Pool is resting on bumpy or slop-
ing ground.
• Drain pool to a 1” water depth and
then smooth out as many wrinkles
as possible.
• Drain pool to a 1” water depth and
then push out side walls until they
are outside of the circumference of
the top ring.
• Make sure ground underneath
pool is very flat, level and free of
any mounds of soil.
COLORED
WATER
• Water turns blue, brown, or black
when first treated with chlorine.
• The chlorine is oxidizing minerals
in your water. This commonly occurs
with water from different sources.
• Adjust pH to recommended level.
• Run filter until water is clear.
• Regularly clean cartridge.
PARTICALS
SUSPENDED
IN WATER
• Water looks “milky” or cloudy.
• “Hard Water” caused by an elevat-
ed pH.
• Chlorination is inadequate.
• Foreign debris in water.
• Bathers are not cleaning their feet
prior to entering pool.
• Adjust pH. Check with a swimming
pool supply retailer for correct water
treatment.
• Ensure proper chlorine level.
• Clean or replace your filter.
• Spray off dirt with a high-pressure
hose before entry.
PERSISTENT
LOW WATER
LEVEL
• Pool appears to be losing water on
a daily basis.
• Tear or hole in pool liner.
• Tear or hole in a filter pump hose.
• Hose clamps are too loose.
• Evaporation from high summer
temperatures.
• Locate damage and repair with the
included patch kit.
• Repair or replace hoses.
• Tighten all hose clamps.
• Keep pool covered when not in
use.
ALGAE
• Water has greenish tint.
• Green, brown or black spots
appear on pool liner.
• Pool bottom is slippery and/or an
unpleasant odor is present.
• Algae is present.
• Apply “shock” treatment (super-
chlorinator). Check pH and adjust to
an appropriate level per your local
pool supply retailer.
• Vacuum or lightly scrub pool liner.
• Test water often to maintain proper
chlorine levels.
POOL
WATER
IS COOL
• Water is not warming to a comfort-
able swimming temperature.
• Pool was set up in an excessively
shady or tree lined area.
• Heat is escaping from pool water.
• Relocate pool to a more open
location where it can get maximum
exposure to sunlight during peak
daylight hours.
• Keep your pool covered whenever
it is not in use.

PB12
RF1-15-GB(V4)
PART9-LIMITED WARRANTY
Model Size Water Capacity Pump Ladder
16026DE/16026EU/16026FR/
16026GB/16026US
Ф10’ x 30”(Ф3m x 76cm) 1158Gal(4383L) √ ×
16026
Ф10’ x 30”(Ф3m x 76cm) 1158Gal(4383L) × ×
17236DE/17236EU/17236FR/
17236GB/17236US
Ф12’ x 30”(Ф3.6m x 76 cm) 1617Gal(6125L) √ ×
17236
Ф12’ x 30”(Ф3.6m x 76 cm) 1617Gal(6125L) × ×
17599DE/17599EU/17599FR
/17599GB
Ф14’ x 33”(Ф4.2m x 84 cm) 2508Gal(9495L) √ ×
17542DE/17542EU/17542FR/
17542GB/17542US
Ф14’ x 33”(Ф4.2m x 84 cm) 2508Gal(9495L) √ ×
17542
Ф14’ x 33”(Ф4.2m x 84 cm) 2508Gal(9495L) × ×
We warrant all components contained in this Prompt Set™ Pool/SPA Pool (excluding the lter pump unit) against defects in
materials and workmanship under normal use and service, for a period of 90days from the date of purchase for the original
owner only.
If any of the components have been consumer-replaced, damaged, or misused, the corresponding warranty on those compo-
nents is invalidated. In this situation, you will be advised of the cost of replacement parts and processing instructions.
If a veriable manufacturing defect is found during the relevant time period, we agree to repair or replace at its option any
product under warranty provided proper proof of purchase is presented.
This limited warranty is not valid if the product is used for commercial purposes, or if the damage is caused by an accident, an
act of God, consumer misuse, neglect or abuse, vandalism, improper use of chemicals, exposure to extreme weather condi-
tions or negligence during product set up or disassembly.
We cannot be held responsible for the cost of installation, labor, or transportation expenses incurred due to the replacement of
defective parts. This limited warranty, furthermore, does not cover any unauthorized alterations to the product.
Shanghai Jilong Plastic Products Co. Ltd.
2555 XiuPu Road, Pudong Area,Shanghai,China.
JILONG PLASTIC PRODUCTS(JIANGSU)CO.,LTD
NO.1 Industrial Area South Zhongchen Road Zhongyang Town,Suqian,Jiangsu,China
This manual suits for next models
20
Table of contents
Other Jilong Swimming Pool manuals
Popular Swimming Pool manuals by other brands

Bestway
Bestway POWER STEEL 2622026 owner's manual

Outside Living Industries
Outside Living Industries ubbink Azura 410 - H120 cm Note of assembly

Intex
Intex Ultra XTR 128927GH owner's manual

Intex
Intex Easy Set 128142GN owner's manual

azalp
azalp ubbink 510-H120 cm Note of assembly

azalp
azalp ubbink 400x750-H130 cm Note of assembly