Jimi LL306 User manual


CONTENTS1.1 Main Features ----------------------------------------------011.2 Specications ----------------------------------------------014.1 Battery -----------------------------------------------------044.2 Installation and power on ------------------------------044.3 LED ----- -----------------------------------------------------054.4 SOS numbers setting ----- -------------------------------054.5 Working modes ----- --------------------------------------064.6 Installation/remove alert ----- --------------------------084.7 Door open/close alert ----- ------------------------------084.8 Low battery alert ----- ------------------------------------084.9 Working mode switch alert ----- -----------------------08

Making connections simpler01 OverviewCommunication systemLTE/GSMFrequencyLTE:B2/B4/B5/B7/B12/B17/B28GSM:850/900/1800/1900MHzLocation Accuracy<10 metersWater/Dust proofIP65Battery5200 mAh Li-Polymer batteryStandby time60 days (upload one GPS data every 6hours in static mode)Dimension43×104×200 mmWeight370 g・AGlobal roaming ・Remote configuration ・Magnetic mount・IP65 dust and water proof ・Environment detection (Optional)・60 days working time (static mode)・Installation/Remove alert ・Container door close/open alert

Making connections simpler02 Appearance1. Door status detection button2. GPS LED3. GSM LED4. Power LED5. Micro USB charging port6. Installation/Remove detection button7. Battery/SIMLTE Container GNSS Tracker
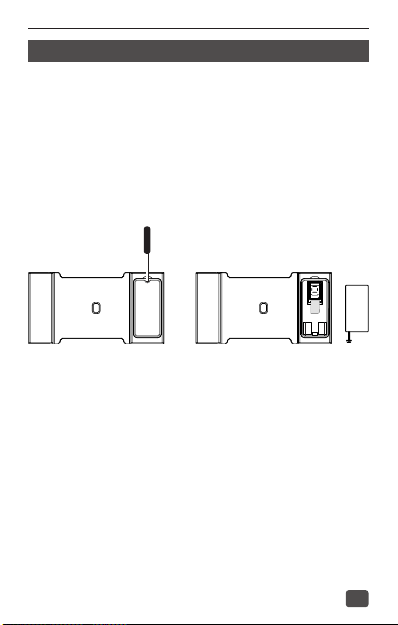
Making connections simpler03 SIM cardIf the device comes without SIM card, please install the SIM card first. Please see the following pictures for SIM card installation.・Remove the screw on the back cover of the device and take out the battery.・Insert the SIM card.・ Put back the battery and cover, finally lock the screws.
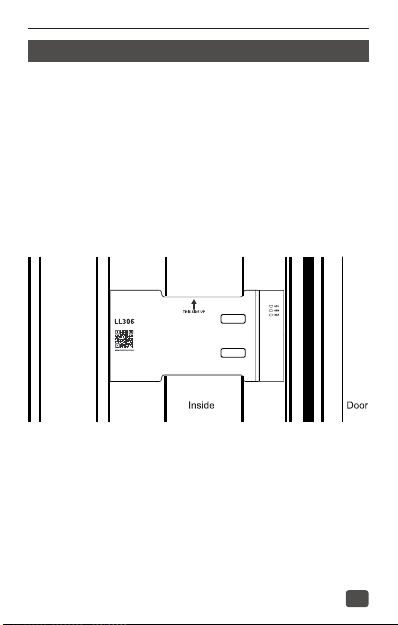
Making connections simpler04 Operation and functions・Before installing the device, momentarily press the installation detection button, the power indicator will light up. If the battery is less than 80%, the power LED will ash (0.6s on and 2s o) 5 times before o. If the battery is more than 80%, power LED will be o after 10 seconds.・If the battery is low, please use the 5V/2A Micro USB charger to charge the device.・Before closing the container door, attach the device to the right doorpost of the container (See above picture).・The device will automatically turn on and the LED indicator will light up after installed.・If the green LED ickers (0.2s on, 1s o), this indicates the device has been successfully connected to the network. Close the container door and view the location of your container on the monitoring platform.LTE Container GNSS Tracker
Making connections simpler05・Add SOS number SMS command:SOS,A, number1, number2, number3 # (A means add phone number).You could set 3 SOS numbers in maximum. If set successfully, the terminal will reply "OK".e.g. SOS,A, 13510****60,135116****6,136126****8# (set all 3 SOSnumbers)SOS,A, 13510****60# (set the rst SOS number)SOS,A, ,135116****6# (set the second SOS number)SOS,A, , ,136126****8# (set the third SOS number)Power onIf the battery is less than 80%, the power LED will ash (0.6s on and 2s o) 5 times before o. If the battery is more than 80%, power LED will be o after 10 seconds.Power o1s on and 1s o (3 times)ChargingSolid on during charging.O while charging nishedBatteryIf the battery is less than 80%, the power LED will ash (0.6s on and 2s o) 5 times before o. If the battery is more than 80%, power LED will be o after 10 seconds.Installation and remove0.2s on and 0.8 o (5 times)Door open/close0.2s on and 0.2 o (10 times)GPS (Blue)Searching satellite Positioning

Making connections simpler06・Delete SOS number SOS,D,1,2,3# (D means delete SOS number)e.g. SOS,D,1# means delete the rst number SOS,D,3# means delete the third number If you do not know the sequence number, you can also delete the number by SMS command like this: SOS,D, number#e.g. SOS,D,13527852360# means delete this SOS number directly.It will reply "OK"if the number is deleted successfully.・Automatic switching (default)The device automatically identify the current environmentalof the container, and changes the mode between static mode, land transportation mode, and sea transportation mode.・Manual switching After the device is activated for the rst time, it enters the static mode by default.Mode switching instruction SMS command for mode switching: MODE,X#X=0, automatic switching X=1, static mode X=2, land transportation mode X=3, sea transportation mode Default: X=0・Query current mode MODE#

Making connections simpler07In manual switching mode, the device will not work according to the ow chart.・Dierent working modes has dierent GPS positioning intervals. Positioning and upload interval setting commands are as follows: MODESET, A, B, C, D#Note:For automatic switching, the device will work as the following ow chart shows.

Making connections simpler08A is the positioning and upload interval in static mode.Ranges: 5-1440 minutes. The default is 180 minutes.B is the positioning and reporting interval of land transportation mode. Range: 5-1440 minutes. The default is 10 mintes.C is the positioning time interval for sea transportation mode.Range: 5-1440 minutes, and the default is 180 minutes.D is the reporting interval for sea transportation mode.Range: 5-1440 minutes, and the default is 720 minutes.・Alert and real-time location will be sent if the device is installed or removed.・Alert and real-time location will be sent if the container's door is opened or closed.・Alert and real-time location will be sent if the device battery is low.・When the device's working mode changes, the device will send a mode switching notication. See the following notication contents:
Table of contents
Other Jimi GPS manuals


