Jimmy JF41 Pro User manual
User Manual Smart Fan
Instrukcja obsługi Inteligentny wentylator
Gebrauchsanweisung Intelligenter
Klimaanlagenlüfter
Mode d'emploi Ventilateur de climatisation
intelligent
Manuale d'uso Ventola intelligente
Instrucciones de uso Ventilador de aire
acondicionado inteligente
Инструкция по эксплуатации
Умный вентилятор для
кондиционирования
воздуха
JF41 Pro


1
Contents
English 2
Polski 13
Deutsch 24
Français 35
Italiano 46
Español 57
русский язык 68
2
Product Installation
Unpacking
Open the package, take out the foam pad, all accessories and machine from the package and
take o the plastic bags. Keep the carton and plastic bags in good condition for the purpose of
maintenance and repair in the future.
1
2
3
5
4
6
7
8
9
10
11
12
13
15
14
16
17
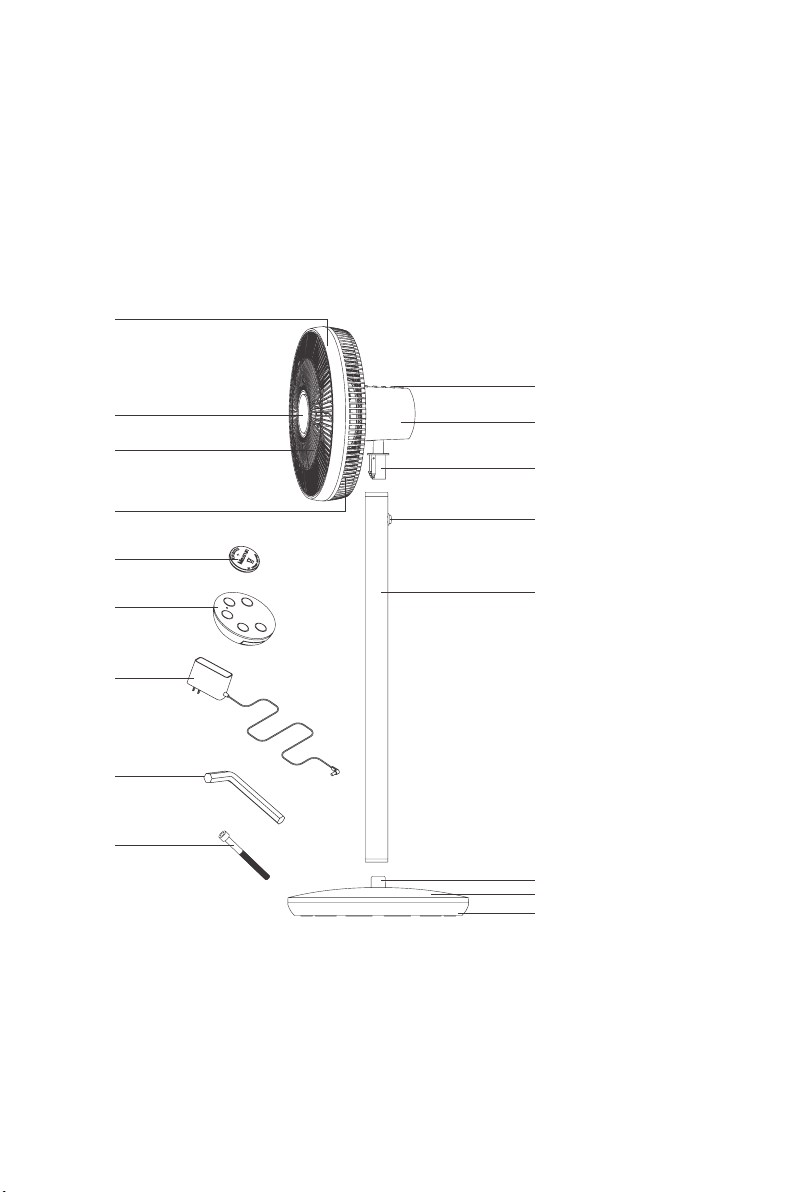
1.Decorative Ring
4.Rear Cover
7.Power Adapter
10.Buttons
13.Release Button
16.Base Cover
2.Decorative Part of Front Cover
5.Coin Battery
8.Wrench
11.Back housing
14.Supporting Pole
17.Base
3.Front Cover
6.Remote Controller
9.M8 Screw
12.Upper Connector
15.Bottom Connector
Part Name

Packing List
Part Name Fan Support Pole Base Power Adapter
Quantity 1 1 1 1
Remote Controller Coin Battery M8 Screw Wrench User Manual
1 1 1 1 1
Main-body Assembly
1.Open the package, take out the support pole
and base, insert the pole into the base and
make sure the release button of pole be on the
top side. Then screw up the base and pole with
the M8 screw.(Picture 1)
2.Take the fan assembly out and install it to the
support pole, when a “click” sound is heard, the
installation is nished.(Picture 2)
Note:
1.Please hold the motor & control part tightly when you
assemble or disassemble the fan to prevent the pinch of
ngers.
2.When you don’t use the product and want to put it
away, just disassemble the it in the reverse order of
the assembly.
Connection of the Power Adapter
Take out the power adapter, insert the plug into
the socket,and connect the other side to the
bottom interface of the base, then it’s done.
(Picture 3)
Note:
Please make sure the input voltage is 220V-240V,
keep the plug and your hands dry before you touch
the plug and insert it into the socket.
3
2
3
Pole
M8 Screw
Base Wrench
Fan Assembly
1
4
Production Operation
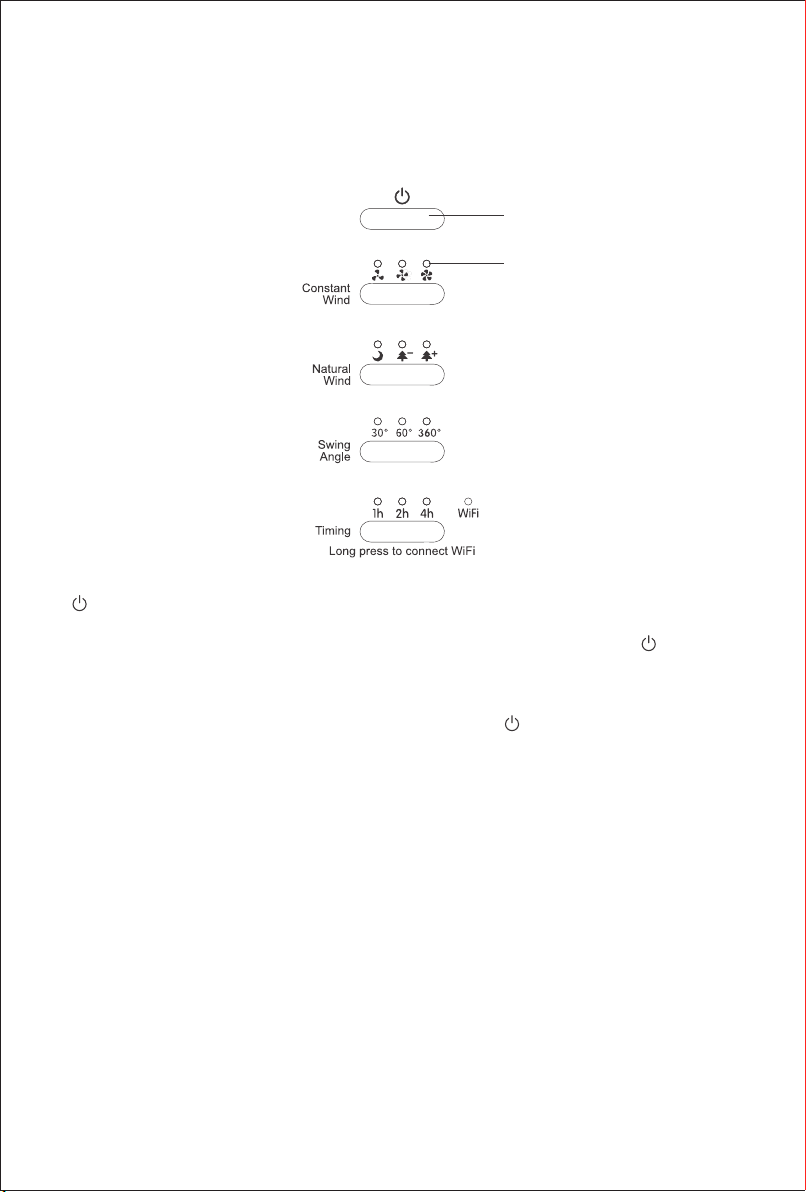
Operation Buttons and Indicator Instruction
" " Button
After being connected to the power, the whole machine will issue a bell and all the indicator lights
will ash once. The machine is in the state of power on and standby. Press the “ ”button, the
buzzer will sound a bell. The machine will enter the mode of constant and moderate wind mode
set by default when the machine is started for the rst time. When the machine is started again,
it will directly enter the mode set when the machine was shut down last time (the power cord
plug is not pulled out). If you need to turn it o, just press the “ ”button again.
"Constant Wind" button
The machine provides the mode of constant wind, which can be selected by pressing the button
of "Constant Wind". In the mode of constant wind, low, medium and high wind speeds are
provided for users to choose manually. When the wind speed is selected, the corresponding
indicator light will be on. This button is cyclic.
"Natural Wind" button
The machine provides a natural wind mode, which can be selected by pressing the "Natural
Wind" button. In the natural wind mode, the user can manually select the three wind speeds of
sleeping wind, forest wind low and forest wind high, and the corresponding indicator light will be
on when the wind speed is selected. This button is cyclic.
The application of various modes is as follows:
Forest wind (high): the wind blows gently on the surface of the human body, which is
comfortable and not harsh. It is suitable for young people.
Forest wind (low) and sleeping wind: the wind blows gently on the surface of human body, which
is comfortable and not harsh. It is suitable for infants, pregnant women and the elderly.
Button
Indicator
5
"Swing Angle" button
The machine provides three swing angles of 30°
left and right, 60° right and left, and 360°innite
cycle. The swing of the machine is the left and
right motion centered on the current position.
Press the "swing angle" button to swing the fan
head from side to side for 30°, press two times
to swing the fan head from side to side for 60°,
press three times to rotate the fan head for 360°
indefinitely, and then press the "swing angle"
button to stop. This button is a cyclic key, which
will be accompanied by the prompt sound from
the buzzer. In the selected state of a certain
angle, the corresponding indicator lights up.
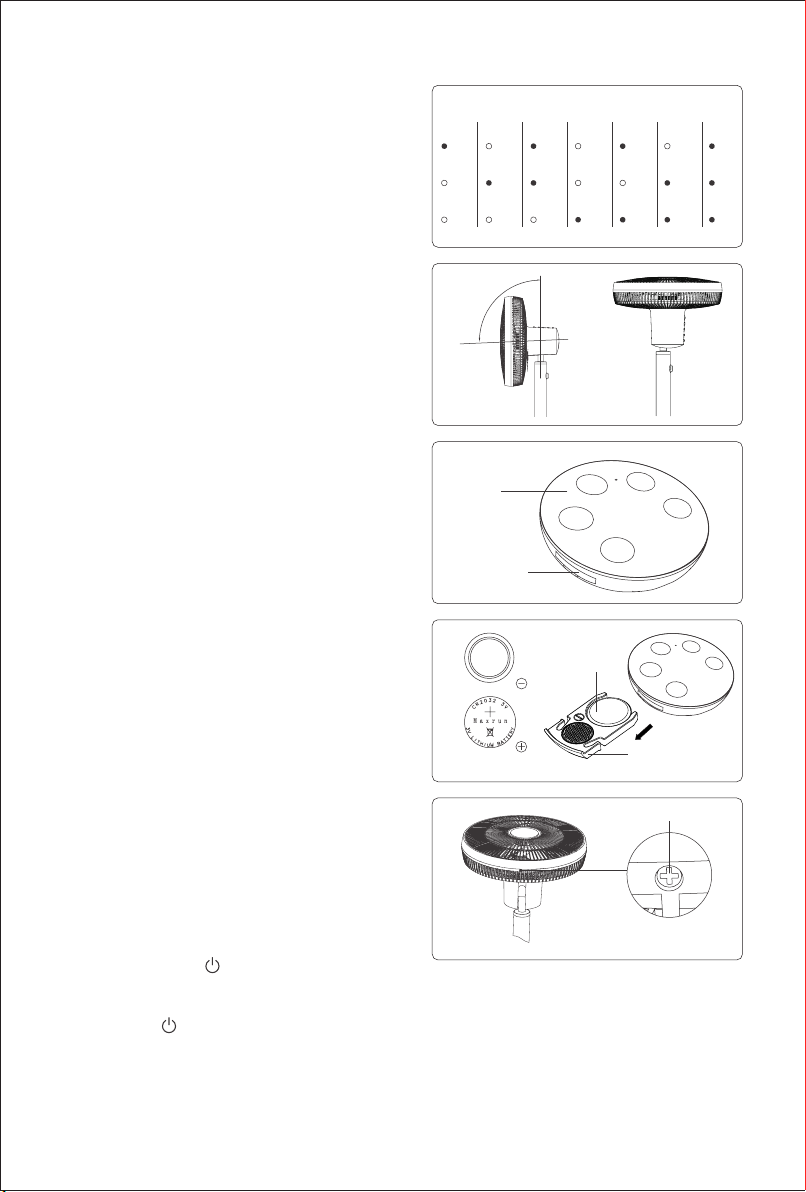
"Timing" button
In order to meet the needs of consumers, the
product provides 1-7 hours of timing time. Press
the "timing" button, the timing is 1h, two times
2h, three times 3h, and so on. This button is a
cyclic key, and it will be accompanied by the
prompt sound issued by the buzzer. When the
time is up, the machine stops running.
In the timing state, the indicator light is on.
Timing for 1h, "1h" light on; When is 2n, "2h"
light is on; Timing for 3h, "1h+2h" light; Timing
for 4h, "4h" light on; Timing for 5h, "1h+4h"
light; Timing for 6h, "2h+4h" light; Timing for 7h,
"1h+2h+4h" light. (Picture 4)
Manual angle adjustment
In addition to the right and left automatic swing
function, the product also can be manually
adjusted at any angle from the bottom to the top
- 5 ° to 90 °. (Picture 5)
Use of Remote Controller
Matching of remote controller and fan
The remote controller and the fan have already
been matched and are normal in use. If there
is no response to operation, please match the
remote controller and fan by means as below:
Keep pressing the " "button tightly , and then
plug in the adapter. After a tinkle sound, the
constant wind high-speed indicator light is on.
Release the" "button and keep pressing the
“natural wind” button on the remote controller
until the fan rotates, then nish the match.
4
5
1h 2h 3h 4h 5h 6h 7h
1h
2h
4h
1h
2h
4h
1h
2h
4h
1h
2h
4h
1h
2h
4h
1h
2h
4h
1h
2h
4h
-5°
90°
6
Button
Battery holder
8 Screw
7Negative
Side Upward
Battery Holder
Negative Electrode/ Positive Electrode
6
Keys and function description .(Picture 6)
"On/o" button: The same function as the " "
button on the fan.
"Constant Wind" button: The same as the
"Constant Wind" button on the fan.
"Natural Wind" button: The same way as the
"Natural Wind" button on the fan.
"Swing Angle" button: The same as the "Swing
Angle" button on the fan.
"Timing" button: The same as the "Timing"
button on the fan.
The battery replacement
Remove the battery holder from the remote
controller. Please distinguish the positive and
negative electrodes of the battery when replacing
it. (Picture 7)
Note:
1. Do not place the remote controller (battery) where children can touch it.
Seek medical advice if batteries are swallowed.
2. When the remote controller is idle for a long time, please remove the battery from the remote controller in
order to prevent battery leakage.
3. If the battery leakage liquid accidentally enters your eyes, please rinse with plenty of water and seek
medical advice immediately.
4. When the battery leakage liquid sticks to the skin or clothes, please rinse immediately with plenty of water.
5. When discarding the battery, please properly dispose of the battery according to the garbage classication
method stipulated in the local area.
WiFi App connection Introduction
1. Power on the machine, ensure that the mobile phone is connected to 2.4GHz WiFi network
and the bluetooth of the phone is turned on.
2. Ensure that the device, mobile phone and wireless router close to each other.
3. Download and open the App:
Users can search for “JIMMY smart life” in the App Store to download.
For the rst use,please click "Sign Up" to register.If users have an existing account, please click
“Log In”to enter account login.
Device networking settings
Long press the "timing" button for 5 seconds until the ”WiFi” indicator starts to ash.
Open the "Home" page of JIMMY Smart Life App and click "+" button on the upper right corner
of the page. Select the "Auto Scan” mode, and the JIMMY Smart Fan will appear on the
screen,click “Next” , then ll in Wi name and password, click “Next” .Until the mobile App pops
up the "add device successfully" interface, click "Done", the added device will be displayed in
the device list. Click the device to enter the main control interface.
Fan blade
Fan knob
9
10
7
Remove device from App
If the user needs to remove the device, click the main page of App, long press the device name,
and click "Remove device". The mobile App will pop up "Delete device or dismiss group?”,click
“Conrm”.Remove the device successfully, click "Done" to return to the interface.
Notes:
1.If the ‘WiFi” indicator is always on,it means the device is connected to the network.
2.If the ‘WiFi” indicator ashes, it means that the device is not connected to the network. Please reconnect
and check whether the home network and mobile phone are connected properly.
For more information about the features and content of the App, please download and use it to understand,
and user can also check the “FAQ&Feedback” in the APP.
Cleaning and Maintenance
Note:
1. In order to eectively use the machine, please carry out maintenance every two weeks according to the
following method during continuous use.
2. Be sure to pull the adapter out of the socket before disassembly and cleaning.
3. Hold the fan tightly to prevent hand clamping when disassembling.
Disassembly and assembly of machinery
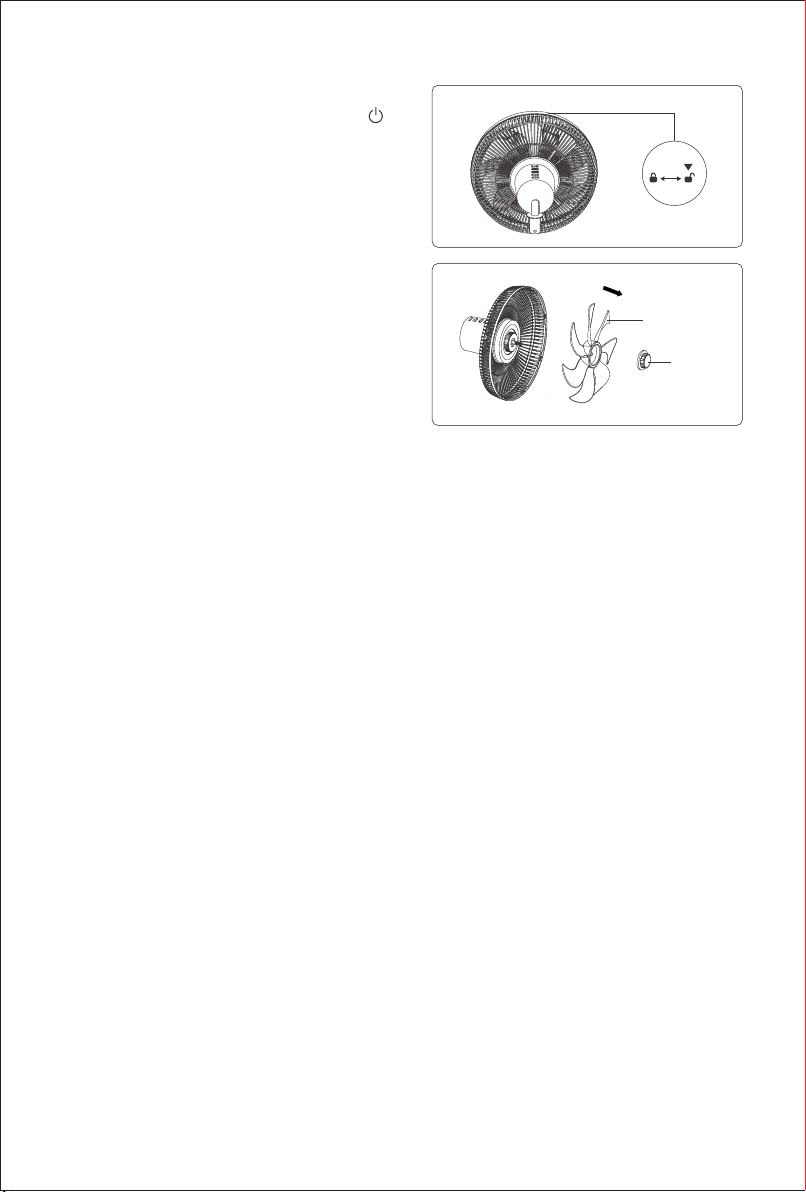
Disassembly
1.Close the machine, press and hold the
release button on the support pole, pull out the
fan components(or not), and screw down the
bottom screw of the decorative ring with a cross
screwdriver. (Picture 8)
2. Rotate the front cover clockwise, and remove
the front cover after the arrow " " on the front
cover points to " "from " ". (Picture 9)
3. Hold the fan blade in one hand, turn the fan
knob clockwise with the other hand, and remove
the fan blade. (Picture 10)
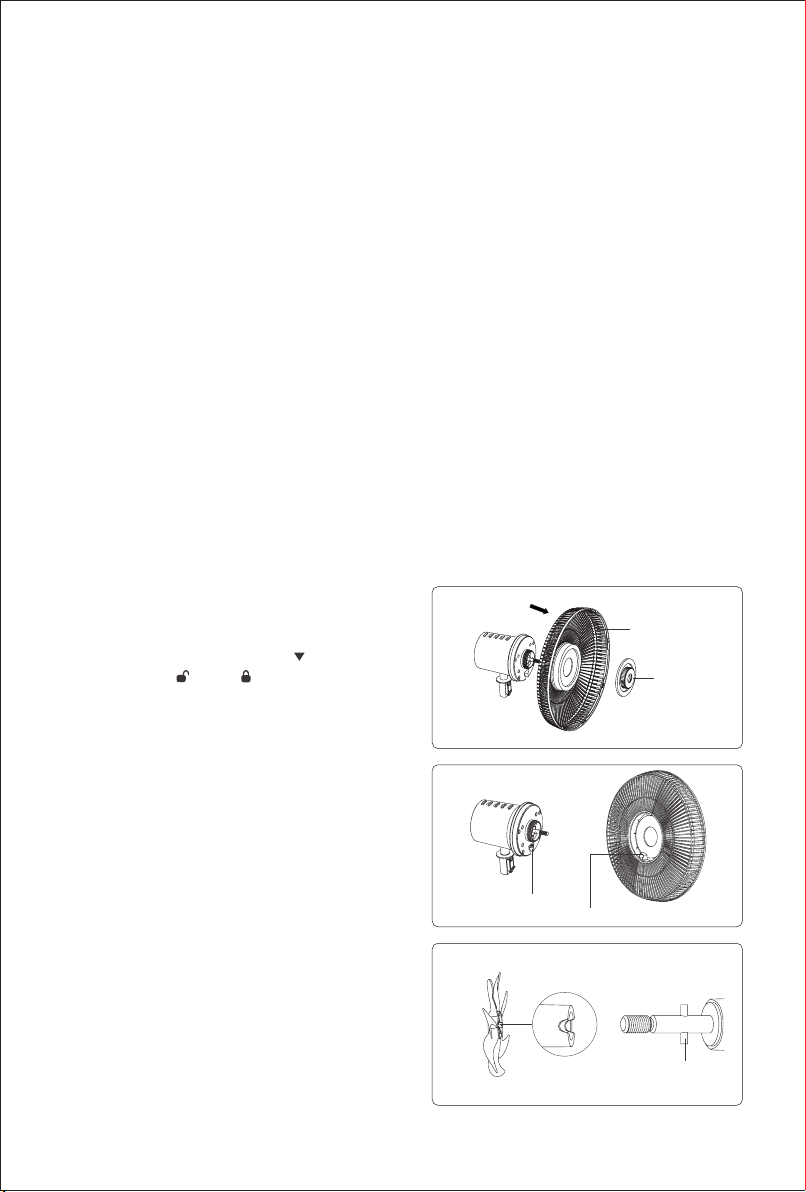
4. After removing the fan blade, rotate the cover
plate of the rear cover counterclockwise and
remove the cover after unscrewing. (Picture 11)
The installation
After the cleaning of all parts of the fan components
,
they can be assembled in reverse according
to the disassembly sequence. Please note the
following points:
1. When the rear cover is assembled with the
motor & control part, the anti-stay groove of
the rear cover shall be aligned with the clamp
groove of the motor & control part, and the
cover plate of the rear cover shall be tightened.
(Picture 12)
2. When installing, please note that the groove
behind the fan blade shall be stuck on the limit
pin of the motor shaft. (Picture 13)
Cover plate of
the rear cover
Anti-stay groove
Clamp groove
Rear Cover
11
12
Groove Limit pin
13
8
3. When installing the front cover, the arrows "
" and " " should be aligned. Rotate the front
cover clockwise until " " and " " are aligned.
Tighten the screw and nish the installation.
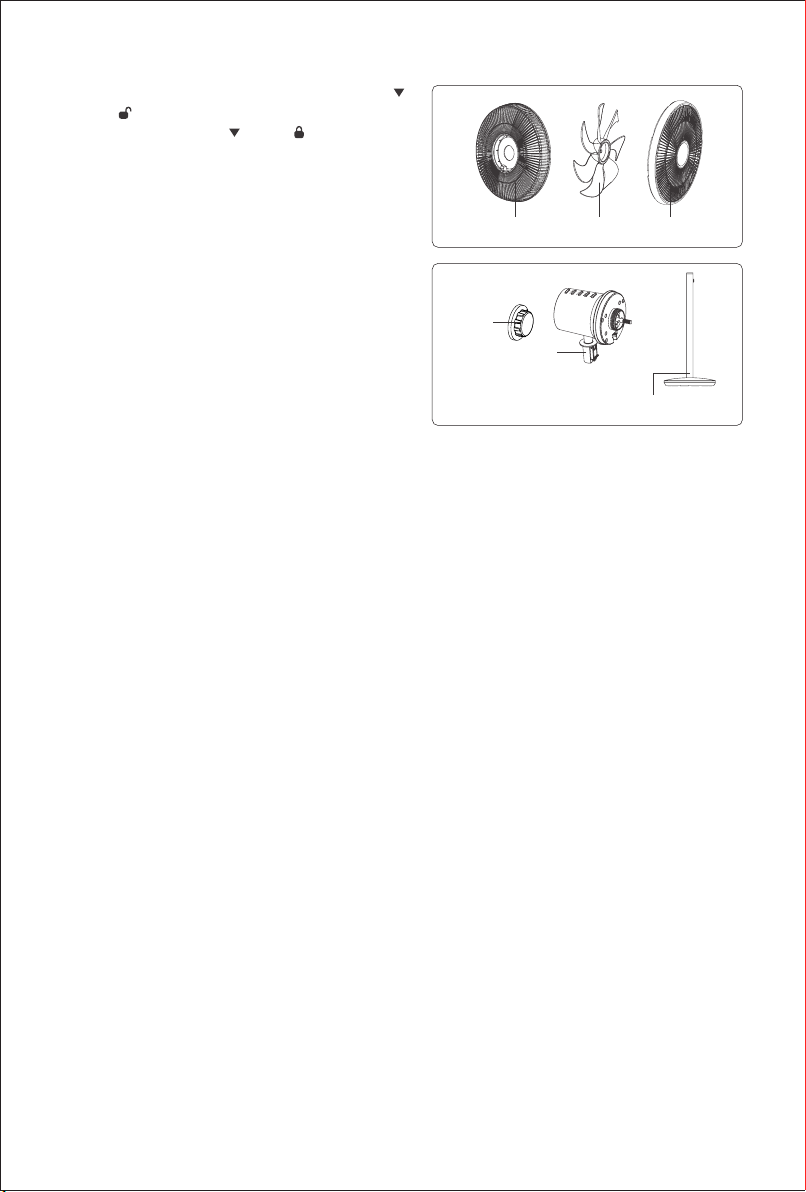
Cleaning and maintenance of all parts
Parts that can be cleaned with water: Rear cover, fan
blade, front cover .(Picture 14)
Use neuter kitchen cleaner to dip wet soft cloth or
sponge and then clean the parts. After cleaning,
please put them in cool and dry place, avoiding direct
sunlight.
Parts not to be cleaned with water: fan blade knob,
motor & control assembly, support pole and base
assembly.(Picture 15) Please use a soft dry cloth to
gently wipe them, do not use banana oil, volatile oil,
detergent, alkaline cleaning uid.
Note: Do not put them into the water to clean, so as not to burn the internal electrical parts and damage the machine.
Storage
If the machine is to be long idled, unplug the power cord and store it in a dry place.
Rear Cover
Fan blade
knob
Rear
housing
Support & base assembly
Fan blade Front cover
15
14
Table of contents
Languages:
Other Jimmy Fan manuals

Popular Fan manuals by other brands

ELTA FANS
ELTA FANS H03VV-F installation guide

Hunter
Hunter 20714 Owner's guide and installation manual

Emerson
Emerson CARRERA VERANDA CF542ORB00 owner's manual

Hunter
Hunter Caraway Owner's guide and installation manual

Panasonic
Panasonic FV-15NLFS1 Service manual

Kompernass
Kompernass KH 1150 operating instructions


